> ## Documentation Index
> Fetch the complete documentation index at: https://www.carstoragesoftware.com/docs/llms.txt
> Use this file to discover all available pages before exploring further.
# Use the Create event home page
> Start vehicle drop-offs, service work, pickups, and multi-step workflows from the Create event page — the classic staff home screen.
Use this guide when you sign in and land on **Create event**, or when front-desk staff need the fastest way to start vehicle work without opening the full Schedule calendar first.
For your first day in the app, start with [Getting started](/docs/getting-started). For the full first-week plan, read [Getting started overview](/docs/basics/overview).
The [Create event page](https://www.carstoragesoftware.com/dashboard) is the large-button home screen at the top of the sidebar. It helps your team pick **what kind of work** is happening (drop-off, detail, pickup, and more), choose the **vehicle or customer**, and continue into photos, checklists, or scheduling.
**Using Create event on a phone?**
Many teams save [Create event](https://www.carstoragesoftware.com/dashboard) to the phone home screen for faster access on the shop floor. See [Install the mobile app](/docs/basics/install-the-mobile-app) for step-by-step iPhone and Android instructions.
## What you will accomplish
You will open Create event, pick an event type or workflow, connect the right car or customer, and continue into the next step your facility uses for that job.
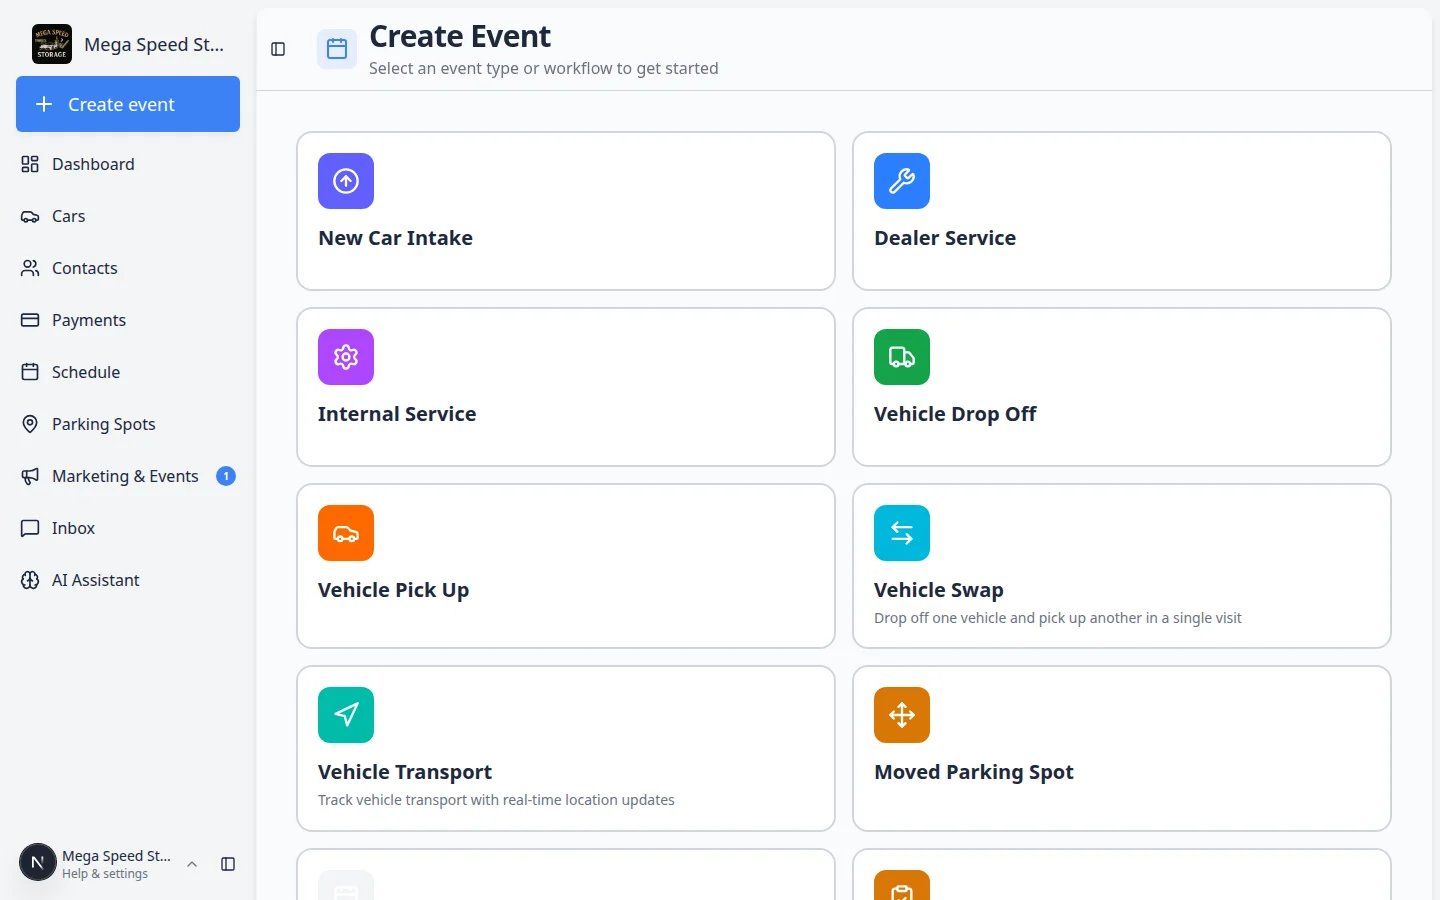 *Each card is one kind of work your facility tracks. Tap the card that matches what is happening right now.*
## When to use Create event vs Schedule
**Create event** ([Create event](https://www.carstoragesoftware.com/dashboard)) is best when someone is **starting work right now** — a car just arrived, a detail is beginning, or a team member is walking through a workflow with photos and checklists.
**Schedule** ([Schedule](https://www.carstoragesoftware.com/dashboard/schedule)) is best when you are **planning ahead** — booking next Tuesday at 2 PM, moving an appointment, or reviewing the whole week.
Many teams use **Create event** dozens of times per day and open **Schedule** when they need the calendar view.
## Before you start
* You are signed in as a staff user (not a customer portal login).
* For vehicle work, the car should already exist in [Cars](https://www.carstoragesoftware.com/dashboard/cars). If not, add it first with [Prepare your first customer and car](/docs/basics/prepare-your-first-customer-and-car).
* For customer-only visits, the contact should exist in [Contacts](https://www.carstoragesoftware.com/dashboard/contacts).
* Your facility owner should have set up event types in [Settings > Events & schedule](https://www.carstoragesoftware.com/dashboard/settings/events). If the card grid looks empty, finish that setup first.
## Open Create event
Look at the top of the left sidebar. Below your facility name, you should see a large **Create event** button with a plus (+) icon.
You can also open the page directly at [Create event](https://www.carstoragesoftware.com/dashboard).
**Expected result:** The page title at the top says **Create Event** and you see a grid of colored cards.
Under the title, the page shows **Select an event type or workflow to get started** until you pick a card.
**Why this matters:** This confirms you are on the starting screen, not inside an active job yet.
## Pick an event type card
Each card is one **event type** your facility configured — for example **Vehicle Drop Off**, **Dealer Service**, **Vehicle Pick Up**, or **Customer Visit**.
Click the card that best describes what is happening.
Example: a collector just dropped off a Porsche for storage → choose **Vehicle Drop Off**.
**Why this matters:** The event type controls which photos, checklists, customer messages, and billing rules run after you click **Continue**. Picking the wrong card is one of the most common front-desk mistakes.
**Expected result:** The page moves to the next step. Near the top you see a banner with the event name (for example **Vehicle Drop Off**). The subtitle changes to **Creating** followed by that name.
If you clicked the wrong card, click **← Back to Selection** near the top left.
**Expected result:** You return to the full card grid without saving anything.
## Pick a workflow card (if your facility uses workflows)
Some facilities also show **workflow** cards in the same grid. Workflows have a small branch icon in the corner and show how many **steps** they include.
Workflows are multi-step checklists — for example a full intake process with photos, condition notes, and parking assignment.
Look for a card with a **branch** icon and a step count (for example **4 steps**). These sit alongside regular event type cards on [Create event](https://www.carstoragesoftware.com/dashboard).
**Expected result:** You can tell workflows apart from single event types by the icon and step number.
Choose the workflow your manager trained you to use for that job.
**Expected result:** You see the workflow name, description, and a **Start Workflow** button.
Click **Start Workflow** to begin the step-by-step screen.
**Expected result:** The app opens the workflow page where you complete each step in order — photos, readings, parking, and similar tasks.
**No workflow cards?**
Workflows are optional. If you only see event type cards, your facility may not use workflows yet. That is normal — use event types for daily work. Managers can add workflows in [Create operations workflows](/docs/settings/create-operations-workflows).
## Connect the vehicle or customer
After you pick an event type, the page asks for the record that work belongs to.
*Each card is one kind of work your facility tracks. Tap the card that matches what is happening right now.*
## When to use Create event vs Schedule
**Create event** ([Create event](https://www.carstoragesoftware.com/dashboard)) is best when someone is **starting work right now** — a car just arrived, a detail is beginning, or a team member is walking through a workflow with photos and checklists.
**Schedule** ([Schedule](https://www.carstoragesoftware.com/dashboard/schedule)) is best when you are **planning ahead** — booking next Tuesday at 2 PM, moving an appointment, or reviewing the whole week.
Many teams use **Create event** dozens of times per day and open **Schedule** when they need the calendar view.
## Before you start
* You are signed in as a staff user (not a customer portal login).
* For vehicle work, the car should already exist in [Cars](https://www.carstoragesoftware.com/dashboard/cars). If not, add it first with [Prepare your first customer and car](/docs/basics/prepare-your-first-customer-and-car).
* For customer-only visits, the contact should exist in [Contacts](https://www.carstoragesoftware.com/dashboard/contacts).
* Your facility owner should have set up event types in [Settings > Events & schedule](https://www.carstoragesoftware.com/dashboard/settings/events). If the card grid looks empty, finish that setup first.
## Open Create event
Look at the top of the left sidebar. Below your facility name, you should see a large **Create event** button with a plus (+) icon.
You can also open the page directly at [Create event](https://www.carstoragesoftware.com/dashboard).
**Expected result:** The page title at the top says **Create Event** and you see a grid of colored cards.
Under the title, the page shows **Select an event type or workflow to get started** until you pick a card.
**Why this matters:** This confirms you are on the starting screen, not inside an active job yet.
## Pick an event type card
Each card is one **event type** your facility configured — for example **Vehicle Drop Off**, **Dealer Service**, **Vehicle Pick Up**, or **Customer Visit**.
Click the card that best describes what is happening.
Example: a collector just dropped off a Porsche for storage → choose **Vehicle Drop Off**.
**Why this matters:** The event type controls which photos, checklists, customer messages, and billing rules run after you click **Continue**. Picking the wrong card is one of the most common front-desk mistakes.
**Expected result:** The page moves to the next step. Near the top you see a banner with the event name (for example **Vehicle Drop Off**). The subtitle changes to **Creating** followed by that name.
If you clicked the wrong card, click **← Back to Selection** near the top left.
**Expected result:** You return to the full card grid without saving anything.
## Pick a workflow card (if your facility uses workflows)
Some facilities also show **workflow** cards in the same grid. Workflows have a small branch icon in the corner and show how many **steps** they include.
Workflows are multi-step checklists — for example a full intake process with photos, condition notes, and parking assignment.
Look for a card with a **branch** icon and a step count (for example **4 steps**). These sit alongside regular event type cards on [Create event](https://www.carstoragesoftware.com/dashboard).
**Expected result:** You can tell workflows apart from single event types by the icon and step number.
Choose the workflow your manager trained you to use for that job.
**Expected result:** You see the workflow name, description, and a **Start Workflow** button.
Click **Start Workflow** to begin the step-by-step screen.
**Expected result:** The app opens the workflow page where you complete each step in order — photos, readings, parking, and similar tasks.
**No workflow cards?**
Workflows are optional. If you only see event type cards, your facility may not use workflows yet. That is normal — use event types for daily work. Managers can add workflows in [Create operations workflows](/docs/settings/create-operations-workflows).
## Connect the vehicle or customer
After you pick an event type, the page asks for the record that work belongs to.
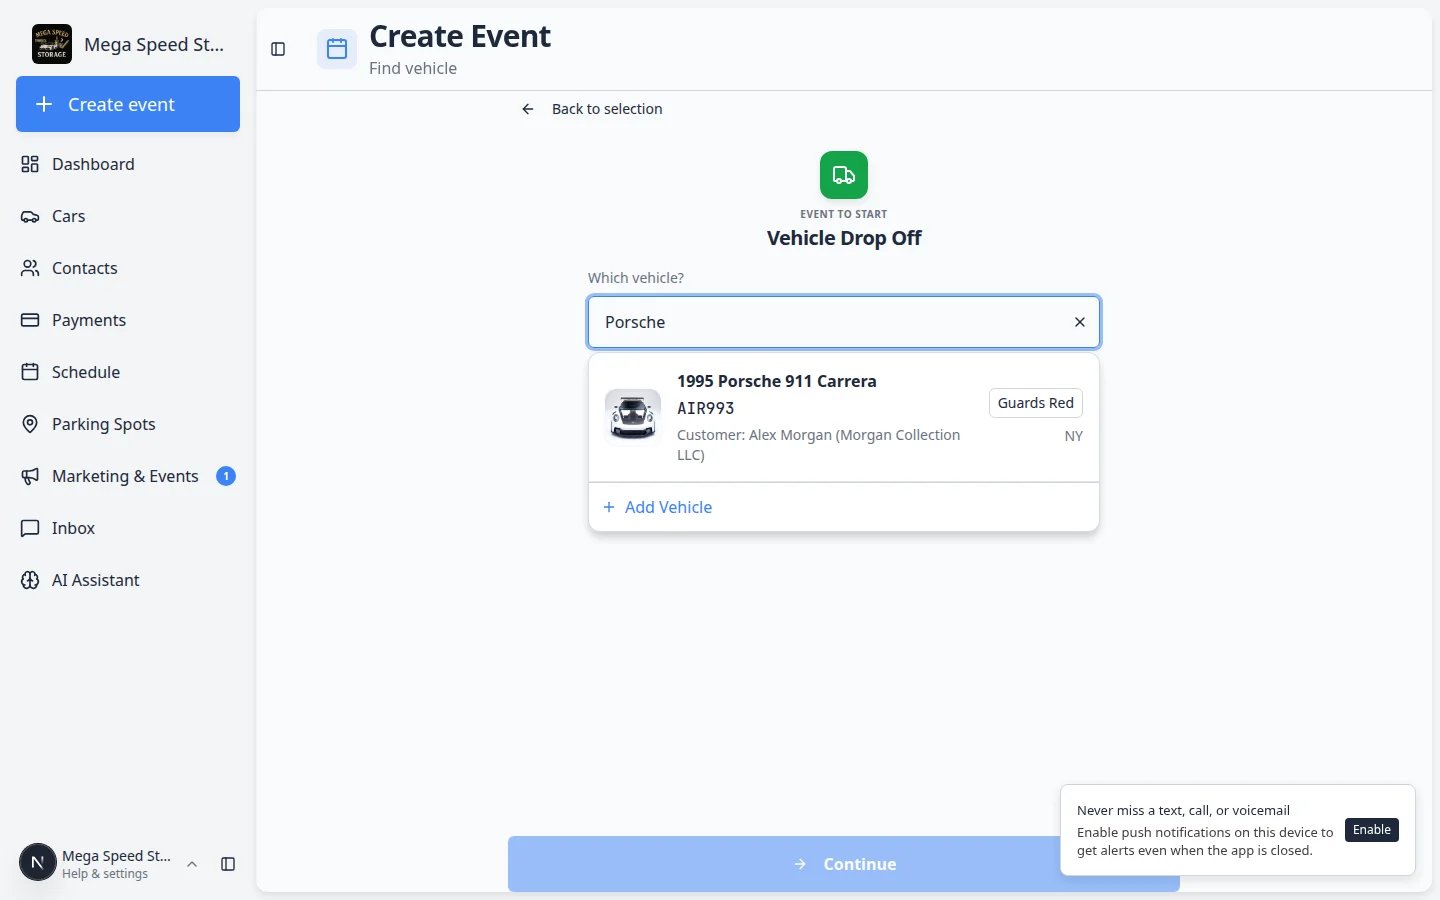 *Vehicle events ask you to **Search Vehicle**. Type a plate, make, model, or VIN — then pick the correct car from the list.*
When the page shows **Search Vehicle**, type part of the license plate, make, model, or VIN.
Wait for the dropdown list to appear, then click the matching car.
*Vehicle events ask you to **Search Vehicle**. Type a plate, make, model, or VIN — then pick the correct car from the list.*
When the page shows **Search Vehicle**, type part of the license plate, make, model, or VIN.
Wait for the dropdown list to appear, then click the matching car.
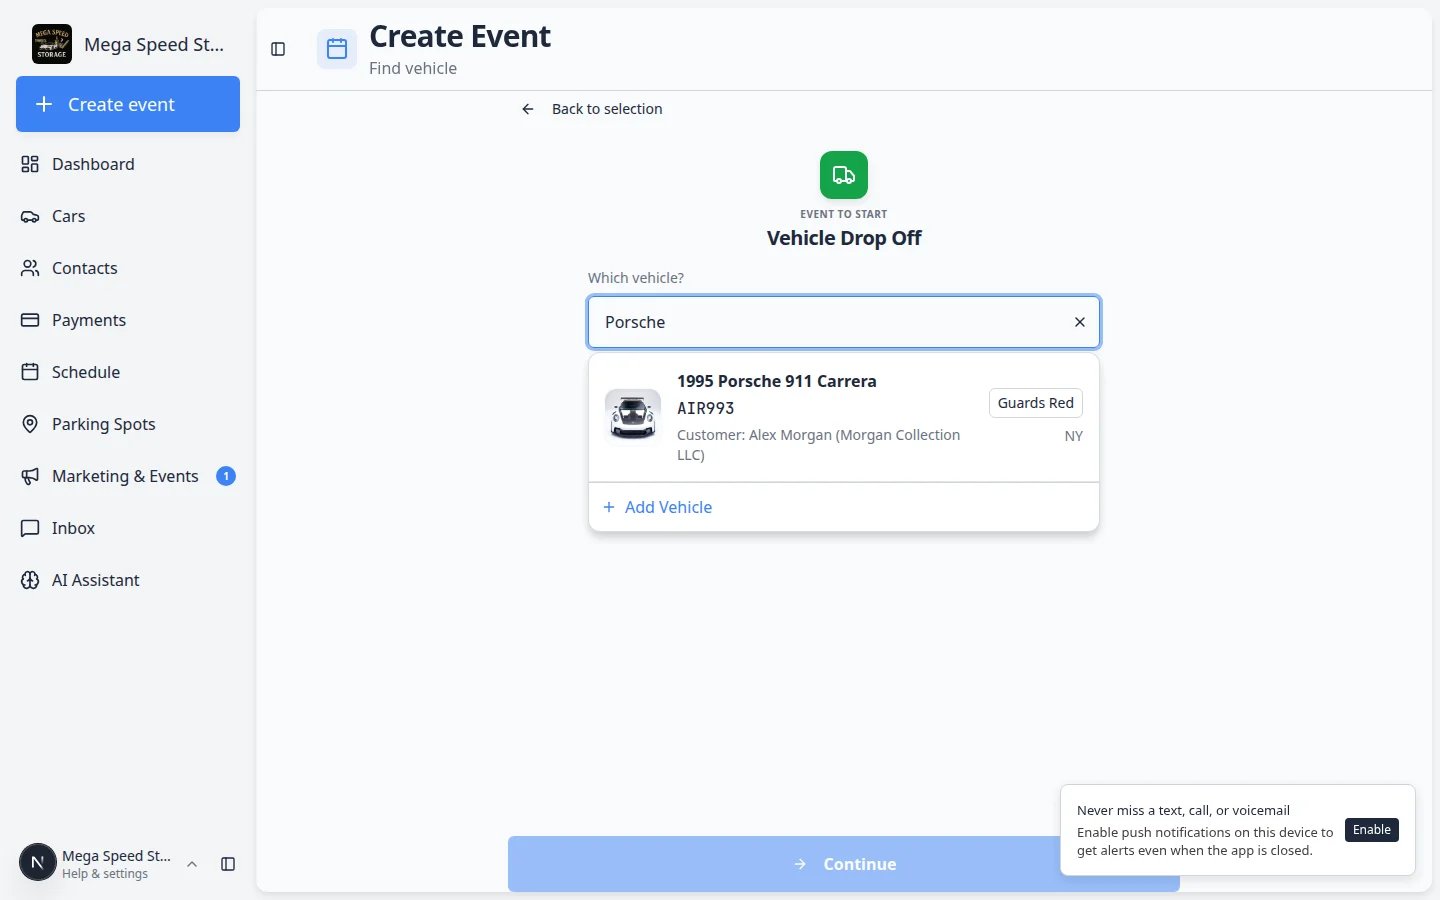 *Type a few letters and read every line in the dropdown before you click. Similar cars may share the same make and model.*
**Why this matters:** Linking the right vehicle keeps photos, parking, invoices, and history on one record.
**Expected result:** Matching vehicles appear in a dropdown. Click the one that matches the plate, VIN, and color you expect.
Some event types ask for **Select Customer** instead of a vehicle. Search by name, email, or company and pick the correct person.
**Expected result:** The customer name appears in a summary box before you continue.
Some event types show extra choices below the search — for example which service package or appointment option applies.
Pick the option your facility uses for this visit before continuing.
When required fields are filled in, the **Continue** button at the bottom becomes active. Click **Continue**.
**Expected result:** The app opens the next screen — often a photo walkthrough, checklist, or scheduling step depending on how your facility configured that event type.
*Type a few letters and read every line in the dropdown before you click. Similar cars may share the same make and model.*
**Why this matters:** Linking the right vehicle keeps photos, parking, invoices, and history on one record.
**Expected result:** Matching vehicles appear in a dropdown. Click the one that matches the plate, VIN, and color you expect.
Some event types ask for **Select Customer** instead of a vehicle. Search by name, email, or company and pick the correct person.
**Expected result:** The customer name appears in a summary box before you continue.
Some event types show extra choices below the search — for example which service package or appointment option applies.
Pick the option your facility uses for this visit before continuing.
When required fields are filled in, the **Continue** button at the bottom becomes active. Click **Continue**.
**Expected result:** The app opens the next screen — often a photo walkthrough, checklist, or scheduling step depending on how your facility configured that event type.
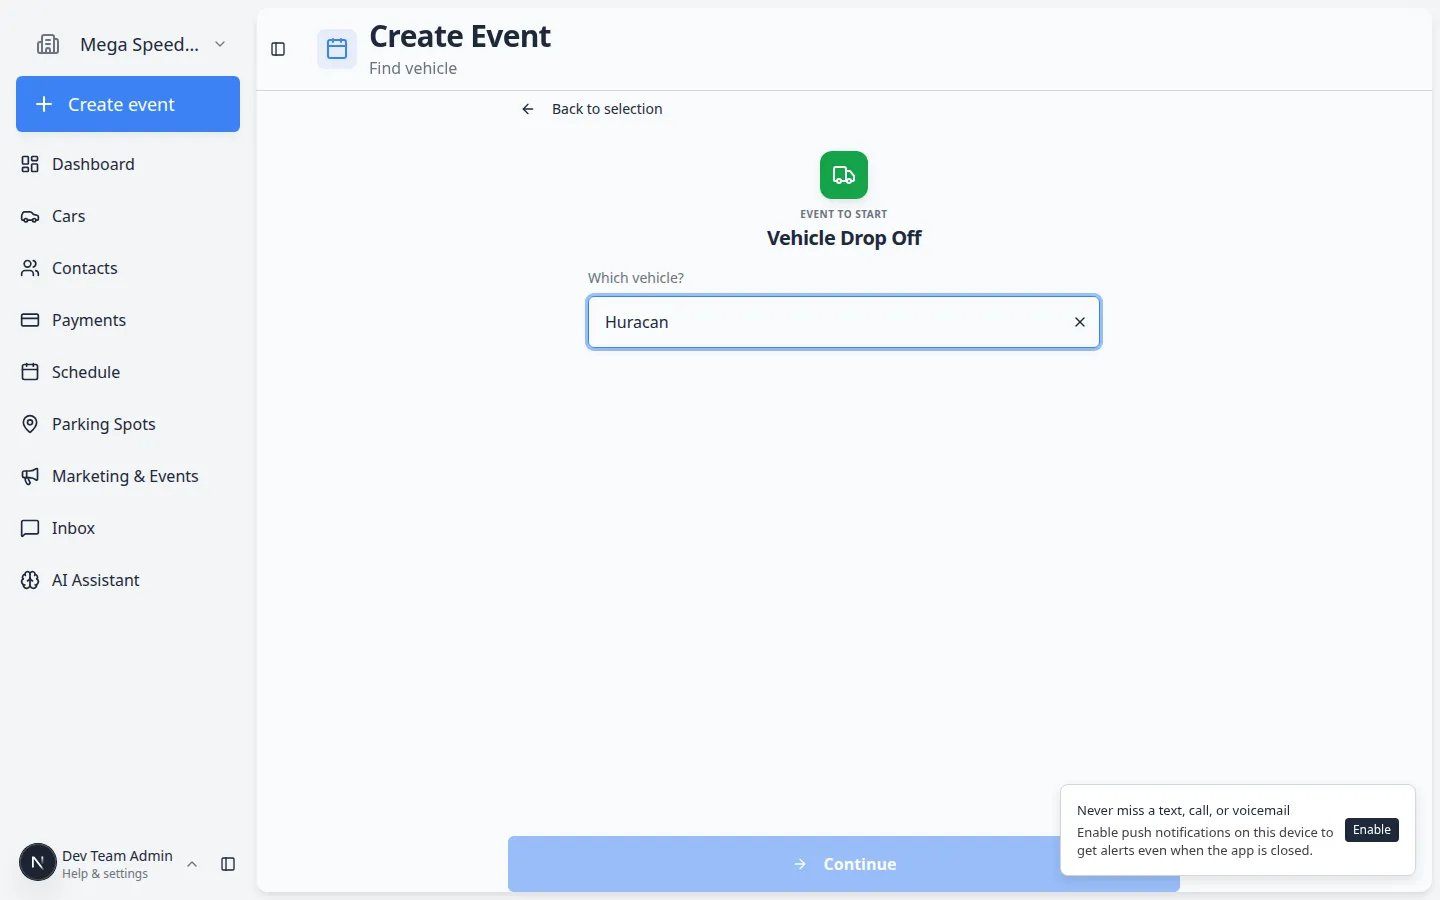 *Before you click **Continue**, read the vehicle summary one more time. The wrong car means photos and billing attach to the wrong record.*
**Continue button stays gray?**
The **Continue** button stays disabled until required fields are complete. Check that you selected a vehicle (or customer), and that any required option below the search is chosen. If you cannot find the car, add it in [Cars](https://www.carstoragesoftware.com/dashboard/cars) first, then return here.
## What happens after you click Continue
The next screen depends on how your facility configured the event type. Common next steps include:
* **Photo walkthrough** — step-by-step camera prompts for intake or inspection images.
* **Checklist or readings** — fuel level, odometer, tire pressure, or condition items your team must record.
* **Parking assignment** — choosing where the vehicle sits in the building.
* **Scheduling** — picking a date and time when the event type books future work instead of starting immediately.
After **Continue**, the app may ask for photos, readings, or parking before the event is fully started.
**Why this matters:** Skipping a required photo or reading can leave the car record incomplete — and your team may need to walk back to the lot later.
Follow the on-screen steps until the event shows as started or complete. Use **Back** only if you need to change the vehicle — not to skip required work.
**Expected result:** New activity appears on the car's **Activity Feed** on [Cars](https://www.carstoragesoftware.com/dashboard/cars).
Open the vehicle from [Cars](https://www.carstoragesoftware.com/dashboard/cars) and scroll the **Activity Feed** on the right. You should see the event you just started with the correct time and status.
**Expected result:** Your manager can answer customer questions from the record without asking you what happened on the floor.
**Why this step matters**
Everything captured after **Continue** saves to the car's record and appears in **Vehicle Activity**. Take your time on photos and readings — they help your team answer customer questions later. See [Start a car session](/docs/cars/start-a-car-session) for more detail on sessions and events.
## Important words in plain English
**Event type** — A labeled kind of work (drop-off, pickup, detail, customer visit). Each type has its own card color and rules.
**Workflow** — A fixed list of steps your team follows in order. Workflows appear as separate cards with a branch icon.
**Search Vehicle** — Finds cars already in your facility’s records. It is not for adding a brand-new car from this screen.
**Continue** — Moves you into the operational screen (photos, forms, or scheduling) for the event you started.
## Common mistakes to avoid
**Starting the wrong event type**
Drop-offs and pick-ups may look similar but can trigger different customer messages and billing. When unsure, ask a teammate or check the card name carefully before clicking **Continue**.
**Searching for a car that was never added**
Create event finds **existing** records. If search returns nothing, open [Cars](https://www.carstoragesoftware.com/dashboard/cars), click **Create New Car**, save the vehicle, then come back to Create event.
**Using Create event to plan next week**
For future dates and times, use [Schedule](https://www.carstoragesoftware.com/dashboard/schedule) or [Create an appointment](/docs/schedule/create-an-appointment). Create event is meant for work happening now (or continuing an in-progress job).
## Troubleshooting
**The card grid is empty or still loading**
Your facility may still be setting up event types. Ask a manager to open [Settings > Events & schedule](https://www.carstoragesoftware.com/dashboard/settings/events) or follow [Configure event types](/docs/events/configure-event-types).
**I do not see Create event in the sidebar**
Your role may hide certain areas. Ask your facility owner to review permissions in [Settings > Team](https://www.carstoragesoftware.com/dashboard/settings/team).
**I wanted the widget dashboard instead**
The sidebar also has **Dashboard** with a **Beta** badge — that opens the customizable widget page. See [Customize your Overview dashboard](/docs/basics/customize-your-overview). **Create event** and **Dashboard (Beta)** are two different home screens; both are valid starting points.
## What success looks like
When Create event is working well for your team:
* Staff pick the correct event card on the first try (drop-off vs pickup vs detail).
* Every session links to the correct vehicle — search results are read before **Continue**.
* Photos, parking, and checklists after **Continue** save to the car’s **Activity Feed**.
* Managers configured enough event types that staff rarely need workarounds or paper notes.
## Use Create event on a phone or tablet
Shop-floor staff often open **Create event** from a phone after saving it to the home screen.
Follow [Install the mobile app](/docs/basics/install-the-mobile-app) while signed in on [Create event](https://www.carstoragesoftware.com/dashboard).
**Expected result:** A home screen icon opens the event card grid full-screen.
The steps in this guide work the same on a phone — pick the event type, search for the vehicle, then tap **Continue**.
**Tip:** Turn your phone sideways if the keyboard covers the search box.
After **Continue**, your facility may ask for intake photos. Use the phone camera when the app requests it — those images save to the car record automatically.
## What to do next
Read [Learn the dashboard](/docs/basics/learn-the-dashboard) for a tour of Cars, Contacts, Schedule, Payments, Parking, and more.
Follow [Install the mobile app](/docs/basics/install-the-mobile-app) so porters can open the card grid from the home screen.
When you need a calendar instead of starting work now, read [Schedule overview](/docs/schedule/overview).
Facility owners configure which cards appear here. Start with [Events overview](/docs/events/overview).
## Related topics
- [Customize Create event screen layout](/docs/events/customize-create-event-screen-layout.md)
- [Install the mobile app](/docs/basics/install-the-mobile-app.md)
- [Learn the dashboard](/docs/basics/learn-the-dashboard.md)
- [Getting started](/docs/getting-started.md)
- [Customize your Overview dashboard](/docs/basics/customize-your-overview.md)
This documentation is built and hosted on [Mintlify](https://mintlify.com), a developer documentation platform.
*Before you click **Continue**, read the vehicle summary one more time. The wrong car means photos and billing attach to the wrong record.*
**Continue button stays gray?**
The **Continue** button stays disabled until required fields are complete. Check that you selected a vehicle (or customer), and that any required option below the search is chosen. If you cannot find the car, add it in [Cars](https://www.carstoragesoftware.com/dashboard/cars) first, then return here.
## What happens after you click Continue
The next screen depends on how your facility configured the event type. Common next steps include:
* **Photo walkthrough** — step-by-step camera prompts for intake or inspection images.
* **Checklist or readings** — fuel level, odometer, tire pressure, or condition items your team must record.
* **Parking assignment** — choosing where the vehicle sits in the building.
* **Scheduling** — picking a date and time when the event type books future work instead of starting immediately.
After **Continue**, the app may ask for photos, readings, or parking before the event is fully started.
**Why this matters:** Skipping a required photo or reading can leave the car record incomplete — and your team may need to walk back to the lot later.
Follow the on-screen steps until the event shows as started or complete. Use **Back** only if you need to change the vehicle — not to skip required work.
**Expected result:** New activity appears on the car's **Activity Feed** on [Cars](https://www.carstoragesoftware.com/dashboard/cars).
Open the vehicle from [Cars](https://www.carstoragesoftware.com/dashboard/cars) and scroll the **Activity Feed** on the right. You should see the event you just started with the correct time and status.
**Expected result:** Your manager can answer customer questions from the record without asking you what happened on the floor.
**Why this step matters**
Everything captured after **Continue** saves to the car's record and appears in **Vehicle Activity**. Take your time on photos and readings — they help your team answer customer questions later. See [Start a car session](/docs/cars/start-a-car-session) for more detail on sessions and events.
## Important words in plain English
**Event type** — A labeled kind of work (drop-off, pickup, detail, customer visit). Each type has its own card color and rules.
**Workflow** — A fixed list of steps your team follows in order. Workflows appear as separate cards with a branch icon.
**Search Vehicle** — Finds cars already in your facility’s records. It is not for adding a brand-new car from this screen.
**Continue** — Moves you into the operational screen (photos, forms, or scheduling) for the event you started.
## Common mistakes to avoid
**Starting the wrong event type**
Drop-offs and pick-ups may look similar but can trigger different customer messages and billing. When unsure, ask a teammate or check the card name carefully before clicking **Continue**.
**Searching for a car that was never added**
Create event finds **existing** records. If search returns nothing, open [Cars](https://www.carstoragesoftware.com/dashboard/cars), click **Create New Car**, save the vehicle, then come back to Create event.
**Using Create event to plan next week**
For future dates and times, use [Schedule](https://www.carstoragesoftware.com/dashboard/schedule) or [Create an appointment](/docs/schedule/create-an-appointment). Create event is meant for work happening now (or continuing an in-progress job).
## Troubleshooting
**The card grid is empty or still loading**
Your facility may still be setting up event types. Ask a manager to open [Settings > Events & schedule](https://www.carstoragesoftware.com/dashboard/settings/events) or follow [Configure event types](/docs/events/configure-event-types).
**I do not see Create event in the sidebar**
Your role may hide certain areas. Ask your facility owner to review permissions in [Settings > Team](https://www.carstoragesoftware.com/dashboard/settings/team).
**I wanted the widget dashboard instead**
The sidebar also has **Dashboard** with a **Beta** badge — that opens the customizable widget page. See [Customize your Overview dashboard](/docs/basics/customize-your-overview). **Create event** and **Dashboard (Beta)** are two different home screens; both are valid starting points.
## What success looks like
When Create event is working well for your team:
* Staff pick the correct event card on the first try (drop-off vs pickup vs detail).
* Every session links to the correct vehicle — search results are read before **Continue**.
* Photos, parking, and checklists after **Continue** save to the car’s **Activity Feed**.
* Managers configured enough event types that staff rarely need workarounds or paper notes.
## Use Create event on a phone or tablet
Shop-floor staff often open **Create event** from a phone after saving it to the home screen.
Follow [Install the mobile app](/docs/basics/install-the-mobile-app) while signed in on [Create event](https://www.carstoragesoftware.com/dashboard).
**Expected result:** A home screen icon opens the event card grid full-screen.
The steps in this guide work the same on a phone — pick the event type, search for the vehicle, then tap **Continue**.
**Tip:** Turn your phone sideways if the keyboard covers the search box.
After **Continue**, your facility may ask for intake photos. Use the phone camera when the app requests it — those images save to the car record automatically.
## What to do next
Read [Learn the dashboard](/docs/basics/learn-the-dashboard) for a tour of Cars, Contacts, Schedule, Payments, Parking, and more.
Follow [Install the mobile app](/docs/basics/install-the-mobile-app) so porters can open the card grid from the home screen.
When you need a calendar instead of starting work now, read [Schedule overview](/docs/schedule/overview).
Facility owners configure which cards appear here. Start with [Events overview](/docs/events/overview).
## Related topics
- [Customize Create event screen layout](/docs/events/customize-create-event-screen-layout.md)
- [Install the mobile app](/docs/basics/install-the-mobile-app.md)
- [Learn the dashboard](/docs/basics/learn-the-dashboard.md)
- [Getting started](/docs/getting-started.md)
- [Customize your Overview dashboard](/docs/basics/customize-your-overview.md)
This documentation is built and hosted on [Mintlify](https://mintlify.com), a developer documentation platform.