> ## Documentation Index
> Fetch the complete documentation index at: https://www.carstoragesoftware.com/docs/llms.txt
> Use this file to discover all available pages before exploring further.
# View and edit vehicle details
> Update a car record so the vehicle, customer, insurance, value, service, and readings stay accurate.
Use the car detail page when you need to review or update information about one vehicle.
This guide explains how to edit the **Vehicle Details** section, why each group of fields matters, and how to avoid common record mistakes.
## What you will accomplish
You will update the fields on one car record so the vehicle can be identified, billed, insured, and serviced correctly.
**Expected outcome:** The [car detail page](https://www.carstoragesoftware.com/dashboard/cars) shows saved values your whole team can trust—especially customer ownership, plate and VIN details, insurance dates, and odometer or fuel readings.
## When to use this guide
Use these steps when:
* A car record is missing a plate, VIN, color, trim, stock number, or key number.
* A vehicle changes owners or needs to be linked to the correct customer.
* Insurance, registration, inspection, or plate expiration dates need to be updated.
* The declared value, odometer, fuel level, battery notes, or service plan information needs review.
## Before you start
* Open the correct car from the [Cars page](https://www.carstoragesoftware.com/dashboard/cars). If you need help finding it, use [Find and filter cars](/docs/cars/find-and-filter-cars).
* Have the correct information ready before editing. For example, use the registration, insurance card, customer message, or intake paperwork.
* Make sure you are allowed to edit car records. If a field is locked or missing, ask a team admin for help.
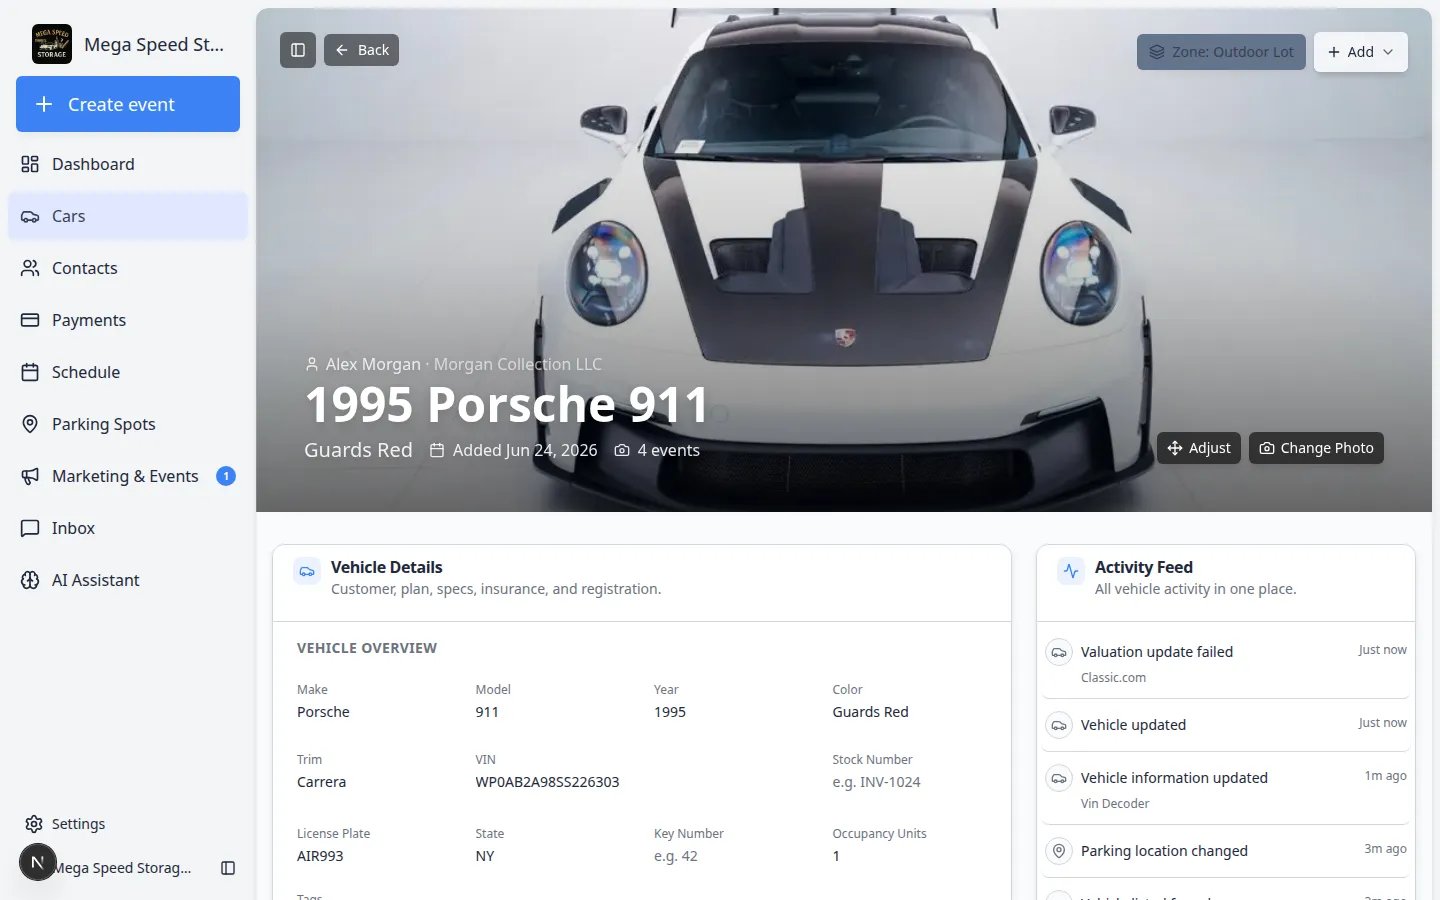
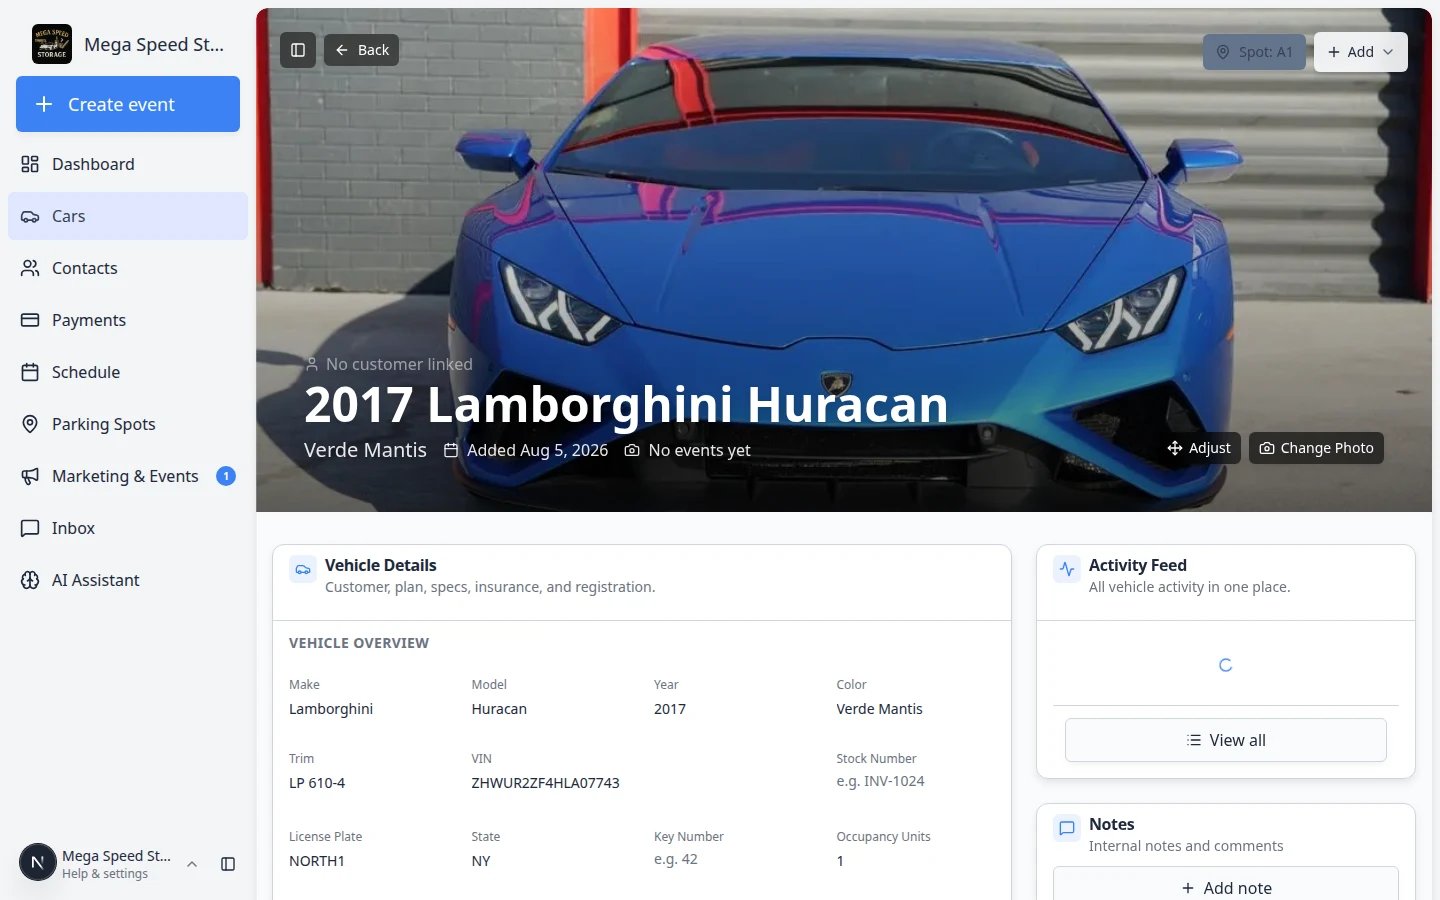 *Each car record has its own detail page. Vehicle Details holds the editable fields your team updates most often.*
## Update the banner photo (optional)
The large photo at the top of the car page is what teammates often see in **Card** view on the [Cars list](https://www.carstoragesoftware.com/dashboard/cars).
Go to [Cars](https://www.carstoragesoftware.com/dashboard/cars) and click **View** on the vehicle.
If the car has no banner image, click **Add Thumbnail** on the photo area. If a photo already exists, use **Change Photo** or **Adjust** (to reposition how the image is cropped).
**Expected result:** The banner shows the vehicle image you chose. The same thumbnail can appear on car cards in the list.
*Each car record has its own detail page. Vehicle Details holds the editable fields your team updates most often.*
## Update the banner photo (optional)
The large photo at the top of the car page is what teammates often see in **Card** view on the [Cars list](https://www.carstoragesoftware.com/dashboard/cars).
Go to [Cars](https://www.carstoragesoftware.com/dashboard/cars) and click **View** on the vehicle.
If the car has no banner image, click **Add Thumbnail** on the photo area. If a photo already exists, use **Change Photo** or **Adjust** (to reposition how the image is cropped).
**Expected result:** The banner shows the vehicle image you chose. The same thumbnail can appear on car cards in the list.
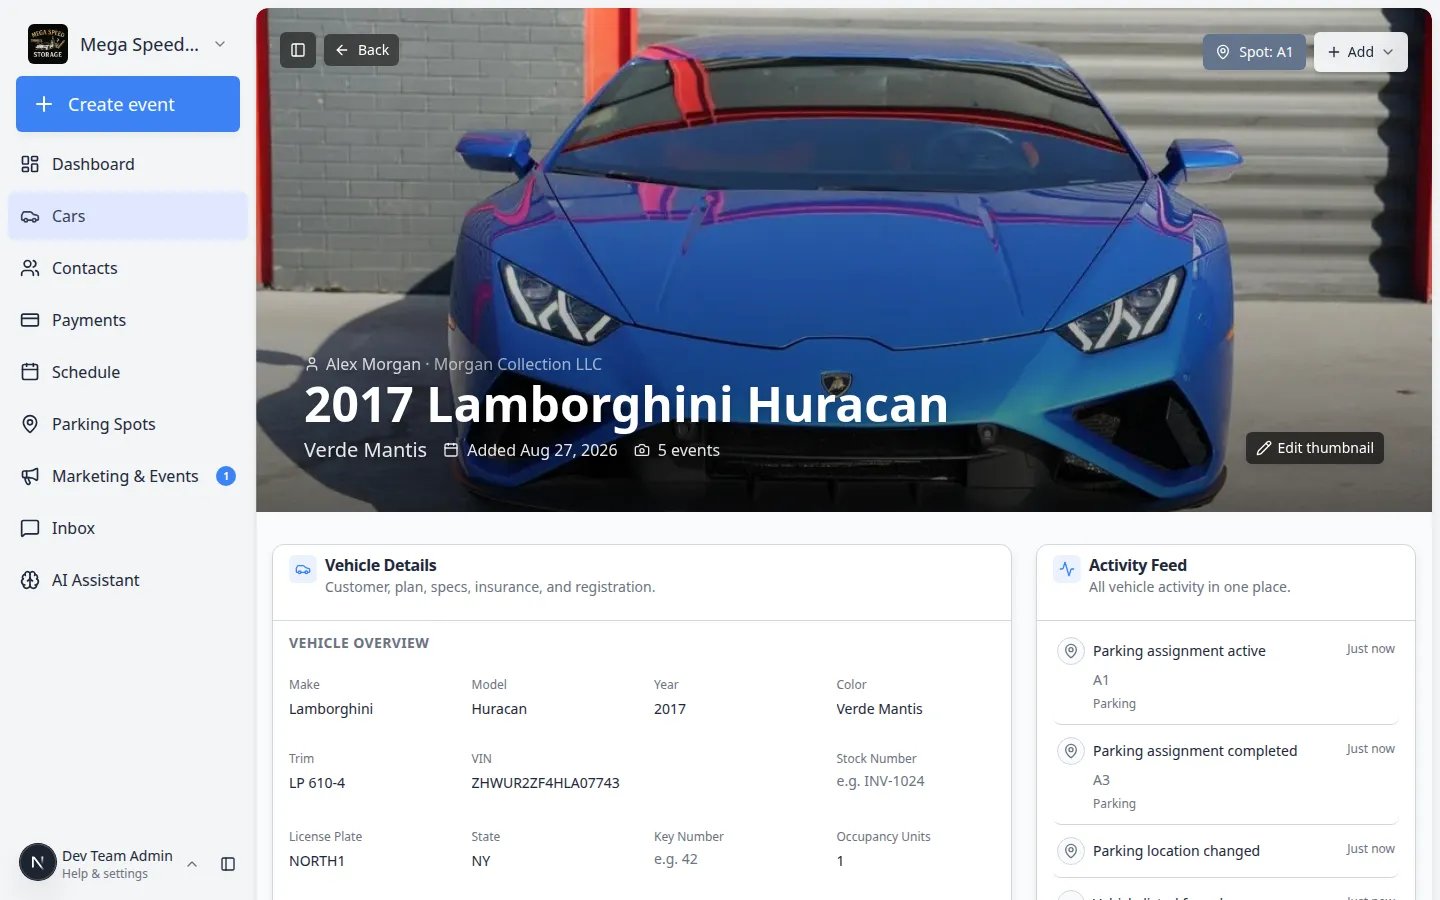 *Add Thumbnail or Change Photo controls how the car appears at the top of the record and in Card view on the Cars list.*
## Open Vehicle Details
Go to [Cars](https://www.carstoragesoftware.com/dashboard/cars) and open the vehicle you want to update.
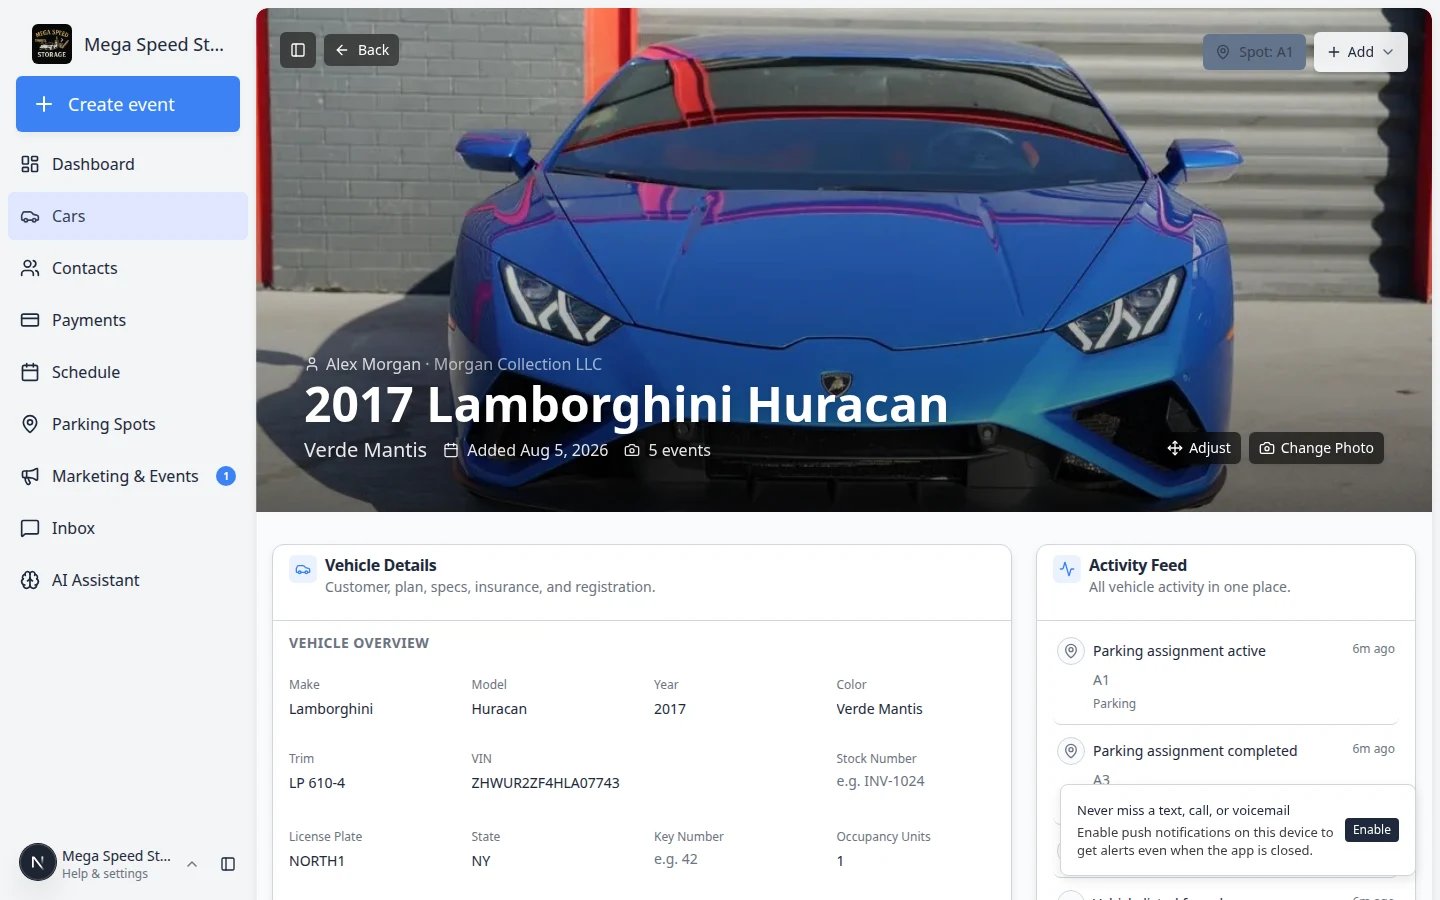
**Expected result:** The car detail page opens with the vehicle name on the banner and buttons such as **Zone:** / **Spot:** and **Add**.
On the left side of the page (or below the banner on smaller screens), look for the card titled **Vehicle Details** with the subtitle "Customer, plan, specs, insurance, and registration."
**Expected result:** You see labeled sections you can scroll through and click to edit.
Vehicle Details is organized into clear blocks:
* **Vehicle Overview** — make, model, year, color, VIN, plate, tags
* **Sale status** — marketplace listing (when enabled)
* **Customer** — linked owner
* **Payments** — recurring billing badge
* **Service Plans** — storage or maintenance plans on this car
* **Insurance** and **Registration** — policy and expiration dates
* **Market Data** — Classic.com price trends (when enabled)
* **Battery Information** and **Vehicle Readings** — odometer, fuel, tire data
**Why this matters:** Knowing which block you need prevents changing the wrong field (for example, mixing up insurance dates with registration dates).
*Add Thumbnail or Change Photo controls how the car appears at the top of the record and in Card view on the Cars list.*
## Open Vehicle Details
Go to [Cars](https://www.carstoragesoftware.com/dashboard/cars) and open the vehicle you want to update.
**Expected result:** The car detail page opens with the vehicle name on the banner and buttons such as **Zone:** / **Spot:** and **Add**.
On the left side of the page (or below the banner on smaller screens), look for the card titled **Vehicle Details** with the subtitle "Customer, plan, specs, insurance, and registration."
**Expected result:** You see labeled sections you can scroll through and click to edit.
Vehicle Details is organized into clear blocks:
* **Vehicle Overview** — make, model, year, color, VIN, plate, tags
* **Sale status** — marketplace listing (when enabled)
* **Customer** — linked owner
* **Payments** — recurring billing badge
* **Service Plans** — storage or maintenance plans on this car
* **Insurance** and **Registration** — policy and expiration dates
* **Market Data** — Classic.com price trends (when enabled)
* **Battery Information** and **Vehicle Readings** — odometer, fuel, tire data
**Why this matters:** Knowing which block you need prevents changing the wrong field (for example, mixing up insurance dates with registration dates).
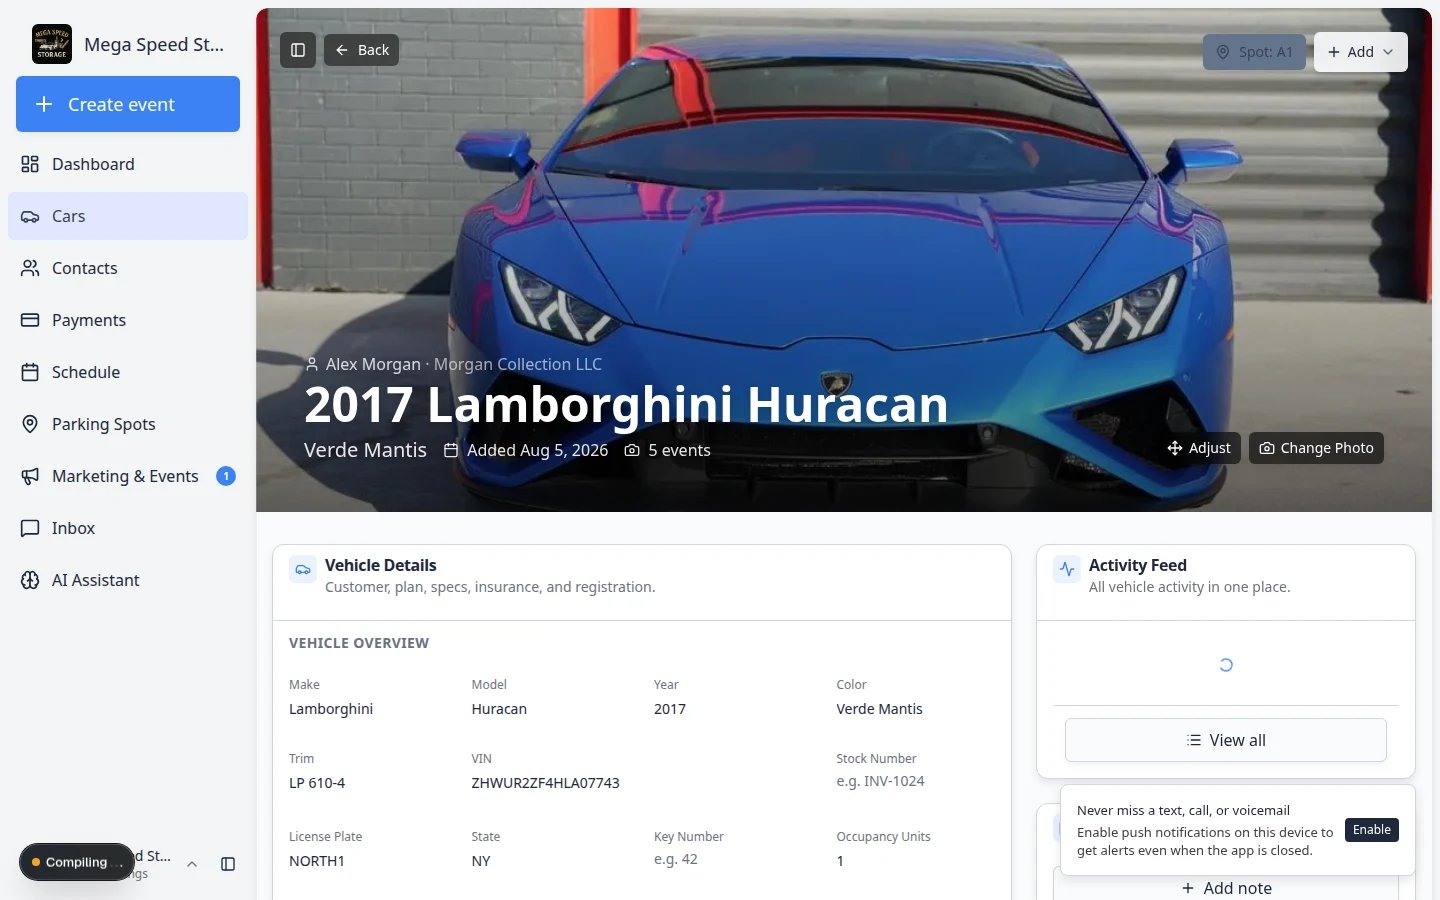 *Start in Vehicle Overview for identification fields, then scroll to other sections as needed.*
## Edit a vehicle field
Most fields on the car detail page save one at a time. This helps prevent large accidental changes.
Click the value or empty placeholder for the field. Empty fields may show examples such as **e.g. INV-1024**, **Enter number**, or **Add policy expires...**.
Type the new value, choose an option, or select a date depending on the field.
Use the field's save action, or click away if the field saves automatically. Wait for the update to finish before editing another field.
Read the updated value on the page. This is the easiest time to catch a typo.
**Expected result:** The field shows your new value without error messages. If the value snaps back, the save did not complete—try again or refresh the page.
*Start in Vehicle Overview for identification fields, then scroll to other sections as needed.*
## Edit a vehicle field
Most fields on the car detail page save one at a time. This helps prevent large accidental changes.
Click the value or empty placeholder for the field. Empty fields may show examples such as **e.g. INV-1024**, **Enter number**, or **Add policy expires...**.
Type the new value, choose an option, or select a date depending on the field.
Use the field's save action, or click away if the field saves automatically. Wait for the update to finish before editing another field.
Read the updated value on the page. This is the easiest time to catch a typo.
**Expected result:** The field shows your new value without error messages. If the value snaps back, the save did not complete—try again or refresh the page.
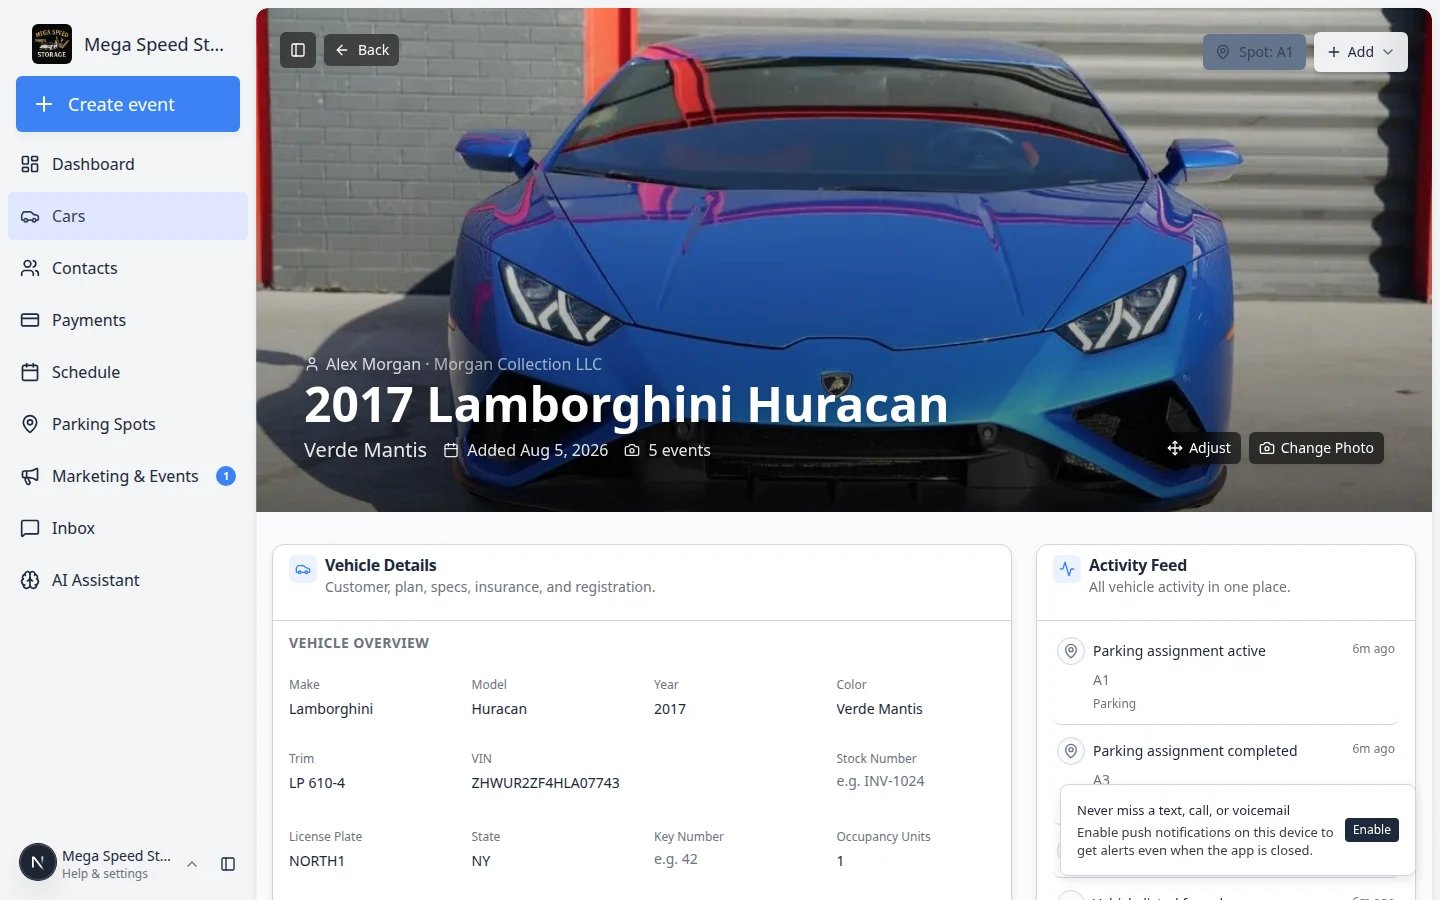 *Edit one field at a time and confirm the saved value before moving on.*
## Upload insurance or registration files
Sometimes you have a paper or PDF file before you have every date typed into the form. You can store the file on the customer record and link it to this car.
**Link the customer first**
**Upload document** only works when a customer is linked to the car. If **Add → Upload document** is grayed out, link the owner in the **CUSTOMER** block first.
Go to [Cars](https://www.carstoragesoftware.com/dashboard/cars) and click **View** on the vehicle.
On the car banner (top of the page), click **Add**, then **Upload document**.
**Expected result:** A window titled **Add New Document** opens with **Contract** and **General Document** choices.
Click **General Document** when you are uploading a file you already have—such as an insurance card photo, registration scan, or title copy.
Pick a document type when your facility uses them (for example **Insurance** or **Registration**), or upload without a type if you are not sure yet.
Choose the file from your computer and complete the save steps on screen.
**Expected outcome:** The file is stored on the **customer** record and tied to this car when applicable. Your team can find it later from [Contacts](https://www.carstoragesoftware.com/dashboard/contacts) or contract guides—not only from this car page.
After the file is saved, scroll to **INSURANCE** and **REGISTRATION** and enter expiration dates when you know them.
**Why this matters:** Files are great for proof, but typed dates power reminders and the **Insurance Exp** column on the [Cars list](https://www.carstoragesoftware.com/dashboard/cars).
*Edit one field at a time and confirm the saved value before moving on.*
## Upload insurance or registration files
Sometimes you have a paper or PDF file before you have every date typed into the form. You can store the file on the customer record and link it to this car.
**Link the customer first**
**Upload document** only works when a customer is linked to the car. If **Add → Upload document** is grayed out, link the owner in the **CUSTOMER** block first.
Go to [Cars](https://www.carstoragesoftware.com/dashboard/cars) and click **View** on the vehicle.
On the car banner (top of the page), click **Add**, then **Upload document**.
**Expected result:** A window titled **Add New Document** opens with **Contract** and **General Document** choices.
Click **General Document** when you are uploading a file you already have—such as an insurance card photo, registration scan, or title copy.
Pick a document type when your facility uses them (for example **Insurance** or **Registration**), or upload without a type if you are not sure yet.
Choose the file from your computer and complete the save steps on screen.
**Expected outcome:** The file is stored on the **customer** record and tied to this car when applicable. Your team can find it later from [Contacts](https://www.carstoragesoftware.com/dashboard/contacts) or contract guides—not only from this car page.
After the file is saved, scroll to **INSURANCE** and **REGISTRATION** and enter expiration dates when you know them.
**Why this matters:** Files are great for proof, but typed dates power reminders and the **Insurance Exp** column on the [Cars list](https://www.carstoragesoftware.com/dashboard/cars).
 *Use General Document for insurance cards and registration scans. Use Contract when you are starting an e-sign agreement from a template.*
For the full signing workflow, see [Send a contract for signature](/docs/contracts/send-a-contract-for-signature).
## Link or change the customer
The customer connection matters because it affects billing, messages, portal access, and the customer's view of the vehicle.
Scroll to the **CUSTOMER** block inside **Vehicle Details**. It shows the linked customer's name, company, and email when one is connected.
You can also see the customer name on the car banner above the vehicle title. Click that name to open the customer record.
If no customer is linked, the banner may show **No customer linked**. Click it to search for and choose the owner, manager, or main contact for the car.
Check the name, company, and email. If the wrong customer is selected, invoices, messages, and portal access can go to the wrong person.
**Expected result:** The customer name and contact details on the car record match the person who owns or pays for this vehicle.
*Use General Document for insurance cards and registration scans. Use Contract when you are starting an e-sign agreement from a template.*
For the full signing workflow, see [Send a contract for signature](/docs/contracts/send-a-contract-for-signature).
## Link or change the customer
The customer connection matters because it affects billing, messages, portal access, and the customer's view of the vehicle.
Scroll to the **CUSTOMER** block inside **Vehicle Details**. It shows the linked customer's name, company, and email when one is connected.
You can also see the customer name on the car banner above the vehicle title. Click that name to open the customer record.
If no customer is linked, the banner may show **No customer linked**. Click it to search for and choose the owner, manager, or main contact for the car.
Check the name, company, and email. If the wrong customer is selected, invoices, messages, and portal access can go to the wrong person.
**Expected result:** The customer name and contact details on the car record match the person who owns or pays for this vehicle.
 *The CUSTOMER block confirms who owns the vehicle. Link the correct person before sending invoices or portal invites.*
**If the customer is not listed**
Create the customer first from [Contacts](https://www.carstoragesoftware.com/dashboard/contacts), then return to the car and link the customer.
## Keep insurance and registration current
Insurance and registration fields help your team spot expiring paperwork before it becomes a problem.
Scroll to the **INSURANCE** and **REGISTRATION** blocks inside **Vehicle Details**.
Add the insurance company, policy number, policy holder, and policy expiration date when you have them.
Add each expiration date your facility tracks. These dates make reports and reminders more useful.
The [Cars page](https://www.carstoragesoftware.com/dashboard/cars) can show an **Insurance Exp** column, so your team can find records that need attention.
**Expected result:** Saved expiration dates appear on the car record and, if your team enabled the column, in the Cars table for quick scanning.
*The CUSTOMER block confirms who owns the vehicle. Link the correct person before sending invoices or portal invites.*
**If the customer is not listed**
Create the customer first from [Contacts](https://www.carstoragesoftware.com/dashboard/contacts), then return to the car and link the customer.
## Keep insurance and registration current
Insurance and registration fields help your team spot expiring paperwork before it becomes a problem.
Scroll to the **INSURANCE** and **REGISTRATION** blocks inside **Vehicle Details**.
Add the insurance company, policy number, policy holder, and policy expiration date when you have them.
Add each expiration date your facility tracks. These dates make reports and reminders more useful.
The [Cars page](https://www.carstoragesoftware.com/dashboard/cars) can show an **Insurance Exp** column, so your team can find records that need attention.
**Expected result:** Saved expiration dates appear on the car record and, if your team enabled the column, in the Cars table for quick scanning.
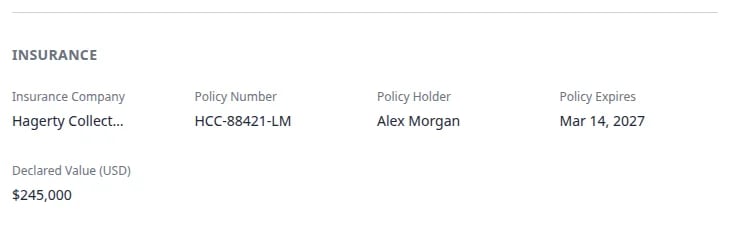 *Keep insurance dates current so your team can filter [Cars](https://www.carstoragesoftware.com/dashboard/cars) by **Active**, **Expired**, or **None**.*
## Check recurring billing on the car
Inside **Vehicle Details**, look for the **Payments** section.
**Recurring plan** means this car is tied to a repeat charge (for example monthly storage).
**No recurring plan linked** means billing for this vehicle is handled with one-time invoices or quotes instead—or no plan has been attached yet.
When a customer should be on monthly storage, confirm the badge matches what your team sold. For step-by-step linking, see [Link recurring billing to a vehicle](/docs/cars/link-recurring-billing-to-a-vehicle). To create the subscription itself, use [Manage recurring billing](/docs/payments/manage-recurring-billing).
## Review service plans on the car
If your facility uses storage or maintenance plans, the **Service Plans** section shows which packages apply to this car.
For full steps to add or change plans, see [Assign service plans on a vehicle](/docs/cars/assign-service-plans-on-a-vehicle).
*Keep insurance dates current so your team can filter [Cars](https://www.carstoragesoftware.com/dashboard/cars) by **Active**, **Expired**, or **None**.*
## Check recurring billing on the car
Inside **Vehicle Details**, look for the **Payments** section.
**Recurring plan** means this car is tied to a repeat charge (for example monthly storage).
**No recurring plan linked** means billing for this vehicle is handled with one-time invoices or quotes instead—or no plan has been attached yet.
When a customer should be on monthly storage, confirm the badge matches what your team sold. For step-by-step linking, see [Link recurring billing to a vehicle](/docs/cars/link-recurring-billing-to-a-vehicle). To create the subscription itself, use [Manage recurring billing](/docs/payments/manage-recurring-billing).
## Review service plans on the car
If your facility uses storage or maintenance plans, the **Service Plans** section shows which packages apply to this car.
For full steps to add or change plans, see [Assign service plans on a vehicle](/docs/cars/assign-service-plans-on-a-vehicle).
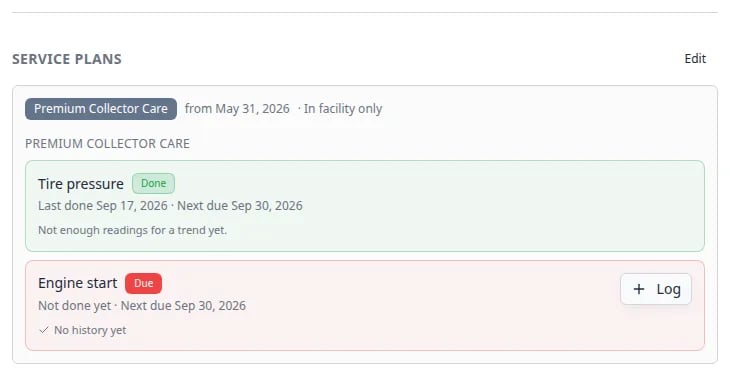 *The **Service Plans** block shows which care package applies to this car. Click **Edit** to attach or change a plan.*
**Need to create a new plan type?**
Team admins add plan templates under [Set up vehicle service plans](/docs/settings/set-up-vehicle-service-plans). Staff usually pick an existing plan on the car record rather than building new plans from this page.
## Add or update tags
Some facilities tag cars for marketing, VIP storage, or internal tracking. Tags appear in the **Vehicle Overview** section.
In **Vehicle Overview**, look for **Tags**. Click **Add** to attach or create a tag.
Pick from tags your facility already uses, or type a new label if your team allows it.
**Why this matters:** Tags help you filter the [Cars list](https://www.carstoragesoftware.com/dashboard/cars) when you need every vehicle in a group—for example, all cars listed for sale or all long-term storage.
Make sure the tag appears on the record. Then try [Find and filter cars](/docs/cars/find-and-filter-cars) with the **Tags** filter to confirm it works for your team.
*The **Service Plans** block shows which care package applies to this car. Click **Edit** to attach or change a plan.*
**Need to create a new plan type?**
Team admins add plan templates under [Set up vehicle service plans](/docs/settings/set-up-vehicle-service-plans). Staff usually pick an existing plan on the car record rather than building new plans from this page.
## Add or update tags
Some facilities tag cars for marketing, VIP storage, or internal tracking. Tags appear in the **Vehicle Overview** section.
In **Vehicle Overview**, look for **Tags**. Click **Add** to attach or create a tag.
Pick from tags your facility already uses, or type a new label if your team allows it.
**Why this matters:** Tags help you filter the [Cars list](https://www.carstoragesoftware.com/dashboard/cars) when you need every vehicle in a group—for example, all cars listed for sale or all long-term storage.
Make sure the tag appears on the record. Then try [Find and filter cars](/docs/cars/find-and-filter-cars) with the **Tags** filter to confirm it works for your team.
 *Tags live in **Vehicle Overview**. Use short labels your whole team understands, such as **VIP Storage** or **High Value**.*
## List a car for sale (when your facility uses marketplace)
Some teams sell vehicles on a public marketplace page. Inside **Vehicle Details**, look for the **Sale status** section.
Go to [Cars](https://www.carstoragesoftware.com/dashboard/cars) and open the vehicle you want to list.
Scroll to **Sale status** inside **Vehicle Details**. If you do not see it, your facility may not have marketplace selling turned on—ask an owner or admin.
When a car is listed, you may see **View listing**, **Unlist**, or **Mark as sold**. Follow the on-screen steps to publish or update the listing with clear photos and pricing.
**Expected result:** You see either **Not listed** with a **List for sale** button, or an active listing with price and status.
Click **List for sale** (or **Edit listing** if the car is already listed). A listing editor opens.
**Why this matters:** Customers browsing your public marketplace only see cars that are listed with a clear price and description.
Enter the **asking price** and any fields your facility requires—such as a short description, highlights, or whether the price is negotiable. Use photos already on the car record when possible; clear exterior shots help buyers trust the listing.
**Expected result:** The editor shows a preview of how the listing will appear on your marketplace page.
Click **Save** or **Publish** (the exact button name may vary). **Sale status** should now show **Listed** with **View listing**, **Unlist**, and **Mark as sold**.
**Expected outcome:** The car appears when you filter the [Cars](https://www.carstoragesoftware.com/dashboard/cars) list by **for sale**, and buyers can find it on your public marketplace after publishing is complete.
*Tags live in **Vehicle Overview**. Use short labels your whole team understands, such as **VIP Storage** or **High Value**.*
## List a car for sale (when your facility uses marketplace)
Some teams sell vehicles on a public marketplace page. Inside **Vehicle Details**, look for the **Sale status** section.
Go to [Cars](https://www.carstoragesoftware.com/dashboard/cars) and open the vehicle you want to list.
Scroll to **Sale status** inside **Vehicle Details**. If you do not see it, your facility may not have marketplace selling turned on—ask an owner or admin.
When a car is listed, you may see **View listing**, **Unlist**, or **Mark as sold**. Follow the on-screen steps to publish or update the listing with clear photos and pricing.
**Expected result:** You see either **Not listed** with a **List for sale** button, or an active listing with price and status.
Click **List for sale** (or **Edit listing** if the car is already listed). A listing editor opens.
**Why this matters:** Customers browsing your public marketplace only see cars that are listed with a clear price and description.
Enter the **asking price** and any fields your facility requires—such as a short description, highlights, or whether the price is negotiable. Use photos already on the car record when possible; clear exterior shots help buyers trust the listing.
**Expected result:** The editor shows a preview of how the listing will appear on your marketplace page.
Click **Save** or **Publish** (the exact button name may vary). **Sale status** should now show **Listed** with **View listing**, **Unlist**, and **Mark as sold**.
**Expected outcome:** The car appears when you filter the [Cars](https://www.carstoragesoftware.com/dashboard/cars) list by **for sale**, and buyers can find it on your public marketplace after publishing is complete.
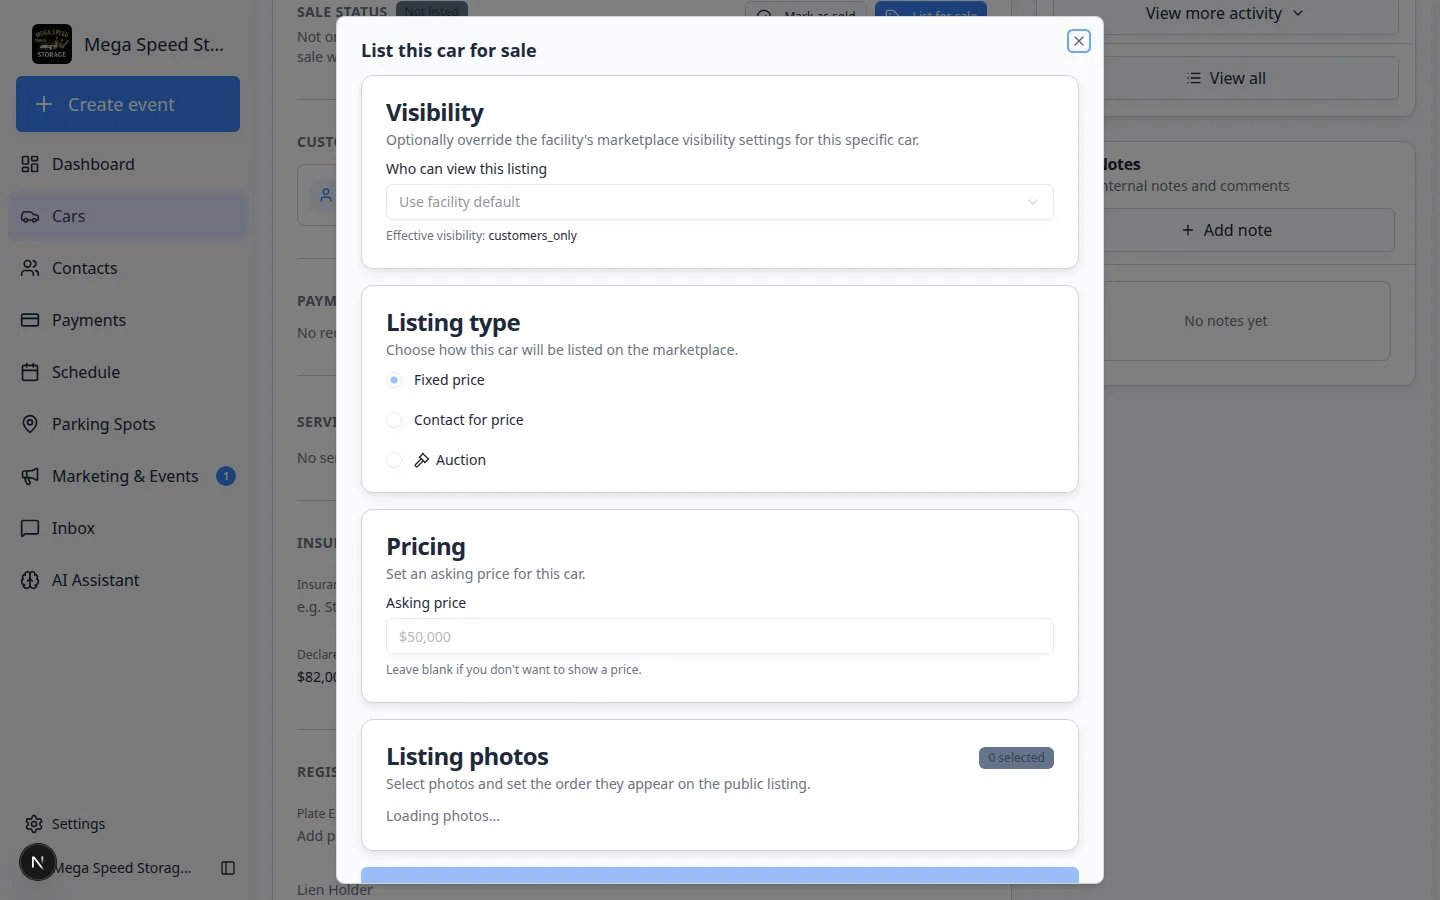 *The listing editor is where you set price and publish the car to your public marketplace.*
When the vehicle sells or should no longer appear publicly, return to **Sale status** and choose **Unlist** (hide from marketplace but keep the car record) or **Mark as sold** (close out the sale on your records).
**Expected result:** The car no longer appears on your public marketplace, but history stays on the car's **Activity Feed**.
*The listing editor is where you set price and publish the car to your public marketplace.*
When the vehicle sells or should no longer appear publicly, return to **Sale status** and choose **Unlist** (hide from marketplace but keep the car record) or **Mark as sold** (close out the sale on your records).
**Expected result:** The car no longer appears on your public marketplace, but history stays on the car's **Activity Feed**.
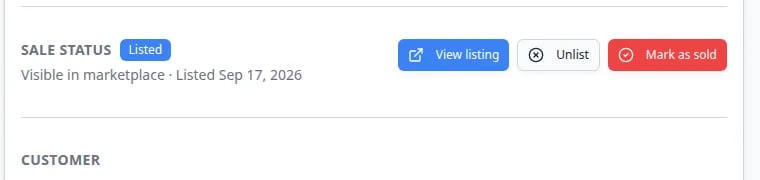 ***Sale status** shows whether a vehicle is on your marketplace and gives **View listing**, **Unlist**, and **Mark as sold**.*
For public page setup, see [Publish marketplace listings](/docs/facility-web-pages/publish-marketplace-listings).
## Review market data (when your facility uses Classic.com)
Some facilities connect **Market Data** on a car record to Classic.com price trends. For a full walkthrough—including how to fix the chart when it shows the wrong vehicle type—see [Review Classic.com market data on a vehicle](/docs/cars/review-classic-com-market-data-on-a-vehicle).
***Sale status** shows whether a vehicle is on your marketplace and gives **View listing**, **Unlist**, and **Mark as sold**.*
For public page setup, see [Publish marketplace listings](/docs/facility-web-pages/publish-marketplace-listings).
## Review market data (when your facility uses Classic.com)
Some facilities connect **Market Data** on a car record to Classic.com price trends. For a full walkthrough—including how to fix the chart when it shows the wrong vehicle type—see [Review Classic.com market data on a vehicle](/docs/cars/review-classic-com-market-data-on-a-vehicle).
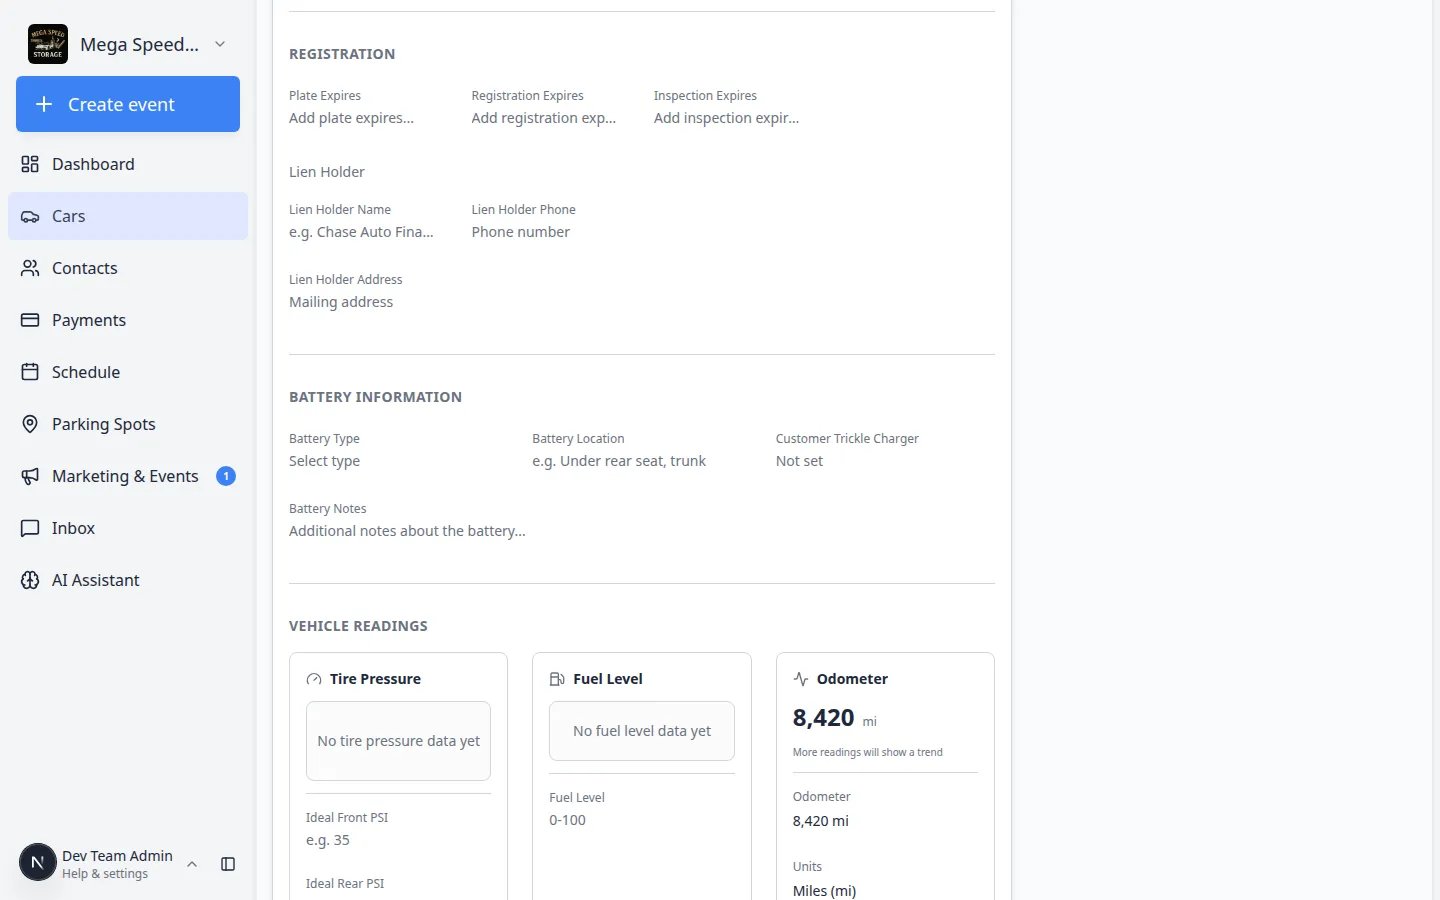 *Market Data connects the car to Classic.com trends when your facility enables this feature.*
## Update declared value and readings
Declared value and vehicle readings help your facility understand risk, storage needs, and service history. **Declared Value** lives under **Insurance**. Odometer, fuel, tire, and battery fields have their own blocks.
For the full walkthrough of **Battery Information** and **Vehicle Readings**—including battery type, customer trickle chargers, target PSI, and odometer units—see [Record battery care and vehicle readings](/docs/cars/record-battery-care-and-vehicle-readings).
* Use **Declared Value (USD)** for the value your facility should use for insurance and reporting conversations.
* Use **Odometer** to record mileage from intake, inspection, or service work.
* Use **Fuel Level** when your team tracks fuel during intake, delivery, or storage checks.
* Use **Battery Information** for battery tender instructions, battery location, or special handling notes.
*Market Data connects the car to Classic.com trends when your facility enables this feature.*
## Update declared value and readings
Declared value and vehicle readings help your facility understand risk, storage needs, and service history. **Declared Value** lives under **Insurance**. Odometer, fuel, tire, and battery fields have their own blocks.
For the full walkthrough of **Battery Information** and **Vehicle Readings**—including battery type, customer trickle chargers, target PSI, and odometer units—see [Record battery care and vehicle readings](/docs/cars/record-battery-care-and-vehicle-readings).
* Use **Declared Value (USD)** for the value your facility should use for insurance and reporting conversations.
* Use **Odometer** to record mileage from intake, inspection, or service work.
* Use **Fuel Level** when your team tracks fuel during intake, delivery, or storage checks.
* Use **Battery Information** for battery tender instructions, battery location, or special handling notes.
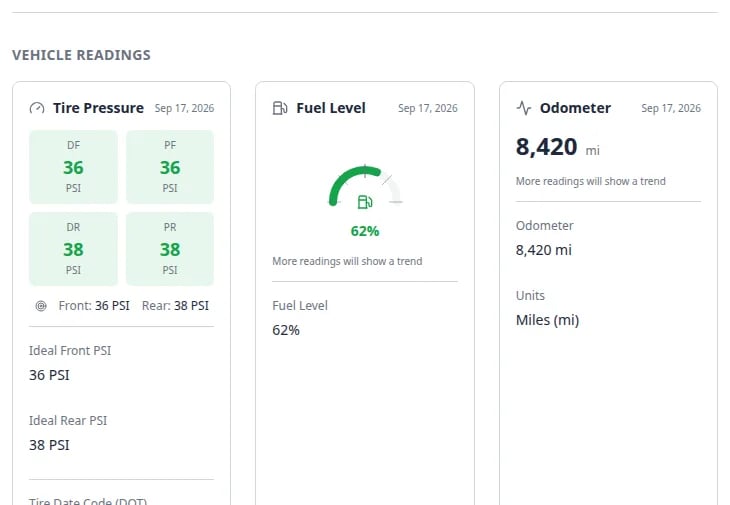 *Record odometer, fuel, and tire readings during intake or service so the next teammate sees accurate numbers without re-walking the lot.*
## What success looks like
After updating Vehicle Details:
* The car can be identified without walking the floor.
* The correct customer is connected to the car.
* Insurance, registration, value, and readings are current enough for your team's daily work.
* Other teammates can trust the record when they search, invoice, schedule, or move the car.
## Common mistakes to avoid
* Do not guess a VIN, plate, or expiration date. Leave the field blank until you have the correct information.
* Do not change the customer unless you are sure the car should belong to that customer record.
* Do not use internal shorthand in customer-facing fields. Use clear names and values.
* Do not edit several fields quickly without checking whether each one saved.
## Troubleshooting
**I cannot edit a field**
Your role may not allow that change, or the field may be managed by another workflow. Ask a team admin to check your permissions.
**The saved value changed back**
Refresh the page and check the field again. If it still changed back, the save may not have completed or another teammate may have edited the same record.
**The wrong customer is linked**
Update the customer link as soon as you notice the mistake. Then check any related invoice, quote, contract, portal invite, or message before sending it.
## What to do next
After the car details are accurate, you can [record battery care and vehicle readings](/docs/cars/record-battery-care-and-vehicle-readings), [move the car](/docs/cars/move-a-car), [start a car session](/docs/cars/start-a-car-session), or [review car activity, notes, and photos](/docs/cars/review-car-activity-notes-and-photos).
## Related topics
- [Import vehicles and photos from a spreadsheet](/docs/cars/import-vehicles-and-photos.md)
- [Find and filter cars](/docs/cars/find-and-filter-cars.md)
- [Track insurance and registration on a vehicle](/docs/cars/track-insurance-and-registration-on-a-vehicle.md)
- [Export your vehicle inventory report](/docs/cars/export-your-vehicle-inventory-report.md)
- [Import vehicles from a spreadsheet](/docs/cars/import-vehicles-from-a-spreadsheet.md)
This documentation is built and hosted on [Mintlify](https://mintlify.com), a developer documentation platform.
*Record odometer, fuel, and tire readings during intake or service so the next teammate sees accurate numbers without re-walking the lot.*
## What success looks like
After updating Vehicle Details:
* The car can be identified without walking the floor.
* The correct customer is connected to the car.
* Insurance, registration, value, and readings are current enough for your team's daily work.
* Other teammates can trust the record when they search, invoice, schedule, or move the car.
## Common mistakes to avoid
* Do not guess a VIN, plate, or expiration date. Leave the field blank until you have the correct information.
* Do not change the customer unless you are sure the car should belong to that customer record.
* Do not use internal shorthand in customer-facing fields. Use clear names and values.
* Do not edit several fields quickly without checking whether each one saved.
## Troubleshooting
**I cannot edit a field**
Your role may not allow that change, or the field may be managed by another workflow. Ask a team admin to check your permissions.
**The saved value changed back**
Refresh the page and check the field again. If it still changed back, the save may not have completed or another teammate may have edited the same record.
**The wrong customer is linked**
Update the customer link as soon as you notice the mistake. Then check any related invoice, quote, contract, portal invite, or message before sending it.
## What to do next
After the car details are accurate, you can [record battery care and vehicle readings](/docs/cars/record-battery-care-and-vehicle-readings), [move the car](/docs/cars/move-a-car), [start a car session](/docs/cars/start-a-car-session), or [review car activity, notes, and photos](/docs/cars/review-car-activity-notes-and-photos).
## Related topics
- [Import vehicles and photos from a spreadsheet](/docs/cars/import-vehicles-and-photos.md)
- [Find and filter cars](/docs/cars/find-and-filter-cars.md)
- [Track insurance and registration on a vehicle](/docs/cars/track-insurance-and-registration-on-a-vehicle.md)
- [Export your vehicle inventory report](/docs/cars/export-your-vehicle-inventory-report.md)
- [Import vehicles from a spreadsheet](/docs/cars/import-vehicles-from-a-spreadsheet.md)
This documentation is built and hosted on [Mintlify](https://mintlify.com), a developer documentation platform.