> ## Documentation Index
> Fetch the complete documentation index at: https://www.carstoragesoftware.com/docs/llms.txt
> Use this file to discover all available pages before exploring further.
# Add a customer
> Create a customer record so your team can connect people, cars, invoices, and communication history.
A **customer record** is the person or company your facility works with. When you add a customer, your team can link cars, send invoices, invite them to the customer portal, and keep communication history in one place.
Use this guide when you need to add one new person or company to your facility's customer list—for example, they want storage, asked for a quote, signed up on your website, or called your office.
**You will accomplish:** a new customer on your [All Contacts](https://www.carstoragesoftware.com/dashboard/contacts/all) list, with the right contact details and relationship stage, ready for cars, billing, and follow-up work.
## When to add a customer (and when not to)
* **Add one customer at a time** when you are helping one person or company right now.
* **Use import instead** when you have many names on a spreadsheet. See [Import customers, cars, events, and photos](/docs/contacts/import-customers-and-cars).
* **Search first** before you create a record. You may already have the customer under a slightly different name or email.
## Before you start
* **First name** and **last name** (required).
* **Email address** if you plan to send invoices, portal invites, or contract links.
* **Phone number** if your team calls or texts customers.
* **Company name** if the customer is a business.
* A rough idea of whether they are a **lead**, active **customer**, or **former customer** (you set this with **CRM Stage** in the form).
**Why email matters**
Email is not required to save a customer, but most day-to-day work needs it: portal sign-in, invoice delivery, and contract links. Add it when you have it.
## Open Contacts and start a new customer
In the left sidebar, click **Contacts**, then **All Contacts**. You can also go directly to [All Contacts](https://www.carstoragesoftware.com/dashboard/contacts/all).
**Expected result:** The page title says **All Contacts** and you see your customer list (table, cards, or board view depending on your team's preference).
In the top-right area of the page, click **Create New Customer**.
If your list is empty, you may also see **Add Your First Customer** in the middle of the page. Both buttons open the same form.
**Expected result:** A window titled **Create New Customer** opens.
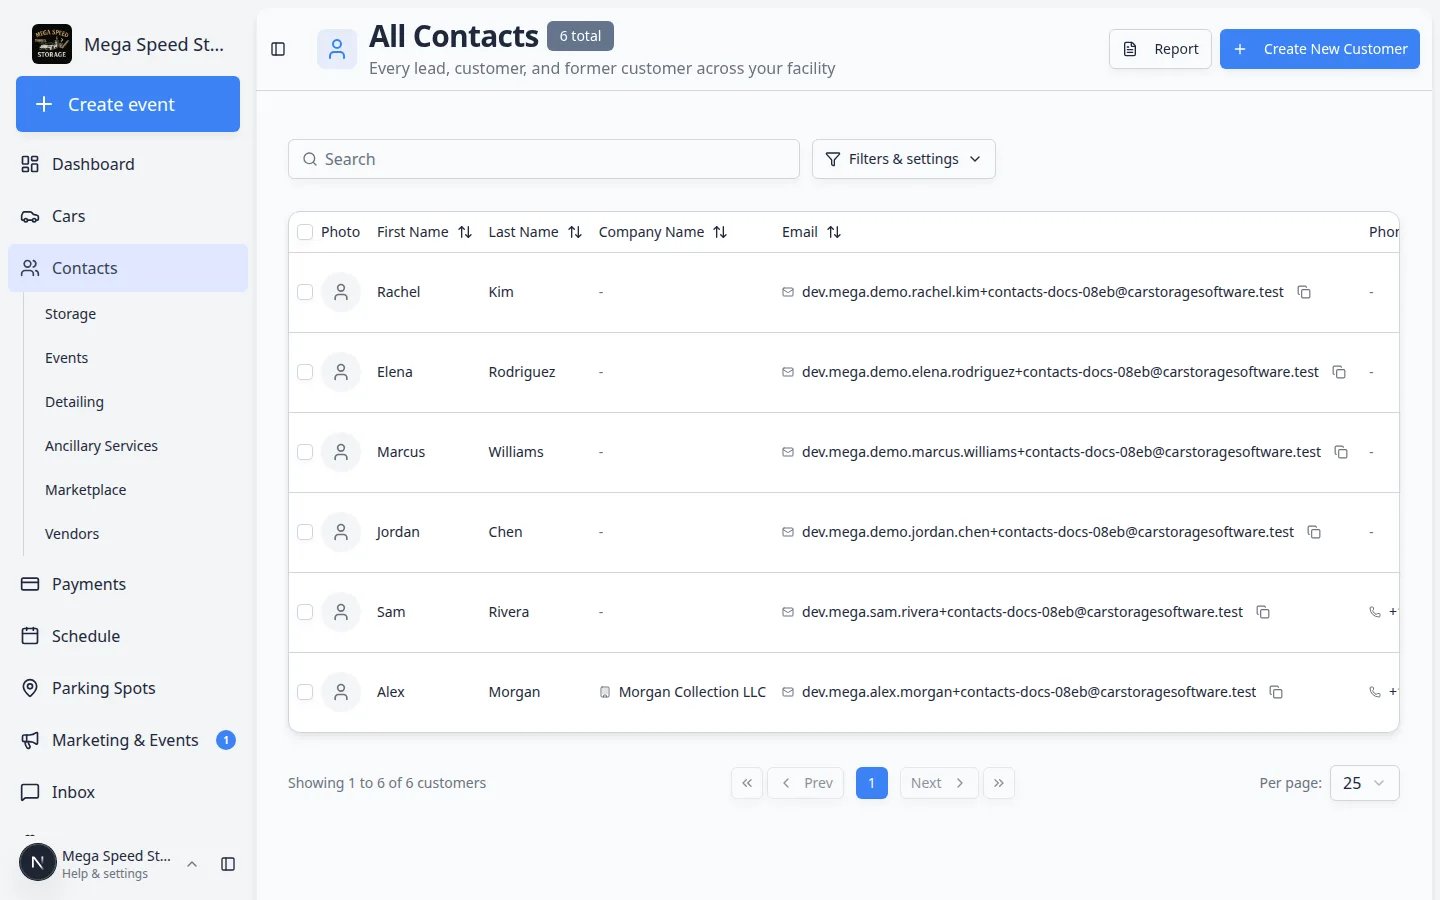 ***All Contacts** is your customer directory. Search first, then click **Create New Customer** in the top-right when you are adding one person at a time.*
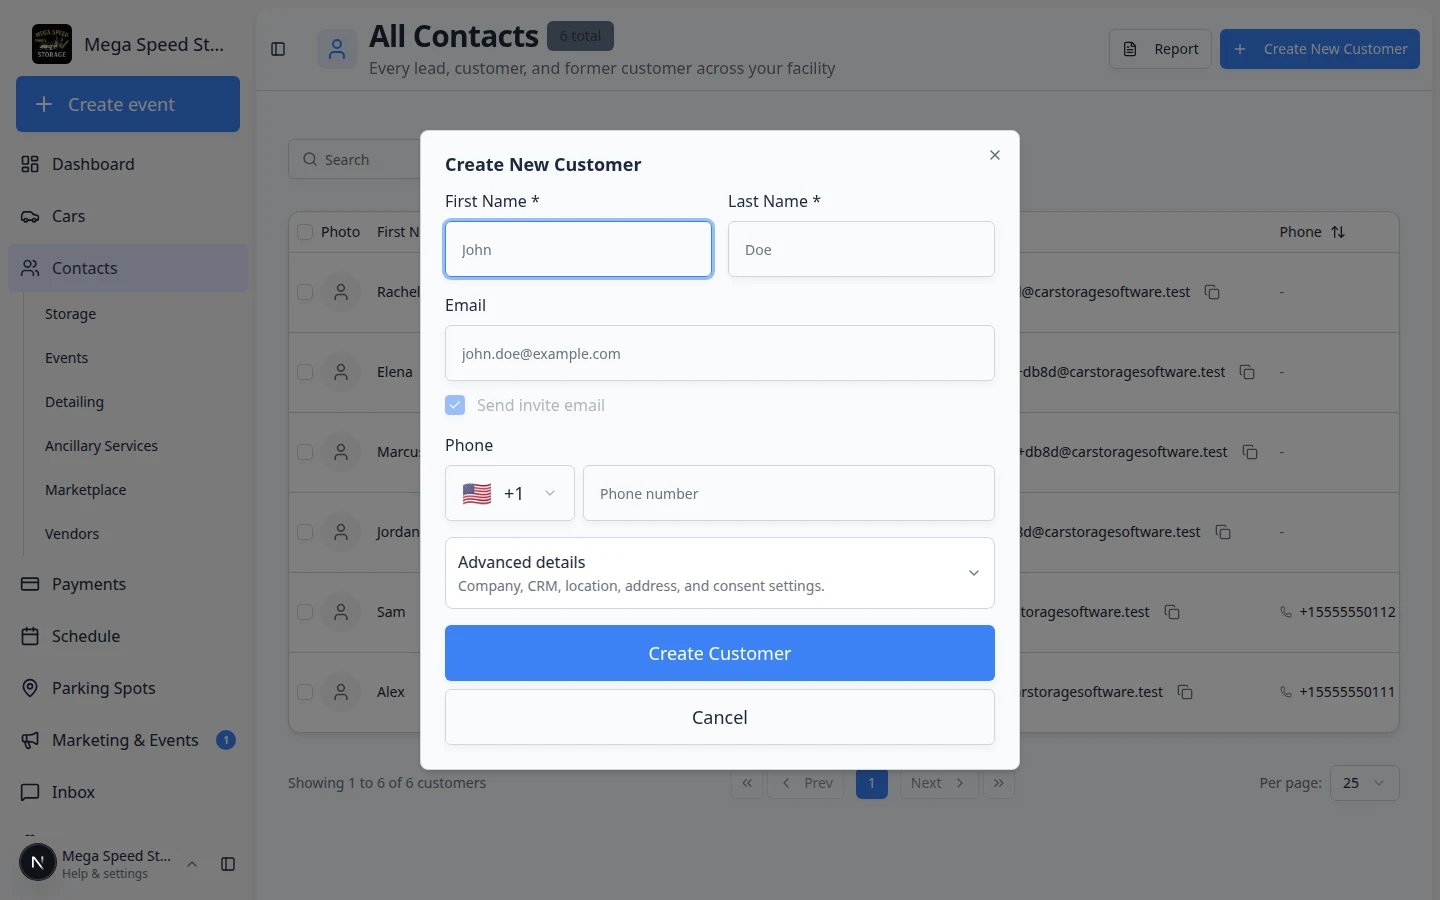 *Use **Create New Customer** in the top-right of All Contacts (or any customer-type page). If the list is empty, **Add Your First Customer** in the middle opens the same form.*
## Fill in the main details
Start with the fields at the top of the form. These are the details most teams need on day one.
Type **First Name** and **Last Name**. These are the only required fields.
Use the name your team will recognize on the phone and on invoices.
Type **Email** if you have it.
When you enter an email, saving may ask **Notify the customer?** Choose **Yes** to send a welcome sign-in email, or **No** to create the record without emailing. Closing that window cancels the save. This welcome email is not the same as the customer portal invite you send later from the customer record.
**Expected result:** The email field is filled and ready to save.
Type **Phone** if your team uses calls or text messages. Use the country format your facility expects.
*Use **Create New Customer** in the top-right of All Contacts (or any customer-type page). If the list is empty, **Add Your First Customer** in the middle opens the same form.*
## Fill in the main details
Start with the fields at the top of the form. These are the details most teams need on day one.
Type **First Name** and **Last Name**. These are the only required fields.
Use the name your team will recognize on the phone and on invoices.
Type **Email** if you have it.
When you enter an email, saving may ask **Notify the customer?** Choose **Yes** to send a welcome sign-in email, or **No** to create the record without emailing. Closing that window cancels the save. This welcome email is not the same as the customer portal invite you send later from the customer record.
**Expected result:** The email field is filled and ready to save.
Type **Phone** if your team uses calls or text messages. Use the country format your facility expects.
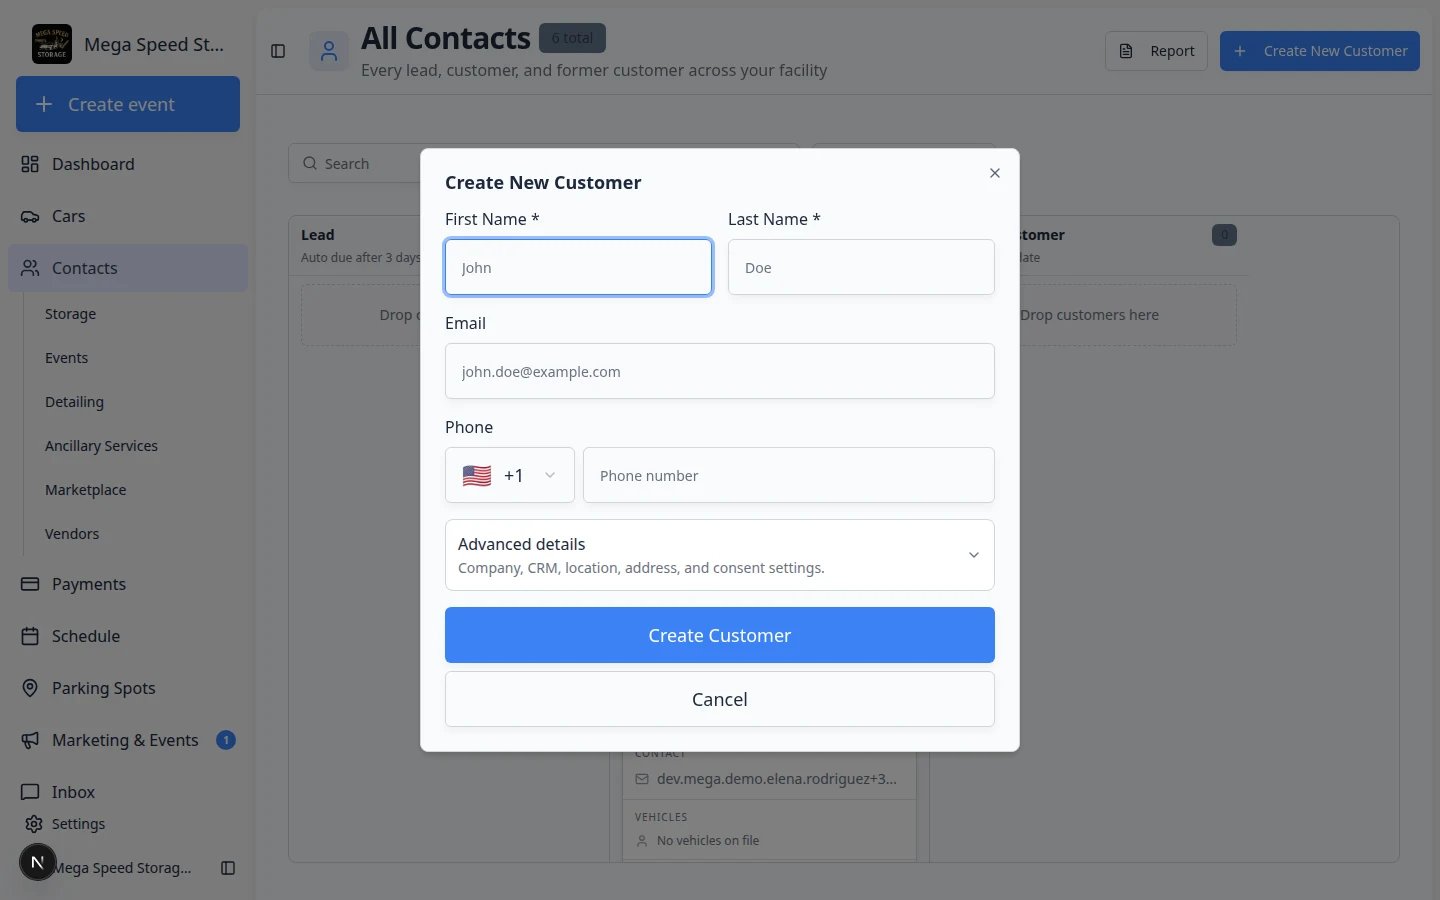 *Enter the customer's name first. Add email and phone when you have them.*
## Add company, CRM stage, types, and address (optional)
Many facilities only need name and email at first. When you have more information, open **Advanced details**.
Click **Advanced details** (subtitle: *Company, CRM, location, address, and consent settings.*).
**Expected result:** More fields appear below, including company name, CRM stage, customer types, and address.
Type **Company Name** when the customer is a business or fleet account.
Open the **CRM Stage** dropdown.
Your facility may see custom stage names (for example *New Inquiry* or *Active Storage*). Each stage belongs to one of three groups:
* **Lead** — interested, not yet paying.
* **Customer** — active, paying relationship.
* **Former Customer** — used to store or work with you but no longer active.
Pick the stage that matches where this person is today. You can change it later on the customer detail page or on the board view.
Click one or more **Customer Types** buttons, such as **Storage**, **Events**, **Detailing**, **Ancillary Services**, or **Marketplace**.
**Storage** is often selected by default. These types help your team group customers; you can still add freeform tags later on the customer record.
If your team uses more than one location, choose **Location** or leave **All locations** so the customer can appear across sites.
If you do not see **Location**, your facility runs as a single site and this field is hidden.
If your facility texts customers, you may see a checkbox: **I have collected customer consent for text messaging communications.** Check it only when your team has actually received consent according to your policies.
Use **Address** search to find and fill in a mailing address. This can appear on invoices and helps with logistics.
*Enter the customer's name first. Add email and phone when you have them.*
## Add company, CRM stage, types, and address (optional)
Many facilities only need name and email at first. When you have more information, open **Advanced details**.
Click **Advanced details** (subtitle: *Company, CRM, location, address, and consent settings.*).
**Expected result:** More fields appear below, including company name, CRM stage, customer types, and address.
Type **Company Name** when the customer is a business or fleet account.
Open the **CRM Stage** dropdown.
Your facility may see custom stage names (for example *New Inquiry* or *Active Storage*). Each stage belongs to one of three groups:
* **Lead** — interested, not yet paying.
* **Customer** — active, paying relationship.
* **Former Customer** — used to store or work with you but no longer active.
Pick the stage that matches where this person is today. You can change it later on the customer detail page or on the board view.
Click one or more **Customer Types** buttons, such as **Storage**, **Events**, **Detailing**, **Ancillary Services**, or **Marketplace**.
**Storage** is often selected by default. These types help your team group customers; you can still add freeform tags later on the customer record.
If your team uses more than one location, choose **Location** or leave **All locations** so the customer can appear across sites.
If you do not see **Location**, your facility runs as a single site and this field is hidden.
If your facility texts customers, you may see a checkbox: **I have collected customer consent for text messaging communications.** Check it only when your team has actually received consent according to your policies.
Use **Address** search to find and fill in a mailing address. This can appear on invoices and helps with logistics.
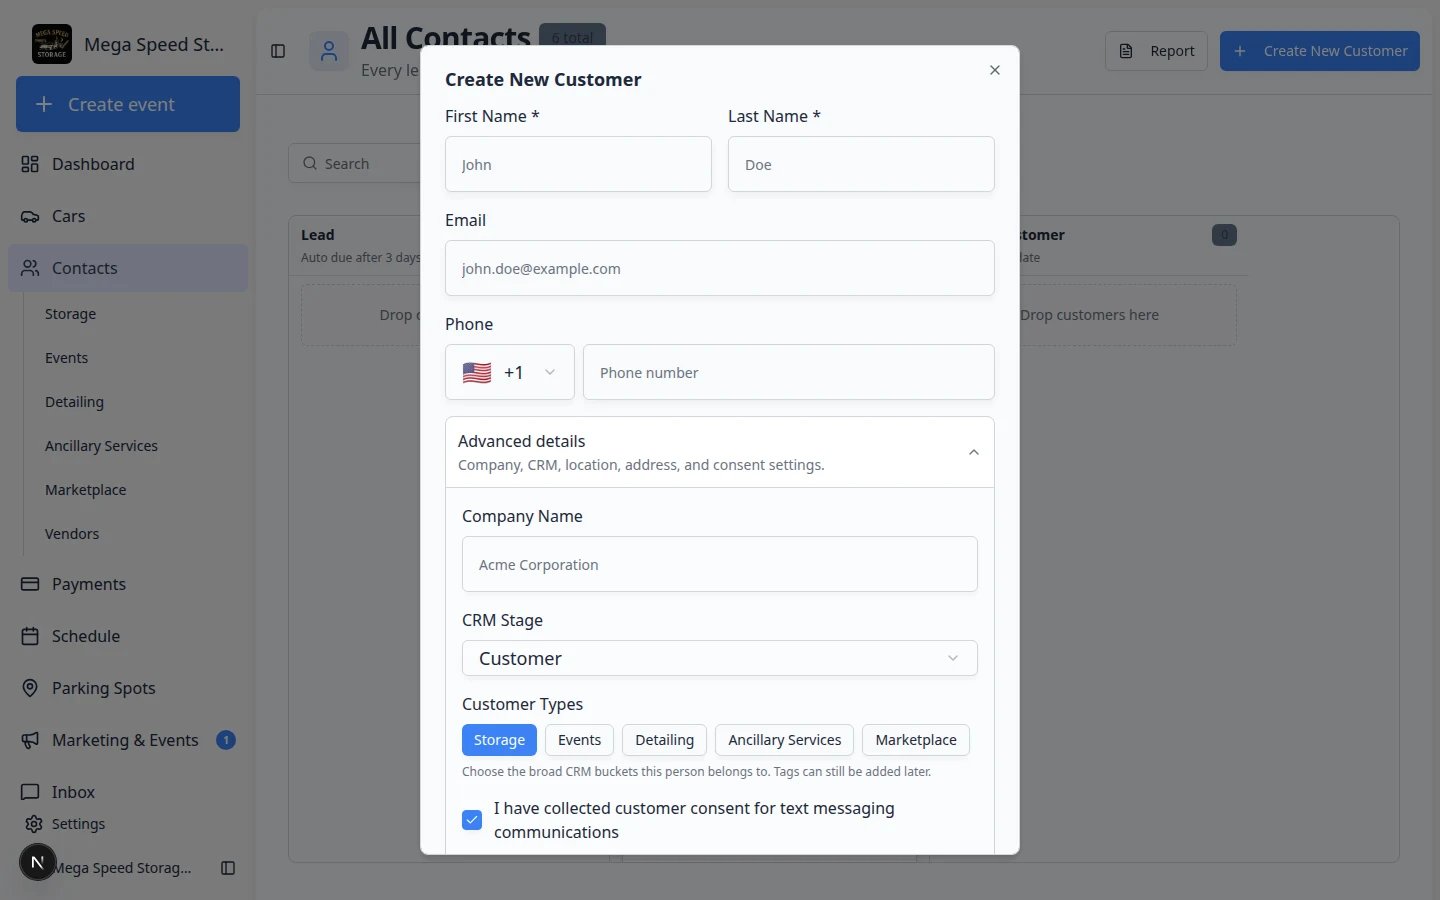 *Advanced details hold CRM stage, customer types, location, consent, and address. Open this section when you have that information ready.*
## Save the customer
Read the name, email, and CRM stage one more time. Fixing mistakes now is faster than moving cars and invoices later.
At the bottom of the window, click **Create Customer**. While the system saves, the button may show **Creating...**
**Expected result:** A success message appears (for example **Customer created successfully**), the window closes, and the new name appears on your [All Contacts](https://www.carstoragesoftware.com/dashboard/contacts/all) list (and on any customer-type page that matches their **Customer Types**).
Click **Cancel** to close the form without saving. Nothing is created.
*Advanced details hold CRM stage, customer types, location, consent, and address. Open this section when you have that information ready.*
## Save the customer
Read the name, email, and CRM stage one more time. Fixing mistakes now is faster than moving cars and invoices later.
At the bottom of the window, click **Create Customer**. While the system saves, the button may show **Creating...**
**Expected result:** A success message appears (for example **Customer created successfully**), the window closes, and the new name appears on your [All Contacts](https://www.carstoragesoftware.com/dashboard/contacts/all) list (and on any customer-type page that matches their **Customer Types**).
Click **Cancel** to close the form without saving. Nothing is created.
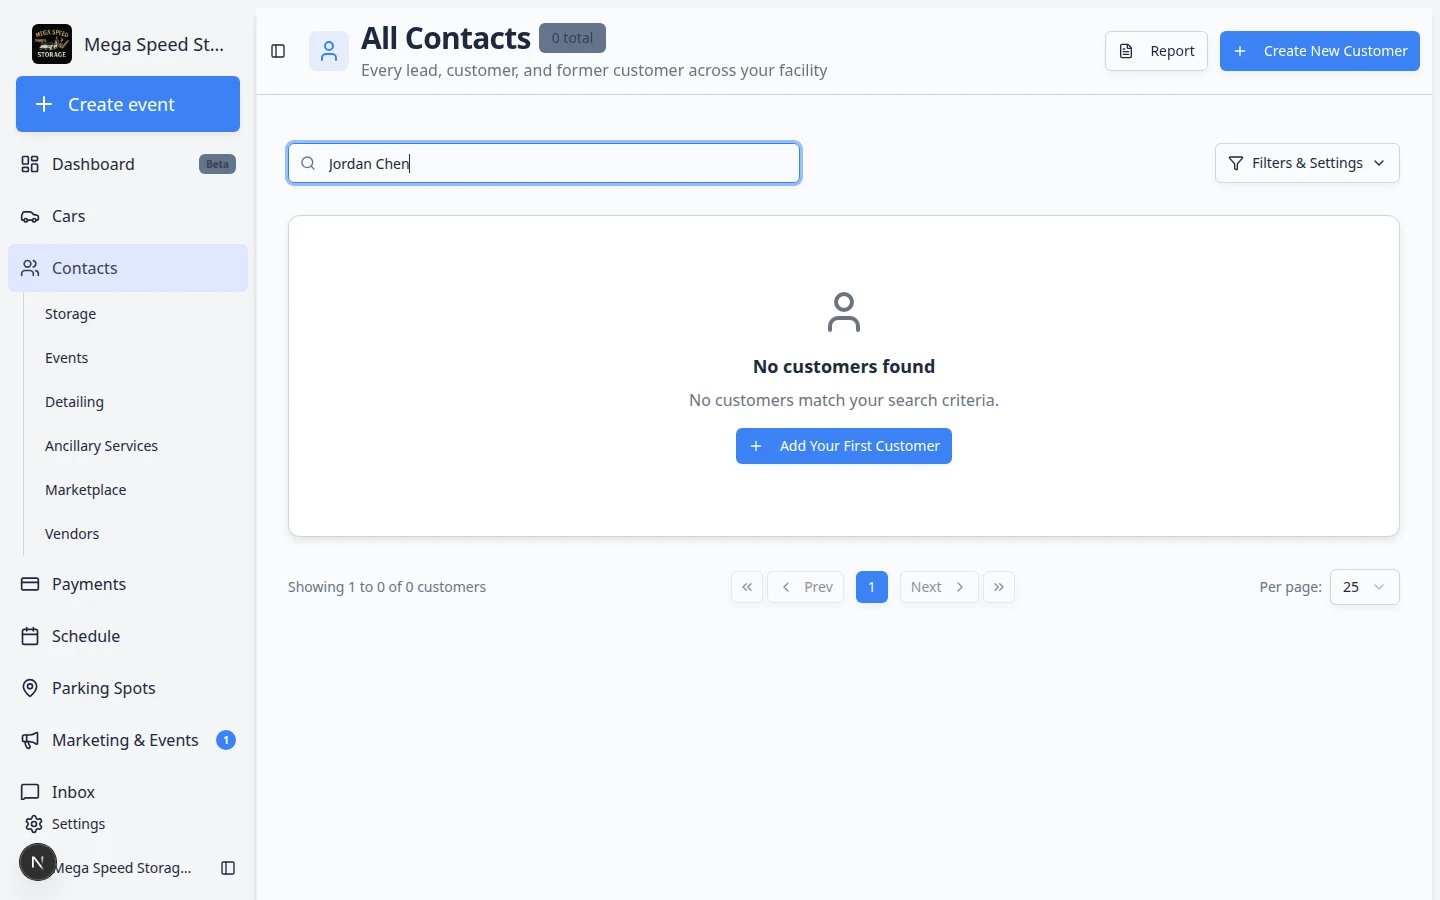 *After you save, search for the customer on Contacts to confirm the record is there.*
## If you see a second window about onboarding contracts
Some facilities use automatic onboarding contracts when a new customer is created. If your team has that turned on, you may see **Link details for onboarding contracts** right after save.
This extra window is not an error. It helps your team connect a vehicle or payment details when a contract template needs them.
* **Add vehicle** — opens the add-car flow for this customer.
* **Open customer** — goes to the customer detail page.
* **Done** — closes the window when requirements are met.
If the message says a vehicle is **required**, add at least one car before you can close the window.
**Why this window appears**
Your facility may require a car on file before a storage contract can be sent. Adding the vehicle now saves a second trip back to the customer record later. If you are not ready to add a car, click **Open customer** and finish setup when you have the VIN or vehicle details.
## After the customer is created
Open the customer from the list to finish setup. The detail page is where your team adds cars, documents, tags, and portal access.
*After you save, search for the customer on Contacts to confirm the record is there.*
## If you see a second window about onboarding contracts
Some facilities use automatic onboarding contracts when a new customer is created. If your team has that turned on, you may see **Link details for onboarding contracts** right after save.
This extra window is not an error. It helps your team connect a vehicle or payment details when a contract template needs them.
* **Add vehicle** — opens the add-car flow for this customer.
* **Open customer** — goes to the customer detail page.
* **Done** — closes the window when requirements are met.
If the message says a vehicle is **required**, add at least one car before you can close the window.
**Why this window appears**
Your facility may require a car on file before a storage contract can be sent. Adding the vehicle now saves a second trip back to the customer record later. If you are not ready to add a car, click **Open customer** and finish setup when you have the VIN or vehicle details.
## After the customer is created
Open the customer from the list to finish setup. The detail page is where your team adds cars, documents, tags, and portal access.
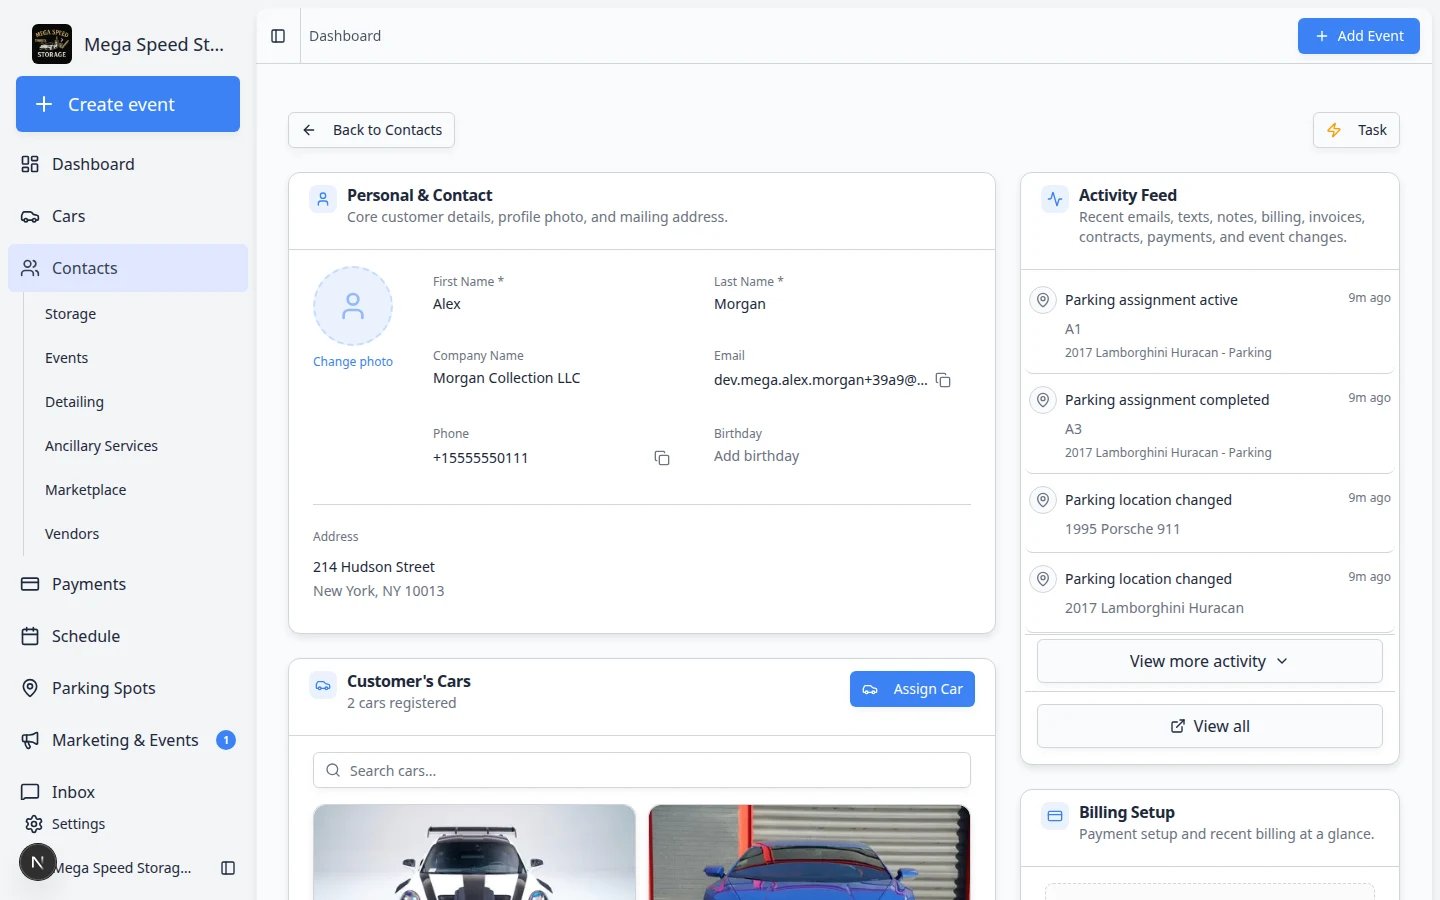 *The customer detail page is your home base for cars, documents, billing links, and portal invites.*
* **Link vehicles** — assign cars in the Cars section so ownership and billing stay connected. See [Add a car](/docs/cars/add-a-car).
* **Add tags** — use tags such as VIP or Collector for filtering and campaigns. See [Manage contact tags](/docs/contacts/manage-contact-tags).
* **Record CRM source** — note how they found you (website, referral, event) on the detail page.
* **Add additional contacts** — add a spouse, assistant, or bookkeeper if they should receive messages too. See [Manage additional contacts](/docs/contacts/manage-additional-contacts).
* **Send a portal invite** — when the record looks ready, invite the customer so they can sign in. See [Invite a customer to the portal](/docs/contacts/invite-a-customer-to-the-portal).
* **Help them use the portal** — share [Guide a customer through the portal](/docs/contacts/guide-a-customer-through-the-portal) with front-desk staff.
## What a good customer record looks like
Your goal is a record the next teammate can use without guessing:
* Correct **name** and **email**
* Clear **CRM Stage** (lead vs active customer)
* **Cars linked** to the right owner
* **Tags or notes** for anything unusual
* **Portal invite** sent only when cars and billing are ready for the customer to see
## Troubleshooting
**I do not see Create New Customer**
You may be viewing **deleted** customers only, or your account may not have permission to add customers. Switch the status filter to **Active** and ask your facility manager about your role.
**The system says this email already exists**
Another customer on your team already uses that email. Search [All Contacts](https://www.carstoragesoftware.com/dashboard/contacts/all) for the email address. Use the existing record, or ask a manager how to handle duplicates.
**I created a duplicate by mistake**
Search before creating next time. If two records exist, move cars, invoices, and documents to the better record, then remove the duplicate from the customer detail page when your policy allows.
**The customer does not appear in the list**
Clear search and filters. The list often defaults to **active** customers. Check **Inactive** or **Deleted** filters if you still cannot find them.
**I changed the email after creating the customer**
Open the customer detail page and edit the email there. Portal sign-in uses email—send a new portal invite after you change it. See [Edit customer details](/docs/contacts/edit-customer-details).
**I do not see Location or custom CRM stages**
**Location** appears only when your facility enables multiple locations in Settings. Custom **CRM Stage** names come from [Configure CRM settings](/docs/settings/configure-crm-settings). If you only see Lead, Customer, and Former Customer, your team has not added custom stages yet.
## What to do next
Go to [Add a car](/docs/cars/add-a-car) and link it to this customer.
When billing is set up, use [Create an invoice](/docs/payments/create-an-invoice).
Read [Contacts overview](/docs/contacts/overview) for search, filters, board view, and import.
## Related topics
- [Add a website embed](/docs/facility-web-pages/add-a-website-embed.md)
- [Prepare your first customer and car](/docs/basics/prepare-your-first-customer-and-car.md)
- [Work with customer type lists](/docs/contacts/work-with-customer-type-lists.md)
- [Add and manage customer notes](/docs/contacts/add-and-manage-customer-notes.md)
- [Let customers add their own cars](/docs/facility-web-pages/let-customers-add-their-own-cars.md)
This documentation is built and hosted on [Mintlify](https://mintlify.com), a developer documentation platform.
*The customer detail page is your home base for cars, documents, billing links, and portal invites.*
* **Link vehicles** — assign cars in the Cars section so ownership and billing stay connected. See [Add a car](/docs/cars/add-a-car).
* **Add tags** — use tags such as VIP or Collector for filtering and campaigns. See [Manage contact tags](/docs/contacts/manage-contact-tags).
* **Record CRM source** — note how they found you (website, referral, event) on the detail page.
* **Add additional contacts** — add a spouse, assistant, or bookkeeper if they should receive messages too. See [Manage additional contacts](/docs/contacts/manage-additional-contacts).
* **Send a portal invite** — when the record looks ready, invite the customer so they can sign in. See [Invite a customer to the portal](/docs/contacts/invite-a-customer-to-the-portal).
* **Help them use the portal** — share [Guide a customer through the portal](/docs/contacts/guide-a-customer-through-the-portal) with front-desk staff.
## What a good customer record looks like
Your goal is a record the next teammate can use without guessing:
* Correct **name** and **email**
* Clear **CRM Stage** (lead vs active customer)
* **Cars linked** to the right owner
* **Tags or notes** for anything unusual
* **Portal invite** sent only when cars and billing are ready for the customer to see
## Troubleshooting
**I do not see Create New Customer**
You may be viewing **deleted** customers only, or your account may not have permission to add customers. Switch the status filter to **Active** and ask your facility manager about your role.
**The system says this email already exists**
Another customer on your team already uses that email. Search [All Contacts](https://www.carstoragesoftware.com/dashboard/contacts/all) for the email address. Use the existing record, or ask a manager how to handle duplicates.
**I created a duplicate by mistake**
Search before creating next time. If two records exist, move cars, invoices, and documents to the better record, then remove the duplicate from the customer detail page when your policy allows.
**The customer does not appear in the list**
Clear search and filters. The list often defaults to **active** customers. Check **Inactive** or **Deleted** filters if you still cannot find them.
**I changed the email after creating the customer**
Open the customer detail page and edit the email there. Portal sign-in uses email—send a new portal invite after you change it. See [Edit customer details](/docs/contacts/edit-customer-details).
**I do not see Location or custom CRM stages**
**Location** appears only when your facility enables multiple locations in Settings. Custom **CRM Stage** names come from [Configure CRM settings](/docs/settings/configure-crm-settings). If you only see Lead, Customer, and Former Customer, your team has not added custom stages yet.
## What to do next
Go to [Add a car](/docs/cars/add-a-car) and link it to this customer.
When billing is set up, use [Create an invoice](/docs/payments/create-an-invoice).
Read [Contacts overview](/docs/contacts/overview) for search, filters, board view, and import.
## Related topics
- [Add a website embed](/docs/facility-web-pages/add-a-website-embed.md)
- [Prepare your first customer and car](/docs/basics/prepare-your-first-customer-and-car.md)
- [Work with customer type lists](/docs/contacts/work-with-customer-type-lists.md)
- [Add and manage customer notes](/docs/contacts/add-and-manage-customer-notes.md)
- [Let customers add their own cars](/docs/facility-web-pages/let-customers-add-their-own-cars.md)
This documentation is built and hosted on [Mintlify](https://mintlify.com), a developer documentation platform.