> ## Documentation Index
> Fetch the complete documentation index at: https://www.carstoragesoftware.com/docs/llms.txt
> Use this file to discover all available pages before exploring further.
# Manage additional contacts
> Add spouses, assistants, bookkeepers, and other people who help manage a customer's account.
Use this guide when someone besides the main customer needs messages, scheduling updates, or their own portal sign-in.
## What you will accomplish
* Add a spouse, assistant, bookkeeper, or other helper under the main customer record.
* Choose which messages each person should receive (invoices, scheduling, car updates, and more).
* Turn on **portal access** and send a separate sign-in link when that person should use the customer portal with their own email.
* Edit or remove additional contacts when roles change.
Some customers have more than one person involved in their account. A spouse may need car updates. An assistant may schedule appointments. A bookkeeper may need invoices. A vehicle manager may handle drop-off and pickup.
**Not the same as a new customer**
Additional contacts belong **under** one customer account. If someone owns their own cars and billing, create a separate customer in [All Contacts](https://www.carstoragesoftware.com/dashboard/contacts/all) instead.
## Before you start
* Open the correct main customer record first.
* Have the additional person's first name and last name ready.
* Add an email address if they should receive messages or have portal access.
* Decide whether this person should be the primary contact.
* Decide which types of messages this person should receive.
* Know whether this person needs their **own** portal sign-in (separate email) or only copies of messages.
**Additional contacts are not separate customers**
Use an additional contact for someone connected to the main customer's account. If the person owns their own cars, receives their own invoices, or needs their own customer history, create a separate customer record instead.
## Open the Contacts section on the customer record
Open [All Contacts](https://www.carstoragesoftware.com/dashboard/contacts/all).
Search for the customer who owns the account.
Click the customer row or **View Details**.
Scroll down to the **Contacts** section. On a wide screen it sits below **CRM Information**.
**If you do not see it:** Someone may have hidden the **Additional Contacts** block. An admin can turn it back on in [Customize the contact page](/docs/contacts/customize-the-contact-page).
**Contacts vs Additional Contacts**
On the customer page the heading says **Contacts**. In [Settings > CRM](https://www.carstoragesoftware.com/dashboard/settings/crm) the same block is named **Additional Contacts**. Both names mean the spouse, assistant, or bookkeeper list—not the main [All Contacts](https://www.carstoragesoftware.com/dashboard/contacts/all) directory.
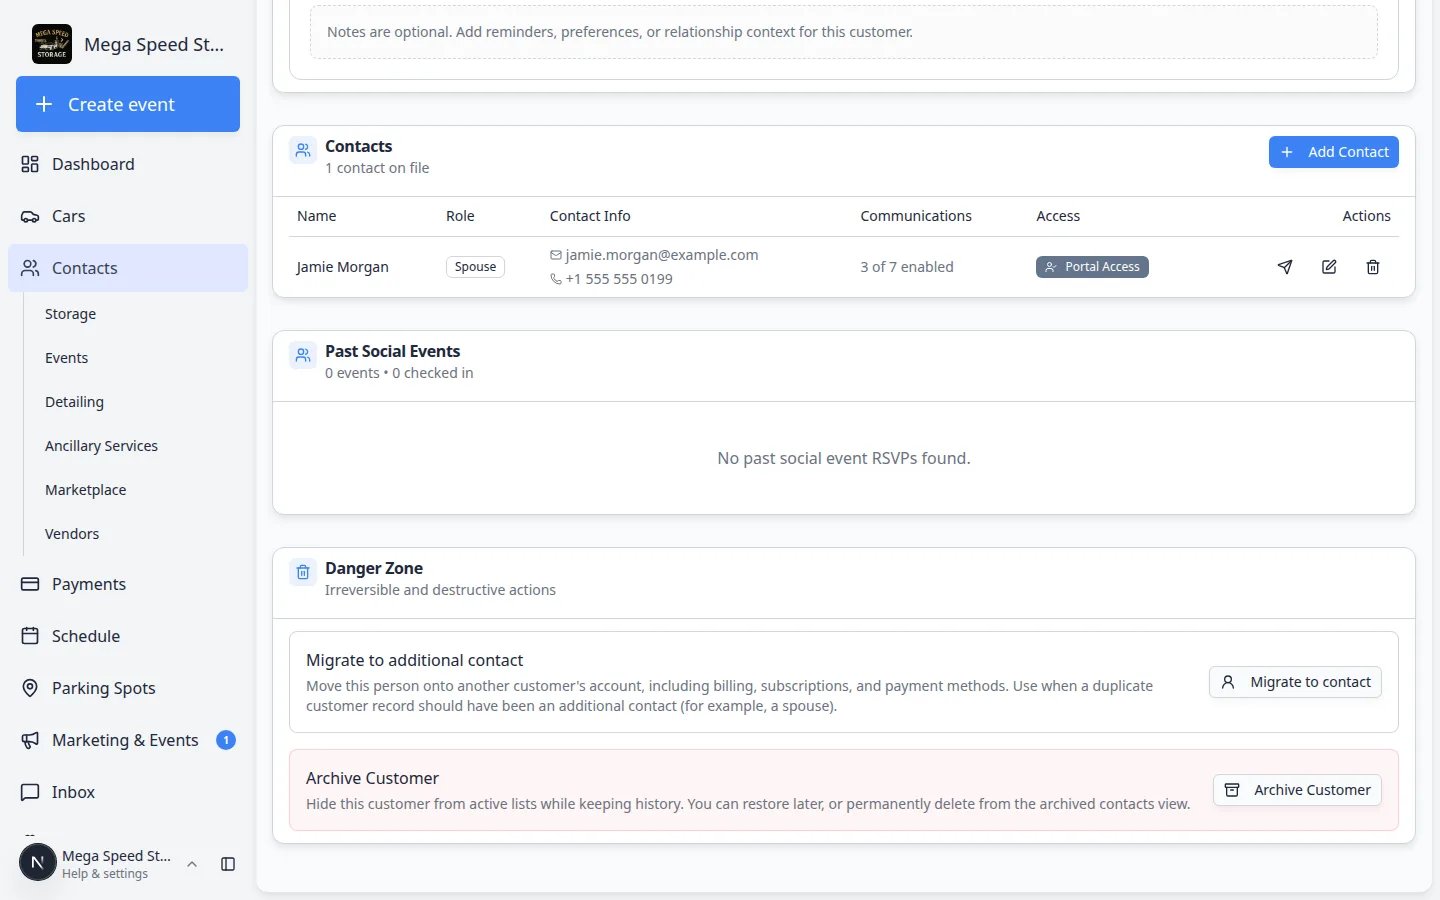 *After you save, each additional contact appears under **Contacts** with their role, email, how many message types they receive (for example **3 of 7 enabled**), and whether they have **Portal Access**.*
## Add an additional contact
In the **Contacts** section, click **Add Contact**.
Fill in **First Name** and **Last Name**. These fields are required.
Add an email address if this person should receive messages, invoices, contracts, or portal access.
Add a phone number if your team may call or text them.
Use **Role** to explain who this person is, such as spouse, assistant, bookkeeper, or other.
If you choose **Other**, add a clear role description.
Turn on **Primary contact (main point of contact for this customer)** only if this person should be your main contact. Most facilities leave the main customer as primary and add helpers as additional contacts.
Turn on **Can access customer portal (login with their email)** only if this person should sign in to the portal themselves—not just receive email copies.
**Why this matters:** Portal access gives someone their own sign-in link. Communication preferences only control which **automatic messages** they receive.
Under **Communication Preferences**, check only the message types this person should receive:
* **Invoices & Billing**
* **Estimates & Quotes**
* **Scheduling Notifications**
* **Car Updates**
* **Contracts**
* **Social Events**
* **Marketing**
*After you save, each additional contact appears under **Contacts** with their role, email, how many message types they receive (for example **3 of 7 enabled**), and whether they have **Portal Access**.*
## Add an additional contact
In the **Contacts** section, click **Add Contact**.
Fill in **First Name** and **Last Name**. These fields are required.
Add an email address if this person should receive messages, invoices, contracts, or portal access.
Add a phone number if your team may call or text them.
Use **Role** to explain who this person is, such as spouse, assistant, bookkeeper, or other.
If you choose **Other**, add a clear role description.
Turn on **Primary contact (main point of contact for this customer)** only if this person should be your main contact. Most facilities leave the main customer as primary and add helpers as additional contacts.
Turn on **Can access customer portal (login with their email)** only if this person should sign in to the portal themselves—not just receive email copies.
**Why this matters:** Portal access gives someone their own sign-in link. Communication preferences only control which **automatic messages** they receive.
Under **Communication Preferences**, check only the message types this person should receive:
* **Invoices & Billing**
* **Estimates & Quotes**
* **Scheduling Notifications**
* **Car Updates**
* **Contracts**
* **Social Events**
* **Marketing**
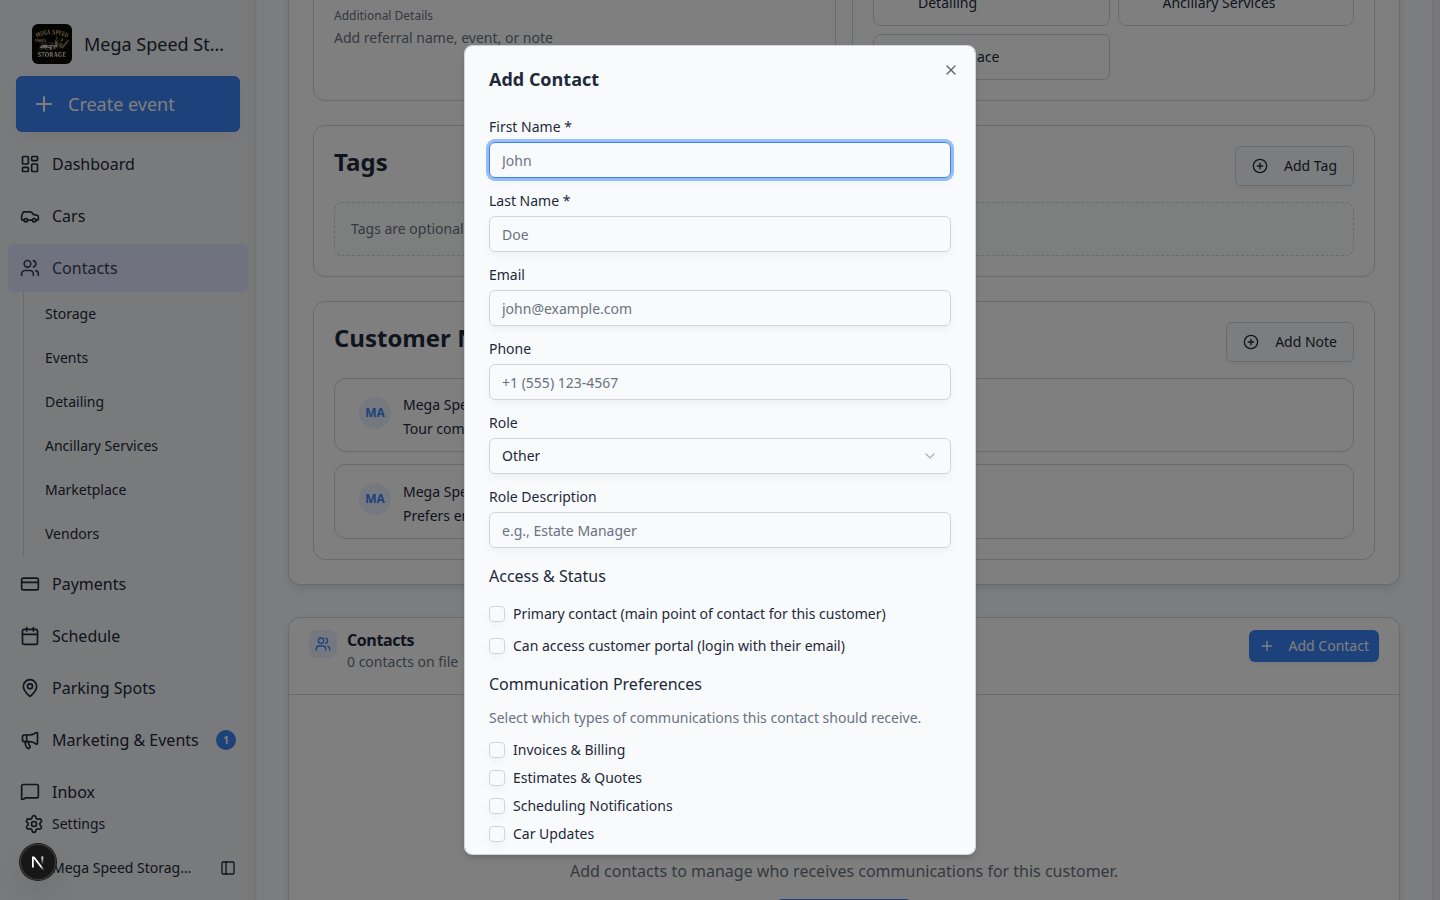 *Turn on only the message types each person should receive. A bookkeeper may need Invoices only; an assistant may need Scheduling and Car Updates.*
**Why this matters:** The main customer and each additional contact can receive different messages. A bookkeeper may need **Invoices & Billing** but not **Marketing**. An assistant may need **Scheduling Notifications** and **Car Updates** only.
**Expected result:** The contact row shows a communication count (how many types are turned on). Fewer checked boxes means fewer automatic messages to that person.
Click **Add Contact** to save the person under the customer record.
**Expected result:** The new person appears in the **Contacts** section with their role, email, communication count, and portal access status.
*Turn on only the message types each person should receive. A bookkeeper may need Invoices only; an assistant may need Scheduling and Car Updates.*
**Why this matters:** The main customer and each additional contact can receive different messages. A bookkeeper may need **Invoices & Billing** but not **Marketing**. An assistant may need **Scheduling Notifications** and **Car Updates** only.
**Expected result:** The contact row shows a communication count (how many types are turned on). Fewer checked boxes means fewer automatic messages to that person.
Click **Add Contact** to save the person under the customer record.
**Expected result:** The new person appears in the **Contacts** section with their role, email, communication count, and portal access status.
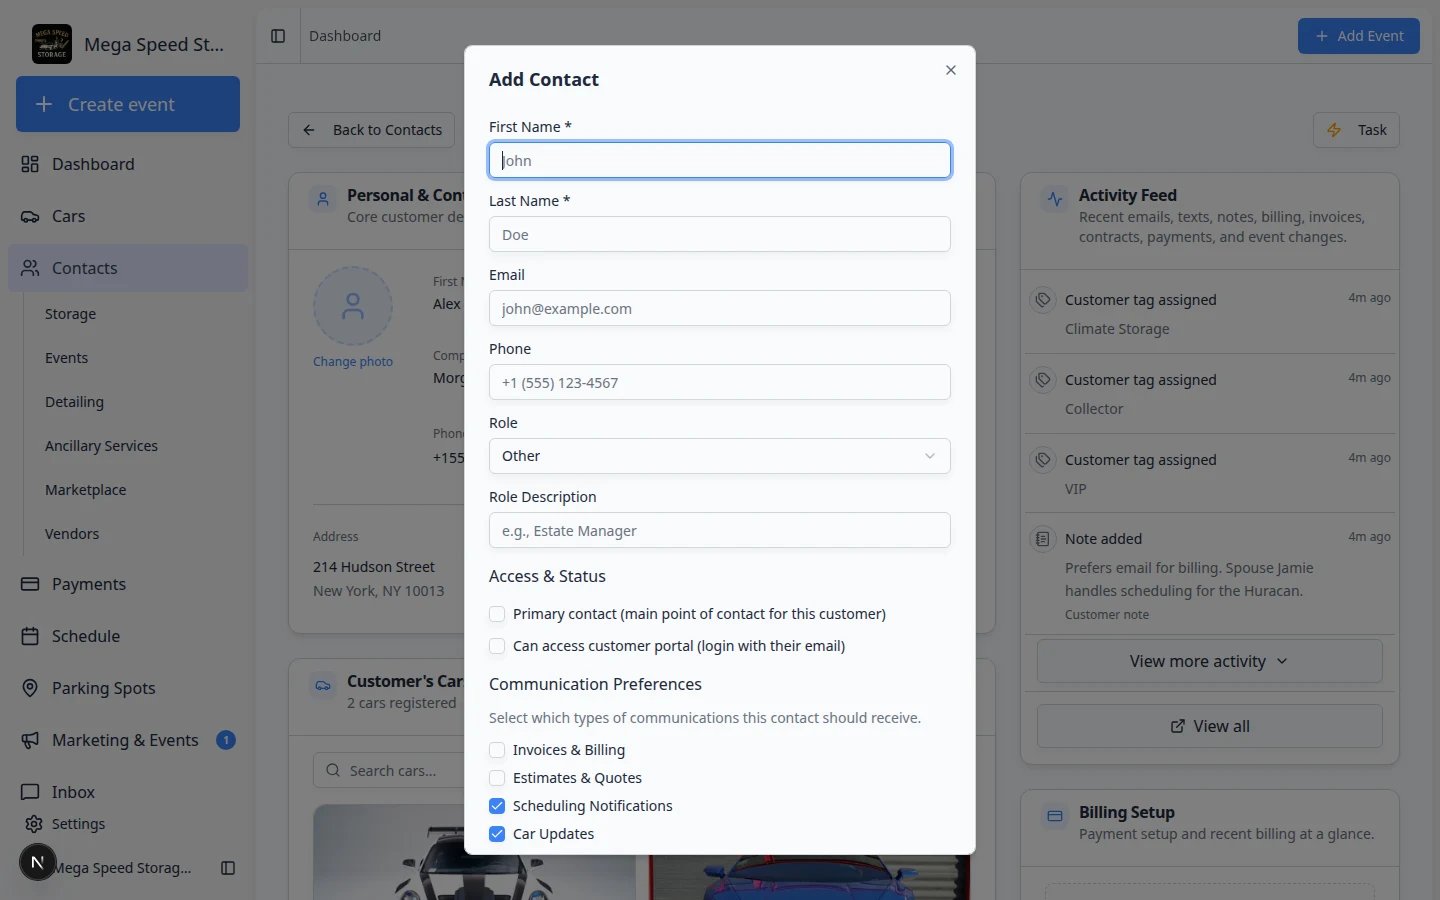 *Check only the message types this person should receive. Fewer checked boxes means fewer automatic emails and texts.*
**What “3 of 7 enabled” means on the list**
After you save, each contact row shows how many communication types are turned on—for example **3 of 7 enabled**. That is a quick reminder of who receives invoices versus who only gets scheduling updates.
**Adding many at once?**
You can import additional contacts from a spreadsheet alongside their customers. See [Import additional contacts](/docs/basics/import-customers-cars-and-plans-during-onboarding#import-additional-contacts).
## Edit an additional contact
Find the customer in [All Contacts](https://www.carstoragesoftware.com/dashboard/contacts/all) and open the detail page.
Scroll to **Contacts**.
Click the **pencil** (edit) icon beside the additional contact—or use the edit button with the pencil icon in the **Actions** column.
**Expected result:** A window titled **Edit Contact** opens with the person's current information filled in.
Change the name, email, phone, role, portal access, or communication preferences.
Save the changes and confirm the contact row now shows the right information.
## Send a portal invite to an additional contact
If **Can access customer portal (login with their email)** is turned on and the contact has an email address, you can send that person their own portal invite.
Go to [All Contacts](https://www.carstoragesoftware.com/dashboard/contacts/all) and open the main customer record.
Find the additional contact.
The contact should show **Portal Access** in the Access column.
Click the **send** (mail) icon beside the contact.
A window titled **Notify the customer?** asks if you want to send the invite now. Choose **Yes** to send the sign-in email. Choose **No** or close the window to cancel without sending.
**Expected result:** After **Yes**, the contact receives a sign-in email at their own address—not the main customer's.
*Check only the message types this person should receive. Fewer checked boxes means fewer automatic emails and texts.*
**What “3 of 7 enabled” means on the list**
After you save, each contact row shows how many communication types are turned on—for example **3 of 7 enabled**. That is a quick reminder of who receives invoices versus who only gets scheduling updates.
**Adding many at once?**
You can import additional contacts from a spreadsheet alongside their customers. See [Import additional contacts](/docs/basics/import-customers-cars-and-plans-during-onboarding#import-additional-contacts).
## Edit an additional contact
Find the customer in [All Contacts](https://www.carstoragesoftware.com/dashboard/contacts/all) and open the detail page.
Scroll to **Contacts**.
Click the **pencil** (edit) icon beside the additional contact—or use the edit button with the pencil icon in the **Actions** column.
**Expected result:** A window titled **Edit Contact** opens with the person's current information filled in.
Change the name, email, phone, role, portal access, or communication preferences.
Save the changes and confirm the contact row now shows the right information.
## Send a portal invite to an additional contact
If **Can access customer portal (login with their email)** is turned on and the contact has an email address, you can send that person their own portal invite.
Go to [All Contacts](https://www.carstoragesoftware.com/dashboard/contacts/all) and open the main customer record.
Find the additional contact.
The contact should show **Portal Access** in the Access column.
Click the **send** (mail) icon beside the contact.
A window titled **Notify the customer?** asks if you want to send the invite now. Choose **Yes** to send the sign-in email. Choose **No** or close the window to cancel without sending.
**Expected result:** After **Yes**, the contact receives a sign-in email at their own address—not the main customer's.
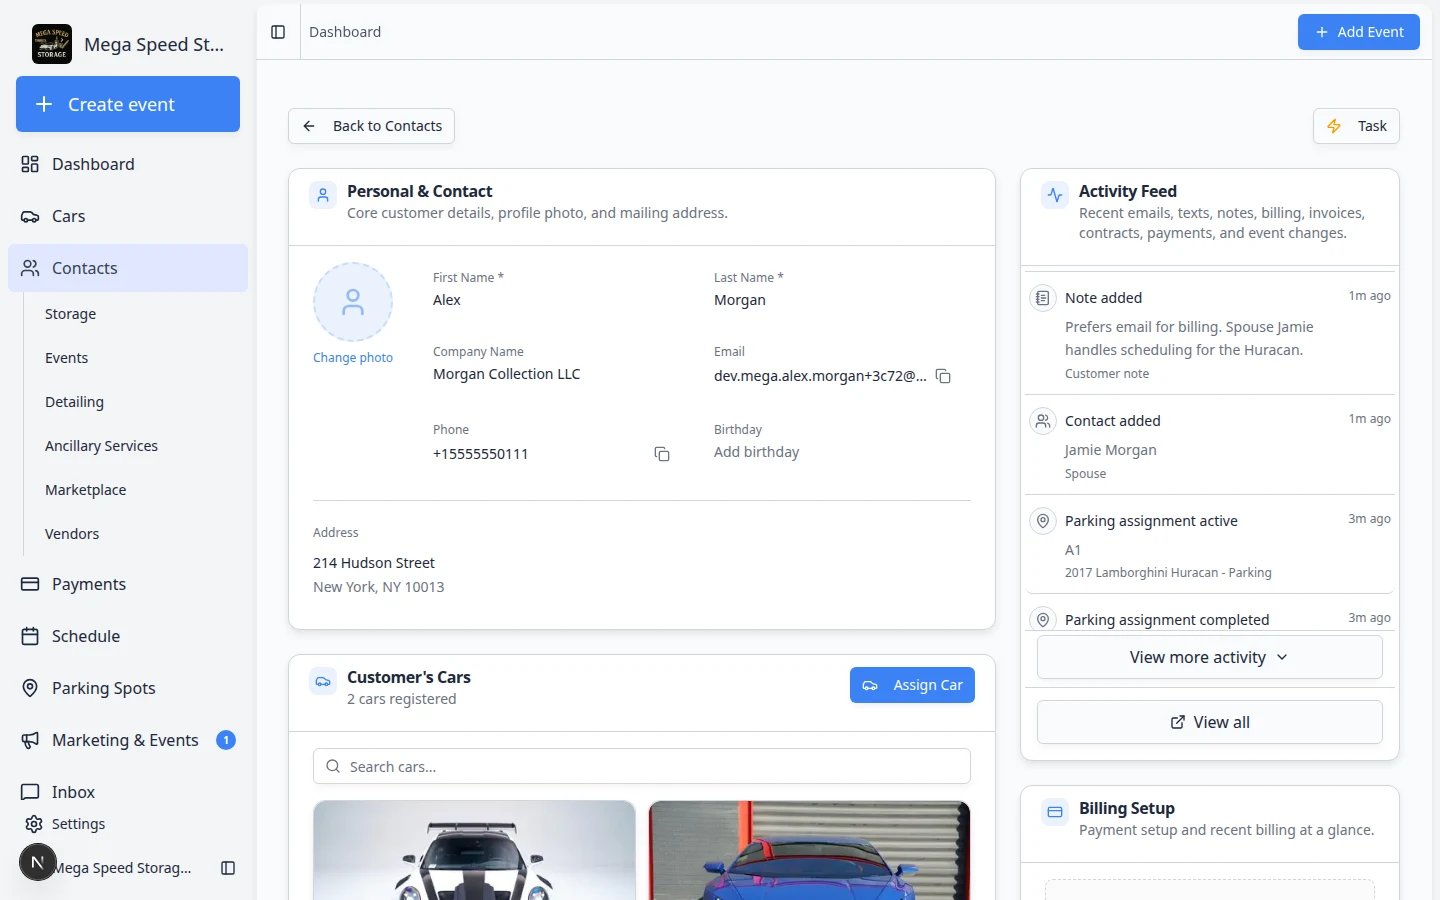 *After you save an additional contact, use the mail icon to send a portal invite, the pencil to edit, or the trash icon to remove the person from the account.*
**Each person signs in with their own email**
The main customer and additional contacts can each have their own sign-in link. They see information connected to the same customer account, but they use their own email address to sign in.
If someone needs help after they receive the invite, use [Guide a customer through the portal](/docs/contacts/guide-a-customer-through-the-portal) to explain what they can see and do.
## Remove an additional contact
Remove a contact only when the person should no longer be connected to the account.
Go to [All Contacts](https://www.carstoragesoftware.com/dashboard/contacts/all) and open the customer.
Find the additional contact.
Click the **trash** (delete) icon beside the contact. Confirm when the app asks.
**Why this matters:** Deleting removes portal access and stops messages tied to that person. The main customer record stays.
Confirm only after checking that this person no longer needs messages or portal access.
## Common examples
| Person | Suggested role | Common preferences |
| - | - | - |
| Spouse or partner | Spouse | Scheduling, Car Updates, Contracts |
| Assistant | Assistant | Scheduling, Car Updates |
| Bookkeeper | Bookkeeper | Invoices, Estimates |
| Vehicle manager | Other | Scheduling, Car Updates, Contracts |
## What happens next
After adding additional contacts, review the main customer record:
* The correct person is marked primary, if needed.
* Only the right people have portal access.
* Communication preferences match each person's role.
* The main customer still has the correct email and phone number.
* If the **Contacts** section is missing on some computers, restore **Additional Contacts** in [Customize the contact page](/docs/contacts/customize-the-contact-page).
## Troubleshooting
**The invite button does not appear**
The contact needs an email address and portal access must be turned on. Edit the contact, add the email, and check **Can access customer portal (login with their email)**.
**The wrong person is receiving messages**
Open the additional contact and review **Communication Preferences**. Turn off message types that person should not receive.
**I need this person to be their own customer**
Create a separate customer record from [All Contacts](https://www.carstoragesoftware.com/dashboard/contacts/all). Use additional contacts only for people who belong under another customer's account.
## Related topics
- [Customize the contact page](/docs/contacts/customize-the-contact-page.md)
- [Add and manage customer notes](/docs/contacts/add-and-manage-customer-notes.md)
- [Load customers, cars, and plans during onboarding](/docs/basics/import-customers-cars-and-plans-during-onboarding.md)
- [Contacts overview](/docs/contacts/overview.md)
- [Guide a customer through the portal](/docs/contacts/guide-a-customer-through-the-portal.md)
This documentation is built and hosted on [Mintlify](https://mintlify.com), a developer documentation platform.
*After you save an additional contact, use the mail icon to send a portal invite, the pencil to edit, or the trash icon to remove the person from the account.*
**Each person signs in with their own email**
The main customer and additional contacts can each have their own sign-in link. They see information connected to the same customer account, but they use their own email address to sign in.
If someone needs help after they receive the invite, use [Guide a customer through the portal](/docs/contacts/guide-a-customer-through-the-portal) to explain what they can see and do.
## Remove an additional contact
Remove a contact only when the person should no longer be connected to the account.
Go to [All Contacts](https://www.carstoragesoftware.com/dashboard/contacts/all) and open the customer.
Find the additional contact.
Click the **trash** (delete) icon beside the contact. Confirm when the app asks.
**Why this matters:** Deleting removes portal access and stops messages tied to that person. The main customer record stays.
Confirm only after checking that this person no longer needs messages or portal access.
## Common examples
| Person | Suggested role | Common preferences |
| - | - | - |
| Spouse or partner | Spouse | Scheduling, Car Updates, Contracts |
| Assistant | Assistant | Scheduling, Car Updates |
| Bookkeeper | Bookkeeper | Invoices, Estimates |
| Vehicle manager | Other | Scheduling, Car Updates, Contracts |
## What happens next
After adding additional contacts, review the main customer record:
* The correct person is marked primary, if needed.
* Only the right people have portal access.
* Communication preferences match each person's role.
* The main customer still has the correct email and phone number.
* If the **Contacts** section is missing on some computers, restore **Additional Contacts** in [Customize the contact page](/docs/contacts/customize-the-contact-page).
## Troubleshooting
**The invite button does not appear**
The contact needs an email address and portal access must be turned on. Edit the contact, add the email, and check **Can access customer portal (login with their email)**.
**The wrong person is receiving messages**
Open the additional contact and review **Communication Preferences**. Turn off message types that person should not receive.
**I need this person to be their own customer**
Create a separate customer record from [All Contacts](https://www.carstoragesoftware.com/dashboard/contacts/all). Use additional contacts only for people who belong under another customer's account.
## Related topics
- [Customize the contact page](/docs/contacts/customize-the-contact-page.md)
- [Add and manage customer notes](/docs/contacts/add-and-manage-customer-notes.md)
- [Load customers, cars, and plans during onboarding](/docs/basics/import-customers-cars-and-plans-during-onboarding.md)
- [Contacts overview](/docs/contacts/overview.md)
- [Guide a customer through the portal](/docs/contacts/guide-a-customer-through-the-portal.md)
This documentation is built and hosted on [Mintlify](https://mintlify.com), a developer documentation platform.