> ## Documentation Index
> Fetch the complete documentation index at: https://www.carstoragesoftware.com/docs/llms.txt
> Use this file to discover all available pages before exploring further.
# Send a contract for signature
> Create a contract from a template, complete the send wizard, and email a signing link to one customer.
## What you will accomplish
You will create a contract from a template, walk through the **send contract** wizard, and email a signing link to one customer. When they finish, the signed PDF stays on their customer record for your team to download.
## When to use this guide
Use this guide for **one customer at a time**, such as:
* A new storage customer needs to sign an agreement today.
* An existing customer adds a new vehicle and needs a new agreement.
* A customer needs a service authorization or waiver.
* You need to resend a signing link because the customer did not receive email.
**Several customers at once?**
To send the **same agreement** to **many contacts**, select them on [Contacts](https://www.carstoragesoftware.com/dashboard/contacts), open **Actions**, and choose **Send contract**. Follow [Send contracts to many customers at once](/docs/contracts/send-contracts-to-many-customers-at-once) for the full wizard, send job, pause, and retry steps.
**Every customer at onboarding?**
If **every** new customer should sign during portal setup, use [Attach contracts to customer workflows](/docs/contracts/attach-contracts-to-workflows) instead of sending one email at a time.
**Several vehicles during onboarding?**
When one customer stores **multiple vehicles** and should sign during **first-time portal setup**, the app can bundle agreements into **one signing email**. See [Send multiple contracts in one signing link](/docs/contracts/send-multiple-contracts-in-one-signing-link). For a one-off send from a customer record, this guide sends **one agreement at a time**.
## Before you start
* The customer exists in [Contacts](https://www.carstoragesoftware.com/dashboard/contacts).
* The customer's **email** on their record is correct (signing links go to this address).
* You created the contract template in [Settings > Contracts & Documents](https://www.carstoragesoftware.com/dashboard/settings/contracts-and-documents).
* The related car is on the customer record if the agreement uses vehicle fields.
* If your template requires a payment plan, you have an active product and price in [Payments](https://www.carstoragesoftware.com/dashboard/payments).
* If the template includes **Event Scheduling**, the matching service is **Active** in [Settings > Services & schedule](https://www.carstoragesoftware.com/dashboard/settings/events). Example: **Vehicle Drop Off**. See [Schedule a service while signing a contract](/docs/contracts/schedule-a-service-while-signing-a-contract).
* The agreement text is final and approved for sending.
## Step 1: Open the customer record
In the sidebar, click **Contacts**, or go to [Contacts](https://www.carstoragesoftware.com/dashboard/contacts).
Search by name, email, phone, or company. Open the correct customer record.
If the agreement is for a specific car, check that the right vehicle appears on the record before you continue.
**Expected result:** You are viewing the customer who should sign—not a different person with a similar name.
## Step 2: Start a new contract
On the customer record, scroll to **Documents & Contracts**.
Click **New Document** in the **Documents & Contracts** section (top-right of that card, or in the empty state).
**Shortcut:** You can also drag a PDF onto the **Add document** tile—but for signed agreements, use **Contract** instead.
In the **Add New Document** window, click **Contract**—the option that says customers sign electronically from a template.
In **Select Contract Template**, click the agreement that matches this customer—for example **Car Storage Agreement**.
**Expected result:** The app creates a **Draft** contract and opens the send wizard. If you stay on the customer page, click the new **Draft** card or choose **Open contract** to continue.
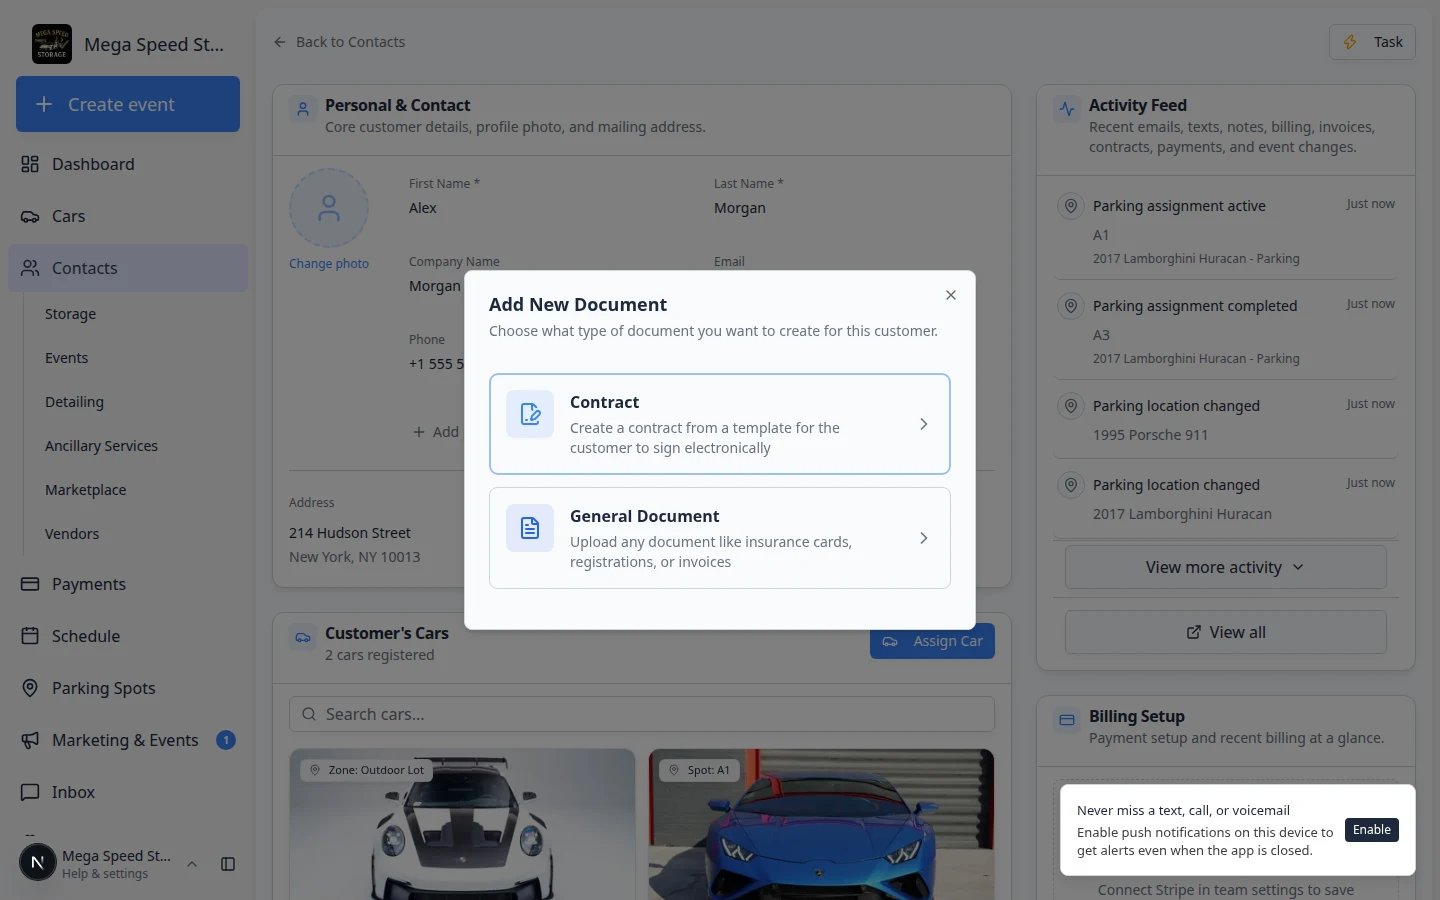 *Click **Contract** when you need a signed agreement—not a simple file upload.*
## Step 3: Pick the contract template
In the **Select Contract Template** window, click the template that matches this customer. Example: **Car Storage Agreement**.
You may see small badges such as **Vehicle**, **Payment**, or **Team signs last**. These tell you what the template needs before you can send.
**Expected result:** The app creates a draft and opens the **send contract** page in a new full-screen view.
*Click **Contract** when you need a signed agreement—not a simple file upload.*
## Step 3: Pick the contract template
In the **Select Contract Template** window, click the template that matches this customer. Example: **Car Storage Agreement**.
You may see small badges such as **Vehicle**, **Payment**, or **Team signs last**. These tell you what the template needs before you can send.
**Expected result:** The app creates a draft and opens the **send contract** page in a new full-screen view.
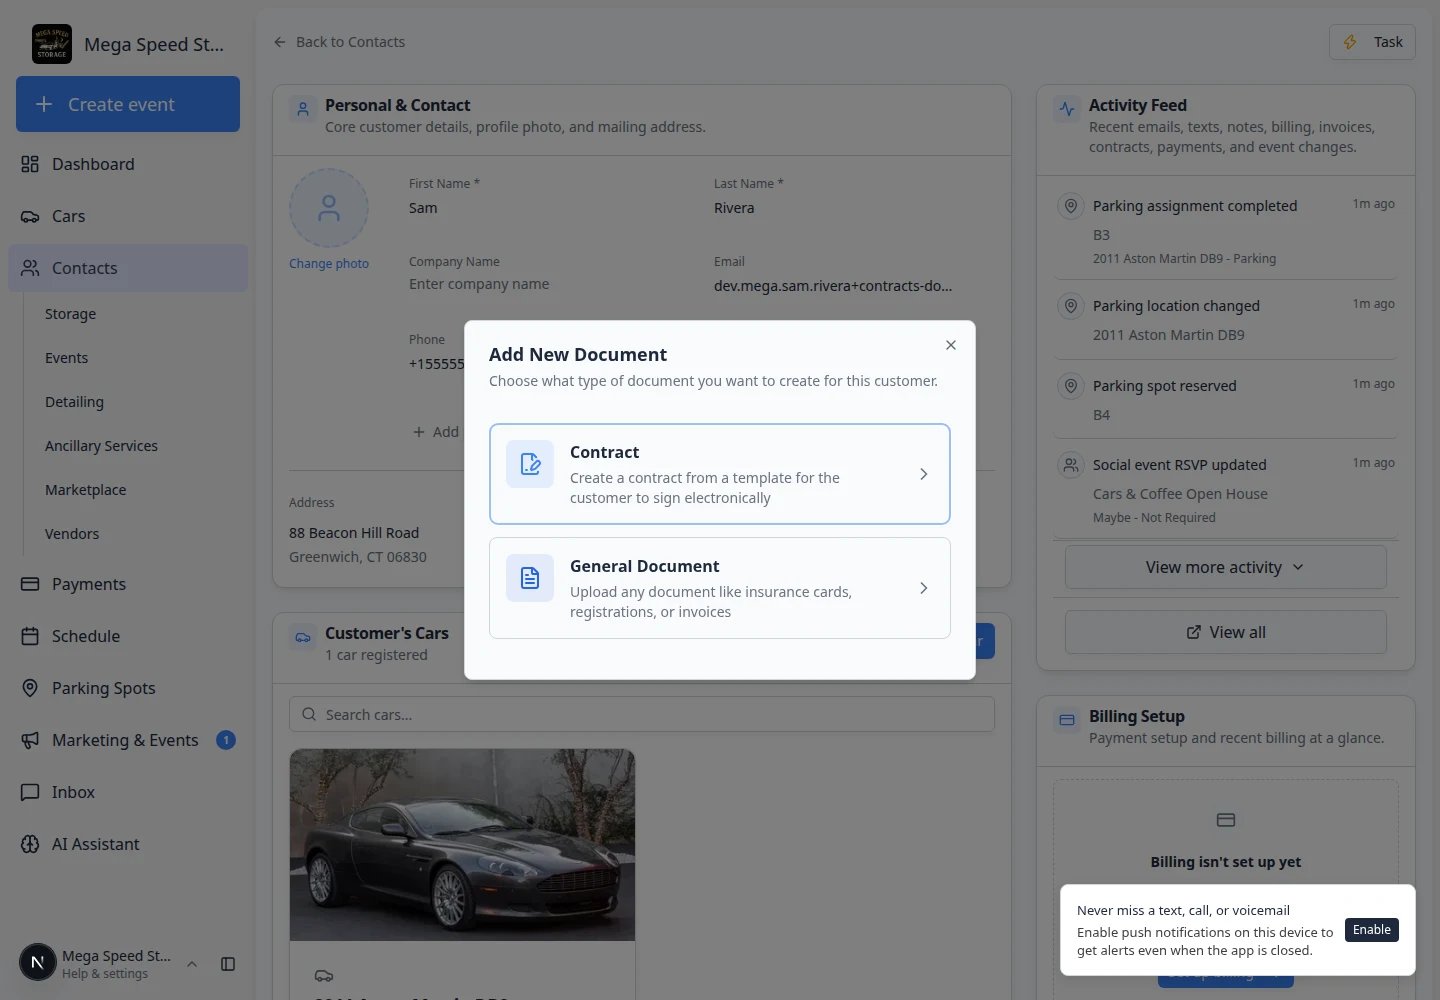 *After you pick a template, the app opens the send wizard. You set the vehicle, fields, and send options on that page—not in this small window.*
**Why the page changes**
Older versions of the app used several small pop-up windows. Today you land on one **send contract** page with three clear steps at the top: **Contract setup**, **Fill required fields**, and **Review & send**.
## Step 4: Contract setup
The first wizard step confirms who receives the agreement and any billing or notes your template needs.
*After you pick a template, the app opens the send wizard. You set the vehicle, fields, and send options on that page—not in this small window.*
**Why the page changes**
Older versions of the app used several small pop-up windows. Today you land on one **send contract** page with three clear steps at the top: **Contract setup**, **Fill required fields**, and **Review & send**.
## Step 4: Contract setup
The first wizard step confirms who receives the agreement and any billing or notes your template needs.
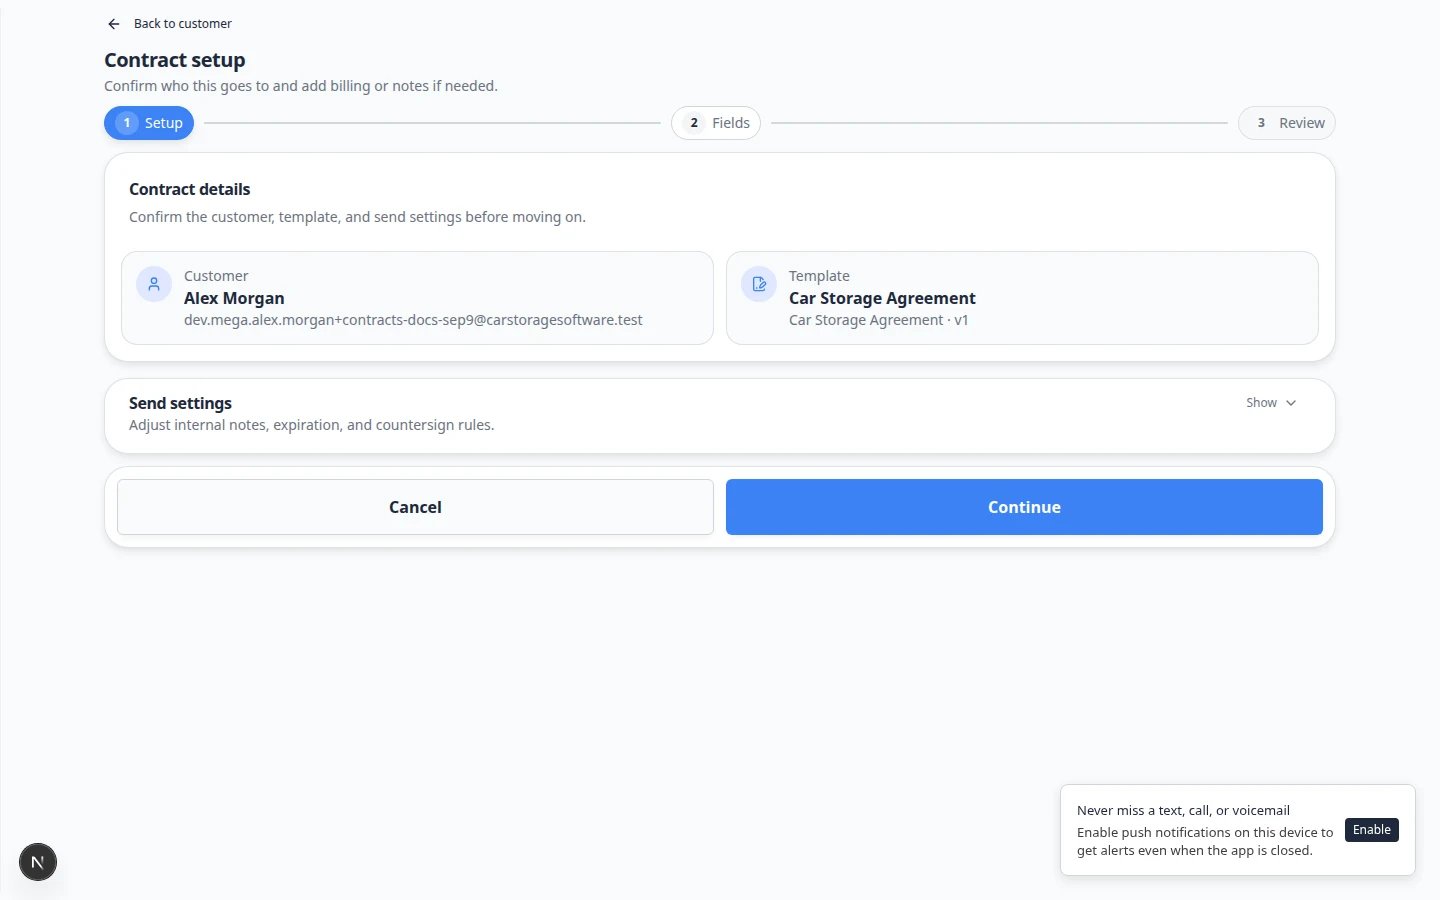 ***Contract setup** is step 1. Confirm the customer, pick the vehicle if required, and click **Continue** when the checklist on the right shows no missing items.*
Under **Send contract**, you should see **Contract setup** and a short description.
Use **Back to customer** (upper-left) if you opened the wrong person.
If the template requires a vehicle, pick the correct car from the list.
**Why this matters:** Year, make, model, and VIN on the PDF come from the car you select here.
Some templates ask for a title, expiration date, payment line, or internal notes. Fill every item marked as required on the checklist panel.
If the template includes a **payment amount** field, choose a **product and price** from your facility's list (for example **Monthly Car Storage**). Without a price, **Continue** stays gray until billing is linked.
If the template uses **Team signs last**, you will also see **Counter-signers**. Pick any team members who may sign after the customer, or leave **Primary team admin**. Any selected person can complete the facility signature.
Click **Continue** at the bottom of the page.
**Expected result:** The wizard moves to **Fill required fields**. Your work saves automatically—you may briefly see a saved message near the top.
## Step 5: Fill required fields
On this step you complete any **team fields** on the PDF preview—fees, dates, or notes your facility fills in before the customer signs.
***Contract setup** is step 1. Confirm the customer, pick the vehicle if required, and click **Continue** when the checklist on the right shows no missing items.*
Under **Send contract**, you should see **Contract setup** and a short description.
Use **Back to customer** (upper-left) if you opened the wrong person.
If the template requires a vehicle, pick the correct car from the list.
**Why this matters:** Year, make, model, and VIN on the PDF come from the car you select here.
Some templates ask for a title, expiration date, payment line, or internal notes. Fill every item marked as required on the checklist panel.
If the template includes a **payment amount** field, choose a **product and price** from your facility's list (for example **Monthly Car Storage**). Without a price, **Continue** stays gray until billing is linked.
If the template uses **Team signs last**, you will also see **Counter-signers**. Pick any team members who may sign after the customer, or leave **Primary team admin**. Any selected person can complete the facility signature.
Click **Continue** at the bottom of the page.
**Expected result:** The wizard moves to **Fill required fields**. Your work saves automatically—you may briefly see a saved message near the top.
## Step 5: Fill required fields
On this step you complete any **team fields** on the PDF preview—fees, dates, or notes your facility fills in before the customer signs.
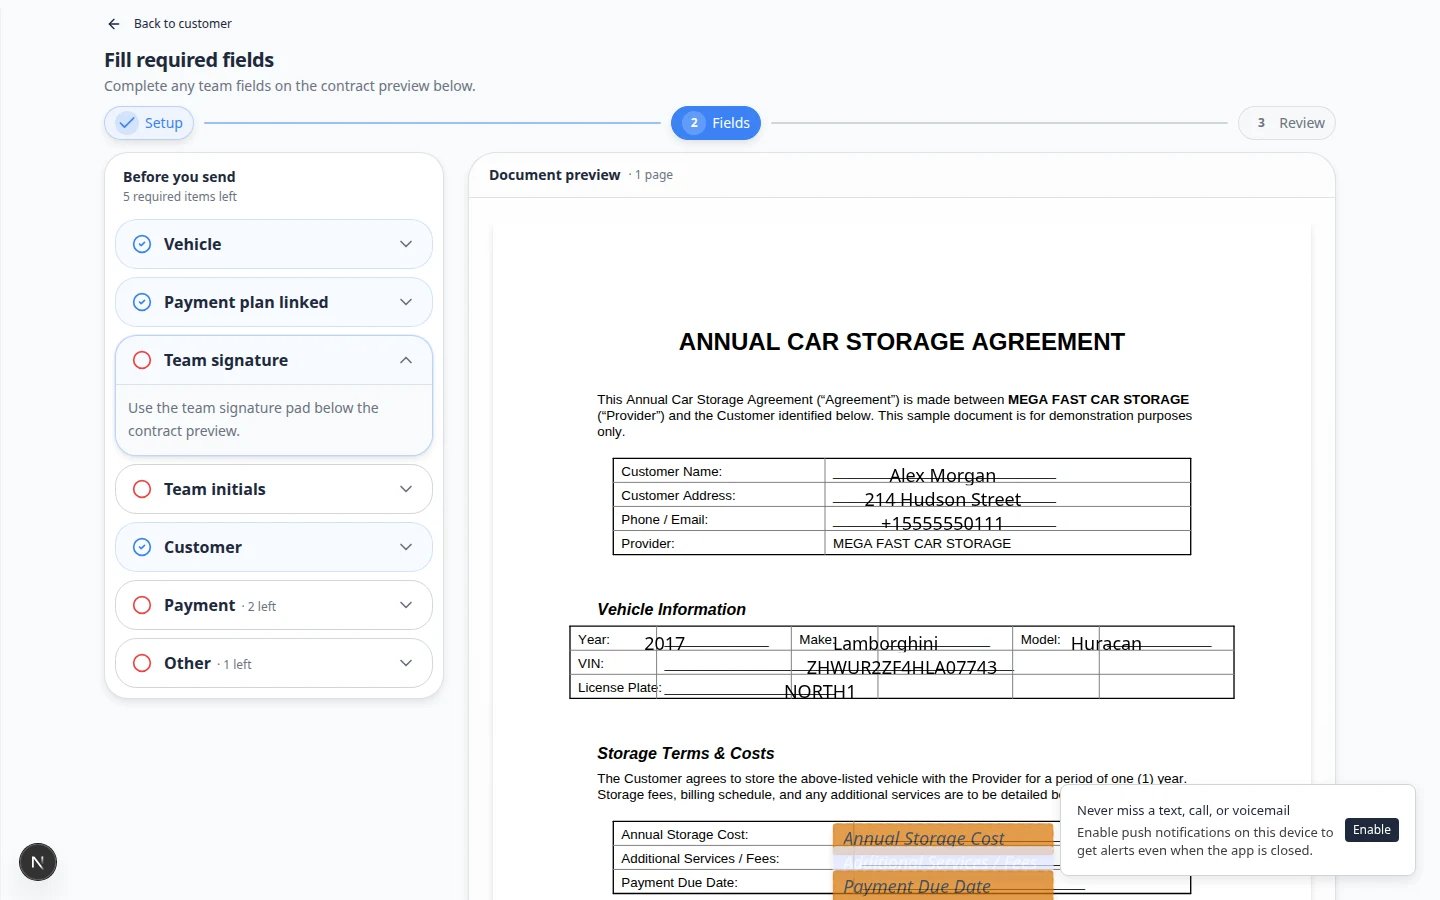 *Click each item in the checklist on the right, or tap a highlighted field on the PDF. Required fields are marked so you know what is left.*
The right panel lists what still needs attention—vehicle info, team signature (if required before send), payment fields, and more.
Click an item to jump to that spot on the PDF.
Click a highlighted box on the PDF and enter the correct value. Use clear, customer-facing wording.
**Expected result:** Checklist items turn complete as you fill them in.
Some templates need a **facility signature before** the customer receives email. If you see **Team signature** on the checklist, draw your signature in the box when prompted.
If your template uses **Team signs last**, you will sign **after** the customer—see [Counter-sign after the customer](/docs/contracts/counter-sign-after-the-customer).
If the template has an **Event Scheduling** field, look for a button such as **Schedule Vehicle Drop Off**.
Click it, pick a day and time, then click **Book event**. After it saves, the button may change to **Change booking**.
**Why this matters:** The customer can finish signing without a second phone call to schedule arrival. Full steps are in [Schedule a service while signing a contract](/docs/contracts/schedule-a-service-while-signing-a-contract).
If you leave it blank and the field allows the customer to book, they will see the same **Schedule …** button on the signing page.
When the checklist is complete, click **Continue**.
**Expected result:** You reach **Review & send**.
**Choose an event type on the template before sending**
If you see **Choose an event type on the template before sending**, the **Event Scheduling** box is on the PDF but no service is selected. Open **Configure** on the template in [Settings > Contracts & Documents](https://www.carstoragesoftware.com/dashboard/settings/contracts-and-documents), double-click the box, and pick **Vehicle Drop Off** (or the matching service).
## Step 6: Review and send
On **Review & send**, confirm the customer name, email, template, vehicle, and total (if payment fields are included).
**Why this matters:** This is your last chance to catch a wrong car or email before the customer sees the agreement.
Click **Send to customer** (or **Send**).
A window titled **Notify the customer?** asks if you want to send the signing email. Choose **Yes** to send. Choose **No** or close the window to cancel without sending.
**Expected result:** After **Yes**, the contract status becomes **Sent**. The customer receives an email with a signing link.
If a manager must review first, use **Back** to fix any step, or leave the page—the draft saves on the customer record with status **Draft**.
Send later by clicking the contract card and finishing the wizard.
*Click each item in the checklist on the right, or tap a highlighted field on the PDF. Required fields are marked so you know what is left.*
The right panel lists what still needs attention—vehicle info, team signature (if required before send), payment fields, and more.
Click an item to jump to that spot on the PDF.
Click a highlighted box on the PDF and enter the correct value. Use clear, customer-facing wording.
**Expected result:** Checklist items turn complete as you fill them in.
Some templates need a **facility signature before** the customer receives email. If you see **Team signature** on the checklist, draw your signature in the box when prompted.
If your template uses **Team signs last**, you will sign **after** the customer—see [Counter-sign after the customer](/docs/contracts/counter-sign-after-the-customer).
If the template has an **Event Scheduling** field, look for a button such as **Schedule Vehicle Drop Off**.
Click it, pick a day and time, then click **Book event**. After it saves, the button may change to **Change booking**.
**Why this matters:** The customer can finish signing without a second phone call to schedule arrival. Full steps are in [Schedule a service while signing a contract](/docs/contracts/schedule-a-service-while-signing-a-contract).
If you leave it blank and the field allows the customer to book, they will see the same **Schedule …** button on the signing page.
When the checklist is complete, click **Continue**.
**Expected result:** You reach **Review & send**.
**Choose an event type on the template before sending**
If you see **Choose an event type on the template before sending**, the **Event Scheduling** box is on the PDF but no service is selected. Open **Configure** on the template in [Settings > Contracts & Documents](https://www.carstoragesoftware.com/dashboard/settings/contracts-and-documents), double-click the box, and pick **Vehicle Drop Off** (or the matching service).
## Step 6: Review and send
On **Review & send**, confirm the customer name, email, template, vehicle, and total (if payment fields are included).
**Why this matters:** This is your last chance to catch a wrong car or email before the customer sees the agreement.
Click **Send to customer** (or **Send**).
A window titled **Notify the customer?** asks if you want to send the signing email. Choose **Yes** to send. Choose **No** or close the window to cancel without sending.
**Expected result:** After **Yes**, the contract status becomes **Sent**. The customer receives an email with a signing link.
If a manager must review first, use **Back** to fix any step, or leave the page—the draft saves on the customer record with status **Draft**.
Send later by clicking the contract card and finishing the wizard.
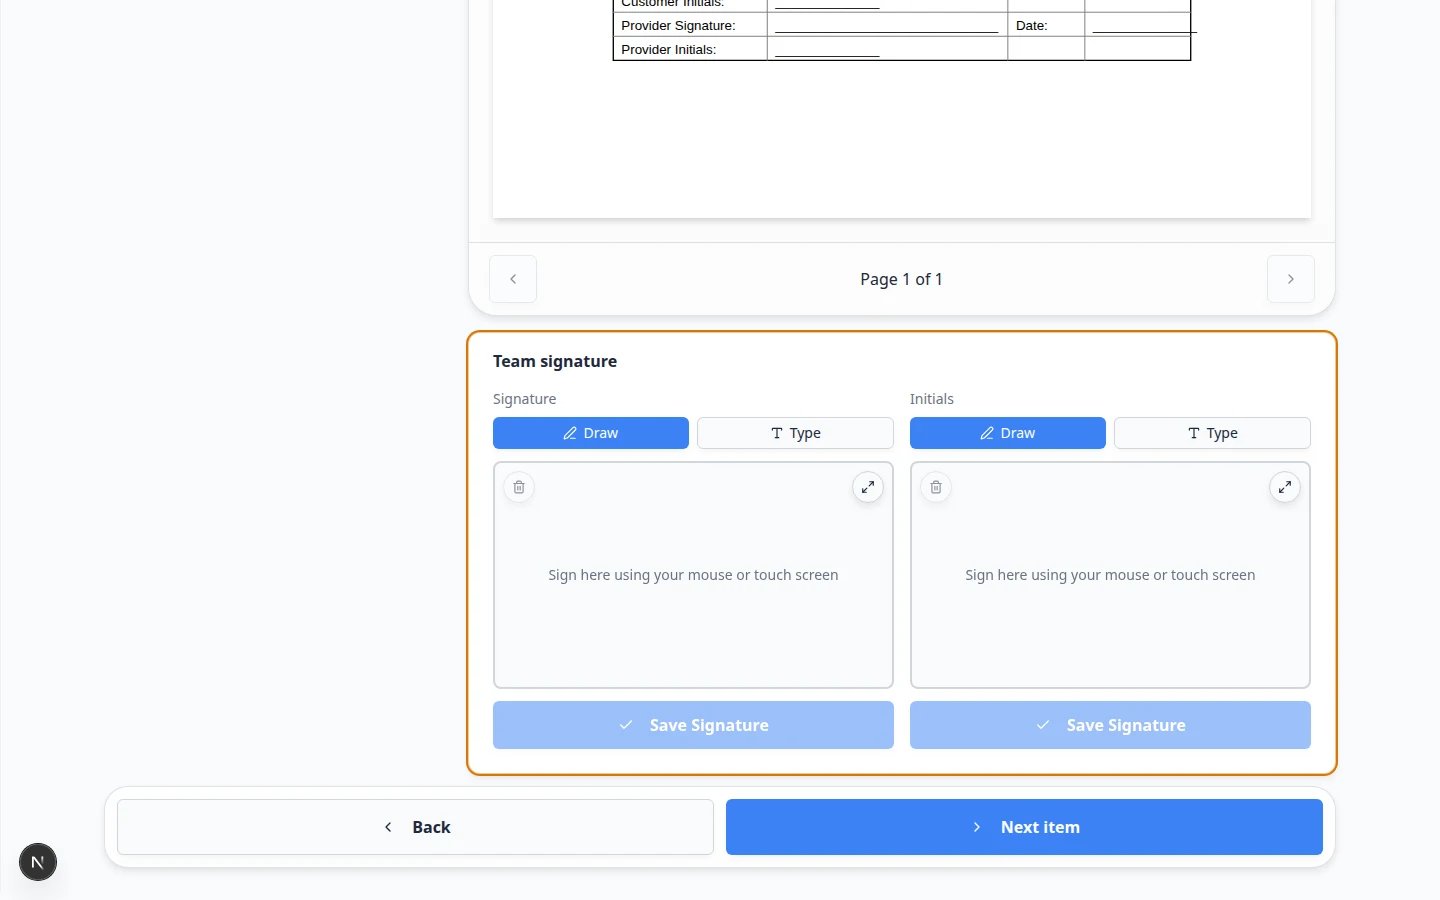 *On **Review & send**, confirm the customer and email, then click **Send to customer**.*
## Step 7: What the customer sees
After you click **Send to customer**, the customer receives an email with a link. They open it on a phone or computer—no app install required.
*On **Review & send**, confirm the customer and email, then click **Send to customer**.*
## Step 7: What the customer sees
After you click **Send to customer**, the customer receives an email with a link. They open it on a phone or computer—no app install required.
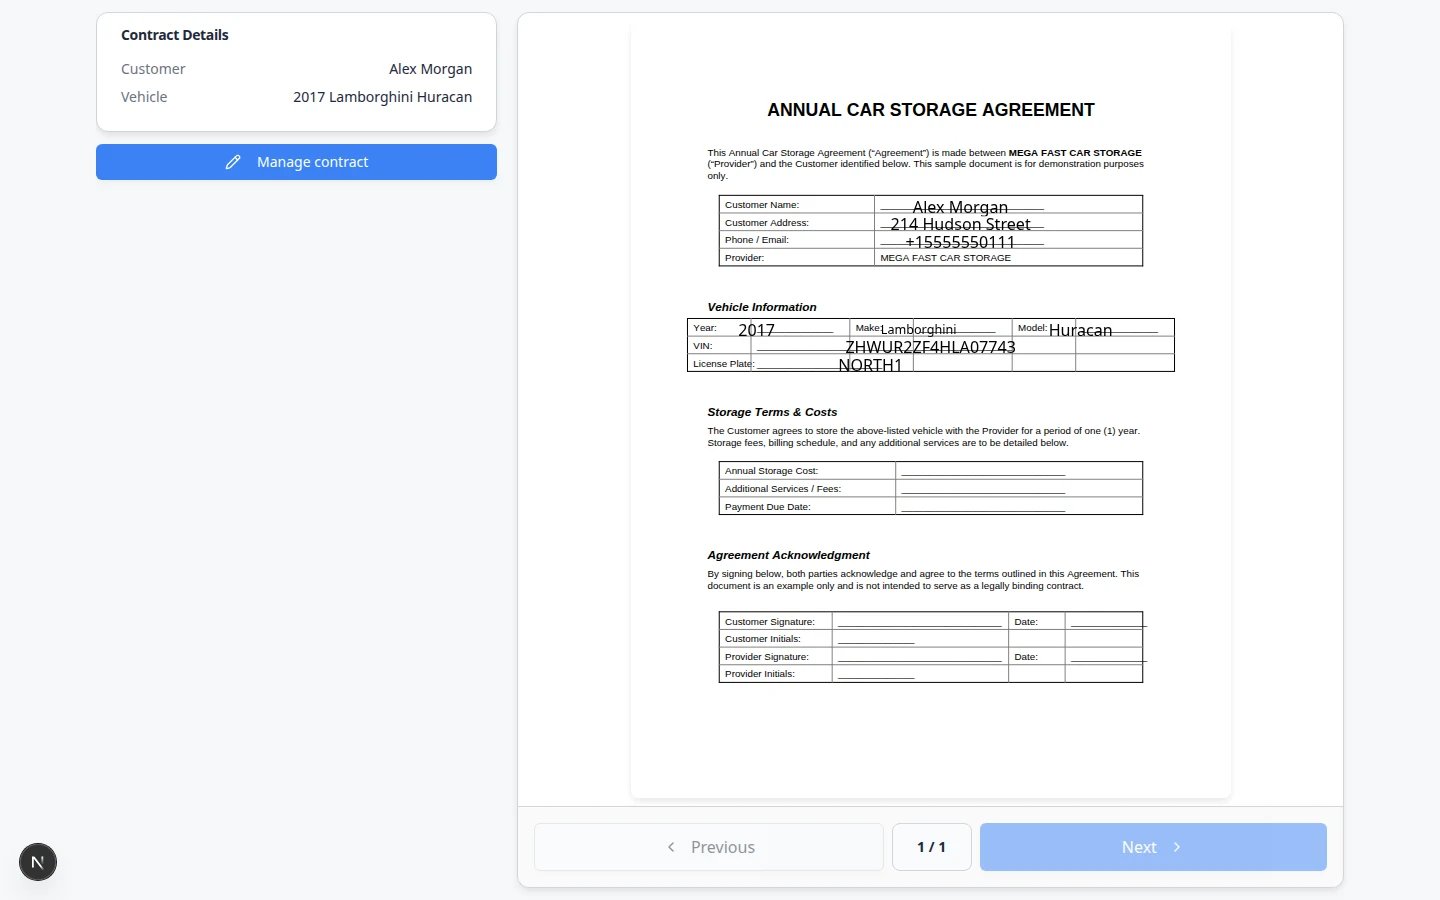 *Customers sign in the browser. The **Sign Contract** button turns on after they view every page, complete required fields, and add their signature.*
Say: "You will get an email from us with a link to sign your storage agreement. Open it on your phone or computer. The button may stay gray until you scroll through every page and sign where asked."
**Why this matters:** Customers who expect an attachment or a separate app often call support before they find the signing link.
On **Review & send**, click **Preview signing page** if you want to see the same screen the customer will see—helpful when coaching someone on the phone.
**Expected result:** After signing, the contract status on the customer record updates. If your template uses **Team signs last**, status may show **Awaiting team signature** until a staff member counter-signs.
## Step 8: Confirm on the customer record
Return to **Documents & Contracts** on the customer record.
*Customers sign in the browser. The **Sign Contract** button turns on after they view every page, complete required fields, and add their signature.*
Say: "You will get an email from us with a link to sign your storage agreement. Open it on your phone or computer. The button may stay gray until you scroll through every page and sign where asked."
**Why this matters:** Customers who expect an attachment or a separate app often call support before they find the signing link.
On **Review & send**, click **Preview signing page** if you want to see the same screen the customer will see—helpful when coaching someone on the phone.
**Expected result:** After signing, the contract status on the customer record updates. If your template uses **Team signs last**, status may show **Awaiting team signature** until a staff member counter-signs.
## Step 8: Confirm on the customer record
Return to **Documents & Contracts** on the customer record.
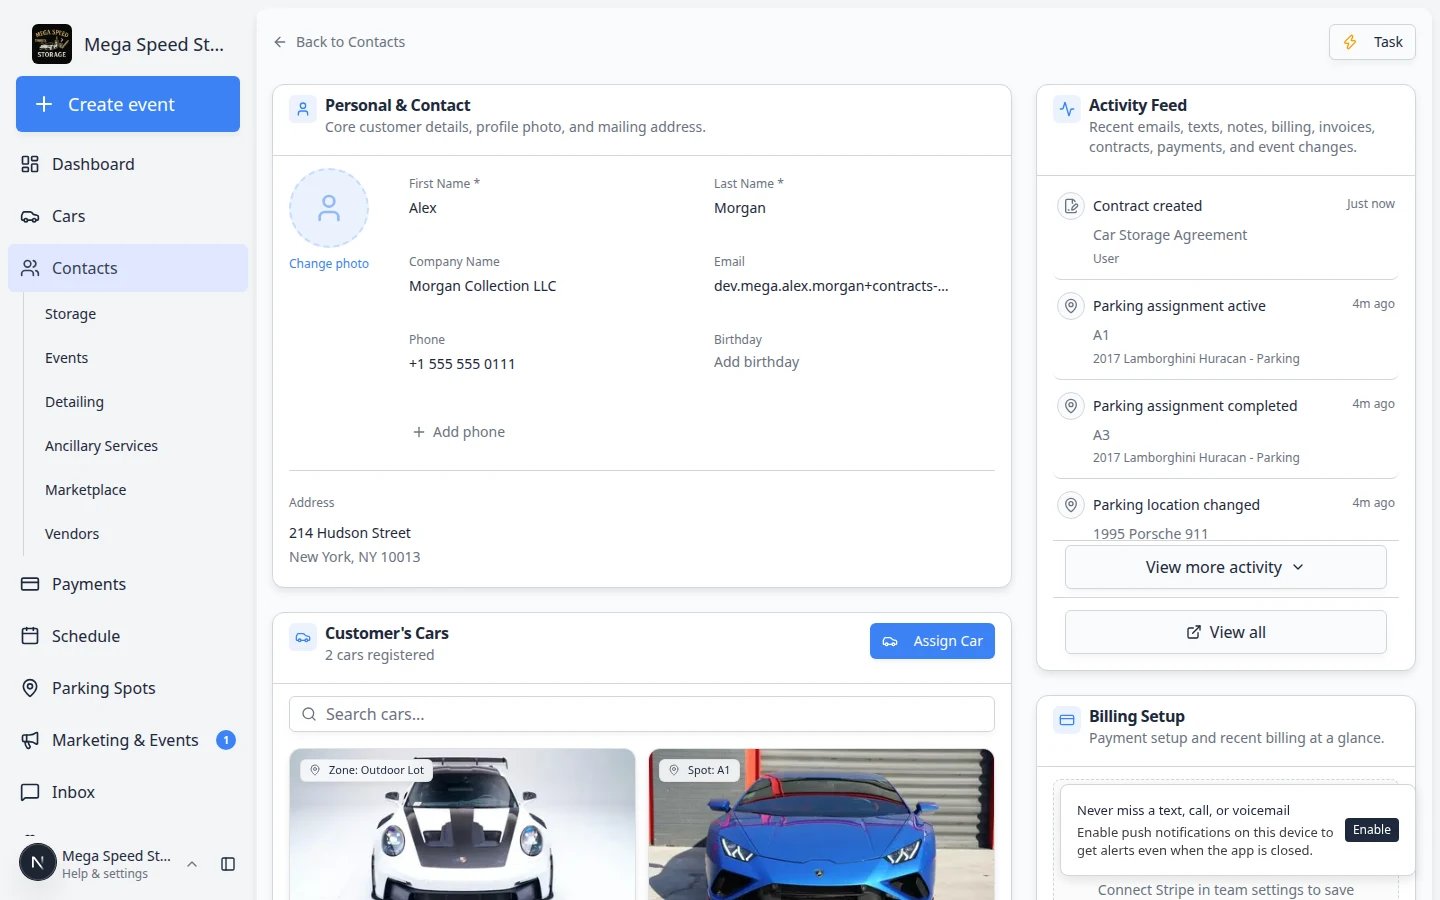 *Each agreement appears as a card with a status badge. Click a card to open the contract page—not a small preview window.*
Common statuses:
**Draft** — created but not emailed.
**Sent** — signing email went out.
**Viewed** — customer opened the contract.
**Awaiting team signature** — customer finished; your facility must counter-sign (see [Counter-sign after the customer](/docs/contracts/counter-sign-after-the-customer)).
**Signed** / **Completed** — everyone who must sign has finished.
**Cancelled** — signing stopped before completion.
For downloads, resends, and amendments, see [Review signed contracts and document history](/docs/contracts/review-signed-contracts-and-documents).
## Resend the signing email
On the customer record, click the **Sent** or **Viewed** contract card.
**Expected result:** The contract status page opens with progress steps and action buttons.
Click **Resend email** (mail icon) near the top of the status page.
When **Notify the customer?** appears, choose **Yes** to resend. Choose **No** or close the window to cancel without sending.
**Expected result:** The customer receives another message with the signing link.
Ask them to check **spam** or **junk** if nothing arrives within a few minutes.
*Each agreement appears as a card with a status badge. Click a card to open the contract page—not a small preview window.*
Common statuses:
**Draft** — created but not emailed.
**Sent** — signing email went out.
**Viewed** — customer opened the contract.
**Awaiting team signature** — customer finished; your facility must counter-sign (see [Counter-sign after the customer](/docs/contracts/counter-sign-after-the-customer)).
**Signed** / **Completed** — everyone who must sign has finished.
**Cancelled** — signing stopped before completion.
For downloads, resends, and amendments, see [Review signed contracts and document history](/docs/contracts/review-signed-contracts-and-documents).
## Resend the signing email
On the customer record, click the **Sent** or **Viewed** contract card.
**Expected result:** The contract status page opens with progress steps and action buttons.
Click **Resend email** (mail icon) near the top of the status page.
When **Notify the customer?** appears, choose **Yes** to resend. Choose **No** or close the window to cancel without sending.
**Expected result:** The customer receives another message with the signing link.
Ask them to check **spam** or **junk** if nothing arrives within a few minutes.
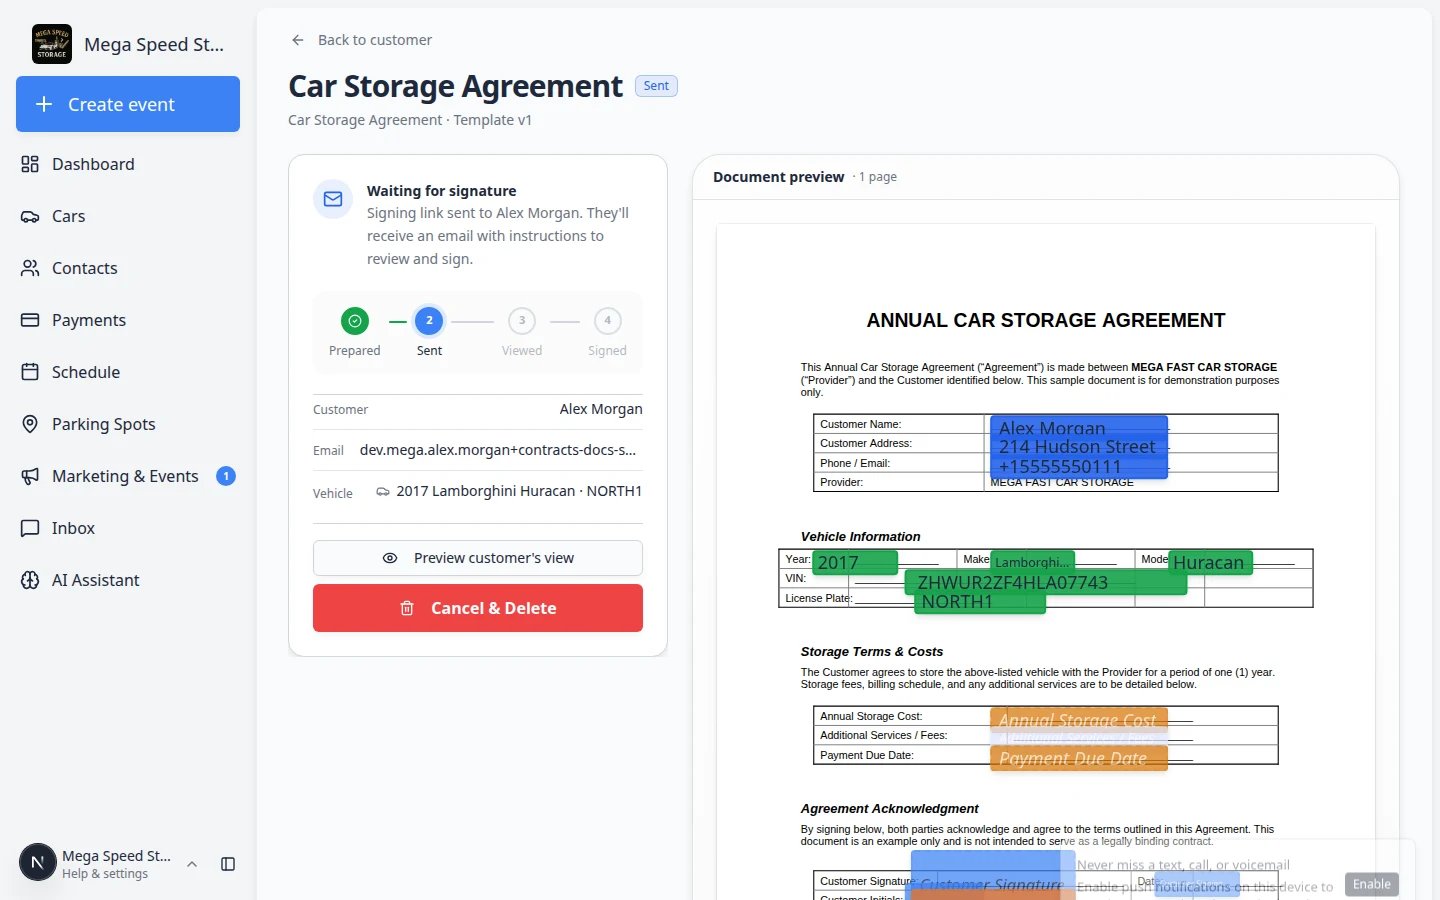 *Open a contract card to see status, resend email, download PDF, or cancel an unsigned request.*
**Check the email first**
Before resending, confirm the email on the customer record. Resending to the wrong address will not help the customer sign.
## Cancel a contract before it is signed
Use **Cancel contract** when the customer should no longer sign **that** request—for example wrong template, wrong car, or wrong email.
Click the **Draft**, **Sent**, or **Viewed** contract in **Documents & Contracts**.
On the contract status page, click **Cancel contract**. Read the warning, then confirm.
**Expected result:** Status changes to **Cancelled**. The customer cannot finish signing that link.
Cancelled contracts stay visible for history, but the customer cannot sign them. Create a new contract if they still need a valid agreement.
## What success looks like
* The contract appears in **Documents & Contracts**.
* The customer can open the signing link from email.
* Status moves from **Sent** to **Viewed** to **Completed** (or **Awaiting team signature** when your team signs last).
* Your team can download the signed PDF after completion.
## Troubleshooting
**Continue or Send is grayed out**
Open the checklist on the right side of the send page. Every required item must be complete—including vehicle, team fields, and team signature when the template requires it before send.
**The customer did not receive the email**
Check the email on the customer record, open the contract card, and click **Resend email**. Ask the customer to check spam.
**Sign Contract stays grayed out (customer side)**
The customer may need to view all pages, complete required fields, add a signature, or allow location before the button activates.
**Wrong vehicle on the agreement**
Cancel the unsigned contract, fix the car on the customer record, and create a new contract. Do not ask the customer to sign incorrect vehicle information.
**Continue is grayed out in the composer**
Open the checklist on the left and finish every required item—title, vehicle, team fields, or team signature—before moving to the next step.
## What to do next
After the customer signs, use [Review signed contracts and document history](/docs/contracts/review-signed-contracts-and-documents) to download the PDF.
If your template uses **Team signs last**, continue with [Counter-sign after the customer](/docs/contracts/counter-sign-after-the-customer).
If they booked a visit while signing, confirm the time on [Schedule](https://www.carstoragesoftware.com/dashboard/schedule).
## Related topics
- [Contracts overview](/docs/contracts/overview.md)
- [Send contracts to many customers at once](/docs/contracts/send-contracts-to-many-customers-at-once.md)
- [Buy a ready-made contract template](/docs/contracts/buy-a-ready-made-contract-template.md)
- [Create a contract template](/docs/contracts/create-a-contract-template.md)
- [Send multiple contracts in one signing link](/docs/contracts/send-multiple-contracts-in-one-signing-link.md)
This documentation is built and hosted on [Mintlify](https://mintlify.com), a developer documentation platform.
*Open a contract card to see status, resend email, download PDF, or cancel an unsigned request.*
**Check the email first**
Before resending, confirm the email on the customer record. Resending to the wrong address will not help the customer sign.
## Cancel a contract before it is signed
Use **Cancel contract** when the customer should no longer sign **that** request—for example wrong template, wrong car, or wrong email.
Click the **Draft**, **Sent**, or **Viewed** contract in **Documents & Contracts**.
On the contract status page, click **Cancel contract**. Read the warning, then confirm.
**Expected result:** Status changes to **Cancelled**. The customer cannot finish signing that link.
Cancelled contracts stay visible for history, but the customer cannot sign them. Create a new contract if they still need a valid agreement.
## What success looks like
* The contract appears in **Documents & Contracts**.
* The customer can open the signing link from email.
* Status moves from **Sent** to **Viewed** to **Completed** (or **Awaiting team signature** when your team signs last).
* Your team can download the signed PDF after completion.
## Troubleshooting
**Continue or Send is grayed out**
Open the checklist on the right side of the send page. Every required item must be complete—including vehicle, team fields, and team signature when the template requires it before send.
**The customer did not receive the email**
Check the email on the customer record, open the contract card, and click **Resend email**. Ask the customer to check spam.
**Sign Contract stays grayed out (customer side)**
The customer may need to view all pages, complete required fields, add a signature, or allow location before the button activates.
**Wrong vehicle on the agreement**
Cancel the unsigned contract, fix the car on the customer record, and create a new contract. Do not ask the customer to sign incorrect vehicle information.
**Continue is grayed out in the composer**
Open the checklist on the left and finish every required item—title, vehicle, team fields, or team signature—before moving to the next step.
## What to do next
After the customer signs, use [Review signed contracts and document history](/docs/contracts/review-signed-contracts-and-documents) to download the PDF.
If your template uses **Team signs last**, continue with [Counter-sign after the customer](/docs/contracts/counter-sign-after-the-customer).
If they booked a visit while signing, confirm the time on [Schedule](https://www.carstoragesoftware.com/dashboard/schedule).
## Related topics
- [Contracts overview](/docs/contracts/overview.md)
- [Send contracts to many customers at once](/docs/contracts/send-contracts-to-many-customers-at-once.md)
- [Buy a ready-made contract template](/docs/contracts/buy-a-ready-made-contract-template.md)
- [Create a contract template](/docs/contracts/create-a-contract-template.md)
- [Send multiple contracts in one signing link](/docs/contracts/send-multiple-contracts-in-one-signing-link.md)
This documentation is built and hosted on [Mintlify](https://mintlify.com), a developer documentation platform.