> ## Documentation Index
> Fetch the complete documentation index at: https://www.carstoragesoftware.com/docs/llms.txt
> Use this file to discover all available pages before exploring further.
# Upload a document for a customer
> Add insurance cards, registration, titles, and other files to a customer record when the customer emails them or brings paper to the front desk.
## What you will accomplish
You will save a file on the correct customer record with the right label—such as **Insurance** or **Vehicle Registration**—so your team can find it later without searching email or shared folders.
This guide is for **staff uploads** from the customer record. When customers upload files themselves in the portal, they use the same document types you set up in [Configure document requirements](/docs/contracts/configure-document-requirements).
## When to use this guide
* A customer emails a photo of an insurance card and you need it on their record today.
* Someone drops off registration paperwork at the front desk.
* You are finishing onboarding and the customer cannot use the portal yet.
* You need a scanned copy on file before approving storage or releasing a vehicle.
**Contract vs upload**
Use **Contract** when the customer must **sign** a PDF agreement. Use **General Document** when they only need to **provide a file** (insurance, registration, license). See [Contracts overview](/docs/contracts/overview).
## Before you start
* The customer exists in [Contacts](https://www.carstoragesoftware.com/dashboard/contacts). Search first—do not create a duplicate record.
* You know which document type fits the file (create types first if needed—see [Configure document requirements](/docs/contracts/configure-document-requirements)).
* You have the file on your computer or phone. Supported formats include PDF, Word, Excel, text, CSV, and common image types. Files can be up to **50 MB**.
* If the file is for one vehicle, know which car on the customer record it belongs to.
## Open the customer record
1. In the left sidebar, click **Contacts**, or go to [Contacts](https://www.carstoragesoftware.com/dashboard/contacts).
2. Search by name, email, phone, or company.
3. Click the correct customer to open their page.
**Expected result:** You see the customer’s name, contact details, vehicles, and other sections.
**Double-check the name**
Families often have more than one customer record. Confirm you opened the right person before you upload a file.
## Find Documents & Contracts
Scroll down until you see the card titled **Documents & Contracts**.
This section holds **uploaded files** and **signed agreements** in one place. Near the top you may see a count such as **0 documents, 0 contracts** or **1 document, 1 contract** after you add files.
You can use the search box (**Search documents and contracts...**) when the list grows long.
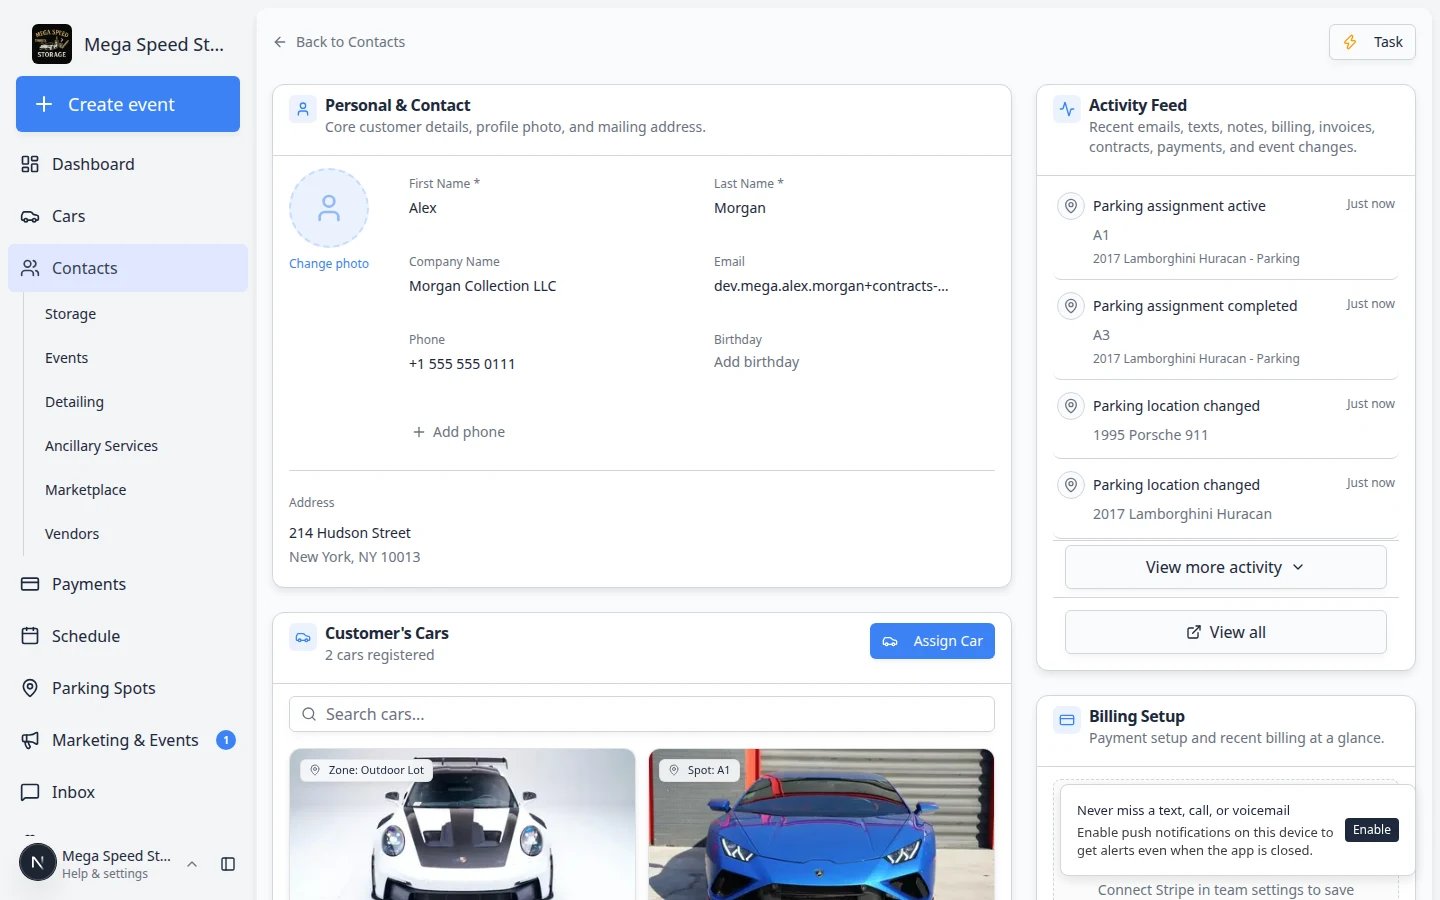 *When nothing is on file yet, the section shows **No documents or contracts** and a blue **New Document** button.*
## Start the upload
You can start an upload in two ways:
**Option A — Click New Document**
1. Click **New Document** in the top-right of the **Documents & Contracts** card (or in the empty-state area).
2. In the **Add New Document** window, click **General Document**—the option for files like insurance cards and registration.
**Option B — Drag and drop**
1. Save the file on your computer (for example from an email attachment).
2. Drag the file onto the **Add document** tile in the **Documents & Contracts** grid.
The upload window opens with your file already attached.
*When nothing is on file yet, the section shows **No documents or contracts** and a blue **New Document** button.*
## Start the upload
You can start an upload in two ways:
**Option A — Click New Document**
1. Click **New Document** in the top-right of the **Documents & Contracts** card (or in the empty-state area).
2. In the **Add New Document** window, click **General Document**—the option for files like insurance cards and registration.
**Option B — Drag and drop**
1. Save the file on your computer (for example from an email attachment).
2. Drag the file onto the **Add document** tile in the **Documents & Contracts** grid.
The upload window opens with your file already attached.
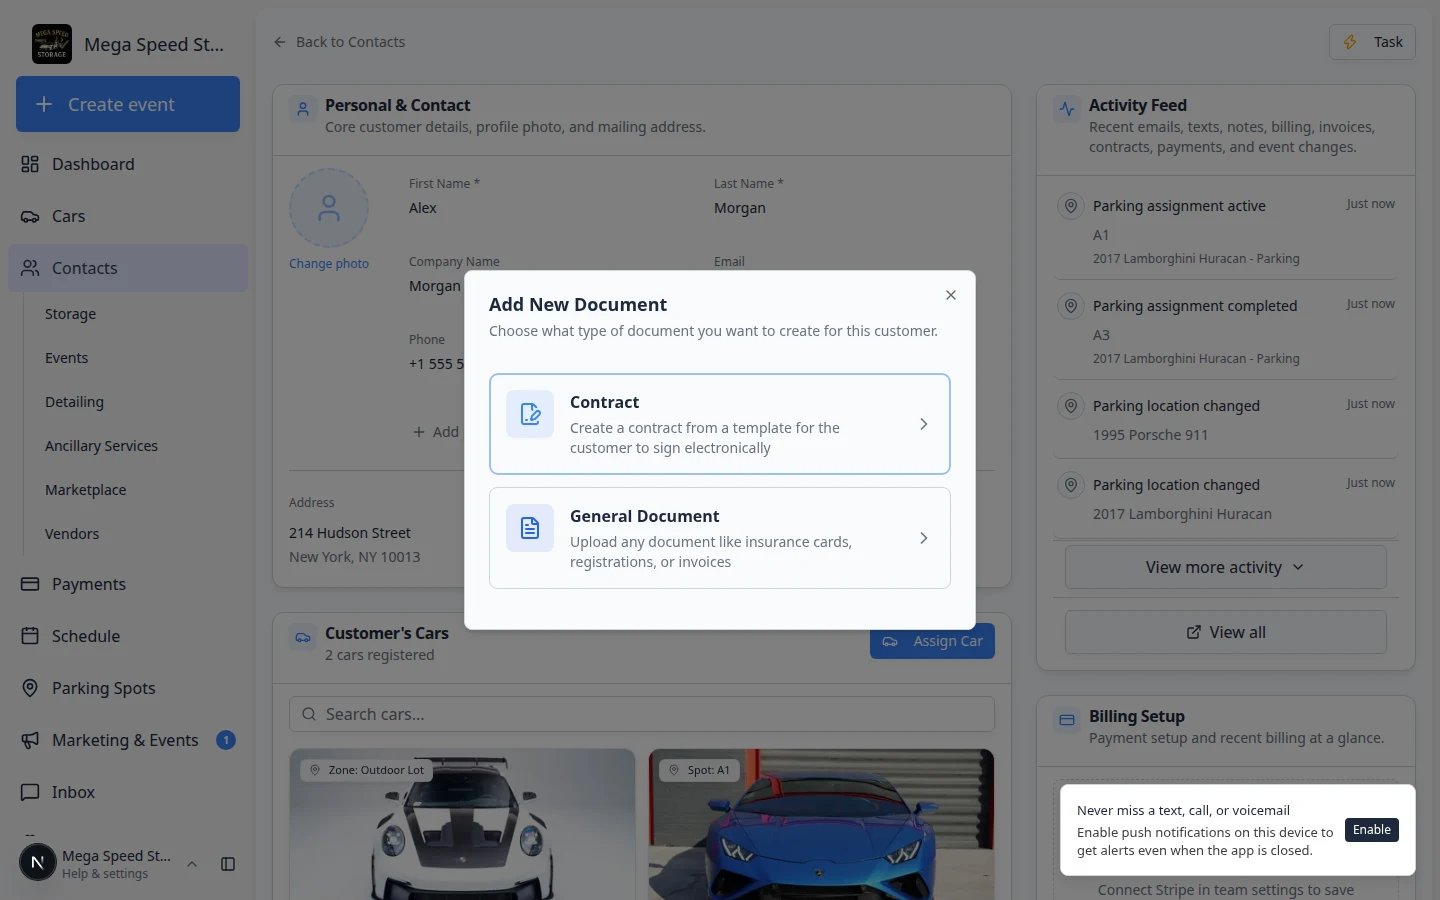 *Click **General Document** when you are uploading a file—not sending something to sign.*
**Expected result:** After you choose **General Document**, you see **Select Document Type** (unless you used drag-and-drop, which may skip straight to the upload form).
## Choose a document type
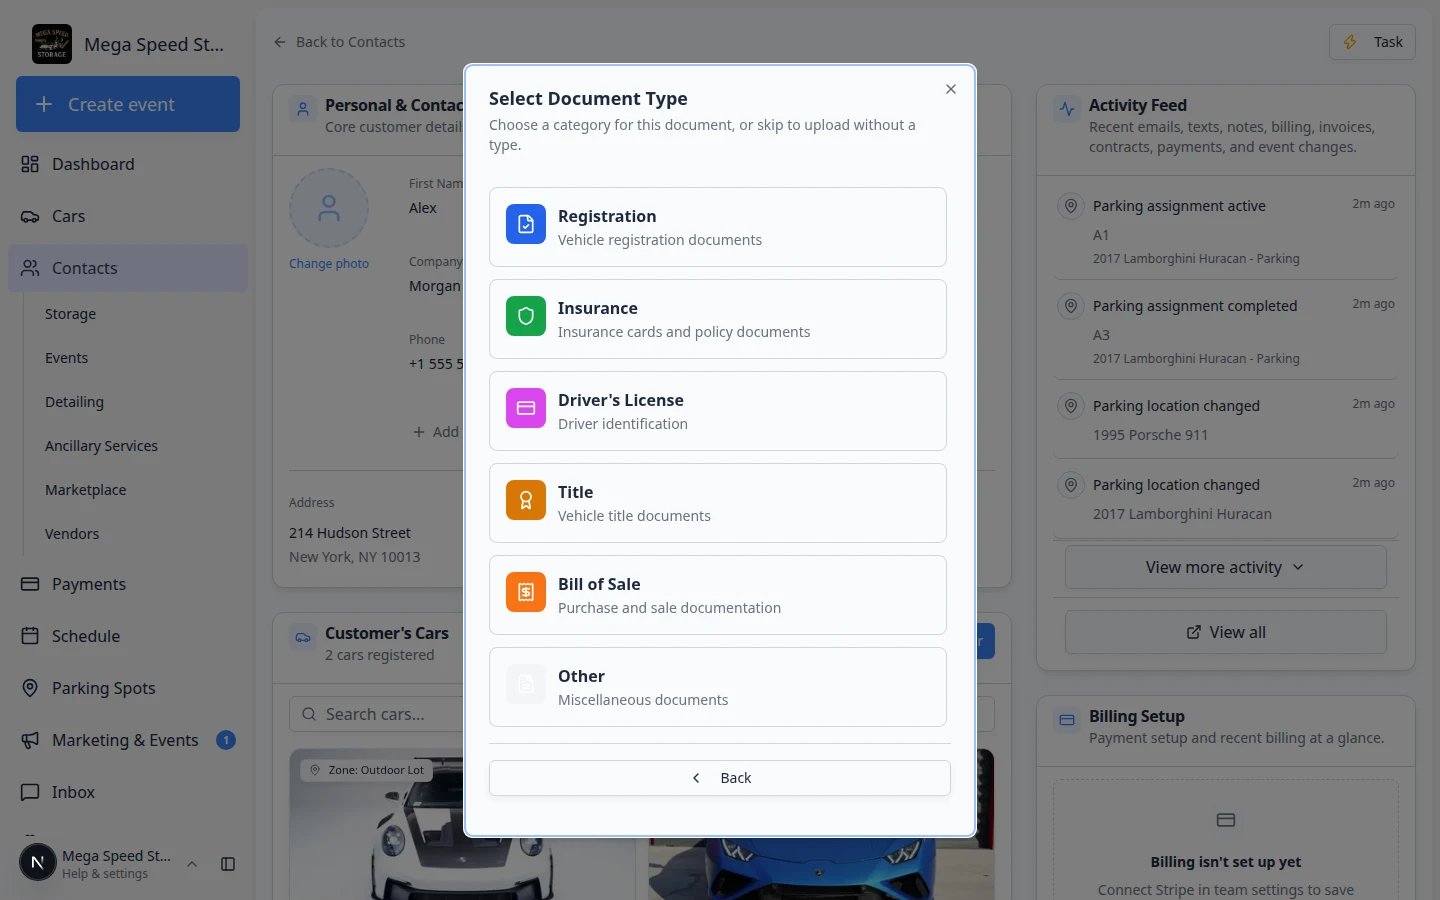
The **Select Document Type** window asks how your team should label this file.
Click the type that fits the file—for example **Insurance** for an insurance card photo or **Registration** for a registration document.
**Why this matters:** Clear labels help your team find files during renewals, audits, and move-out checks.
Choose **Skip - No Type** only when you need the file saved immediately and will fix the label later.
**Expected result:** The **Upload Document** form opens.
Click **Back** at the bottom if you meant to send a contract instead of upload a file.
*Click **General Document** when you are uploading a file—not sending something to sign.*
**Expected result:** After you choose **General Document**, you see **Select Document Type** (unless you used drag-and-drop, which may skip straight to the upload form).
## Choose a document type
The **Select Document Type** window asks how your team should label this file.
Click the type that fits the file—for example **Insurance** for an insurance card photo or **Registration** for a registration document.
**Why this matters:** Clear labels help your team find files during renewals, audits, and move-out checks.
Choose **Skip - No Type** only when you need the file saved immediately and will fix the label later.
**Expected result:** The **Upload Document** form opens.
Click **Back** at the bottom if you meant to send a contract instead of upload a file.
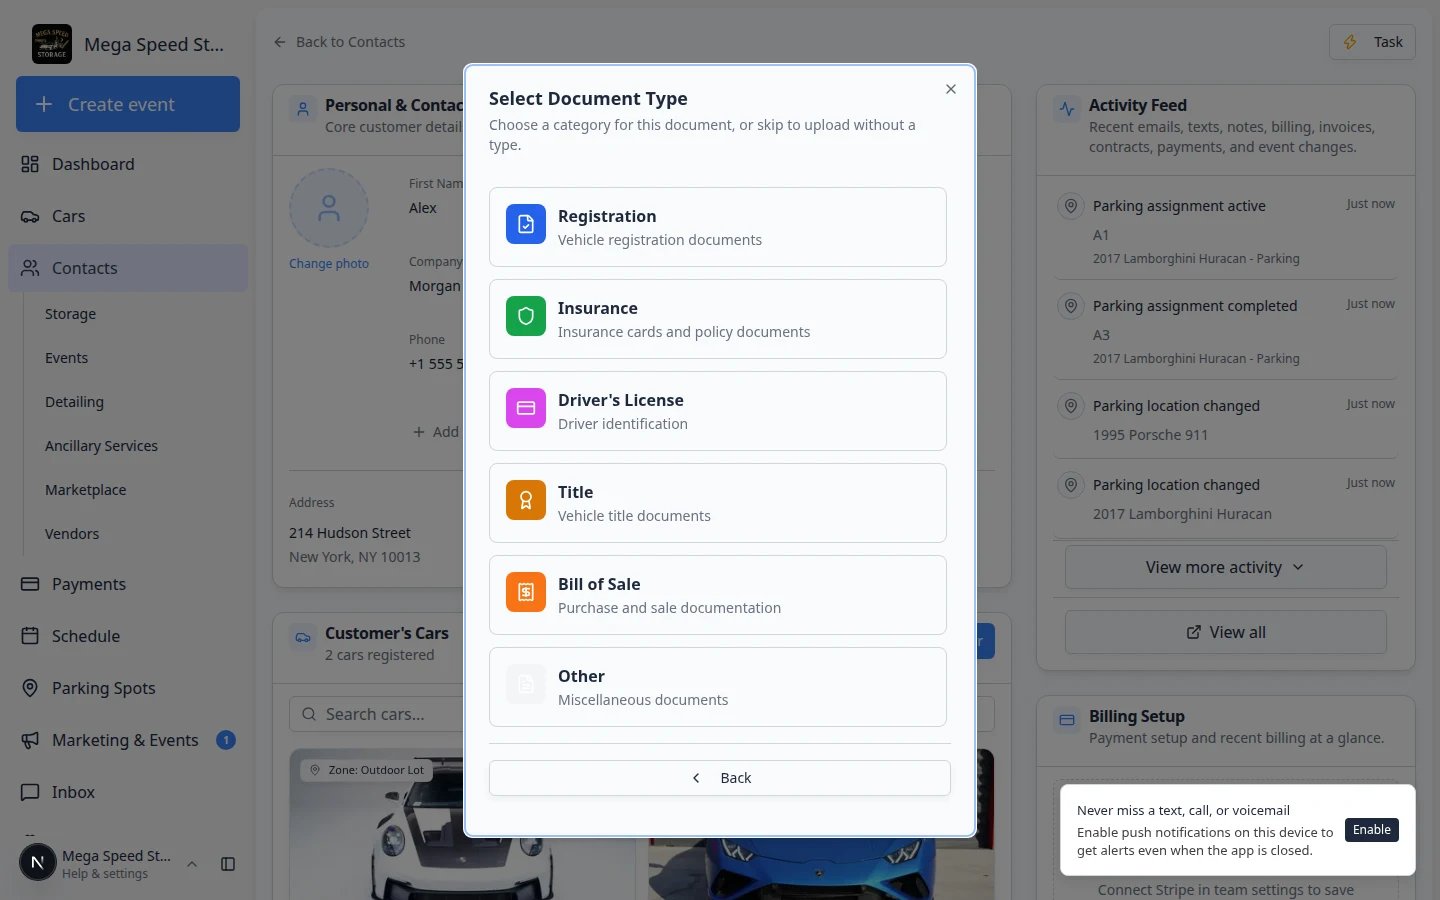 *Choose a document type so insurance and registration stay organized—or **Skip - No Type** when you must upload first and label later.*
## Fill in the Upload Document form
Under **Document File**, check that the correct file name appears. If not, click the upload area (**Drag and drop a file here, or click to browse**) and choose the file again.
In **Title**, type a short name your team will recognize. Examples: **Insurance Card — 2027 renewal** or **NY registration — Porsche 911**.
**Why this matters:** The title appears on the document card in **Documents & Contracts** and in search results.
Use **Description** for notes such as **Expires March 2027** or **Covers both stored vehicles**.
**Document Type** should show the category you picked (for example **Insurance**). You can change it here if needed.
If the file applies to one car, open **Associate with Car (Optional)** and select the correct vehicle.
**Expected result:** The file is tied to that car on the customer record.
Some teams use **Tags** to group renewals or audits. Type a short tag and press **Enter**, or click **Add**.
Review the file, title, type, and vehicle link. Click **Upload**.
**Expected result:** The window closes and a new card appears in **Documents & Contracts**.
*Choose a document type so insurance and registration stay organized—or **Skip - No Type** when you must upload first and label later.*
## Fill in the Upload Document form
Under **Document File**, check that the correct file name appears. If not, click the upload area (**Drag and drop a file here, or click to browse**) and choose the file again.
In **Title**, type a short name your team will recognize. Examples: **Insurance Card — 2027 renewal** or **NY registration — Porsche 911**.
**Why this matters:** The title appears on the document card in **Documents & Contracts** and in search results.
Use **Description** for notes such as **Expires March 2027** or **Covers both stored vehicles**.
**Document Type** should show the category you picked (for example **Insurance**). You can change it here if needed.
If the file applies to one car, open **Associate with Car (Optional)** and select the correct vehicle.
**Expected result:** The file is tied to that car on the customer record.
Some teams use **Tags** to group renewals or audits. Type a short tag and press **Enter**, or click **Add**.
Review the file, title, type, and vehicle link. Click **Upload**.
**Expected result:** The window closes and a new card appears in **Documents & Contracts**.
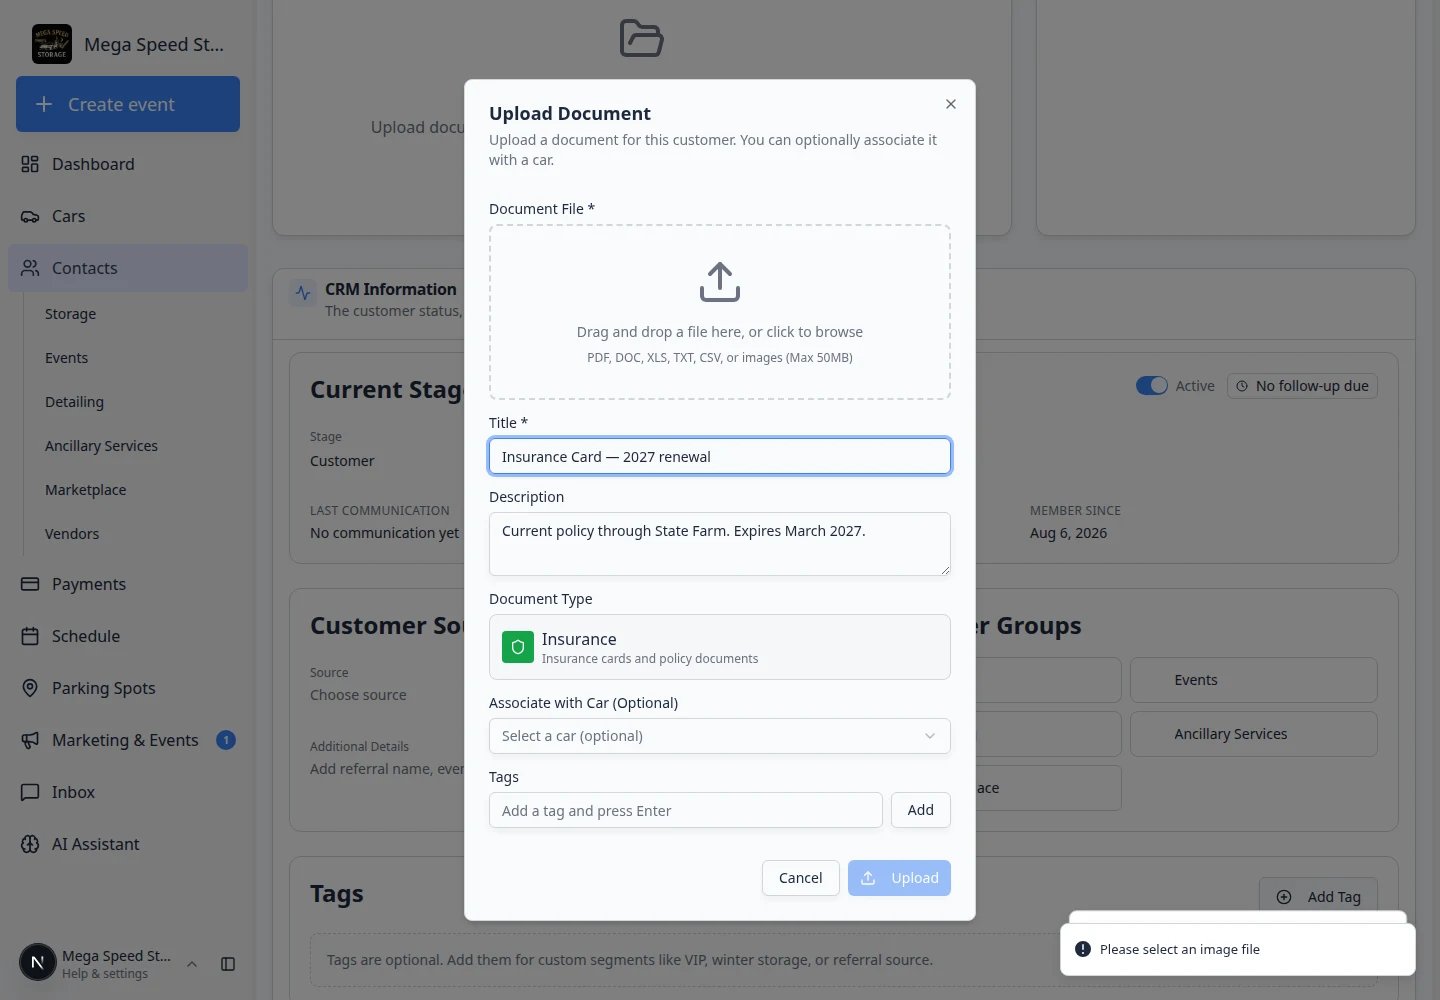 *Fill in **Title** (required), optional **Description**, and link a vehicle when the file applies to one car.*
## Drag and drop (faster for front desk)
If a customer emails a PDF and you already saved it to your computer, you can skip several clicks:
Go to [Contacts](https://www.carstoragesoftware.com/dashboard/contacts) and open the correct customer.
In **Documents & Contracts**, look for a dashed tile labeled **Add document** (or similar wording in the grid).
Drag the file from your desktop or downloads folder onto **Add document**.
**Expected result:** The **Add New Document** window opens with the file already attached. Continue with **General Document** and the document type.
**Drag-and-drop still needs the right type**
Dropping a file does not skip choosing **General Document** or the document type. Take five extra seconds to label insurance and registration correctly.
## Open a file after upload (staff check)
After you save, you can confirm the upload looks correct:
In **Documents & Contracts**, click the new upload card.
Use **Open full view** or **Download** in the preview window to make sure the image is readable and shows the right document (not a blank photo or wrong page).
**Why this matters:** A blurry insurance photo may not count for your records. Catch problems while the customer is still on the phone.
## What success looks like
*Fill in **Title** (required), optional **Description**, and link a vehicle when the file applies to one car.*
## Drag and drop (faster for front desk)
If a customer emails a PDF and you already saved it to your computer, you can skip several clicks:
Go to [Contacts](https://www.carstoragesoftware.com/dashboard/contacts) and open the correct customer.
In **Documents & Contracts**, look for a dashed tile labeled **Add document** (or similar wording in the grid).
Drag the file from your desktop or downloads folder onto **Add document**.
**Expected result:** The **Add New Document** window opens with the file already attached. Continue with **General Document** and the document type.
**Drag-and-drop still needs the right type**
Dropping a file does not skip choosing **General Document** or the document type. Take five extra seconds to label insurance and registration correctly.
## Open a file after upload (staff check)
After you save, you can confirm the upload looks correct:
In **Documents & Contracts**, click the new upload card.
Use **Open full view** or **Download** in the preview window to make sure the image is readable and shows the right document (not a blank photo or wrong page).
**Why this matters:** A blurry insurance photo may not count for your records. Catch problems while the customer is still on the phone.
## What success looks like
 *After you save, the header shows an updated count (for example **1 document, 0 contracts**) and a card for the file you uploaded.*
* The file appears on the customer record under **Documents & Contracts**.
* The **document type** label is correct (Insurance, Registration, and so on).
* The linked vehicle is correct when the file applies to one car.
* Another team member can open or download the file from the same customer page without asking you for a copy.
## Open, download, or remove a file later
Scroll to **Documents & Contracts** on the customer record. Use the search box if needed.
Click the document card to open a preview window.
**Expected result:** You can view the file and use actions such as **Download** or **Delete** (wording may vary).
Use **Delete** when the file was uploaded to the wrong customer or is a duplicate. Ask a manager first if you are unsure—deleted files may not be recoverable.
## Common mistakes to avoid
**Chose Contract instead of General Document**
Insurance and registration are **uploads**, not signed agreements. If you opened the contract flow by mistake, click **Back** or close the window and start again with **General Document**.
**Wrong document type**
Do not pick **Other** when **Insurance** or **Registration** exists. Clear labels make audits and renewals much easier later.
**Wrong customer or vehicle**
Confirm the customer name and linked car before you click **Upload**. Fixing the wrong record takes more time than checking once.
**Missing title**
**Title** is required. Without it, the upload button stays disabled or the form will not save.
## Troubleshooting
**I do not see the document type I need**
An admin can add types in [Settings > Contracts & Documents](https://www.carstoragesoftware.com/dashboard/settings/contracts-and-documents). Turn on **Customer Access** only for types customers should upload in the portal.
**The file will not upload**
Check the file size (max **50 MB**), try a PDF instead of a very large photo, or use a different browser. Slow internet can also cause timeouts on big files.
**The customer should upload this themselves**
Turn on **Customer Access** for that document type and include it in portal onboarding. See [Configure document requirements](/docs/contracts/configure-document-requirements), [Attach contracts to customer workflows](/docs/contracts/attach-contracts-to-workflows), and [Help customers upload documents in the portal](/docs/contracts/help-customers-upload-documents-in-the-portal).
## What to do next
* To collect a **signed** agreement, use [Send a contract for signature](/docs/contracts/send-a-contract-for-signature).
* To confirm what is already on file, use [Review signed contracts and document history](/docs/contracts/review-signed-contracts-and-documents).
* To require uploads during portal setup, see [Attach contracts to customer workflows](/docs/contracts/attach-contracts-to-workflows).
## Related topics
- [Help customers upload documents in the portal](/docs/contracts/help-customers-upload-documents-in-the-portal.md)
- [Configure document requirements](/docs/contracts/configure-document-requirements.md)
- [Review signed contracts and document history](/docs/contracts/review-signed-contracts-and-documents.md)
- [Help customers complete onboarding paperwork](/docs/contracts/help-customers-complete-onboarding-paperwork.md)
- [Track insurance and registration on a vehicle](/docs/cars/track-insurance-and-registration-on-a-vehicle.md)
This documentation is built and hosted on [Mintlify](https://mintlify.com), a developer documentation platform.
*After you save, the header shows an updated count (for example **1 document, 0 contracts**) and a card for the file you uploaded.*
* The file appears on the customer record under **Documents & Contracts**.
* The **document type** label is correct (Insurance, Registration, and so on).
* The linked vehicle is correct when the file applies to one car.
* Another team member can open or download the file from the same customer page without asking you for a copy.
## Open, download, or remove a file later
Scroll to **Documents & Contracts** on the customer record. Use the search box if needed.
Click the document card to open a preview window.
**Expected result:** You can view the file and use actions such as **Download** or **Delete** (wording may vary).
Use **Delete** when the file was uploaded to the wrong customer or is a duplicate. Ask a manager first if you are unsure—deleted files may not be recoverable.
## Common mistakes to avoid
**Chose Contract instead of General Document**
Insurance and registration are **uploads**, not signed agreements. If you opened the contract flow by mistake, click **Back** or close the window and start again with **General Document**.
**Wrong document type**
Do not pick **Other** when **Insurance** or **Registration** exists. Clear labels make audits and renewals much easier later.
**Wrong customer or vehicle**
Confirm the customer name and linked car before you click **Upload**. Fixing the wrong record takes more time than checking once.
**Missing title**
**Title** is required. Without it, the upload button stays disabled or the form will not save.
## Troubleshooting
**I do not see the document type I need**
An admin can add types in [Settings > Contracts & Documents](https://www.carstoragesoftware.com/dashboard/settings/contracts-and-documents). Turn on **Customer Access** only for types customers should upload in the portal.
**The file will not upload**
Check the file size (max **50 MB**), try a PDF instead of a very large photo, or use a different browser. Slow internet can also cause timeouts on big files.
**The customer should upload this themselves**
Turn on **Customer Access** for that document type and include it in portal onboarding. See [Configure document requirements](/docs/contracts/configure-document-requirements), [Attach contracts to customer workflows](/docs/contracts/attach-contracts-to-workflows), and [Help customers upload documents in the portal](/docs/contracts/help-customers-upload-documents-in-the-portal).
## What to do next
* To collect a **signed** agreement, use [Send a contract for signature](/docs/contracts/send-a-contract-for-signature).
* To confirm what is already on file, use [Review signed contracts and document history](/docs/contracts/review-signed-contracts-and-documents).
* To require uploads during portal setup, see [Attach contracts to customer workflows](/docs/contracts/attach-contracts-to-workflows).
## Related topics
- [Help customers upload documents in the portal](/docs/contracts/help-customers-upload-documents-in-the-portal.md)
- [Configure document requirements](/docs/contracts/configure-document-requirements.md)
- [Review signed contracts and document history](/docs/contracts/review-signed-contracts-and-documents.md)
- [Help customers complete onboarding paperwork](/docs/contracts/help-customers-complete-onboarding-paperwork.md)
- [Track insurance and registration on a vehicle](/docs/cars/track-insurance-and-registration-on-a-vehicle.md)
This documentation is built and hosted on [Mintlify](https://mintlify.com), a developer documentation platform.