> ## Documentation Index
> Fetch the complete documentation index at: https://www.carstoragesoftware.com/docs/llms.txt
> Use this file to discover all available pages before exploring further.
# Add hours, map, contacts, and social links to your website
> Show your address, weekly hours, public contacts, and social icons on the facility page so prospects can visit, call, or follow you without calling the office first.
## What you will accomplish
Prospects who open your public facility page will see **where you are**, **when you are open**, **who to contact**, and **which social accounts to follow**. You will fill in that information once in Settings, then add the matching sections to your page.
When this is set up well:
* Visitors can find your street address and a map without asking your staff.
* Weekly hours on the website match the hours your team actually keeps.
* A named person (for example **Member Services Manager**) appears with a work email and phone.
* Social icons appear only after you connect a real account.
## When to use this guide
Use this guide after your [main facility page](/docs/facility-web-pages/configure-the-facility-landing-page) is on and you want it to answer everyday questions such as:
* “Where are you?”
* “What time do you close on Saturday?”
* “Who should I email about storage?”
* “Do you have Instagram?”
**Fill in the facts first**
These sections do not invent information. They display what you already saved in Settings. If you add **Hours of operation** before you set hours, the section stays hidden on the public page.
## Before you start
* **Public Facility Pages** is on and your **Facility slug** is saved. See [Configure the facility landing page](/docs/facility-web-pages/configure-the-facility-landing-page).
* You can edit [Settings > General](https://www.carstoragesoftware.com/dashboard/settings/general).
* You know your street address, weekly hours, and at least one public contact person.
* If you want social icons, you can sign in to those accounts from [Settings > Communications](https://www.carstoragesoftware.com/dashboard/settings/communications).
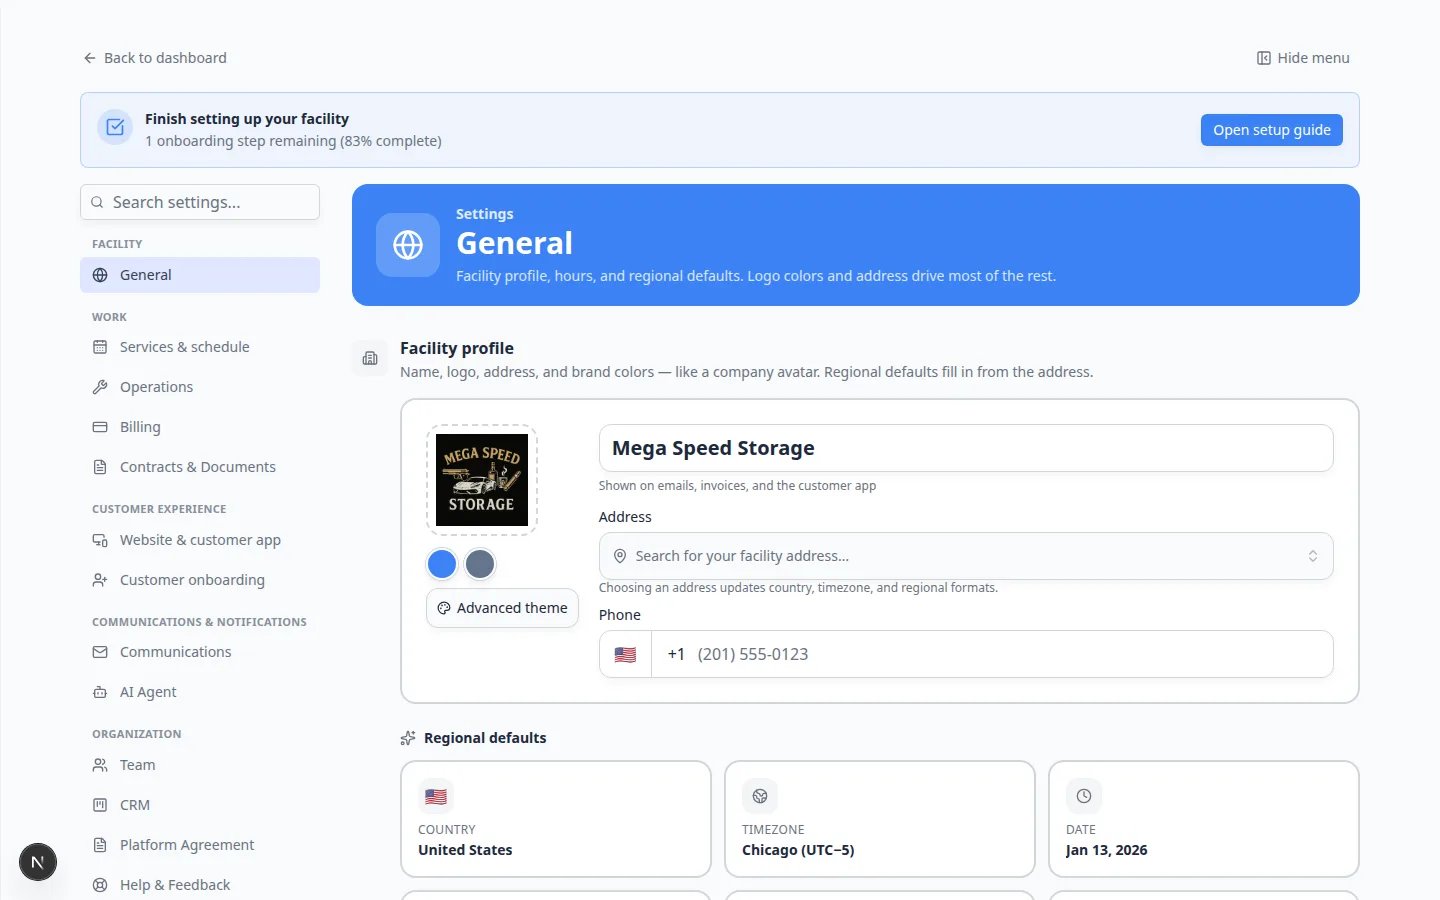 *Your public map uses the address on [Settings > General](https://www.carstoragesoftware.com/dashboard/settings/general) under **Facility profile**. Save a real street address before you add **Location & map**.*
## How the pieces fit together
Each built-in section on your website has a **source** in Settings. You do not type the hours or address inside the page editor.
| Website section | Where you fill in the facts | Hidden on the public page until… |
| - | - | - |
| **Location & map** | [Settings > General](https://www.carstoragesoftware.com/dashboard/settings/general) → **Facility profile** (address and phone) | You add the facility address |
| **Hours of operation** | [Settings > General](https://www.carstoragesoftware.com/dashboard/settings/general) → **Hours of operation** | You set opening hours |
| **Contact people** | [Settings > General](https://www.carstoragesoftware.com/dashboard/settings/general) → **Website contacts** | You add a public contact |
| **Social links** | [Settings > Communications](https://www.carstoragesoftware.com/dashboard/settings/communications) → **Marketing** | You connect a social account |
| **Custom form** | [Marketing & Events > Forms](https://www.carstoragesoftware.com/dashboard/marketing/forms) | You select a published form |
**Why this matters:** One address and one hours list stay correct everywhere. If you move or change Saturday hours, you update Settings once. The website updates with it.
## Step 1: Save the facts in Settings
Do this before you add the sections. It takes a few minutes and prevents empty gray boxes later.
Open [Settings > General](https://www.carstoragesoftware.com/dashboard/settings/general). In **Facility profile**, click **Search for an address**. Choose your street, then add the main phone number.
**Expected result:** The facility card shows a real street, city, and phone. That is what **Location & map** will display.
Full steps: [Set up general facility settings](/docs/settings/set-up-general-facility-settings).
On the same General page, scroll to **Hours of operation**. Pick **Weekdays** (Monday–Friday, 9–5), **Open 24/7**, or **Custom**. Click a day card if Saturday or Sunday is different.
**Expected result:** The selected preset has a check mark, and the day cards match what you tell customers on the phone.
*Your public map uses the address on [Settings > General](https://www.carstoragesoftware.com/dashboard/settings/general) under **Facility profile**. Save a real street address before you add **Location & map**.*
## How the pieces fit together
Each built-in section on your website has a **source** in Settings. You do not type the hours or address inside the page editor.
| Website section | Where you fill in the facts | Hidden on the public page until… |
| - | - | - |
| **Location & map** | [Settings > General](https://www.carstoragesoftware.com/dashboard/settings/general) → **Facility profile** (address and phone) | You add the facility address |
| **Hours of operation** | [Settings > General](https://www.carstoragesoftware.com/dashboard/settings/general) → **Hours of operation** | You set opening hours |
| **Contact people** | [Settings > General](https://www.carstoragesoftware.com/dashboard/settings/general) → **Website contacts** | You add a public contact |
| **Social links** | [Settings > Communications](https://www.carstoragesoftware.com/dashboard/settings/communications) → **Marketing** | You connect a social account |
| **Custom form** | [Marketing & Events > Forms](https://www.carstoragesoftware.com/dashboard/marketing/forms) | You select a published form |
**Why this matters:** One address and one hours list stay correct everywhere. If you move or change Saturday hours, you update Settings once. The website updates with it.
## Step 1: Save the facts in Settings
Do this before you add the sections. It takes a few minutes and prevents empty gray boxes later.
Open [Settings > General](https://www.carstoragesoftware.com/dashboard/settings/general). In **Facility profile**, click **Search for an address**. Choose your street, then add the main phone number.
**Expected result:** The facility card shows a real street, city, and phone. That is what **Location & map** will display.
Full steps: [Set up general facility settings](/docs/settings/set-up-general-facility-settings).
On the same General page, scroll to **Hours of operation**. Pick **Weekdays** (Monday–Friday, 9–5), **Open 24/7**, or **Custom**. Click a day card if Saturday or Sunday is different.
**Expected result:** The selected preset has a check mark, and the day cards match what you tell customers on the phone.
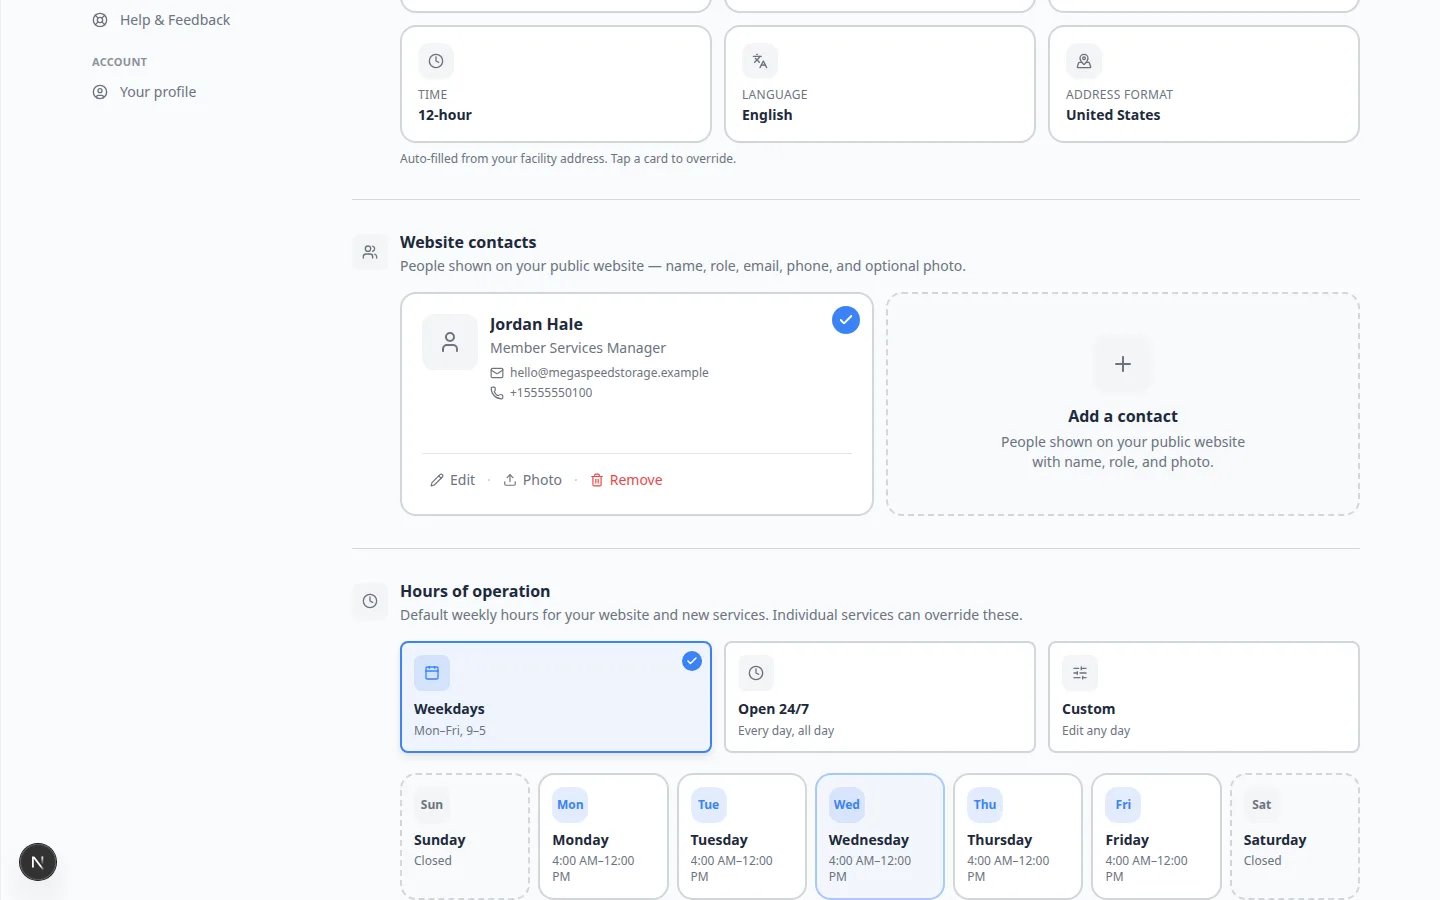 *Set hours on [Settings > General](https://www.carstoragesoftware.com/dashboard/settings/general). The website always shows this facility default — not a special schedule you later add to one service.*
Scroll to **Website contacts**. Click the dashed **Add a contact** card. Use a role customers can call, such as **Member Services Manager**. Add a work email and phone. Leave the person **Active** (check mark) so they appear on the website.
**Expected result:** A contact card appears with a check mark.
*Set hours on [Settings > General](https://www.carstoragesoftware.com/dashboard/settings/general). The website always shows this facility default — not a special schedule you later add to one service.*
Scroll to **Website contacts**. Click the dashed **Add a contact** card. Use a role customers can call, such as **Member Services Manager**. Add a work email and phone. Leave the person **Active** (check mark) so they appear on the website.
**Expected result:** A contact card appears with a check mark.
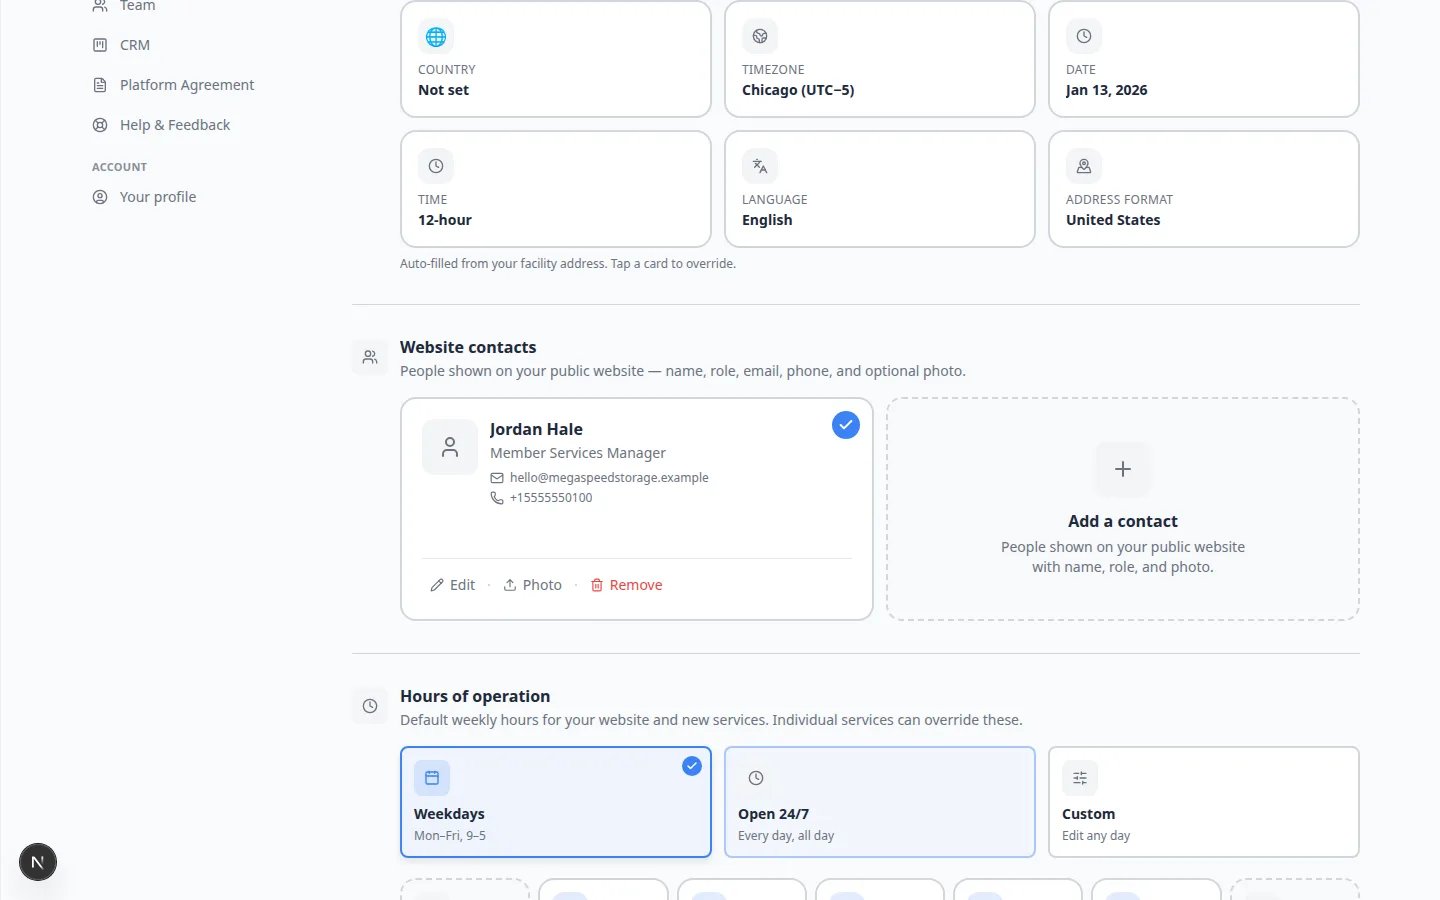 ***Website contacts** are the people on your public page. Use a shared inbox such as [hello@yourfacility.com](mailto:hello@yourfacility.com) when more than one person answers email.*
Open [Settings > Communications](https://www.carstoragesoftware.com/dashboard/settings/communications) and scroll to **Marketing**. Sign in to the platforms you already use (for example Instagram, Facebook, or Google).
Skip this step if you are not ready. **Social links** stays hidden until at least one account is connected.
**Hours live on General, not on the page editor**
If you click a section and see **Edit hours of operation**, **Edit facility contact**, **Edit website contacts**, or **Connect social accounts**, those buttons take you back to Settings. That is expected. You change the facts there, not by typing on the page.
## Step 2: Add the sections to your public page
You can add sections in the classic **Page editor** or in the website editor. Both write to the same website.
Go to [Settings > Website & customer app](https://www.carstoragesoftware.com/dashboard/settings/website) and scroll to **Public website**.
In the **Page editor**, click the dashed **Add section** button, or click the **Add** tab on the right.
**Expected result:** You see **Add to your page** with three choices: **Layout**, **Content block**, and **Built-in section**.
Click **Built-in section**. The next screen says **Choose a section** and lists prebuilt blocks such as **Location & map**, **Hours of operation**, **Contact people**, and **Social links**.
From the **Add** tab, the same names appear under **Built-in sections**.
***Website contacts** are the people on your public page. Use a shared inbox such as [hello@yourfacility.com](mailto:hello@yourfacility.com) when more than one person answers email.*
Open [Settings > Communications](https://www.carstoragesoftware.com/dashboard/settings/communications) and scroll to **Marketing**. Sign in to the platforms you already use (for example Instagram, Facebook, or Google).
Skip this step if you are not ready. **Social links** stays hidden until at least one account is connected.
**Hours live on General, not on the page editor**
If you click a section and see **Edit hours of operation**, **Edit facility contact**, **Edit website contacts**, or **Connect social accounts**, those buttons take you back to Settings. That is expected. You change the facts there, not by typing on the page.
## Step 2: Add the sections to your public page
You can add sections in the classic **Page editor** or in the website editor. Both write to the same website.
Go to [Settings > Website & customer app](https://www.carstoragesoftware.com/dashboard/settings/website) and scroll to **Public website**.
In the **Page editor**, click the dashed **Add section** button, or click the **Add** tab on the right.
**Expected result:** You see **Add to your page** with three choices: **Layout**, **Content block**, and **Built-in section**.
Click **Built-in section**. The next screen says **Choose a section** and lists prebuilt blocks such as **Location & map**, **Hours of operation**, **Contact people**, and **Social links**.
From the **Add** tab, the same names appear under **Built-in sections**.
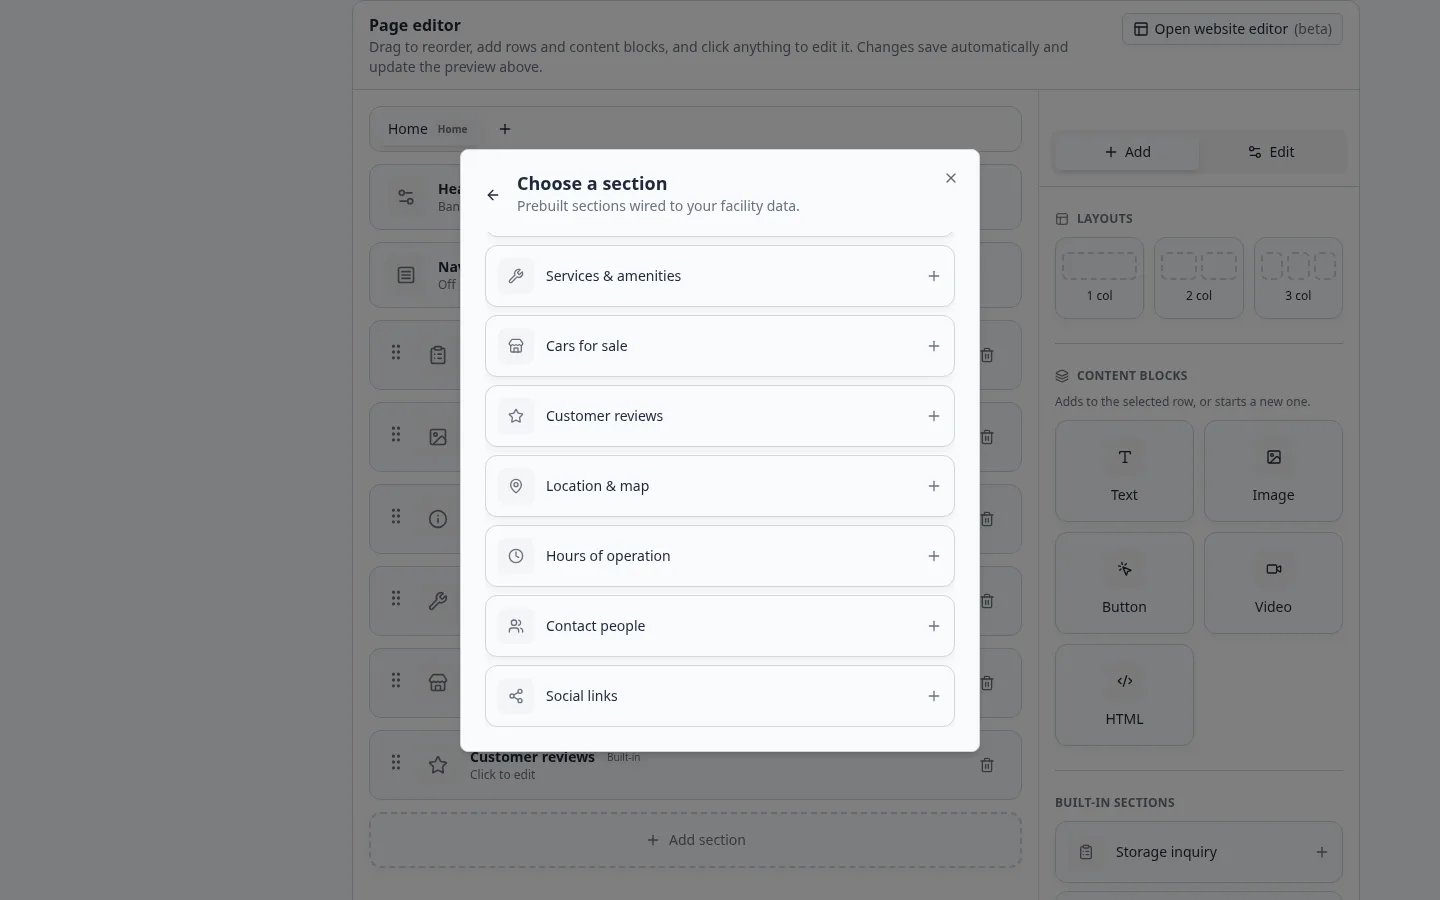 *After you click **Built-in section**, **Choose a section** lists **Location & map**, **Hours of operation**, **Contact people**, and **Social links**. Click one to add it. You do not design the hours table or the map yourself.*
Click each section you want:
* **Location & map** — address, phone, and a map pin
* **Hours of operation** — the weekly hours you saved on General
* **Contact people** — the **Website contacts** you marked Active
* **Social links** — icons for connected **Marketing** accounts
**Why this matters:** Add only what you can keep accurate. An empty or outdated hours list is worse than no hours list.
Use the six-dot handle to move **Location & map** and **Hours of operation** near the bottom of the page, after your story and services. Many visitors look for those details after they decide they like the facility.
**Expected result:** The live preview above the editor updates right away.
*After you click **Built-in section**, **Choose a section** lists **Location & map**, **Hours of operation**, **Contact people**, and **Social links**. Click one to add it. You do not design the hours table or the map yourself.*
Click each section you want:
* **Location & map** — address, phone, and a map pin
* **Hours of operation** — the weekly hours you saved on General
* **Contact people** — the **Website contacts** you marked Active
* **Social links** — icons for connected **Marketing** accounts
**Why this matters:** Add only what you can keep accurate. An empty or outdated hours list is worse than no hours list.
Use the six-dot handle to move **Location & map** and **Hours of operation** near the bottom of the page, after your story and services. Many visitors look for those details after they decide they like the facility.
**Expected result:** The live preview above the editor updates right away.
 *New sections join this list. Drag them with the six-dot handle. Use the trash icon if you added one too soon.*
### Prefer the website editor?
If you see **Open website editor** with **(beta)** on the **Page editor** card, you can add the same sections from **Manual edit** → **Add** → **Built-in sections**. Those changes stay in a **draft** until you click **Publish**. See [Edit your website with the AI website editor](/docs/facility-web-pages/build-your-website-with-ai).
**Some details go live right away**
Changing the address, hours, website contacts, or connected social accounts in Settings updates the public page as soon as you save — even if you still have an unpublished website-editor draft. Publish is only for the page layout and wording you change in the editor.
## Step 3: Preview like a prospect
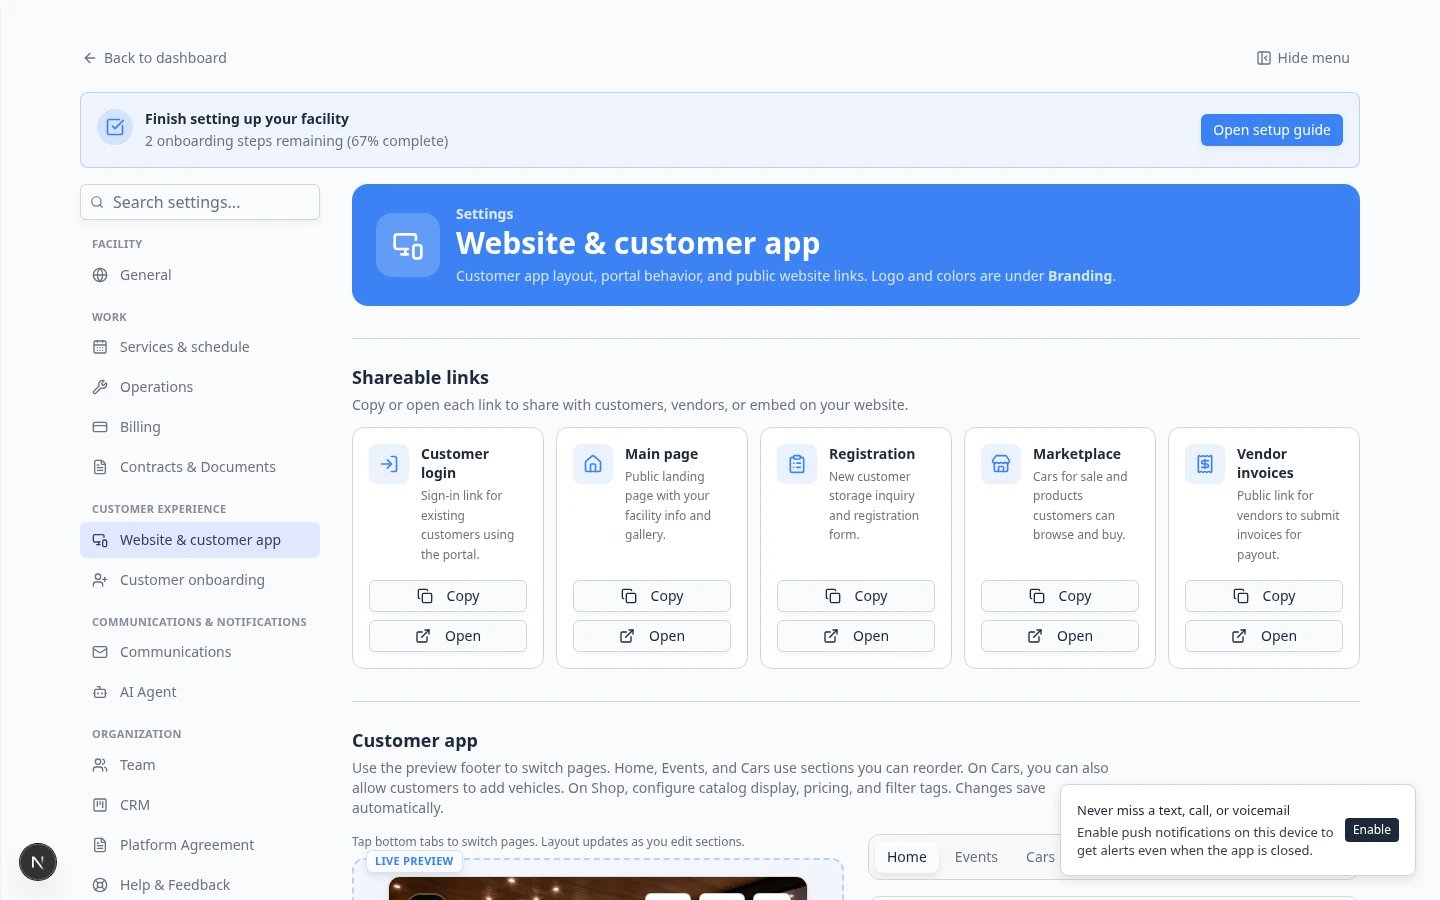
At the top of [Settings > Website & customer app](https://www.carstoragesoftware.com/dashboard/settings/website), find **Shareable links**. Click **Open** on **Main page**.
Confirm the map matches your building, the hours match the front door, and the contact person is someone who answers the phone.
**Expected result:** No gray hint boxes. If you still see a hint in the editor (for example **Hours of operation: hidden until you set opening hours**), go back to Step 1.
Open the same **Main page** link on your phone, or shrink the browser window. Hours and contact cards should stay readable without sideways scrolling.
*New sections join this list. Drag them with the six-dot handle. Use the trash icon if you added one too soon.*
### Prefer the website editor?
If you see **Open website editor** with **(beta)** on the **Page editor** card, you can add the same sections from **Manual edit** → **Add** → **Built-in sections**. Those changes stay in a **draft** until you click **Publish**. See [Edit your website with the AI website editor](/docs/facility-web-pages/build-your-website-with-ai).
**Some details go live right away**
Changing the address, hours, website contacts, or connected social accounts in Settings updates the public page as soon as you save — even if you still have an unpublished website-editor draft. Publish is only for the page layout and wording you change in the editor.
## Step 3: Preview like a prospect
At the top of [Settings > Website & customer app](https://www.carstoragesoftware.com/dashboard/settings/website), find **Shareable links**. Click **Open** on **Main page**.
Confirm the map matches your building, the hours match the front door, and the contact person is someone who answers the phone.
**Expected result:** No gray hint boxes. If you still see a hint in the editor (for example **Hours of operation: hidden until you set opening hours**), go back to Step 1.
Open the same **Main page** link on your phone, or shrink the browser window. Hours and contact cards should stay readable without sideways scrolling.
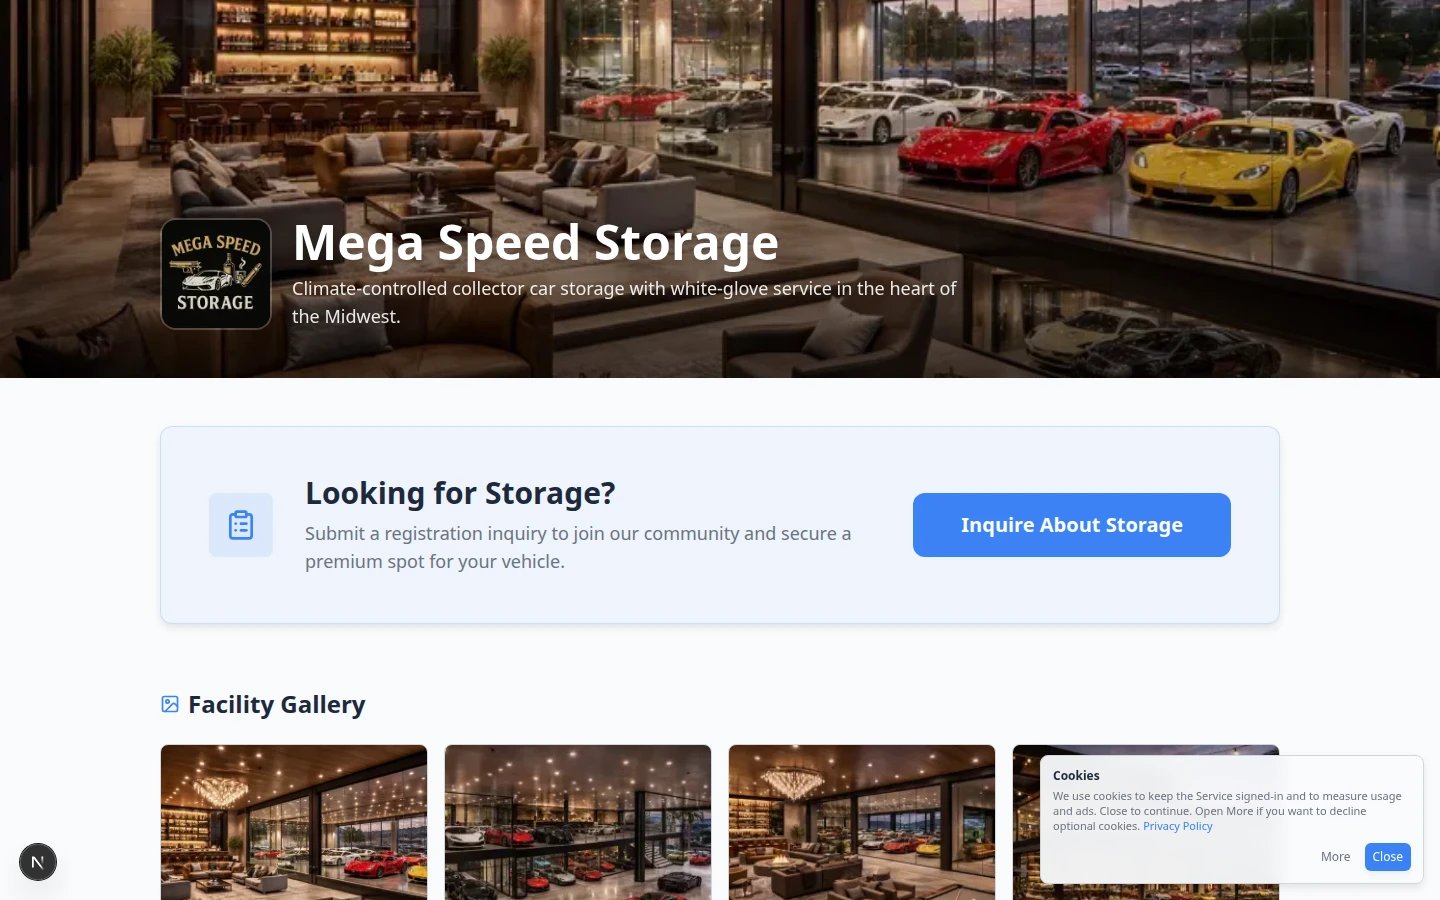 *After you add the sections, scroll the public page the way a new visitor would. Address, hours, and people should appear below your story and services.*
## Optional: Add a Custom form
**Custom form** embeds a form you already published in [Marketing & Events > Forms](https://www.carstoragesoftware.com/dashboard/marketing/forms). Use it for waitlists, tour requests, or event sign-ups that are not the storage registration form.
Create and publish the form in **Forms**. A draft form will not appear as a choice.
In the **Page editor**, click **Add section** → **Built-in section** → **Custom form**.
Click the new **Custom form** row. Choose the published form. If you are in the website editor and create a form from there, the editor may open the form builder so you can finish the questions.
**Expected result:** The public page shows the form. The gray hint **Custom form: no form is selected** goes away.
**Registration form is different**
**Registration form** is the storage request form from [Settings > Customer onboarding](https://www.carstoragesoftware.com/dashboard/settings/customer-onboarding). **Custom form** is any other published form. Use [Set up customer registration](/docs/facility-web-pages/set-up-customer-registration) for new storage requests.
## What success looks like
* **Facility profile** has a real address and phone.
* **Hours of operation** match the hours you tell customers.
* At least one **Website contact** is Active.
* **Location & map**, **Hours of operation**, and **Contact people** appear on **Main page** (not only in the editor).
* **Social links** appears only if you connected a marketing account.
## Troubleshooting
**The editor shows a gray hint instead of the section**
The public page hides empty built-in sections. Common hints:
* **Location & map: hidden until you add the facility address**
* **Hours of operation: hidden until you set opening hours**
* **Contact people: hidden until you add a public contact**
* **Social links: hidden until you connect a social account**
* **Custom form: no form is selected**
Fill in the matching Settings page, then refresh **Main page**.
**The map is missing or shows the wrong place**
Return to [Settings > General](https://www.carstoragesoftware.com/dashboard/settings/general) and search for the address again. Choose the matching row instead of typing a partial street. Then reopen **Main page**.
**Hours look wrong on Saturday**
On General, click the **Saturday** day card and set that day by itself. The website shows the facility default. A special Saturday schedule on one service does not change the public hours block.
**A person I added does not appear**
Open **Website contacts** and confirm that contact has a check mark (**Active**). Inactive people stay in Settings but do not show on the website.
**Social icons are missing**
Connect the account under **Marketing** on [Settings > Communications](https://www.carstoragesoftware.com/dashboard/settings/communications). Signing in once is enough. You do not paste profile links into the page editor.
**I do not see Add section**
Turn on **Public Facility Pages** first. The **Page editor** appears only after the public website is on. See [Configure the facility landing page](/docs/facility-web-pages/configure-the-facility-landing-page).
## What to do next
Preview **Main page** on a phone, then run [Go live checklist for public pages](/docs/facility-web-pages/go-live-checklist-for-public-pages) before you put the link on your website or in a text message.
If you want to describe page changes in plain words (for example “Move hours above the map”), use [Edit your website with the AI website editor](/docs/facility-web-pages/build-your-website-with-ai).
## Related topics
- [Edit your website with the AI website editor](/docs/facility-web-pages/build-your-website-with-ai.md)
- [Configure the facility landing page](/docs/facility-web-pages/configure-the-facility-landing-page.md)
- [Go live checklist for public pages](/docs/facility-web-pages/go-live-checklist-for-public-pages.md)
- [Facility Web Pages overview](/docs/facility-web-pages/overview.md)
- [Set up general facility settings](/docs/settings/set-up-general-facility-settings.md)
This documentation is built and hosted on [Mintlify](https://mintlify.com), a developer documentation platform.
*After you add the sections, scroll the public page the way a new visitor would. Address, hours, and people should appear below your story and services.*
## Optional: Add a Custom form
**Custom form** embeds a form you already published in [Marketing & Events > Forms](https://www.carstoragesoftware.com/dashboard/marketing/forms). Use it for waitlists, tour requests, or event sign-ups that are not the storage registration form.
Create and publish the form in **Forms**. A draft form will not appear as a choice.
In the **Page editor**, click **Add section** → **Built-in section** → **Custom form**.
Click the new **Custom form** row. Choose the published form. If you are in the website editor and create a form from there, the editor may open the form builder so you can finish the questions.
**Expected result:** The public page shows the form. The gray hint **Custom form: no form is selected** goes away.
**Registration form is different**
**Registration form** is the storage request form from [Settings > Customer onboarding](https://www.carstoragesoftware.com/dashboard/settings/customer-onboarding). **Custom form** is any other published form. Use [Set up customer registration](/docs/facility-web-pages/set-up-customer-registration) for new storage requests.
## What success looks like
* **Facility profile** has a real address and phone.
* **Hours of operation** match the hours you tell customers.
* At least one **Website contact** is Active.
* **Location & map**, **Hours of operation**, and **Contact people** appear on **Main page** (not only in the editor).
* **Social links** appears only if you connected a marketing account.
## Troubleshooting
**The editor shows a gray hint instead of the section**
The public page hides empty built-in sections. Common hints:
* **Location & map: hidden until you add the facility address**
* **Hours of operation: hidden until you set opening hours**
* **Contact people: hidden until you add a public contact**
* **Social links: hidden until you connect a social account**
* **Custom form: no form is selected**
Fill in the matching Settings page, then refresh **Main page**.
**The map is missing or shows the wrong place**
Return to [Settings > General](https://www.carstoragesoftware.com/dashboard/settings/general) and search for the address again. Choose the matching row instead of typing a partial street. Then reopen **Main page**.
**Hours look wrong on Saturday**
On General, click the **Saturday** day card and set that day by itself. The website shows the facility default. A special Saturday schedule on one service does not change the public hours block.
**A person I added does not appear**
Open **Website contacts** and confirm that contact has a check mark (**Active**). Inactive people stay in Settings but do not show on the website.
**Social icons are missing**
Connect the account under **Marketing** on [Settings > Communications](https://www.carstoragesoftware.com/dashboard/settings/communications). Signing in once is enough. You do not paste profile links into the page editor.
**I do not see Add section**
Turn on **Public Facility Pages** first. The **Page editor** appears only after the public website is on. See [Configure the facility landing page](/docs/facility-web-pages/configure-the-facility-landing-page).
## What to do next
Preview **Main page** on a phone, then run [Go live checklist for public pages](/docs/facility-web-pages/go-live-checklist-for-public-pages) before you put the link on your website or in a text message.
If you want to describe page changes in plain words (for example “Move hours above the map”), use [Edit your website with the AI website editor](/docs/facility-web-pages/build-your-website-with-ai).
## Related topics
- [Edit your website with the AI website editor](/docs/facility-web-pages/build-your-website-with-ai.md)
- [Configure the facility landing page](/docs/facility-web-pages/configure-the-facility-landing-page.md)
- [Go live checklist for public pages](/docs/facility-web-pages/go-live-checklist-for-public-pages.md)
- [Facility Web Pages overview](/docs/facility-web-pages/overview.md)
- [Set up general facility settings](/docs/settings/set-up-general-facility-settings.md)
This documentation is built and hosted on [Mintlify](https://mintlify.com), a developer documentation platform.