> ## Documentation Index
> Fetch the complete documentation index at: https://www.carstoragesoftware.com/docs/llms.txt
> Use this file to discover all available pages before exploring further.
# Configure the facility landing page
> Set up the public page that introduces your facility, services, location, and calls to action.
## What you will accomplish
Prospects will open a polished public page that explains your facility, shows your services, and offers clear next steps such as registration or marketplace browsing.
## When to use this guide
Use this guide when you want **one main link** that tells prospects who you are and what they can do next—request storage, browse your marketplace, or contact your team.
## Overview
You will set up the public page in [Settings > Website & customer app](https://www.carstoragesoftware.com/dashboard/settings/website) under **Public website**.
When you finish, prospects can open a page that explains who you are, what services you offer, and which buttons to use for registration, marketplace, or vendor invoices.
After the public page looks ready, customize what **signed-in** customers see on [Customize the customer mobile app](/docs/facility-web-pages/customize-the-customer-mobile-app).
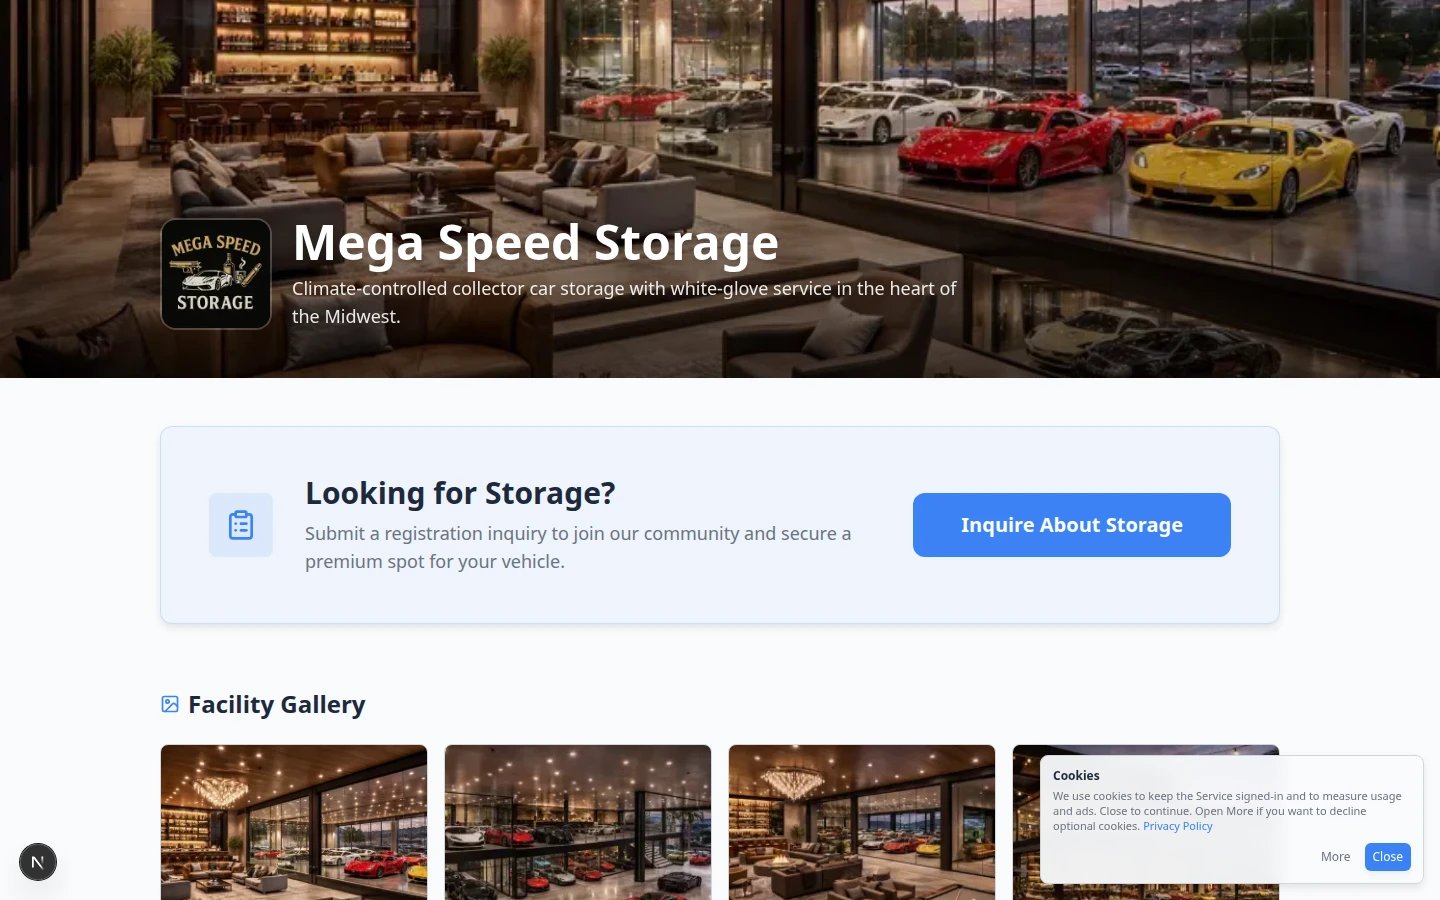 *The public facility page is the customer-facing front door for your facility. Open **Main page** from **Shareable links** to preview what prospects see.*
## Before you start
* Prepare a short description of your facility.
* List the services or amenities customers should know about.
* Choose what visitors should do next, such as register, view listings, or contact your team.
* Review [Branding](https://www.carstoragesoftware.com/dashboard/settings/branding) if your logo or colors need updates.
## Step 1: Open Website & customer app settings
Go to [Settings > Website & customer app](https://www.carstoragesoftware.com/dashboard/settings/website).
Scroll to **Public website**.
*The public facility page is the customer-facing front door for your facility. Open **Main page** from **Shareable links** to preview what prospects see.*
## Before you start
* Prepare a short description of your facility.
* List the services or amenities customers should know about.
* Choose what visitors should do next, such as register, view listings, or contact your team.
* Review [Branding](https://www.carstoragesoftware.com/dashboard/settings/branding) if your logo or colors need updates.
## Step 1: Open Website & customer app settings
Go to [Settings > Website & customer app](https://www.carstoragesoftware.com/dashboard/settings/website).
Scroll to **Public website**.
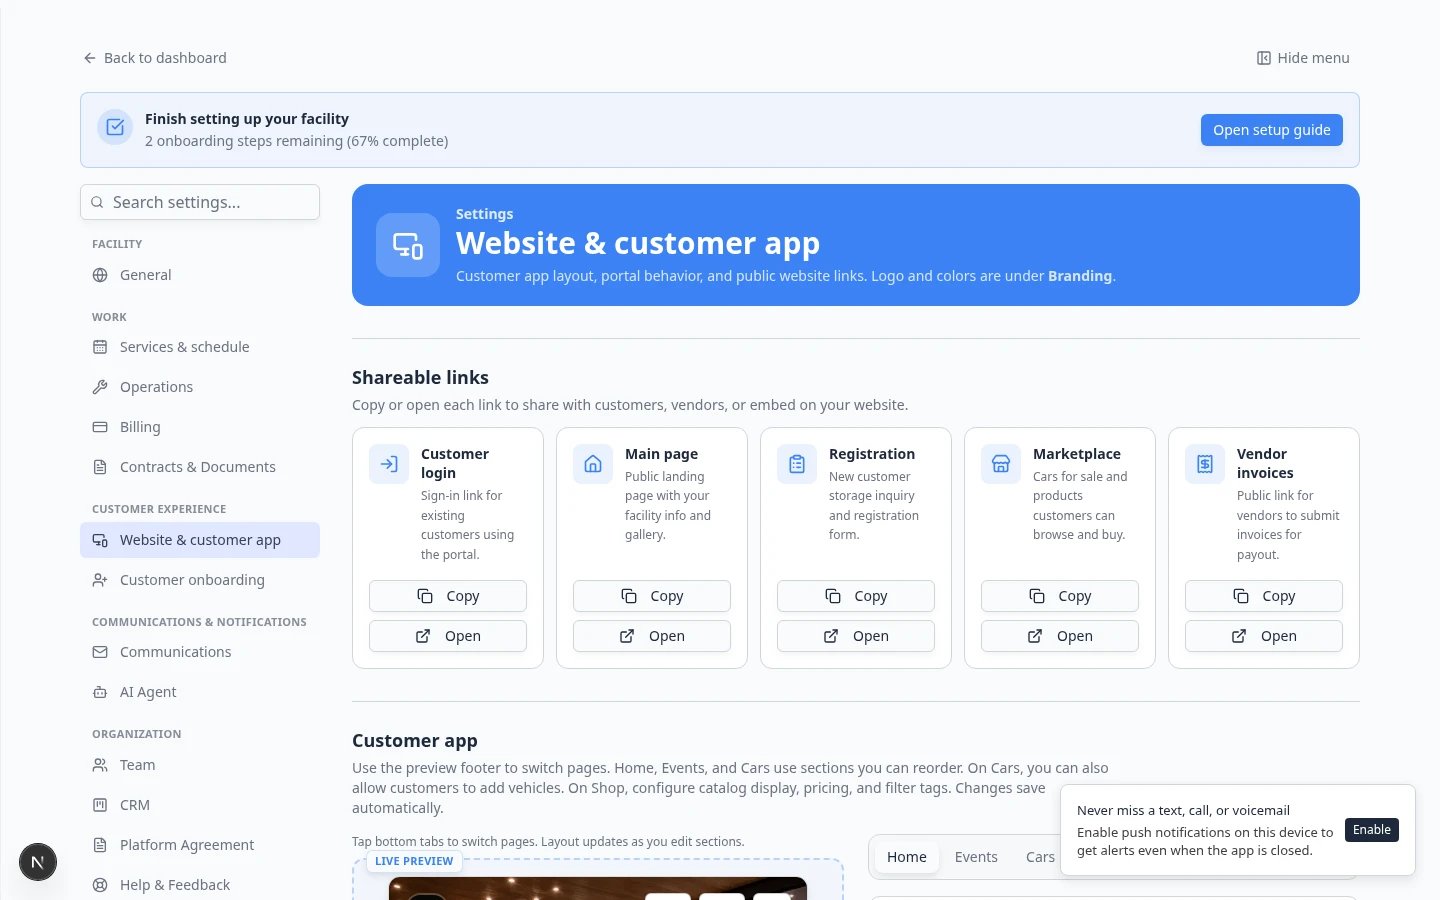 *Public website uses a live preview on top and a Page editor below. Changes save automatically.*
## Step 2: Turn on Public Facility Pages
Find the switch labeled **Public Facility Pages** and turn it on when you are ready for people outside your team to open your facility page.
**Preview before sharing**
It is okay to turn the page on so your team can preview it. Just do not add the link to your website or emails until the page looks ready.
### Expected result
The live preview at the top of the page shows your facility page. The **Page editor** section appears below the preview.
**Prefer to describe changes in plain words?**
If your team has the beta, **Open website editor (beta)** at the top of the **Page editor** opens a full-screen editor with an AI designer, a clickable page preview, and a draft you publish when ready. See [Edit your website with the AI website editor](/docs/facility-web-pages/build-your-website-with-ai).
## Step 3: Choose your facility slug
In **Page editor**, open **Header & page settings** and find **Facility slug**.
A slug is the short name used at the end of your web address.
Good examples:
* `smith-storage`
* `apex-collector-cars`
* `downtown-car-club`
Avoid long names, spaces, punctuation, or words customers may spell wrong.
Your public page address will look like:
`/facility/your-facility-slug`
### Expected result
Your facility has a public page address that your team can say, type, and share easily.
## Step 4: Open Header & page settings
Before you add content sections, confirm the page address and any top-level toggles.
On [Settings > Website & customer app](https://www.carstoragesoftware.com/dashboard/settings/website), scroll to **Page editor**.
Click **Header & page settings** at the top of the editor panel.
**Expected result:** You see **Header banner**, **Page address** (Facility slug), and **Vendor invoice portal**.
*Public website uses a live preview on top and a Page editor below. Changes save automatically.*
## Step 2: Turn on Public Facility Pages
Find the switch labeled **Public Facility Pages** and turn it on when you are ready for people outside your team to open your facility page.
**Preview before sharing**
It is okay to turn the page on so your team can preview it. Just do not add the link to your website or emails until the page looks ready.
### Expected result
The live preview at the top of the page shows your facility page. The **Page editor** section appears below the preview.
**Prefer to describe changes in plain words?**
If your team has the beta, **Open website editor (beta)** at the top of the **Page editor** opens a full-screen editor with an AI designer, a clickable page preview, and a draft you publish when ready. See [Edit your website with the AI website editor](/docs/facility-web-pages/build-your-website-with-ai).
## Step 3: Choose your facility slug
In **Page editor**, open **Header & page settings** and find **Facility slug**.
A slug is the short name used at the end of your web address.
Good examples:
* `smith-storage`
* `apex-collector-cars`
* `downtown-car-club`
Avoid long names, spaces, punctuation, or words customers may spell wrong.
Your public page address will look like:
`/facility/your-facility-slug`
### Expected result
Your facility has a public page address that your team can say, type, and share easily.
## Step 4: Open Header & page settings
Before you add content sections, confirm the page address and any top-level toggles.
On [Settings > Website & customer app](https://www.carstoragesoftware.com/dashboard/settings/website), scroll to **Page editor**.
Click **Header & page settings** at the top of the editor panel.
**Expected result:** You see **Header banner**, **Page address** (Facility slug), and **Vendor invoice portal**.
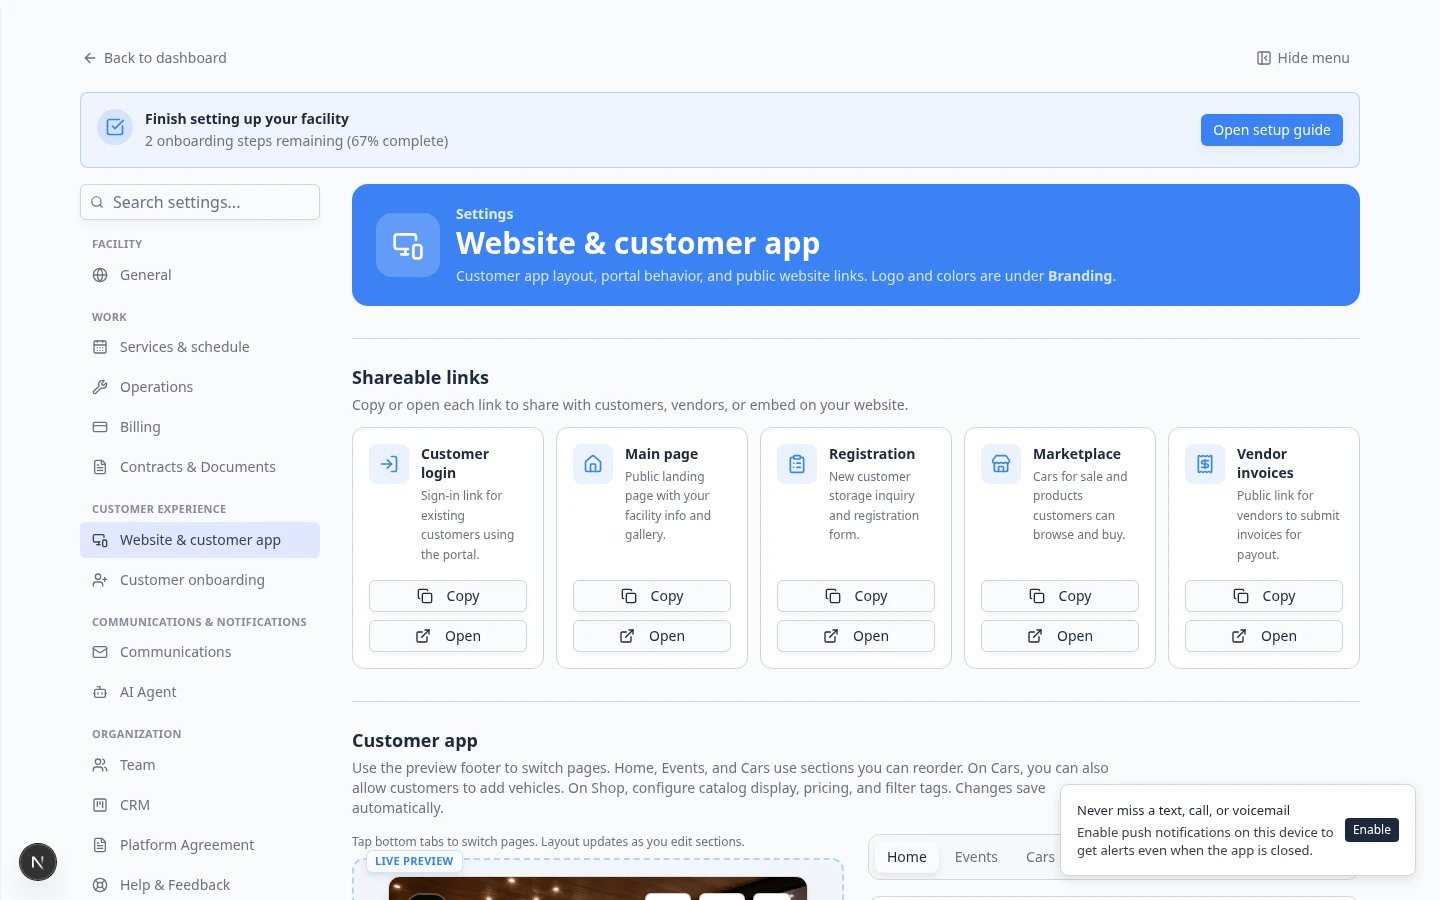 ***Vendor invoice portal** lives under **Header & page settings**—not in the draggable section list below. Turn it on here when vendors should submit invoices through your public link.*
**Vendor invoices are not a draggable section**
**Vendor invoice portal** is a switch in **Header & page settings**. It does not appear as a row you drag up and down like **Photo gallery** or **Cars for sale**. After you turn it on, copy **Vendor invoices** from **Shareable links** at the top of the page.
## Step 5: Edit the page with draggable sections
The **Page editor** lets you build your page section by section. Each draggable section appears in the live preview above. Changes here save automatically and go live right away.
To work on a draft that goes live only when you publish, use the website editor instead. See [Edit your website with the AI website editor](/docs/facility-web-pages/build-your-website-with-ai).
***Vendor invoice portal** lives under **Header & page settings**—not in the draggable section list below. Turn it on here when vendors should submit invoices through your public link.*
**Vendor invoices are not a draggable section**
**Vendor invoice portal** is a switch in **Header & page settings**. It does not appear as a row you drag up and down like **Photo gallery** or **Cars for sale**. After you turn it on, copy **Vendor invoices** from **Shareable links** at the top of the page.
## Step 5: Edit the page with draggable sections
The **Page editor** lets you build your page section by section. Each draggable section appears in the live preview above. Changes here save automatically and go live right away.
To work on a draft that goes live only when you publish, use the website editor instead. See [Edit your website with the AI website editor](/docs/facility-web-pages/build-your-website-with-ai).
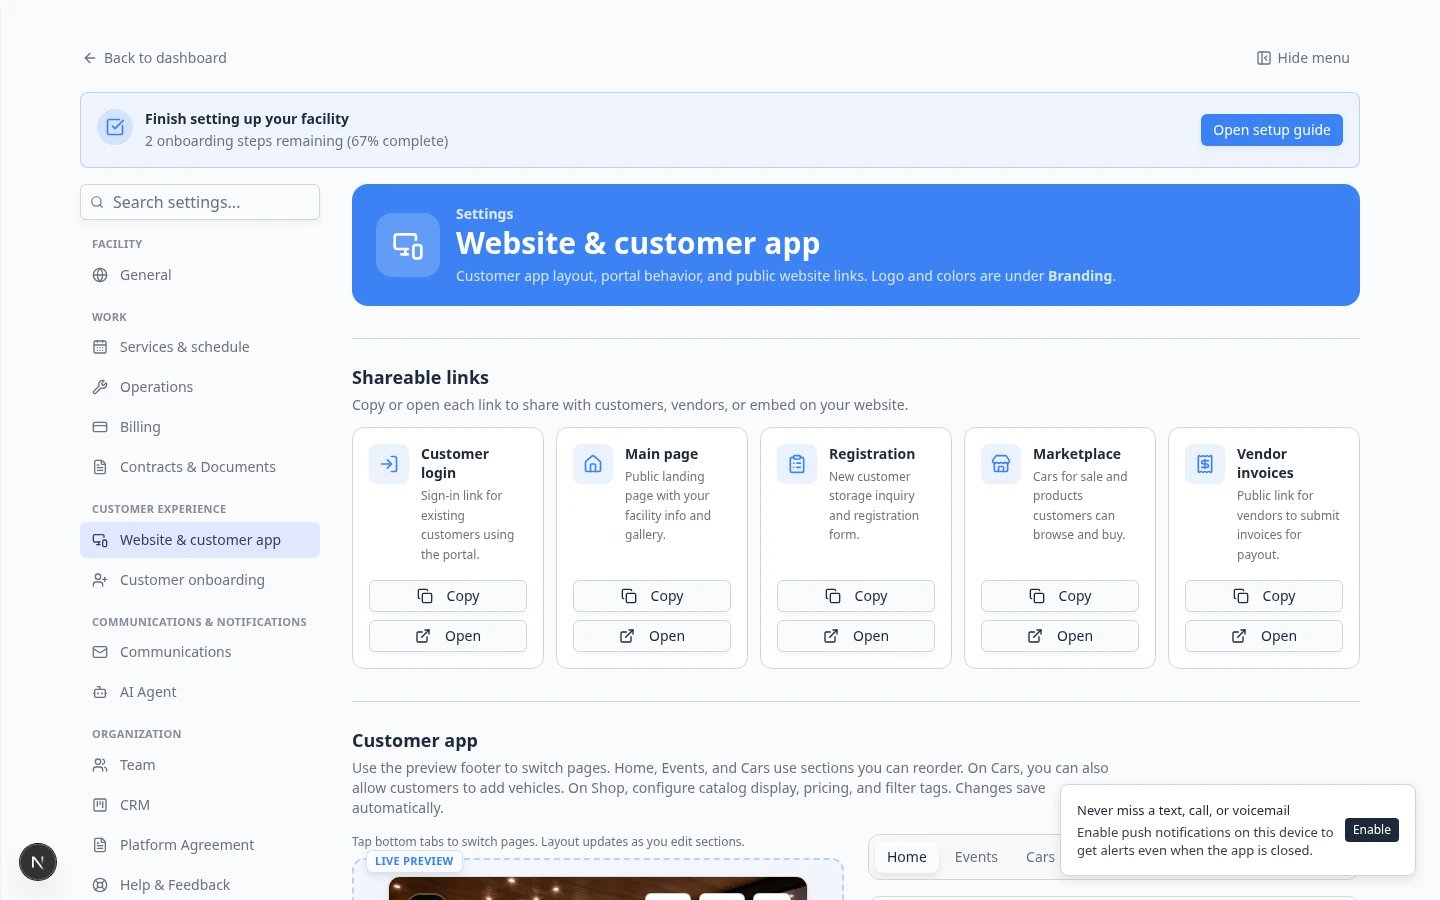 *Drag sections to reorder them. Use the trash icon to remove a section you do not need. Click a section name to edit its details.*
In the **Page editor**, click a section name (for example **Services & amenities** or a content row) to open its details. The preview above updates as you edit.
**Why this matters:** You see exactly what customers will see while you edit.
In the website editor, you can click the page preview itself to select a section.
Use **Add section** to insert new rows. Drag the six-dot handle on the left to change the order.
Common built-in sections include:
* **Storage inquiry** — a button on the public page. Customers see **Looking for Storage?** with an **Inquire About Storage** button that leads to registration
* **Registration form** — the full registration form embedded on the page
* **Custom form** — a published form from [Marketing & Events > Forms](https://www.carstoragesoftware.com/dashboard/marketing/forms)
* **About the facility** — your description in plain language
* **Services & amenities** — checkboxes for climate control, detailing, transport, and similar
* **Photo gallery** — facility photos
* **Upcoming events** — your published events from Social events, soonest first
* **Customer reviews** — reviews from Google or your team (see below)
* **Cars for sale** — preview of marketplace vehicles
* **Location & map** — address, phone, and a map from **Facility profile**
* **Hours of operation** — weekly hours from [Settings > General](https://www.carstoragesoftware.com/dashboard/settings/general)
* **Contact people** — people from **Website contacts**
* **Social links** — icons from **Marketing** accounts on Communications
For the address, hours, people, and social sections, fill in Settings first. See [Add hours, map, contacts, and social links to your website](/docs/facility-web-pages/add-hours-map-contacts-and-social-to-your-website).
Content rows hold **Text**, **Image**, **Button**, **Video**, and **HTML** blocks. Add them with **Add section** > **Content block**, or from the **Add** tab in the website editor.
Click the **Customer reviews** section. If your facility has a Google Business profile, paste your **Google Place ID** and click the button to fetch reviews. Turn on the reviews you want visitors to see.
**Why this matters:** Real reviews help new prospects trust your facility before they call or visit.
Click the trash icon on a section to remove it. You can add built-in sections back later with **Add section**. A removed content row is deleted along with its content.
Built-in sections with nothing to show, such as **Customer reviews** before you select reviews or **Photo gallery** before you add photos, stay hidden on the public page until they have content.
**Expected result:** The live preview updates right away.
In **Header & page settings**, upload a wide banner image (about 1920×600 pixels works well). Drag to adjust how the image is cropped.
If your page brings its own header, for example in a custom HTML block, turn **Show banner** off. The page then starts at the nav bar or your first section, and a blur or transparent nav shows as a solid bar.
The banner grows to fit its title and subtitle. A subtitle longer than about 280 characters ends at a whole word with an ellipsis.
**Expected result:** The top of your public page looks professional on desktop and mobile.
### Show upcoming events
Use the **Upcoming events** section to list your events on the website. Your team keeps the events in **Social events**. The website updates on its own.
Click **Add section**, then **Upcoming events**. You can also add it to a column of a content row.
Select the section. Set the heading and the number of events to show. Turn **Include customers-only events** on or off. It lists only customers-only events that have **Show link preview** turned on. Select **Cards with photos** or **Compact list**.
In **Social events**, create an event and set **Visibility** to **Public** or **Customers only**. Then publish the event.
**Expected result:** The event is on the website. For a public event, the section shows the date, the time, the location, and the price. Each event links to its event page, where visitors RSVP.
The section shows published events only. An event leaves the list when it ends. Invite-only events are not shown. A customers-only event appears only when its **Show link preview** is on. It shows a **Members** badge with its name, photo, description, date, and time. Its location and price stay hidden until a customer signs in on the event page. The section is hidden on the public page until you have an event to show.
### Add custom HTML
Use an **HTML** block to bring over something from your previous website, such as a map, a booking widget, or a styled announcement.
Click **Add section** > **Content block** > **HTML**, or add it to an existing row.
Paste the code into the **HTML** box in the editor panel. The preview updates as you type.
A new HTML block starts in its own **full width** row. It spans the whole screen, edge to edge, with no side padding, rounded corners, or vertical spacing.
To keep it inside the page's content column instead, click the row in the section list. In **Row settings**, turn off **Full width (edge to edge)**. You can make any content row full width the same way.
If you add HTML to a row you already selected, that row stays as it is.
Your HTML is shown in an isolated frame on your page. Scripts inside it run only in that frame and cannot read or change the rest of your page. Links to other websites open in a new tab. In-page `#section` links work: the page scrolls to that part of the block, or to a section in another HTML block or elsewhere on the page, and a visitor can open `your-site.com/#section` directly. Scripts in the block can call `window.scrollTo` and `scrollIntoView` to scroll the page. Forms work: plain HTML forms open their confirmation in a new tab, and forms that submit with JavaScript stay inside the block. Embeds that need visitors to sign in or remember settings may not work. Each HTML block holds up to 1,000,000 characters, enough for a whole one-page site with its styles and scripts. A block over the limit is not cut: the save is refused with a message naming the block, and the editor panel shows how far over it is until you shorten it or split it across blocks.
The block adds no fonts or styles of its own; it only removes the browser's default page margin. Your CSS is used exactly as written, so HTML without CSS shows in the browser's default font. Each block is a separate frame, so the CSS in one block does not reach another block. To use one stylesheet on all blocks, paste it into **Shared CSS for HTML blocks** under **Header & page settings**. The site puts it in every block, before the block's own code. It holds up to 200,000 characters. `100vw` and media queries see the block's width. When the row is full width, that is the screen width.
## Step 6: Write a clear facility description
In the **About the facility** section (or your description field), write two or three sentences in plain language.
Example:
We provide secure indoor storage for collector and specialty vehicles. Our team helps with battery care, detailing appointments, and scheduled pickup or dropoff so your vehicle is ready when you need it.
### Expected result
Visitors understand what your facility offers without needing to call first.
## Step 7: Turn on customer actions your team is ready for
In the **Page editor**, add only the sections your team can support today, and remove the rest.
Use **Storage inquiry** when you want a button that leads to registration. Use **Registration form** when the full form should appear on the page itself.
Configure form questions in [Settings > Customer onboarding](https://www.carstoragesoftware.com/dashboard/settings/customer-onboarding).
Add the **Cars for sale** section when visitors should see marketplace vehicles. Use the visibility control on that section to choose **Public**, **Customers only**, or **All Car Storage Software users**.
See [Publish marketplace listings](/docs/facility-web-pages/publish-marketplace-listings) before sharing marketplace links widely.
Add **Location & map**, **Hours of operation**, **Contact people**, and **Social links** only after those facts exist in Settings.
See [Add hours, map, contacts, and social links to your website](/docs/facility-web-pages/add-hours-map-contacts-and-social-to-your-website).
Scroll to **Header & page settings** at the top of the Page editor. Turn on **Vendor invoice portal** only when outside providers should submit invoices through your public page.
**Why this matters:** This toggle is separate from draggable sections. After you turn it on, copy **Vendor invoices** from **Shareable links**.
Follow [Set up the vendor invoice portal](/docs/facility-web-pages/set-up-vendor-invoice-portal) before sending that link.
**Registration on the main page vs a separate link**
**Main page** (from **Shareable links**) can include a **Storage inquiry** button or an embedded registration form. **Registration** (also in **Shareable links**) opens the standalone registration page directly. Both paths work—pick the one that fits how you want prospects to start.
### Expected result
Visitors see the right buttons and sections for the next step you want them to take.
## Step 8: Open the public page and review it
Open **Main page** from **Shareable links**, or click **Open** on that card.
Review the page as if you are a brand-new customer.
Check:
* The facility name is correct.
* The description is clear and friendly.
* The service list is accurate.
* The main button points to the right next step.
* Marketplace or registration sections appear only if you want them visible.
* The vendor invoice link appears only if vendors should use it.
## Step 9: Check it on a phone-sized screen
Many prospects will open the page from a text message or mobile search result.
Open **Main page** from **Shareable links** on your phone. Check that text is easy to read and buttons are easy to tap.
Your page should look similar: facility name at the top, clear services, and one obvious next action without sideways scrolling.
**Why this matters:** Many prospects open your link from a text message. A clear mobile layout builds trust before they call or register.
For the signed-in phone experience (after customers have an account), see [Customize the customer mobile app](/docs/facility-web-pages/customize-the-customer-mobile-app).
*Drag sections to reorder them. Use the trash icon to remove a section you do not need. Click a section name to edit its details.*
In the **Page editor**, click a section name (for example **Services & amenities** or a content row) to open its details. The preview above updates as you edit.
**Why this matters:** You see exactly what customers will see while you edit.
In the website editor, you can click the page preview itself to select a section.
Use **Add section** to insert new rows. Drag the six-dot handle on the left to change the order.
Common built-in sections include:
* **Storage inquiry** — a button on the public page. Customers see **Looking for Storage?** with an **Inquire About Storage** button that leads to registration
* **Registration form** — the full registration form embedded on the page
* **Custom form** — a published form from [Marketing & Events > Forms](https://www.carstoragesoftware.com/dashboard/marketing/forms)
* **About the facility** — your description in plain language
* **Services & amenities** — checkboxes for climate control, detailing, transport, and similar
* **Photo gallery** — facility photos
* **Upcoming events** — your published events from Social events, soonest first
* **Customer reviews** — reviews from Google or your team (see below)
* **Cars for sale** — preview of marketplace vehicles
* **Location & map** — address, phone, and a map from **Facility profile**
* **Hours of operation** — weekly hours from [Settings > General](https://www.carstoragesoftware.com/dashboard/settings/general)
* **Contact people** — people from **Website contacts**
* **Social links** — icons from **Marketing** accounts on Communications
For the address, hours, people, and social sections, fill in Settings first. See [Add hours, map, contacts, and social links to your website](/docs/facility-web-pages/add-hours-map-contacts-and-social-to-your-website).
Content rows hold **Text**, **Image**, **Button**, **Video**, and **HTML** blocks. Add them with **Add section** > **Content block**, or from the **Add** tab in the website editor.
Click the **Customer reviews** section. If your facility has a Google Business profile, paste your **Google Place ID** and click the button to fetch reviews. Turn on the reviews you want visitors to see.
**Why this matters:** Real reviews help new prospects trust your facility before they call or visit.
Click the trash icon on a section to remove it. You can add built-in sections back later with **Add section**. A removed content row is deleted along with its content.
Built-in sections with nothing to show, such as **Customer reviews** before you select reviews or **Photo gallery** before you add photos, stay hidden on the public page until they have content.
**Expected result:** The live preview updates right away.
In **Header & page settings**, upload a wide banner image (about 1920×600 pixels works well). Drag to adjust how the image is cropped.
If your page brings its own header, for example in a custom HTML block, turn **Show banner** off. The page then starts at the nav bar or your first section, and a blur or transparent nav shows as a solid bar.
The banner grows to fit its title and subtitle. A subtitle longer than about 280 characters ends at a whole word with an ellipsis.
**Expected result:** The top of your public page looks professional on desktop and mobile.
### Show upcoming events
Use the **Upcoming events** section to list your events on the website. Your team keeps the events in **Social events**. The website updates on its own.
Click **Add section**, then **Upcoming events**. You can also add it to a column of a content row.
Select the section. Set the heading and the number of events to show. Turn **Include customers-only events** on or off. It lists only customers-only events that have **Show link preview** turned on. Select **Cards with photos** or **Compact list**.
In **Social events**, create an event and set **Visibility** to **Public** or **Customers only**. Then publish the event.
**Expected result:** The event is on the website. For a public event, the section shows the date, the time, the location, and the price. Each event links to its event page, where visitors RSVP.
The section shows published events only. An event leaves the list when it ends. Invite-only events are not shown. A customers-only event appears only when its **Show link preview** is on. It shows a **Members** badge with its name, photo, description, date, and time. Its location and price stay hidden until a customer signs in on the event page. The section is hidden on the public page until you have an event to show.
### Add custom HTML
Use an **HTML** block to bring over something from your previous website, such as a map, a booking widget, or a styled announcement.
Click **Add section** > **Content block** > **HTML**, or add it to an existing row.
Paste the code into the **HTML** box in the editor panel. The preview updates as you type.
A new HTML block starts in its own **full width** row. It spans the whole screen, edge to edge, with no side padding, rounded corners, or vertical spacing.
To keep it inside the page's content column instead, click the row in the section list. In **Row settings**, turn off **Full width (edge to edge)**. You can make any content row full width the same way.
If you add HTML to a row you already selected, that row stays as it is.
Your HTML is shown in an isolated frame on your page. Scripts inside it run only in that frame and cannot read or change the rest of your page. Links to other websites open in a new tab. In-page `#section` links work: the page scrolls to that part of the block, or to a section in another HTML block or elsewhere on the page, and a visitor can open `your-site.com/#section` directly. Scripts in the block can call `window.scrollTo` and `scrollIntoView` to scroll the page. Forms work: plain HTML forms open their confirmation in a new tab, and forms that submit with JavaScript stay inside the block. Embeds that need visitors to sign in or remember settings may not work. Each HTML block holds up to 1,000,000 characters, enough for a whole one-page site with its styles and scripts. A block over the limit is not cut: the save is refused with a message naming the block, and the editor panel shows how far over it is until you shorten it or split it across blocks.
The block adds no fonts or styles of its own; it only removes the browser's default page margin. Your CSS is used exactly as written, so HTML without CSS shows in the browser's default font. Each block is a separate frame, so the CSS in one block does not reach another block. To use one stylesheet on all blocks, paste it into **Shared CSS for HTML blocks** under **Header & page settings**. The site puts it in every block, before the block's own code. It holds up to 200,000 characters. `100vw` and media queries see the block's width. When the row is full width, that is the screen width.
## Step 6: Write a clear facility description
In the **About the facility** section (or your description field), write two or three sentences in plain language.
Example:
We provide secure indoor storage for collector and specialty vehicles. Our team helps with battery care, detailing appointments, and scheduled pickup or dropoff so your vehicle is ready when you need it.
### Expected result
Visitors understand what your facility offers without needing to call first.
## Step 7: Turn on customer actions your team is ready for
In the **Page editor**, add only the sections your team can support today, and remove the rest.
Use **Storage inquiry** when you want a button that leads to registration. Use **Registration form** when the full form should appear on the page itself.
Configure form questions in [Settings > Customer onboarding](https://www.carstoragesoftware.com/dashboard/settings/customer-onboarding).
Add the **Cars for sale** section when visitors should see marketplace vehicles. Use the visibility control on that section to choose **Public**, **Customers only**, or **All Car Storage Software users**.
See [Publish marketplace listings](/docs/facility-web-pages/publish-marketplace-listings) before sharing marketplace links widely.
Add **Location & map**, **Hours of operation**, **Contact people**, and **Social links** only after those facts exist in Settings.
See [Add hours, map, contacts, and social links to your website](/docs/facility-web-pages/add-hours-map-contacts-and-social-to-your-website).
Scroll to **Header & page settings** at the top of the Page editor. Turn on **Vendor invoice portal** only when outside providers should submit invoices through your public page.
**Why this matters:** This toggle is separate from draggable sections. After you turn it on, copy **Vendor invoices** from **Shareable links**.
Follow [Set up the vendor invoice portal](/docs/facility-web-pages/set-up-vendor-invoice-portal) before sending that link.
**Registration on the main page vs a separate link**
**Main page** (from **Shareable links**) can include a **Storage inquiry** button or an embedded registration form. **Registration** (also in **Shareable links**) opens the standalone registration page directly. Both paths work—pick the one that fits how you want prospects to start.
### Expected result
Visitors see the right buttons and sections for the next step you want them to take.
## Step 8: Open the public page and review it
Open **Main page** from **Shareable links**, or click **Open** on that card.
Review the page as if you are a brand-new customer.
Check:
* The facility name is correct.
* The description is clear and friendly.
* The service list is accurate.
* The main button points to the right next step.
* Marketplace or registration sections appear only if you want them visible.
* The vendor invoice link appears only if vendors should use it.
## Step 9: Check it on a phone-sized screen
Many prospects will open the page from a text message or mobile search result.
Open **Main page** from **Shareable links** on your phone. Check that text is easy to read and buttons are easy to tap.
Your page should look similar: facility name at the top, clear services, and one obvious next action without sideways scrolling.
**Why this matters:** Many prospects open your link from a text message. A clear mobile layout builds trust before they call or register.
For the signed-in phone experience (after customers have an account), see [Customize the customer mobile app](/docs/facility-web-pages/customize-the-customer-mobile-app).
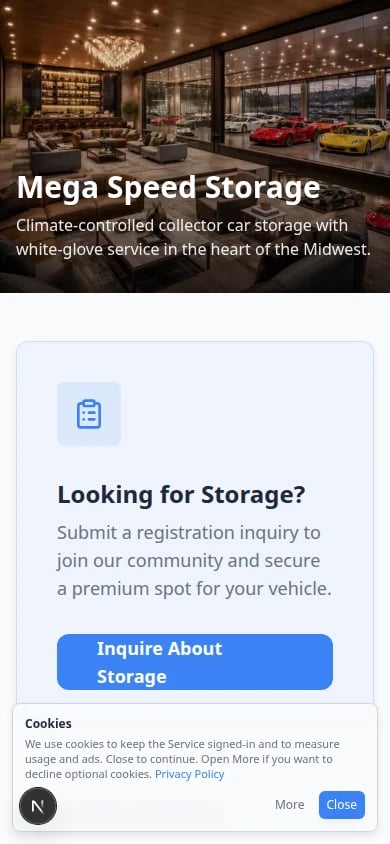 *Preview **Main page** on your phone before you share the link widely. Text should be easy to read and buttons easy to tap—no sideways scrolling.*
Check that:
* Text is easy to read.
* Buttons are easy to tap.
* Photos are not cut off in a confusing way.
* The most important action is visible without too much scrolling.
## What success looks like
* Your public page has a simple **Facility slug**.
* The page explains your facility in plain language.
* Services and customer actions are accurate.
* Your team has previewed the page before sharing it.
## Troubleshooting
**The page does not open**
Return to [Settings > Website & customer app](https://www.carstoragesoftware.com/dashboard/settings/website). Under **Public website**, make sure **Public Facility Pages** is turned on and your **Facility slug** is saved.
**The wrong sections are showing**
Open the **Page editor** and check which sections are in the list. Remove any you do not want. **Storage inquiry**, **Registration form**, and **Cars for sale** are separate rows you can drag and reorder.
**Vendor invoice portal** is different—it is a toggle under **Header & page settings**, not a draggable section.
**The page does not look like my brand**
Open [Settings > Branding](https://www.carstoragesoftware.com/dashboard/settings/branding) for logo and colors, and [Settings > Website & customer app](https://www.carstoragesoftware.com/dashboard/settings/website) for public page wording and links.
**My custom HTML is cut off or empty**
Open the **HTML** block and check that the code you pasted is complete, including any closing tags. The block grows to fit your content, up to 10,000 pixels. Taller content scrolls inside the block rather than being cut off. If your HTML sets the page height itself (for example `html, body { height: 100% }`), the block sizes to the content when the page loads but may not shrink when the content later gets shorter; reload the page to resize it.
Sizes in `vh` refer to the block itself, not the browser window. Use pixel or content-based heights instead. This is a known limitation.
**My custom HTML has a gap at the sides, or does not fill the screen**
Click the row in the section list (in the **Page editor**, or under **Structure** in the website editor) to open its **Row settings**, and turn on **Full width (edge to edge)**. The page keeps its normal spacing above and below contained sections.
## What to do next
After the landing page looks ready, add [hours, map, contacts, and social links](/docs/facility-web-pages/add-hours-map-contacts-and-social-to-your-website) if visitors should find you without calling. Then follow [Set up customer registration](/docs/facility-web-pages/set-up-customer-registration) if prospects should request storage from the page. If vendors should submit invoices through your public page, follow [Set up the vendor invoice portal](/docs/facility-web-pages/set-up-vendor-invoice-portal).
## Related topics
- [Facility Web Pages overview](/docs/facility-web-pages/overview.md)
- [Configure portal and website](/docs/settings/configure-portal-and-website.md)
- [Edit your website with the AI website editor](/docs/facility-web-pages/build-your-website-with-ai.md)
- [Embed a custom form on your website](/docs/marketing-events/embed-a-custom-form-on-your-website.md)
- [Connect a custom domain](/docs/facility-web-pages/connect-a-custom-domain.md)
This documentation is built and hosted on [Mintlify](https://mintlify.com), a developer documentation platform.
*Preview **Main page** on your phone before you share the link widely. Text should be easy to read and buttons easy to tap—no sideways scrolling.*
Check that:
* Text is easy to read.
* Buttons are easy to tap.
* Photos are not cut off in a confusing way.
* The most important action is visible without too much scrolling.
## What success looks like
* Your public page has a simple **Facility slug**.
* The page explains your facility in plain language.
* Services and customer actions are accurate.
* Your team has previewed the page before sharing it.
## Troubleshooting
**The page does not open**
Return to [Settings > Website & customer app](https://www.carstoragesoftware.com/dashboard/settings/website). Under **Public website**, make sure **Public Facility Pages** is turned on and your **Facility slug** is saved.
**The wrong sections are showing**
Open the **Page editor** and check which sections are in the list. Remove any you do not want. **Storage inquiry**, **Registration form**, and **Cars for sale** are separate rows you can drag and reorder.
**Vendor invoice portal** is different—it is a toggle under **Header & page settings**, not a draggable section.
**The page does not look like my brand**
Open [Settings > Branding](https://www.carstoragesoftware.com/dashboard/settings/branding) for logo and colors, and [Settings > Website & customer app](https://www.carstoragesoftware.com/dashboard/settings/website) for public page wording and links.
**My custom HTML is cut off or empty**
Open the **HTML** block and check that the code you pasted is complete, including any closing tags. The block grows to fit your content, up to 10,000 pixels. Taller content scrolls inside the block rather than being cut off. If your HTML sets the page height itself (for example `html, body { height: 100% }`), the block sizes to the content when the page loads but may not shrink when the content later gets shorter; reload the page to resize it.
Sizes in `vh` refer to the block itself, not the browser window. Use pixel or content-based heights instead. This is a known limitation.
**My custom HTML has a gap at the sides, or does not fill the screen**
Click the row in the section list (in the **Page editor**, or under **Structure** in the website editor) to open its **Row settings**, and turn on **Full width (edge to edge)**. The page keeps its normal spacing above and below contained sections.
## What to do next
After the landing page looks ready, add [hours, map, contacts, and social links](/docs/facility-web-pages/add-hours-map-contacts-and-social-to-your-website) if visitors should find you without calling. Then follow [Set up customer registration](/docs/facility-web-pages/set-up-customer-registration) if prospects should request storage from the page. If vendors should submit invoices through your public page, follow [Set up the vendor invoice portal](/docs/facility-web-pages/set-up-vendor-invoice-portal).
## Related topics
- [Facility Web Pages overview](/docs/facility-web-pages/overview.md)
- [Configure portal and website](/docs/settings/configure-portal-and-website.md)
- [Edit your website with the AI website editor](/docs/facility-web-pages/build-your-website-with-ai.md)
- [Embed a custom form on your website](/docs/marketing-events/embed-a-custom-form-on-your-website.md)
- [Connect a custom domain](/docs/facility-web-pages/connect-a-custom-domain.md)
This documentation is built and hosted on [Mintlify](https://mintlify.com), a developer documentation platform.