> ## Documentation Index
> Fetch the complete documentation index at: https://www.carstoragesoftware.com/docs/llms.txt
> Use this file to discover all available pages before exploring further.
# Set up customer registration
> Configure the public registration flow for prospects and new customers.
## What you will accomplish
Prospects will complete one registration form on your public page. Your team will receive their details in [Contacts](https://www.carstoragesoftware.com/dashboard/contacts) so you can review the request before inviting them to the portal.
## When to use this guide
Use this guide when you want new customers to request storage online instead of emailing forms or calling your office.
When you finish:
* The public registration link works from your website or facility page.
* The form asks only for information your team needs at first contact.
* Your team knows where submitted requests appear.
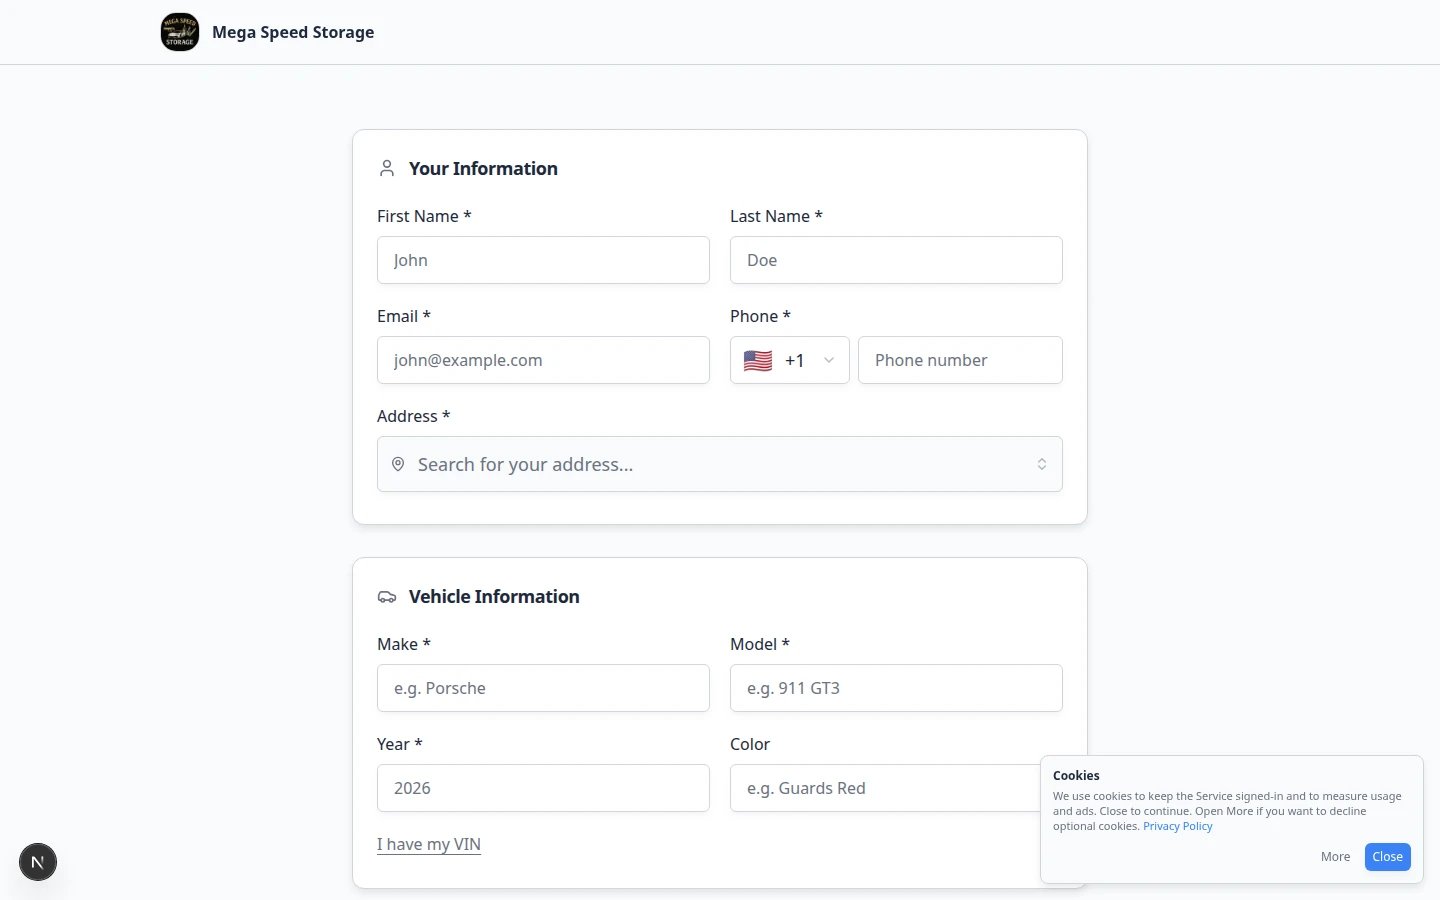 *The public registration page gives new customers one clear place to start. Preview it in a private browser window before you share the link.*
## Before you start
* Decide what information you need from every new customer (contact info, vehicle details, documents, payment).
* Confirm your team is ready to review new requests in [Contacts](https://www.carstoragesoftware.com/dashboard/contacts).
* Turn on your public pages in [Settings > Website & customer app](https://www.carstoragesoftware.com/dashboard/settings/website) under **Public website**.
* If you will collect payment during signup, finish [Connect payment processing](/docs/settings/connect-payment-processing) first.
**Registration setup lives in two places**
Use [Settings > Customer onboarding](https://www.carstoragesoftware.com/dashboard/settings/customer-onboarding) to choose **which questions** appear on the form.
Use [Settings > Website & customer app](https://www.carstoragesoftware.com/dashboard/settings/website) to turn on **Registration form** in the **Page editor** and to copy the public registration URL from **Shareable links**.
Both places control whether registration works—the **Online registration form** switch and the **Registration form** page section must be on for submissions to succeed.
## Step 1: Turn on the online registration form
Go to [Settings > Customer onboarding](https://www.carstoragesoftware.com/dashboard/settings/customer-onboarding).
**Expected result:** The page title is **Customer onboarding**.
Find the **Online registration form** section and click the heading if it is collapsed.
**Expected result:** You see a switch labeled **Online registration form** and a list of **Form Cards** below it.
Turn the **Online registration form** switch on.
**Why this matters:** When this switch is off, your public registration link will not accept new submissions—even if the link still opens.
Open the **On complete** section and pick one of the two cards.
Use **Email and start onboarding** when you want them to get a welcome email and finish onboarding right away.
Use **Save as a lead** when you want the request in [Contacts](https://www.carstoragesoftware.com/dashboard/contacts) first, then follow up and send a welcome invite yourself.
Your team is notified either way.
**Expected result:** The selected card stays highlighted. New submissions follow that rule until you change it.
*The public registration page gives new customers one clear place to start. Preview it in a private browser window before you share the link.*
## Before you start
* Decide what information you need from every new customer (contact info, vehicle details, documents, payment).
* Confirm your team is ready to review new requests in [Contacts](https://www.carstoragesoftware.com/dashboard/contacts).
* Turn on your public pages in [Settings > Website & customer app](https://www.carstoragesoftware.com/dashboard/settings/website) under **Public website**.
* If you will collect payment during signup, finish [Connect payment processing](/docs/settings/connect-payment-processing) first.
**Registration setup lives in two places**
Use [Settings > Customer onboarding](https://www.carstoragesoftware.com/dashboard/settings/customer-onboarding) to choose **which questions** appear on the form.
Use [Settings > Website & customer app](https://www.carstoragesoftware.com/dashboard/settings/website) to turn on **Registration form** in the **Page editor** and to copy the public registration URL from **Shareable links**.
Both places control whether registration works—the **Online registration form** switch and the **Registration form** page section must be on for submissions to succeed.
## Step 1: Turn on the online registration form
Go to [Settings > Customer onboarding](https://www.carstoragesoftware.com/dashboard/settings/customer-onboarding).
**Expected result:** The page title is **Customer onboarding**.
Find the **Online registration form** section and click the heading if it is collapsed.
**Expected result:** You see a switch labeled **Online registration form** and a list of **Form Cards** below it.
Turn the **Online registration form** switch on.
**Why this matters:** When this switch is off, your public registration link will not accept new submissions—even if the link still opens.
Open the **On complete** section and pick one of the two cards.
Use **Email and start onboarding** when you want them to get a welcome email and finish onboarding right away.
Use **Save as a lead** when you want the request in [Contacts](https://www.carstoragesoftware.com/dashboard/contacts) first, then follow up and send a welcome invite yourself.
Your team is notified either way.
**Expected result:** The selected card stays highlighted. New submissions follow that rule until you change it.
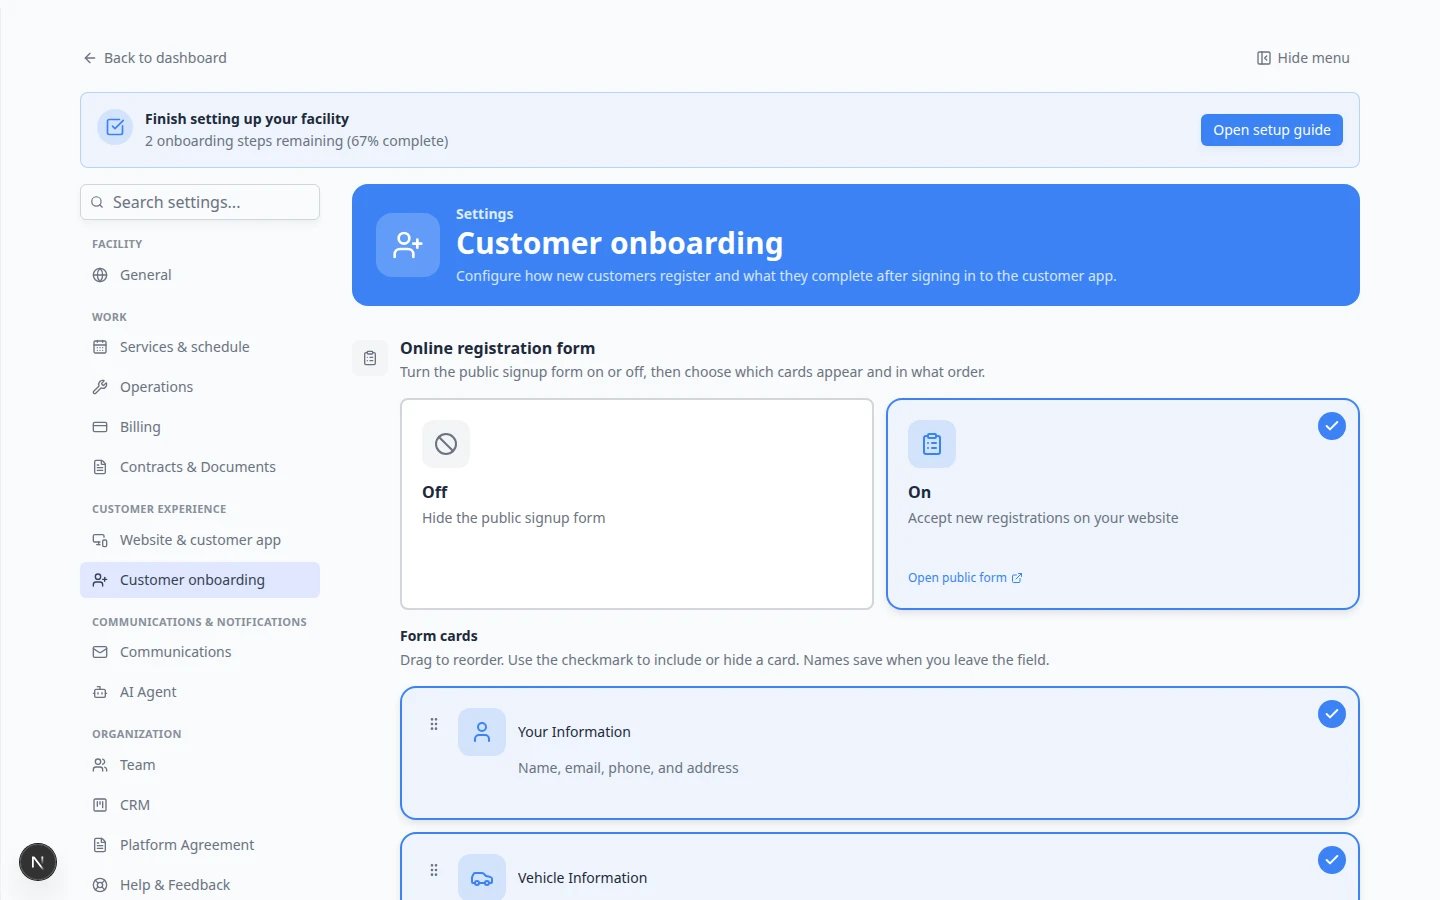 *Form Cards control what prospects see on the public registration page. Turn cards on or off and drag to reorder.*
## Step 2: Choose which form cards to show
Each **Form Card** is one section of the registration form.
Common cards include:
* **Your Information** — name, email, phone, and address. The card's **Address required** switch decides whether customers must enter a full address (on by default).
* Make, model, year, and color—or use **I have my VIN** on the public form for a faster vehicle lookup
* **Drop-off Details** — preferred arrival date and notes.
* **Payment** — only if your team is ready to collect payment during signup.
* **Additional contacts** — spouse, assistant, or company contact.
* **Documents** — insurance, registration, or ID uploads (files appear under **Documents & Contracts** on the customer record).
* **Custom Questions** — extra fields your team configured.
**Contracts during registration**
If customers must **sign** an agreement (not just upload a file), that is usually handled through **Contracts** and customer onboarding—not the **Documents** card alone. See [Attach contracts to customer workflows](/docs/contracts/attach-contracts-to-workflows) when signing is required before portal access.
Use the switch on the right side of each card.
Keep the first version short. You can collect extra details after your team speaks with the customer.
Drag the handle on the left to reorder cards.
A simple order: **Your Information** → **Vehicle Information** → optional cards such as **Drop-off Details** or **Documents**.
Some cards have a **Configure** button (for example **Vehicle Information**).
Click **Configure** to choose which fields appear, then save.
**Keep the first form short**
A shorter form is easier to finish on a phone. Add payment or document uploads only when your facility truly needs them before approval.
### Expected result
The form feels natural: easy questions first, detailed questions later.
## Step 3: Turn on registration on your public page
Registration has two switches. Both must be on before the public link works.
Go to [Settings > Website & customer app](https://www.carstoragesoftware.com/dashboard/settings/website).
**Expected result:** You see **Shareable links** near the top and **Public website** farther down the page.
Under **Public website**, turn on **Public Facility Pages** if it is not already on.
**Why this matters:** Prospects need a public address for your facility before any registration link will open.
Scroll to **Page editor**. Turn on the **Registration form** section (or **Storage inquiry** if you prefer a button that leads to registration).
**Why this matters:** The **Registration** card in **Shareable links** appears only when registration is enabled here.
*Form Cards control what prospects see on the public registration page. Turn cards on or off and drag to reorder.*
## Step 2: Choose which form cards to show
Each **Form Card** is one section of the registration form.
Common cards include:
* **Your Information** — name, email, phone, and address. The card's **Address required** switch decides whether customers must enter a full address (on by default).
* Make, model, year, and color—or use **I have my VIN** on the public form for a faster vehicle lookup
* **Drop-off Details** — preferred arrival date and notes.
* **Payment** — only if your team is ready to collect payment during signup.
* **Additional contacts** — spouse, assistant, or company contact.
* **Documents** — insurance, registration, or ID uploads (files appear under **Documents & Contracts** on the customer record).
* **Custom Questions** — extra fields your team configured.
**Contracts during registration**
If customers must **sign** an agreement (not just upload a file), that is usually handled through **Contracts** and customer onboarding—not the **Documents** card alone. See [Attach contracts to customer workflows](/docs/contracts/attach-contracts-to-workflows) when signing is required before portal access.
Use the switch on the right side of each card.
Keep the first version short. You can collect extra details after your team speaks with the customer.
Drag the handle on the left to reorder cards.
A simple order: **Your Information** → **Vehicle Information** → optional cards such as **Drop-off Details** or **Documents**.
Some cards have a **Configure** button (for example **Vehicle Information**).
Click **Configure** to choose which fields appear, then save.
**Keep the first form short**
A shorter form is easier to finish on a phone. Add payment or document uploads only when your facility truly needs them before approval.
### Expected result
The form feels natural: easy questions first, detailed questions later.
## Step 3: Turn on registration on your public page
Registration has two switches. Both must be on before the public link works.
Go to [Settings > Website & customer app](https://www.carstoragesoftware.com/dashboard/settings/website).
**Expected result:** You see **Shareable links** near the top and **Public website** farther down the page.
Under **Public website**, turn on **Public Facility Pages** if it is not already on.
**Why this matters:** Prospects need a public address for your facility before any registration link will open.
Scroll to **Page editor**. Turn on the **Registration form** section (or **Storage inquiry** if you prefer a button that leads to registration).
**Why this matters:** The **Registration** card in **Shareable links** appears only when registration is enabled here.
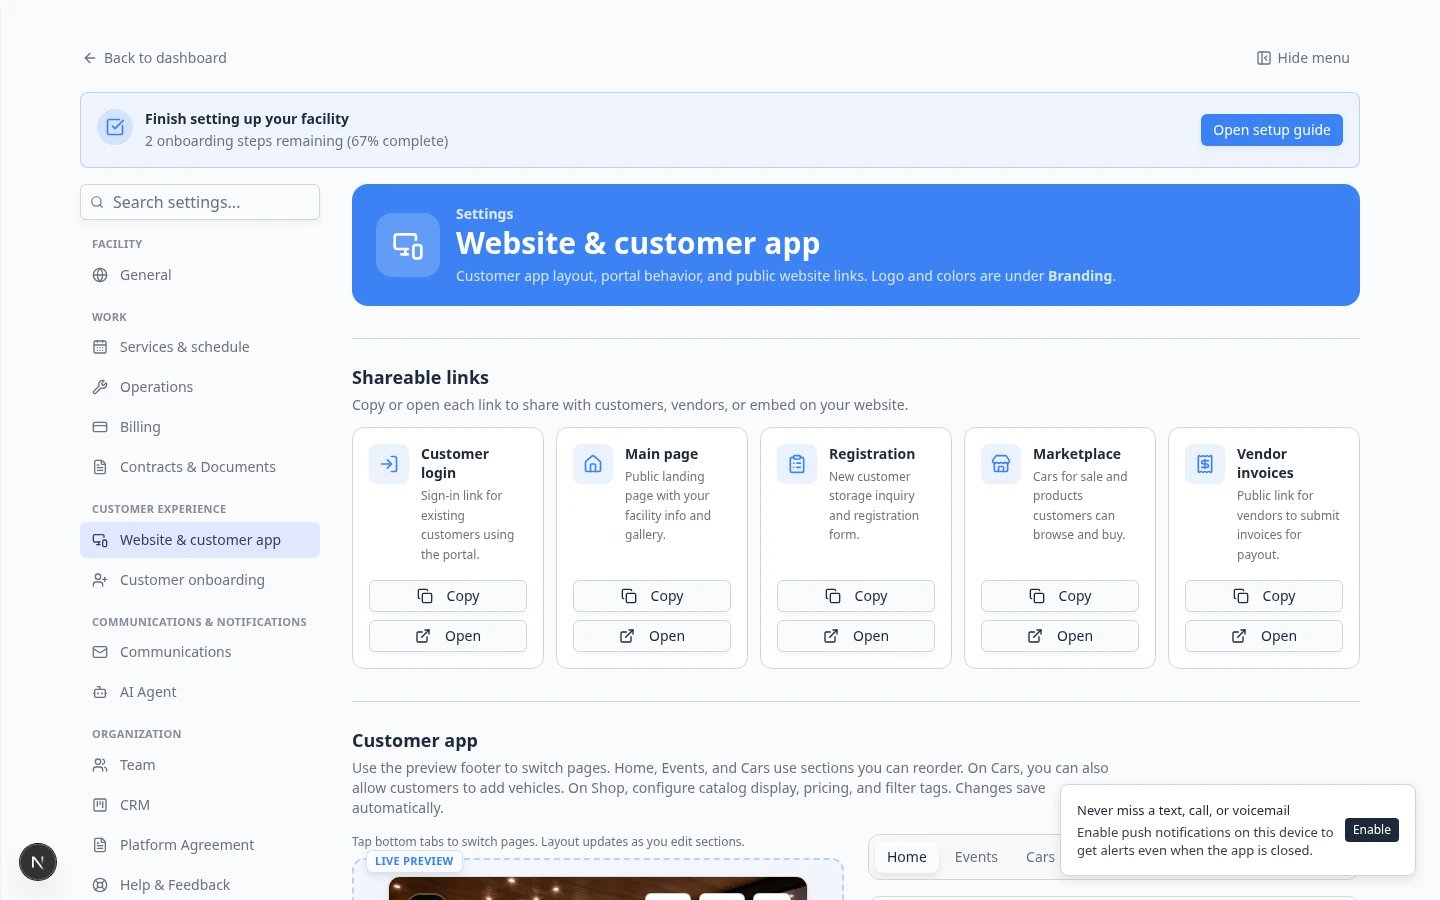 *In **Page editor**, turn on **Registration form**. You can also turn on **Storage inquiry** if you want a button on your main page that leads to registration.*
### Expected result
**Registration** appears as a card in **Shareable links** at the top of the same settings page.
## Step 4: Copy your registration link for testing
Go to [Settings > Website & customer app](https://www.carstoragesoftware.com/dashboard/settings/website).
Near the top, find the **Shareable links** section.
On the **Registration** card, click **Copy**.
The link usually ends with `/registration`.
**Expected result:** You copied the full link—not just part of the address.
*In **Page editor**, turn on **Registration form**. You can also turn on **Storage inquiry** if you want a button on your main page that leads to registration.*
### Expected result
**Registration** appears as a card in **Shareable links** at the top of the same settings page.
## Step 4: Copy your registration link for testing
Go to [Settings > Website & customer app](https://www.carstoragesoftware.com/dashboard/settings/website).
Near the top, find the **Shareable links** section.
On the **Registration** card, click **Copy**.
The link usually ends with `/registration`.
**Expected result:** You copied the full link—not just part of the address.
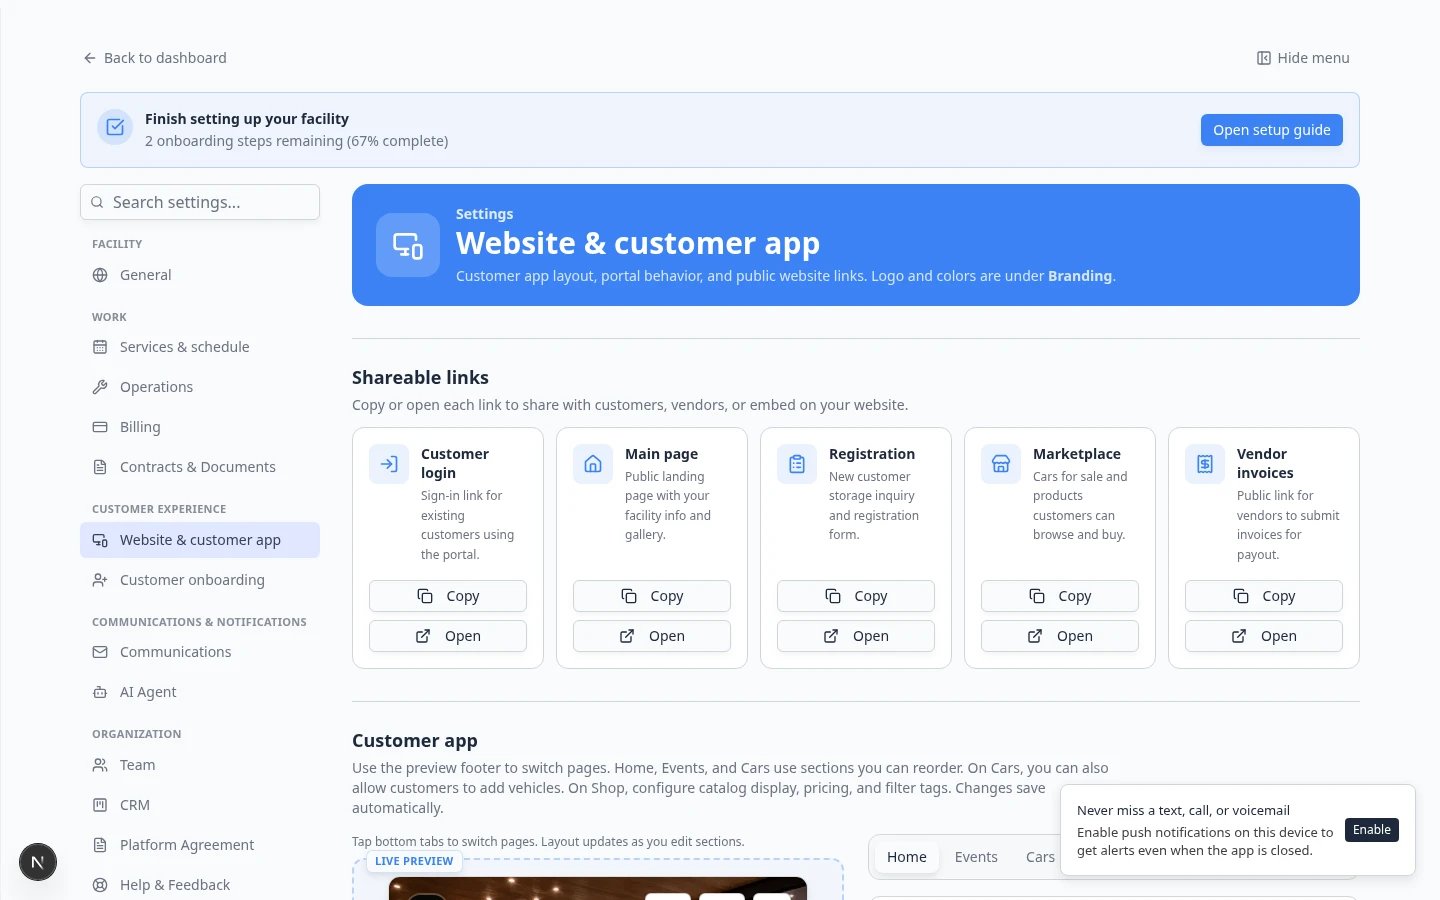 *After registration is turned on, copy the **Registration** link from **Shareable links** and share it on your website or in emails.*
## Step 5: Test the registration form
Use a private or incognito window so you are not signed in as staff.
**Why this matters:** If you stay signed in as staff, you may see the dashboard instead of the public form your prospects will see.
Open the link you copied from **Shareable links**.
**Expected result:** You see your facility name and a registration form—not the staff dashboard.
Use a clear test name such as **Test Registration** and an email your team will recognize.
Complete every required field. Do not click **Submit Registration** yet—first confirm every section looks correct.
*After registration is turned on, copy the **Registration** link from **Shareable links** and share it on your website or in emails.*
## Step 5: Test the registration form
Use a private or incognito window so you are not signed in as staff.
**Why this matters:** If you stay signed in as staff, you may see the dashboard instead of the public form your prospects will see.
Open the link you copied from **Shareable links**.
**Expected result:** You see your facility name and a registration form—not the staff dashboard.
Use a clear test name such as **Test Registration** and an email your team will recognize.
Complete every required field. Do not click **Submit Registration** yet—first confirm every section looks correct.
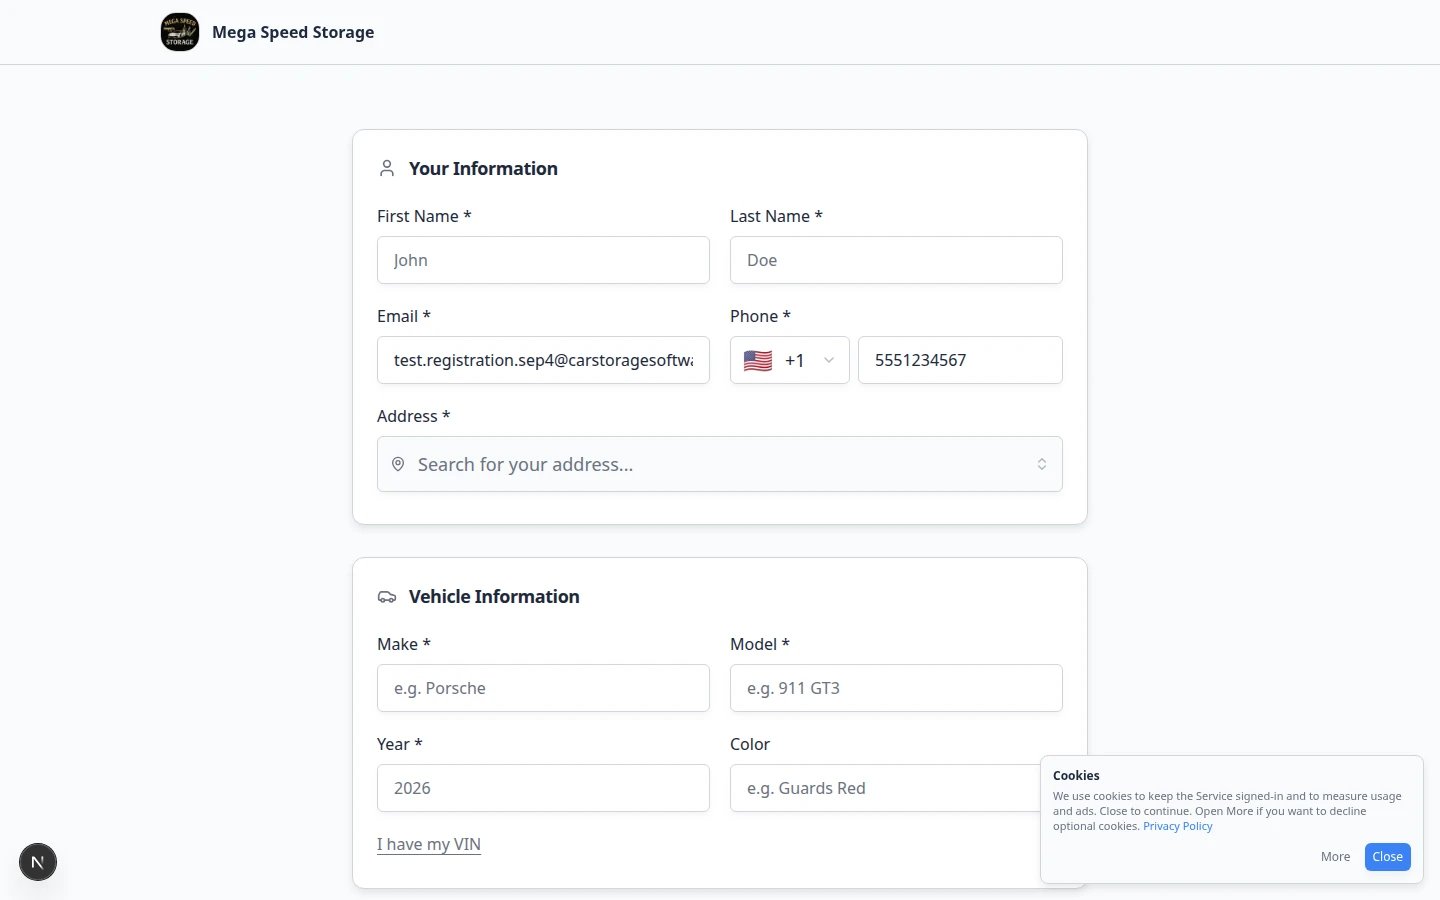 *Fill in a test request with a name like **Test Registration** before you click submit. This is what prospects will see on their phone or computer.*
Click **Submit Registration** at the bottom of the form.
**Expected result:** A confirmation message appears. If nothing happens, check that **Online registration form** is on in [Customer onboarding](https://www.carstoragesoftware.com/dashboard/settings/customer-onboarding).
Sign in to the staff dashboard and open [Contacts](https://www.carstoragesoftware.com/dashboard/contacts).
Search for your test name or email.
**Expected result:** The new record appears so your team can practice review steps in [Review and approve registration requests](/docs/facility-web-pages/review-and-approve-registration-requests).
*Fill in a test request with a name like **Test Registration** before you click submit. This is what prospects will see on their phone or computer.*
Click **Submit Registration** at the bottom of the form.
**Expected result:** A confirmation message appears. If nothing happens, check that **Online registration form** is on in [Customer onboarding](https://www.carstoragesoftware.com/dashboard/settings/customer-onboarding).
Sign in to the staff dashboard and open [Contacts](https://www.carstoragesoftware.com/dashboard/contacts).
Search for your test name or email.
**Expected result:** The new record appears so your team can practice review steps in [Review and approve registration requests](/docs/facility-web-pages/review-and-approve-registration-requests).
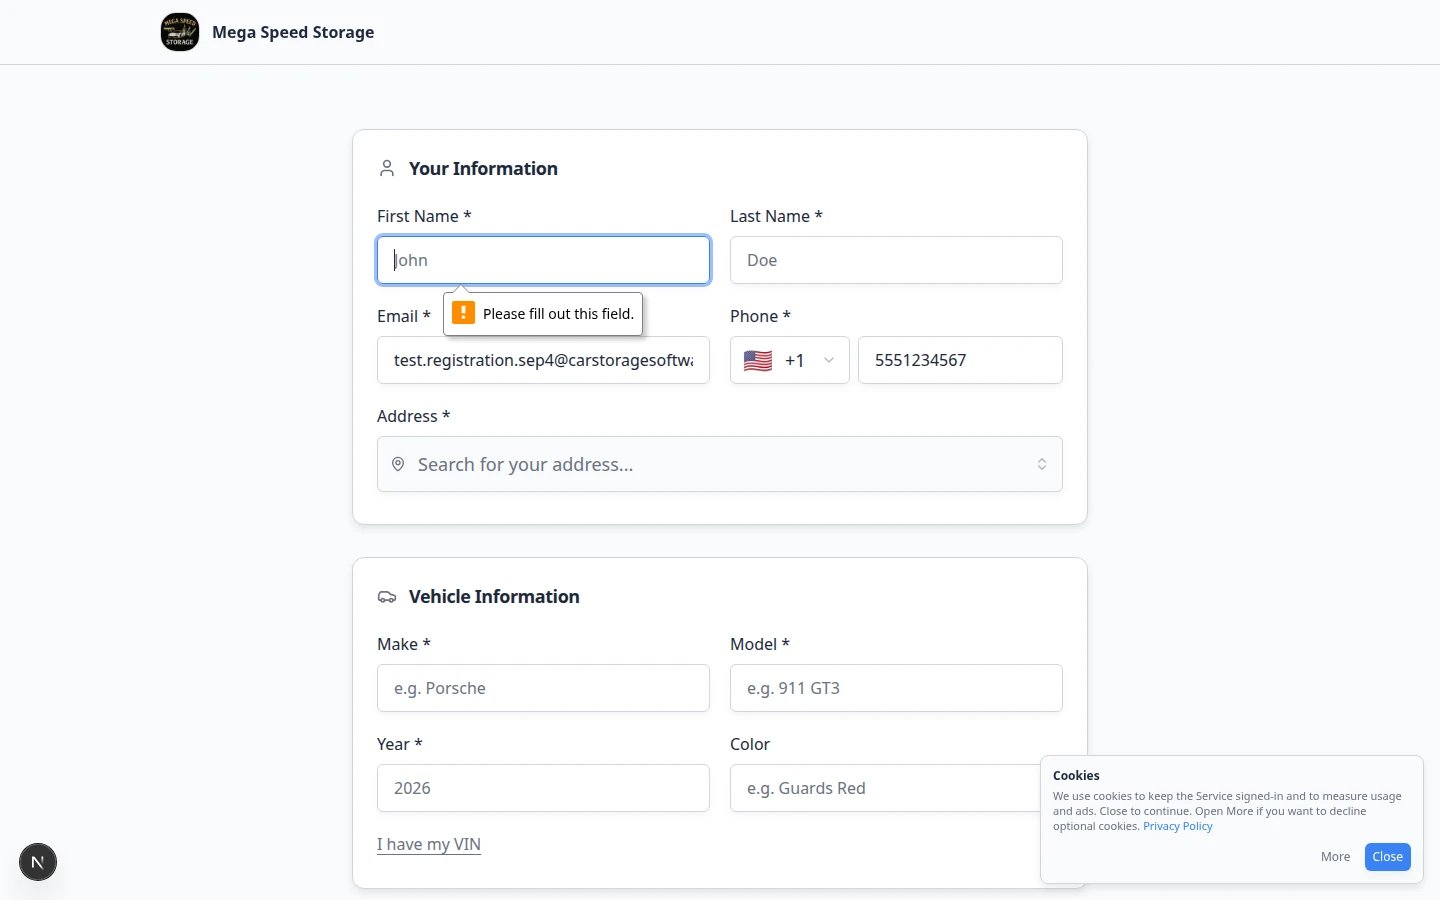 *After a prospect clicks submit, they should see a confirmation message. If they do not, the request may not have reached [Contacts](https://www.carstoragesoftware.com/dashboard/contacts).*
## Step 6: Review payment rules (optional)
If your form includes a **Payment** card, confirm your billing setup is ready.
* [Payment processing](/docs/settings/connect-payment-processing) is connected in [Settings > Billing](https://www.carstoragesoftware.com/dashboard/settings/billing).
* Your team can explain what the customer is paying for if payment is required during signup.
* You tested a safe payment path using your facility’s approved test process.
**Payment during signup affects trust**
Do not require payment on the registration form until your team is ready to answer customer questions about charges and next steps.
## What success looks like
* **Online registration form** is turned on in [Customer onboarding](https://www.carstoragesoftware.com/dashboard/settings/customer-onboarding).
* **On complete** is set to **Email and start onboarding** or **Save as a lead**, depending on whether you want instant portal access.
* Form cards match the information your team needs at first contact.
* The registration link opens from **Shareable links** and works in a private browser window.
* A test submission appears in [Contacts](https://www.carstoragesoftware.com/dashboard/contacts).
* Your team tested the full path before sharing the link publicly.
## Troubleshooting
**The registration page says not found**
Open [Settings > Website & customer app](https://www.carstoragesoftware.com/dashboard/settings/website). Under **Public website**, confirm **Public Facility Pages** is on and your **Facility slug** is saved. Turn on **Registration form** in the **Page editor**.
**I do not see Form Cards**
Open [Settings > Customer onboarding](https://www.carstoragesoftware.com/dashboard/settings/customer-onboarding) and expand **Online registration form**. Form cards appear inside that section—not on the Website & customer app page.
**Customers say the form is too long**
Turn off non-essential cards. Keep **Your Information** and **Vehicle Information**, then collect documents or payment after your team reviews the request.
**Payment during signup fails**
Review [Settings > Billing](https://www.carstoragesoftware.com/dashboard/settings/billing) and [Connect payment processing](/docs/settings/connect-payment-processing). Signup payment cannot work until processing is ready.
## What to do next
After registration works, follow [Review and approve registration requests](/docs/facility-web-pages/review-and-approve-registration-requests) with your team. Then add the link to your [public facility page](/docs/facility-web-pages/configure-the-facility-landing-page) or website using [Add a website embed](/docs/facility-web-pages/add-a-website-embed).
## Related topics
- [Review and approve registration requests](/docs/facility-web-pages/review-and-approve-registration-requests.md)
- [Facility Web Pages overview](/docs/facility-web-pages/overview.md)
- [Choose the right public link to share](/docs/facility-web-pages/choose-the-right-public-link.md)
- [Let customers add their own cars](/docs/facility-web-pages/let-customers-add-their-own-cars.md)
- [Share customer login links](/docs/facility-web-pages/share-customer-login-links.md)
This documentation is built and hosted on [Mintlify](https://mintlify.com), a developer documentation platform.
*After a prospect clicks submit, they should see a confirmation message. If they do not, the request may not have reached [Contacts](https://www.carstoragesoftware.com/dashboard/contacts).*
## Step 6: Review payment rules (optional)
If your form includes a **Payment** card, confirm your billing setup is ready.
* [Payment processing](/docs/settings/connect-payment-processing) is connected in [Settings > Billing](https://www.carstoragesoftware.com/dashboard/settings/billing).
* Your team can explain what the customer is paying for if payment is required during signup.
* You tested a safe payment path using your facility’s approved test process.
**Payment during signup affects trust**
Do not require payment on the registration form until your team is ready to answer customer questions about charges and next steps.
## What success looks like
* **Online registration form** is turned on in [Customer onboarding](https://www.carstoragesoftware.com/dashboard/settings/customer-onboarding).
* **On complete** is set to **Email and start onboarding** or **Save as a lead**, depending on whether you want instant portal access.
* Form cards match the information your team needs at first contact.
* The registration link opens from **Shareable links** and works in a private browser window.
* A test submission appears in [Contacts](https://www.carstoragesoftware.com/dashboard/contacts).
* Your team tested the full path before sharing the link publicly.
## Troubleshooting
**The registration page says not found**
Open [Settings > Website & customer app](https://www.carstoragesoftware.com/dashboard/settings/website). Under **Public website**, confirm **Public Facility Pages** is on and your **Facility slug** is saved. Turn on **Registration form** in the **Page editor**.
**I do not see Form Cards**
Open [Settings > Customer onboarding](https://www.carstoragesoftware.com/dashboard/settings/customer-onboarding) and expand **Online registration form**. Form cards appear inside that section—not on the Website & customer app page.
**Customers say the form is too long**
Turn off non-essential cards. Keep **Your Information** and **Vehicle Information**, then collect documents or payment after your team reviews the request.
**Payment during signup fails**
Review [Settings > Billing](https://www.carstoragesoftware.com/dashboard/settings/billing) and [Connect payment processing](/docs/settings/connect-payment-processing). Signup payment cannot work until processing is ready.
## What to do next
After registration works, follow [Review and approve registration requests](/docs/facility-web-pages/review-and-approve-registration-requests) with your team. Then add the link to your [public facility page](/docs/facility-web-pages/configure-the-facility-landing-page) or website using [Add a website embed](/docs/facility-web-pages/add-a-website-embed).
## Related topics
- [Review and approve registration requests](/docs/facility-web-pages/review-and-approve-registration-requests.md)
- [Facility Web Pages overview](/docs/facility-web-pages/overview.md)
- [Choose the right public link to share](/docs/facility-web-pages/choose-the-right-public-link.md)
- [Let customers add their own cars](/docs/facility-web-pages/let-customers-add-their-own-cars.md)
- [Share customer login links](/docs/facility-web-pages/share-customer-login-links.md)
This documentation is built and hosted on [Mintlify](https://mintlify.com), a developer documentation platform.