> ## Documentation Index
> Fetch the complete documentation index at: https://www.carstoragesoftware.com/docs/llms.txt
> Use this file to discover all available pages before exploring further.
# Share customer login links
> Copy the correct customer login link, place it where customers can find it, and test it before sharing.
## What you will accomplish
Existing customers will have a simple **Customer login** link on your website, emails, or printed materials. They can open their portal without calling your office for the address.
## When to use this guide
Use this guide when someone who **already has a customer account** needs to sign in to the portal.
This is **not** the link for brand-new prospects. New customers usually start with [Set up customer registration](/docs/facility-web-pages/set-up-customer-registration) or your public facility page first.
## Before you start
* Your logo and colors look correct in [Settings > Branding](https://www.carstoragesoftware.com/dashboard/settings/branding).
* You can open [Settings > Website & customer app](https://www.carstoragesoftware.com/dashboard/settings/website).
* You know where customers should find the link (website header, welcome email, printed packet).
* If you use a custom domain, test it with [Connect a custom domain](/docs/facility-web-pages/connect-a-custom-domain) before sharing widely.
**How customer login works**
The customer portal uses a **secure sign-in link** sent to their email—there is no password to remember. The email address must match the one on their record in [Contacts](https://www.carstoragesoftware.com/dashboard/contacts).
The **Customer login** link from **Shareable links** usually ends with `/signin` on your facility address (for example `/facility/your-facility-name/signin`). That is the page customers should open—not `/dashboard`.
**Customer login is not the staff dashboard**
Do not copy a link from your browser while you are inside the staff dashboard (addresses that start with `/dashboard`). Customers need the **Customer login** link from **Shareable links**.
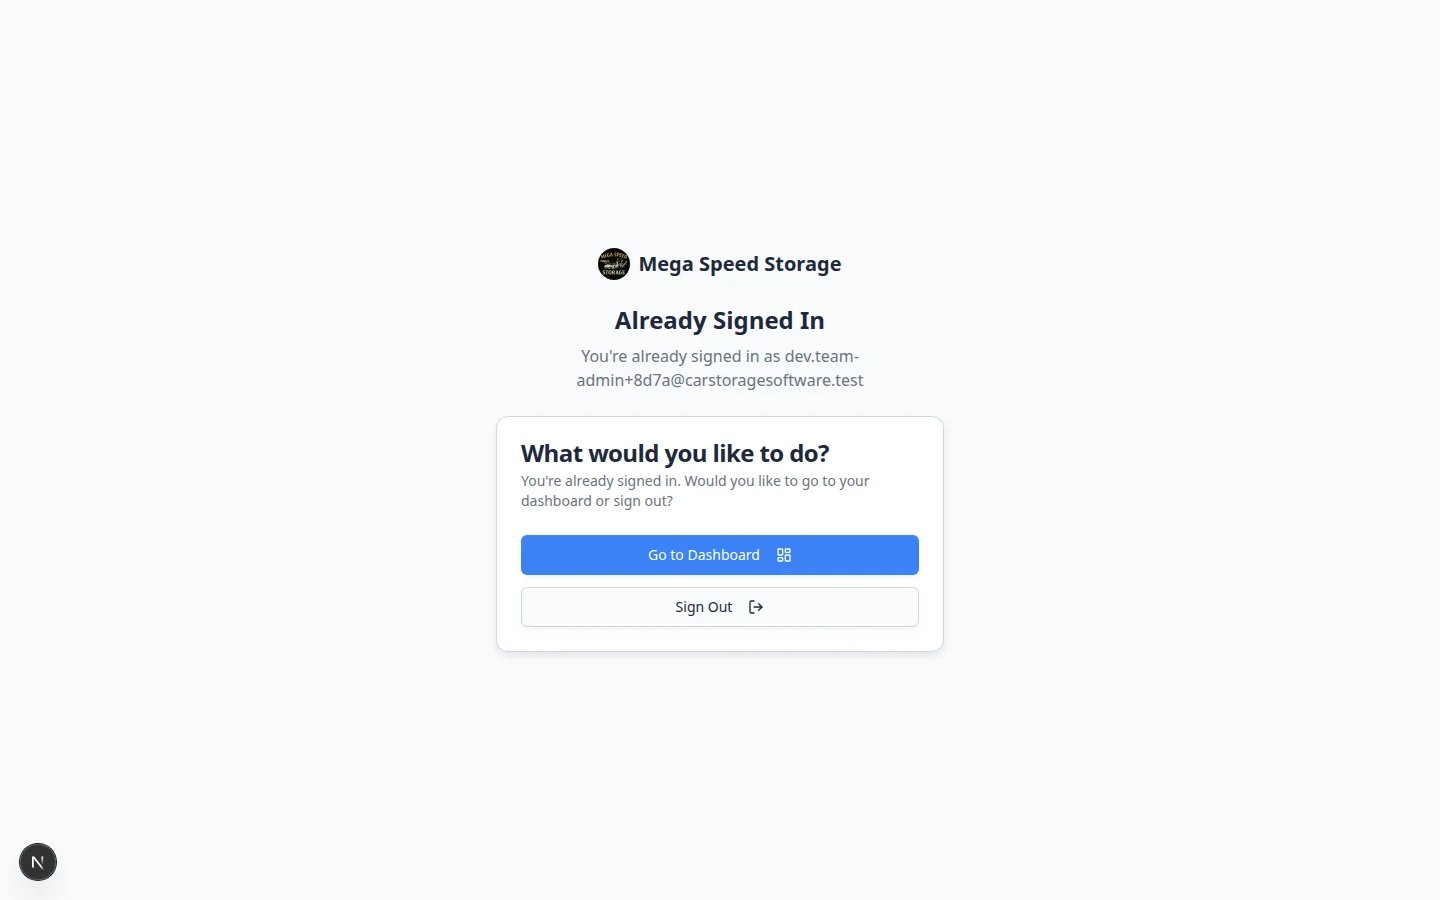 *Copy the Customer login link from the Shareable links section—never from the staff dashboard address bar.*
## Step 1: Open Website & customer app settings
In the dashboard sidebar, click **Settings**, then **Website & customer app**.
You can also go directly to [Settings > Website & customer app](https://www.carstoragesoftware.com/dashboard/settings/website).
**Expected result:** The page title is **Website & customer app**.
Scroll to the **Shareable links** section near the top of the page.
**Expected result:** You see cards such as **Customer login**, **Main page**, **Registration**, **Marketplace**, and **Vendor invoices** (when your **Facility slug** is saved).
*Copy the Customer login link from the Shareable links section—never from the staff dashboard address bar.*
## Step 1: Open Website & customer app settings
In the dashboard sidebar, click **Settings**, then **Website & customer app**.
You can also go directly to [Settings > Website & customer app](https://www.carstoragesoftware.com/dashboard/settings/website).
**Expected result:** The page title is **Website & customer app**.
Scroll to the **Shareable links** section near the top of the page.
**Expected result:** You see cards such as **Customer login**, **Main page**, **Registration**, **Marketplace**, and **Vendor invoices** (when your **Facility slug** is saved).
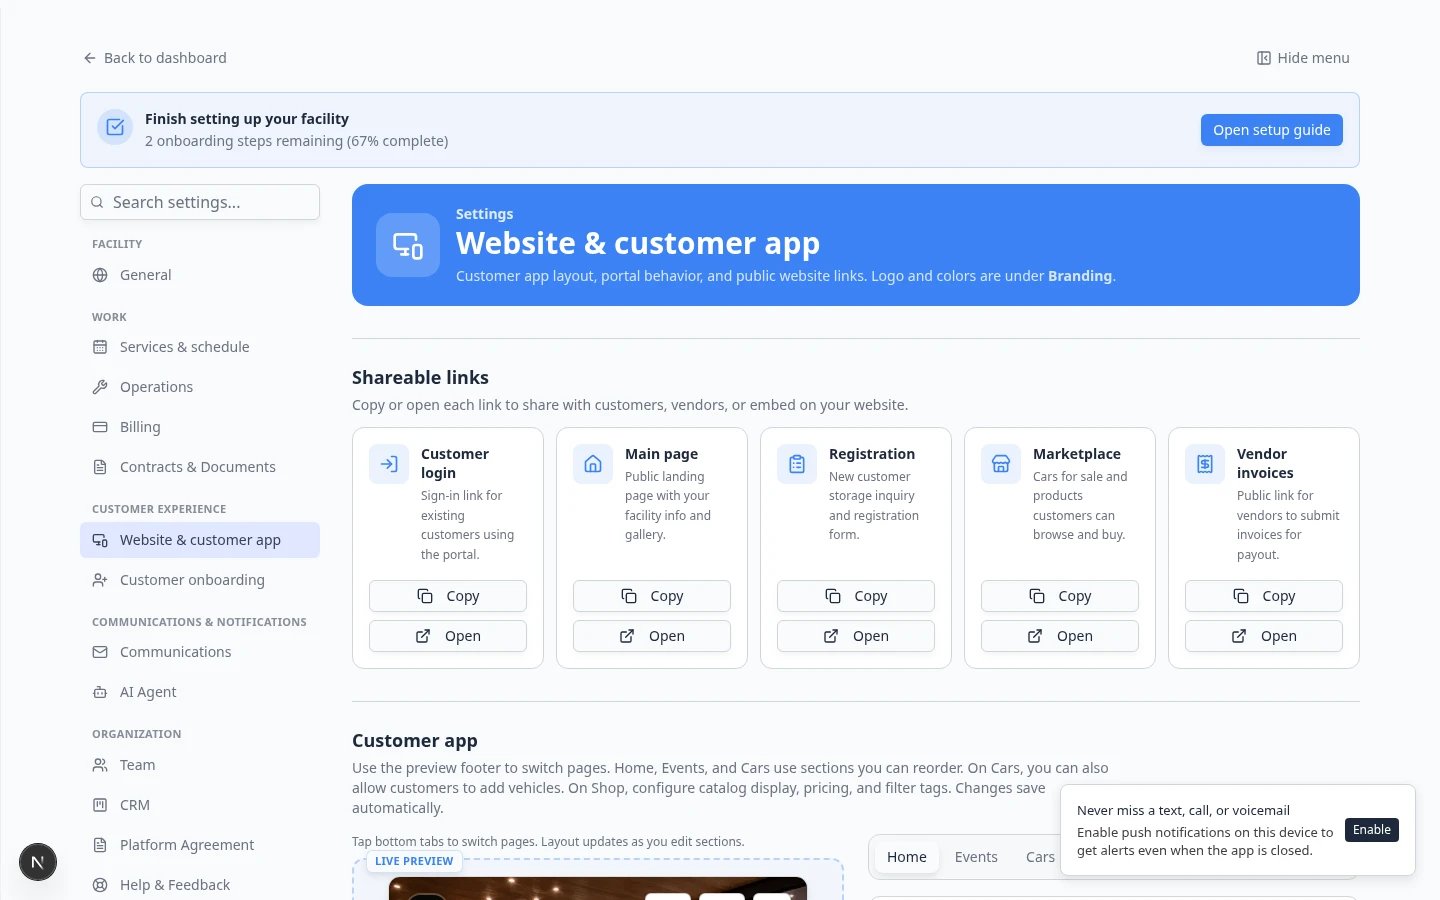 *Copy links from **Shareable links**—not from your browser address bar while you are in the staff dashboard. Use **Customer login** for existing customers; use **Marketplace** when shoppers should browse cars or products.*
## Step 2: Copy the Customer login link
Look for the card labeled **Customer login**.
The description should mention sign-in for existing customers using the portal.
Click **Copy** on that card.
**Why this matters:** Copying prevents typos. One wrong character can send customers to an error page.
Click **Open** if you want to see the sign-in page before you send the link.
**Expected result:** A new tab shows the customer sign-in page—not the staff dashboard.
## Step 3: Decide where the link should appear
Choose places customers already look for login access:
* A **Customer Login** button in your website header.
* A link on your storage or contact page.
* Your new customer welcome email (after they are invited).
* Your team’s email signature.
* A printed welcome sheet or QR code at the facility.
Use simple wording such as **Customer Login** or **Open your customer portal**.
## Step 3b: Create a QR code (optional)
A QR code lets customers scan a sign at your front desk instead of typing a long web address.
From **Shareable links**, click **Copy** on **Customer login** (for existing customers) or **Main page** (for prospects learning about your facility).
Go to [QR code generator](https://www.carstoragesoftware.com/dashboard/qr-code) in your dashboard.
Paste your copied **Customer login** link into the URL field if the page asks for one.
**Expected result:** A square QR code appears on screen instead of **No URL provided**.
Click **Download** to save the image. Print it for your front desk, welcome packet, or facility signage.
**Why this matters:** Many customers are more comfortable scanning a code than typing a web address on their phone.
Scan the printed code. Confirm it opens the page you intended—the customer sign-in page for **Customer login**, or your public facility page for **Main page**—not the staff dashboard.
*Copy links from **Shareable links**—not from your browser address bar while you are in the staff dashboard. Use **Customer login** for existing customers; use **Marketplace** when shoppers should browse cars or products.*
## Step 2: Copy the Customer login link
Look for the card labeled **Customer login**.
The description should mention sign-in for existing customers using the portal.
Click **Copy** on that card.
**Why this matters:** Copying prevents typos. One wrong character can send customers to an error page.
Click **Open** if you want to see the sign-in page before you send the link.
**Expected result:** A new tab shows the customer sign-in page—not the staff dashboard.
## Step 3: Decide where the link should appear
Choose places customers already look for login access:
* A **Customer Login** button in your website header.
* A link on your storage or contact page.
* Your new customer welcome email (after they are invited).
* Your team’s email signature.
* A printed welcome sheet or QR code at the facility.
Use simple wording such as **Customer Login** or **Open your customer portal**.
## Step 3b: Create a QR code (optional)
A QR code lets customers scan a sign at your front desk instead of typing a long web address.
From **Shareable links**, click **Copy** on **Customer login** (for existing customers) or **Main page** (for prospects learning about your facility).
Go to [QR code generator](https://www.carstoragesoftware.com/dashboard/qr-code) in your dashboard.
Paste your copied **Customer login** link into the URL field if the page asks for one.
**Expected result:** A square QR code appears on screen instead of **No URL provided**.
Click **Download** to save the image. Print it for your front desk, welcome packet, or facility signage.
**Why this matters:** Many customers are more comfortable scanning a code than typing a web address on their phone.
Scan the printed code. Confirm it opens the page you intended—the customer sign-in page for **Customer login**, or your public facility page for **Main page**—not the staff dashboard.
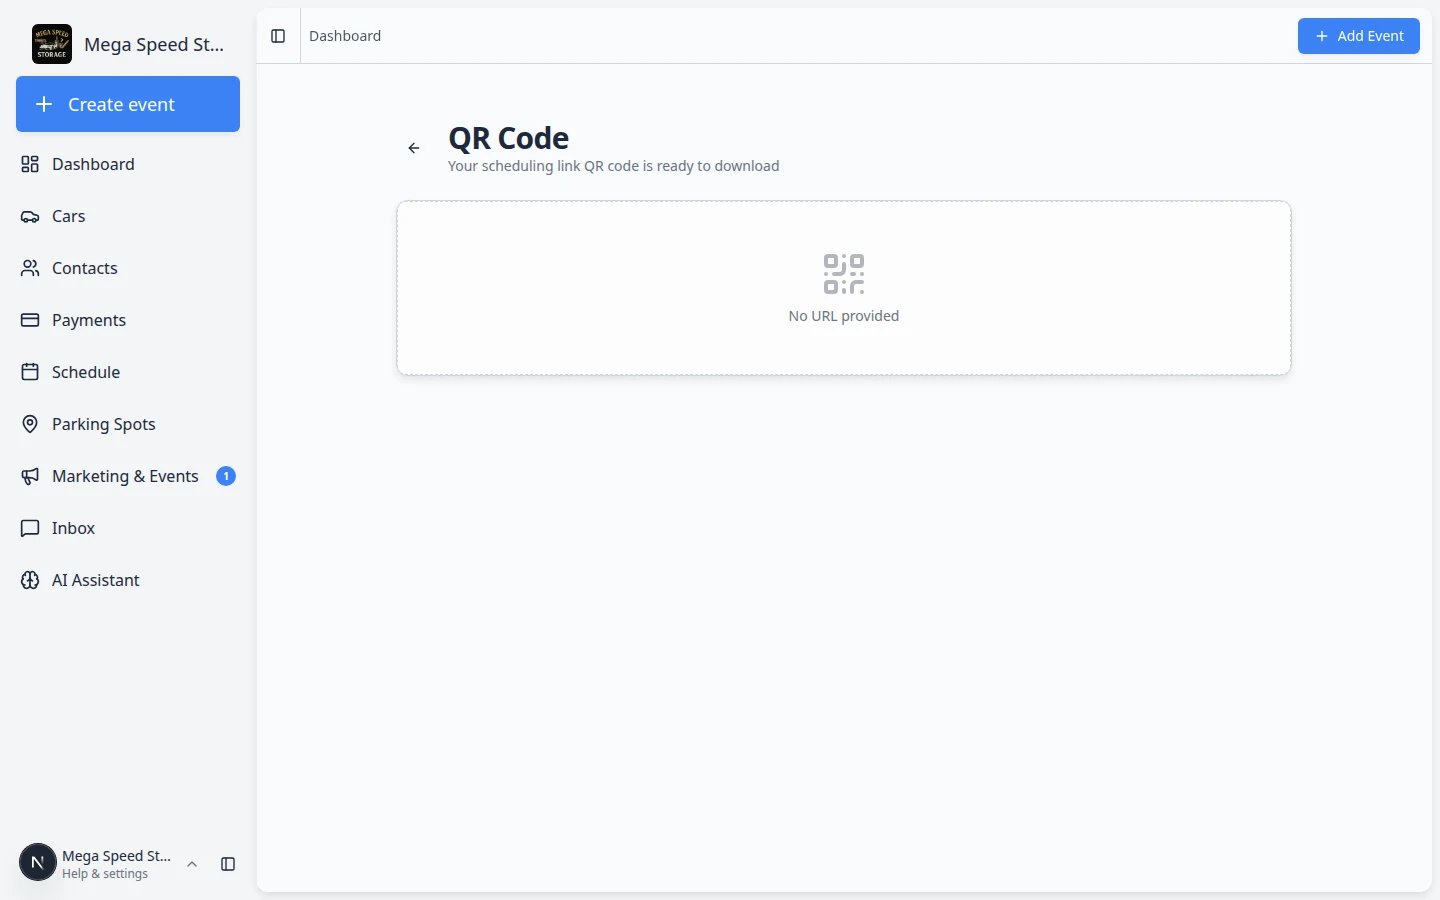 *Generate a QR code from the customer login link so front-desk customers can scan instead of typing.*
## Step 4: Add the link to your website or message
If you manage your website, add the link as a button or menu item.
If someone else manages your website, send a clear request:
Please add this link to our website header as a button named "Customer Login": \[paste customer login link].
For email, use clear link text:
You can open your customer portal here: \[Customer Login].
## Step 5: Test the link like a customer
Use private/incognito mode or a browser where you are **not** signed in as staff.
Confirm the page matches the screenshot below.
*Generate a QR code from the customer login link so front-desk customers can scan instead of typing.*
## Step 4: Add the link to your website or message
If you manage your website, add the link as a button or menu item.
If someone else manages your website, send a clear request:
Please add this link to our website header as a button named "Customer Login": \[paste customer login link].
For email, use clear link text:
You can open your customer portal here: \[Customer Login].
## Step 5: Test the link like a customer
Use private/incognito mode or a browser where you are **not** signed in as staff.
Confirm the page matches the screenshot below.
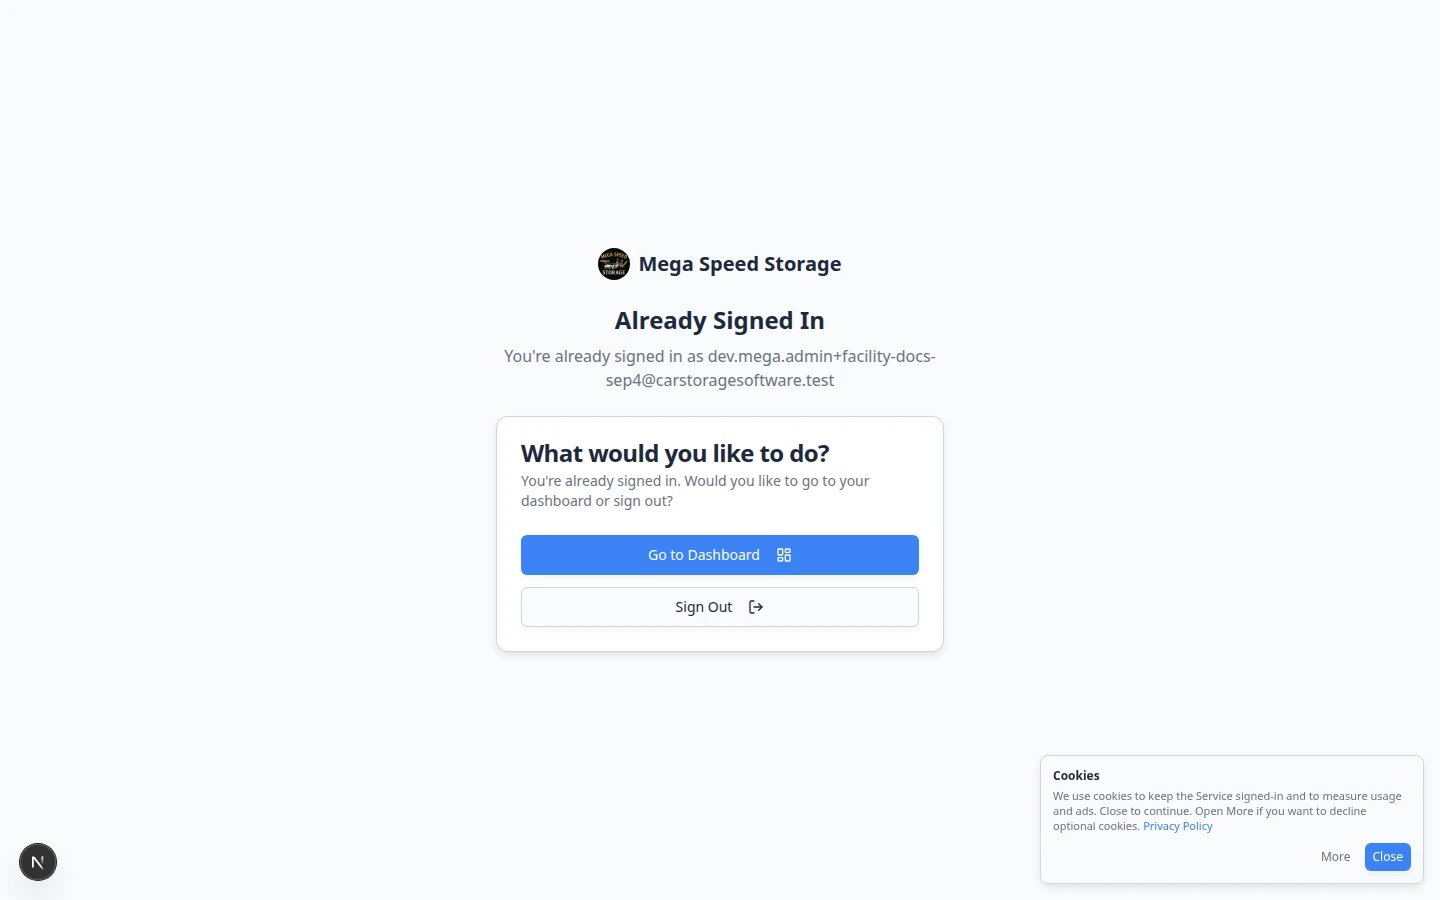 *A successful test opens this customer sign-in page—not the staff dashboard.*
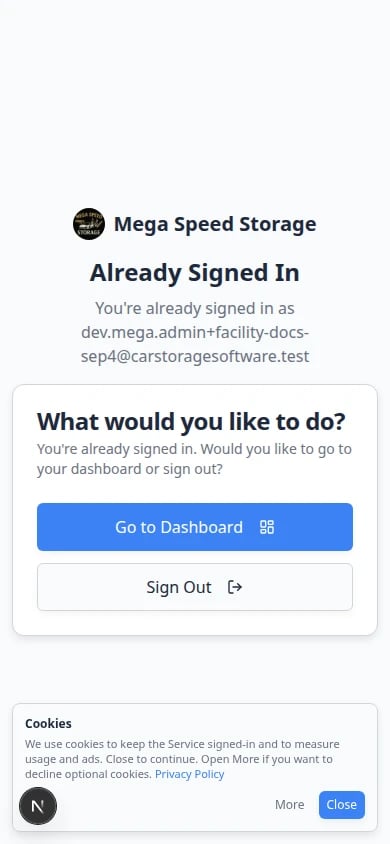 *Test **Customer login** on a phone-sized screen. Many customers open this link from a text message, not a desktop browser.*
Check:
* The page does not show the staff dashboard sidebar.
* Your facility name or branding looks correct.
* The page asks for the customer’s email address.
* The page is readable on a phone-sized screen.
### What the customer sees after they enter their email
They enter the same email address on file in [Contacts](https://www.carstoragesoftware.com/dashboard/contacts).
**Why this matters:** Portal sign-in does not use a password. The email must match the record exactly.
They receive a secure sign-in link or code from your facility.
**Expected result:** Clicking the link opens the customer portal—not the staff dashboard.
After sign-in, they can view vehicles, events, documents, and billing (depending on your settings).
**Expected result:** The home screen matches the **Customer app** preview in Website settings.
For a full walkthrough, see [Guide a customer through the portal](/docs/contacts/guide-a-customer-through-the-portal).
*Test **Customer login** on a phone-sized screen. Many customers open this link from a text message, not a desktop browser.*
Check:
* The page does not show the staff dashboard sidebar.
* Your facility name or branding looks correct.
* The page asks for the customer’s email address.
* The page is readable on a phone-sized screen.
### What the customer sees after they enter their email
They enter the same email address on file in [Contacts](https://www.carstoragesoftware.com/dashboard/contacts).
**Why this matters:** Portal sign-in does not use a password. The email must match the record exactly.
They receive a secure sign-in link or code from your facility.
**Expected result:** Clicking the link opens the customer portal—not the staff dashboard.
After sign-in, they can view vehicles, events, documents, and billing (depending on your settings).
**Expected result:** The home screen matches the **Customer app** preview in Website settings.
For a full walkthrough, see [Guide a customer through the portal](/docs/contacts/guide-a-customer-through-the-portal).
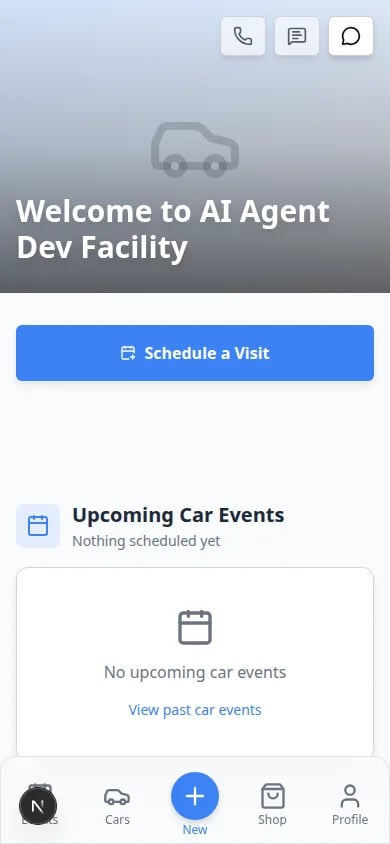 *After a successful sign-in, customers see your **Customer app** home screen—not the staff dashboard. Preview this layout in Website settings before you invite customers widely.*
### Expected result
Customers can reach sign-in without extra instructions from your team.
## Step 6: Tell customers what to expect
When you share the login link, add one short sentence:
Use this link to open your customer portal, view vehicle information, and review upcoming events.
Enter the email address we have on file. You will receive a secure sign-in link or code.
## What success looks like
* Your team copied **Customer login** from **Shareable links**.
* The link appears where customers can find it easily.
* You tested the link outside the staff dashboard.
* Customers know to sign in with the email on their account in [Contacts](https://www.carstoragesoftware.com/dashboard/contacts).
* **Customer app** layout was reviewed before wide portal invites ([Customize the customer mobile app](/docs/facility-web-pages/customize-the-customer-mobile-app)).
## Troubleshooting
**The customer says the link does not work**
Copy the link again from [Settings > Website & customer app](https://www.carstoragesoftware.com/dashboard/settings/website). Test it in a private window before sending it again.
**The customer used a different email address**
Ask which email they entered. It should match the email on their record in [Contacts](https://www.carstoragesoftware.com/dashboard/contacts). Update the record if needed, then send the link again.
**The page does not look like our brand**
Review [Settings > Branding](https://www.carstoragesoftware.com/dashboard/settings/branding) for logo, colors, and facility name.
**We use a custom domain**
After you connect a custom domain, the **Customer login** URL in **Shareable links** may change. Copy the link again from [Settings > Website & customer app](https://www.carstoragesoftware.com/dashboard/settings/website) and update website buttons and printed materials. Test with [Connect a custom domain](/docs/facility-web-pages/connect-a-custom-domain).
## What to do next
Add the login link to your website, welcome emails, invoices, and staff signatures. If prospects still need to request storage, share the **Registration** link from the same **Shareable links** section—or follow [Choose the right public link to share](/docs/facility-web-pages/choose-the-right-public-link).
## Related topics
- [Choose the right public link to share](/docs/facility-web-pages/choose-the-right-public-link.md)
- [Install the mobile app](/docs/basics/install-the-mobile-app.md)
- [Go live checklist for public pages](/docs/facility-web-pages/go-live-checklist-for-public-pages.md)
- [Facility Web Pages overview](/docs/facility-web-pages/overview.md)
- [Customize the customer mobile app](/docs/facility-web-pages/customize-the-customer-mobile-app.md)
This documentation is built and hosted on [Mintlify](https://mintlify.com), a developer documentation platform.
*After a successful sign-in, customers see your **Customer app** home screen—not the staff dashboard. Preview this layout in Website settings before you invite customers widely.*
### Expected result
Customers can reach sign-in without extra instructions from your team.
## Step 6: Tell customers what to expect
When you share the login link, add one short sentence:
Use this link to open your customer portal, view vehicle information, and review upcoming events.
Enter the email address we have on file. You will receive a secure sign-in link or code.
## What success looks like
* Your team copied **Customer login** from **Shareable links**.
* The link appears where customers can find it easily.
* You tested the link outside the staff dashboard.
* Customers know to sign in with the email on their account in [Contacts](https://www.carstoragesoftware.com/dashboard/contacts).
* **Customer app** layout was reviewed before wide portal invites ([Customize the customer mobile app](/docs/facility-web-pages/customize-the-customer-mobile-app)).
## Troubleshooting
**The customer says the link does not work**
Copy the link again from [Settings > Website & customer app](https://www.carstoragesoftware.com/dashboard/settings/website). Test it in a private window before sending it again.
**The customer used a different email address**
Ask which email they entered. It should match the email on their record in [Contacts](https://www.carstoragesoftware.com/dashboard/contacts). Update the record if needed, then send the link again.
**The page does not look like our brand**
Review [Settings > Branding](https://www.carstoragesoftware.com/dashboard/settings/branding) for logo, colors, and facility name.
**We use a custom domain**
After you connect a custom domain, the **Customer login** URL in **Shareable links** may change. Copy the link again from [Settings > Website & customer app](https://www.carstoragesoftware.com/dashboard/settings/website) and update website buttons and printed materials. Test with [Connect a custom domain](/docs/facility-web-pages/connect-a-custom-domain).
## What to do next
Add the login link to your website, welcome emails, invoices, and staff signatures. If prospects still need to request storage, share the **Registration** link from the same **Shareable links** section—or follow [Choose the right public link to share](/docs/facility-web-pages/choose-the-right-public-link).
## Related topics
- [Choose the right public link to share](/docs/facility-web-pages/choose-the-right-public-link.md)
- [Install the mobile app](/docs/basics/install-the-mobile-app.md)
- [Go live checklist for public pages](/docs/facility-web-pages/go-live-checklist-for-public-pages.md)
- [Facility Web Pages overview](/docs/facility-web-pages/overview.md)
- [Customize the customer mobile app](/docs/facility-web-pages/customize-the-customer-mobile-app.md)
This documentation is built and hosted on [Mintlify](https://mintlify.com), a developer documentation platform.