> ## Documentation Index
> Fetch the complete documentation index at: https://www.carstoragesoftware.com/docs/llms.txt
> Use this file to discover all available pages before exploring further.
# Assign a parking spot
> Move a car into the correct parking spot or zone so your map matches the real facility.
## What you will accomplish
You will record where a vehicle is parked right now so the map, the car record, and the parking report all agree.
## When to use this guide
Use this guide when a vehicle enters storage, changes spaces, moves onto a lift, or needs its location corrected.
When you assign the spot in the app, the [Parking Spots](https://www.carstoragesoftware.com/dashboard/parking-spots) map, the [Cars](https://www.carstoragesoftware.com/dashboard/cars) record, and the [parking report](https://www.carstoragesoftware.com/dashboard/parking-spots/report) all stay in sync. That helps every teammate see the same location without calling around the building.
**Important habit**
Update the app when the physical car moves. If staff move the car first and update the record later, the map can become confusing for everyone else.
**Assigning is different from reserving**
Assign a parking spot when the car is actually in that spot now. Reserve a parking spot when you want to hold a space for a customer or car before the vehicle arrives. If you only need to hold a spot, use [Reserve a parking spot](/docs/parking-spots/reserve-a-parking-spot).
If your team records parking at the end of a **Schedule** drop-off visit, the app may ask for a spot during the workflow instead—see [Assign parking during a Schedule event](/docs/parking-spots/assign-parking-during-a-schedule-event).
## When the app asks you to park during an event
Some event types—such as **Storage Intake**—can prompt staff to choose a parking spot **when the appointment is finished**.
Open the event on [Schedule](https://www.carstoragesoftware.com/dashboard/schedule) and finish the steps your facility uses (photos, notes, status, and so on).
Near the end of the visit, click **Continue to destination** on the workflow page (or look for a window titled **Assign parking location**). This only happens when your admin set **When this event completes** to **Ask where the car is going** for that event type in [Settings > Events & schedule](https://www.carstoragesoftware.com/dashboard/settings/events).
See [Assign parking during a Schedule event](/docs/parking-spots/assign-parking-during-a-schedule-event) for screenshots of each step.
Type the destination name (for example **A2** or **Outdoor Lot**). Pick the correct row under **Spots** or **Zones**.
Confirm the assignment. Open [Parking Spots](https://www.carstoragesoftware.com/dashboard/parking-spots) if you want to verify the car appears in the right place.
**Expected result:** The car record and the map both show the new location without a separate manual update.
**If you do not see the parking prompt**
The event type may not require parking on completion, or an admin may handle parking separately. You can still assign the car anytime using the steps below.
## Before you start
* The car should already exist in [Cars](https://www.carstoragesoftware.com/dashboard/cars).
* The parking spot or zone should already exist in [Parking Spots](https://www.carstoragesoftware.com/dashboard/parking-spots).
* Confirm the real destination before changing the record.
* If your team uses photos or inspection events for moves, complete that workflow before or during the move.
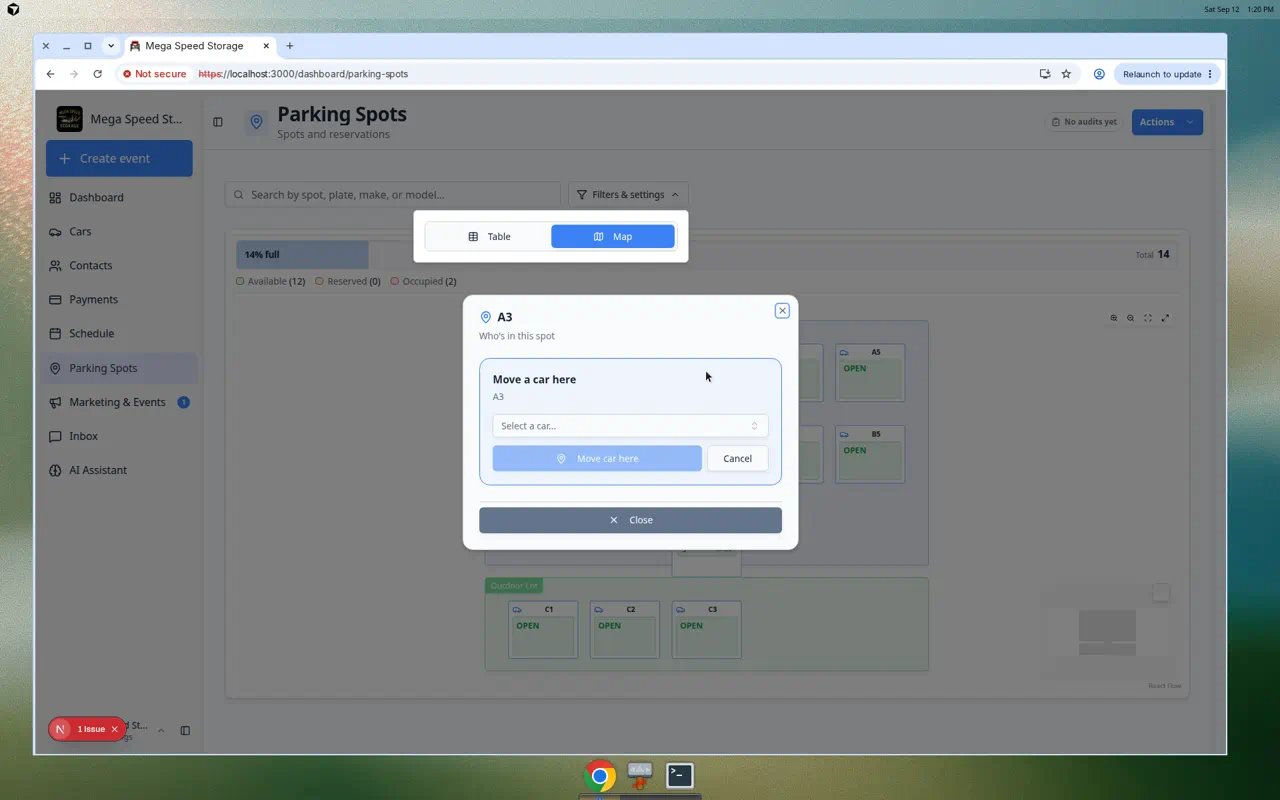 *Click a spot on the map to review its current car, add a car, or move a car to another location.*
## Park a car after a scheduled drop-off
When a customer arrives for a **drop-off**, **intake**, or **storage start** appointment on [Schedule](https://www.carstoragesoftware.com/dashboard/schedule), parking the vehicle in the app should happen in the same few minutes as parking it in the building.
Open [Schedule](https://www.carstoragesoftware.com/dashboard/schedule) and find the event for this vehicle. Note the customer and car so you pick the right record in Parking Spots.
**Why this matters:** Busy afternoons bring several similar cars. Matching the calendar event to the correct VIN or plate prevents putting the wrong vehicle in **A3**.
Go to [Parking Spots](https://www.carstoragesoftware.com/dashboard/parking-spots). Use [Find parking spots and available spaces](/docs/parking-spots/find-parking-spots-and-available-spaces) if you need to search for **Available** spots or a reserved space.
**Expected result:** You know the destination spot or zone before you walk the car there.
Follow the steps in this guide—map, **Move Vehicle**, or car record—to save the location.
**Expected result:** The map legend **Occupied** count goes up. The car record shows the new **Spot:** or **Zone:**.
Mark the appointment **Completed** or run the event workflow if your facility uses one. See [Run event workflow from Schedule](/docs/schedule/run-event-workflow-from-schedule) when photos or checklists are part of intake.
**Reserved spot waiting for this car?**
If **Reserved Customer** or **Reserved Car** already shows on the spot row, assign the vehicle to that same space so **Currently Parked** changes from **Reserved** to **Present**. See [Reserve a parking spot](/docs/parking-spots/reserve-a-parking-spot).
## Assign a car from the Parking Spots map
Go to the [Parking Spots page](https://www.carstoragesoftware.com/dashboard/parking-spots).
If you do not see the facility map, open the view controls near the top of the page and choose **Map**.
Use the search box or visually find the spot on the map. Look for the spot name, such as **A1** or **LIFT-1**.
Click the destination spot. A dialog opens with information about that spot.
If the spot is empty, use the car search field in the dialog to find the vehicle. Search by customer name, plate, VIN, make, or model.
Click the button to add or move the car to the spot. The exact button text may change based on whether the spot is empty or already has a car.
Confirm the spot now shows the assigned vehicle. This is your quick check that the record matches the facility.
## Move a car from one spot to another
Use this when a car already has a location and needs to move.
On [Parking Spots](https://www.carstoragesoftware.com/dashboard/parking-spots), click the spot where the car is currently located.
**Tip:** In **Table** view, find the row under **Currently Parked**, then open the **⋯** menu on the right side of that row.
In the spot dialog, click **Move Vehicle**.
**Expected result:** A **Move Vehicle** window opens. You can search for the new spot or zone by name.
Type or select the new spot (for example **B3**) or zone (for example **Outdoor Lot**). Read the vehicle name and plate one more time before you continue.
Confirm the move. The app ends the old assignment and starts the new one.
The old spot should look open. The new spot should show the car on the map and in **Table** view.
*Click a spot on the map to review its current car, add a car, or move a car to another location.*
## Park a car after a scheduled drop-off
When a customer arrives for a **drop-off**, **intake**, or **storage start** appointment on [Schedule](https://www.carstoragesoftware.com/dashboard/schedule), parking the vehicle in the app should happen in the same few minutes as parking it in the building.
Open [Schedule](https://www.carstoragesoftware.com/dashboard/schedule) and find the event for this vehicle. Note the customer and car so you pick the right record in Parking Spots.
**Why this matters:** Busy afternoons bring several similar cars. Matching the calendar event to the correct VIN or plate prevents putting the wrong vehicle in **A3**.
Go to [Parking Spots](https://www.carstoragesoftware.com/dashboard/parking-spots). Use [Find parking spots and available spaces](/docs/parking-spots/find-parking-spots-and-available-spaces) if you need to search for **Available** spots or a reserved space.
**Expected result:** You know the destination spot or zone before you walk the car there.
Follow the steps in this guide—map, **Move Vehicle**, or car record—to save the location.
**Expected result:** The map legend **Occupied** count goes up. The car record shows the new **Spot:** or **Zone:**.
Mark the appointment **Completed** or run the event workflow if your facility uses one. See [Run event workflow from Schedule](/docs/schedule/run-event-workflow-from-schedule) when photos or checklists are part of intake.
**Reserved spot waiting for this car?**
If **Reserved Customer** or **Reserved Car** already shows on the spot row, assign the vehicle to that same space so **Currently Parked** changes from **Reserved** to **Present**. See [Reserve a parking spot](/docs/parking-spots/reserve-a-parking-spot).
## Assign a car from the Parking Spots map
Go to the [Parking Spots page](https://www.carstoragesoftware.com/dashboard/parking-spots).
If you do not see the facility map, open the view controls near the top of the page and choose **Map**.
Use the search box or visually find the spot on the map. Look for the spot name, such as **A1** or **LIFT-1**.
Click the destination spot. A dialog opens with information about that spot.
If the spot is empty, use the car search field in the dialog to find the vehicle. Search by customer name, plate, VIN, make, or model.
Click the button to add or move the car to the spot. The exact button text may change based on whether the spot is empty or already has a car.
Confirm the spot now shows the assigned vehicle. This is your quick check that the record matches the facility.
## Move a car from one spot to another
Use this when a car already has a location and needs to move.
On [Parking Spots](https://www.carstoragesoftware.com/dashboard/parking-spots), click the spot where the car is currently located.
**Tip:** In **Table** view, find the row under **Currently Parked**, then open the **⋯** menu on the right side of that row.
In the spot dialog, click **Move Vehicle**.
**Expected result:** A **Move Vehicle** window opens. You can search for the new spot or zone by name.
Type or select the new spot (for example **B3**) or zone (for example **Outdoor Lot**). Read the vehicle name and plate one more time before you continue.
Confirm the move. The app ends the old assignment and starts the new one.
The old spot should look open. The new spot should show the car on the map and in **Table** view.
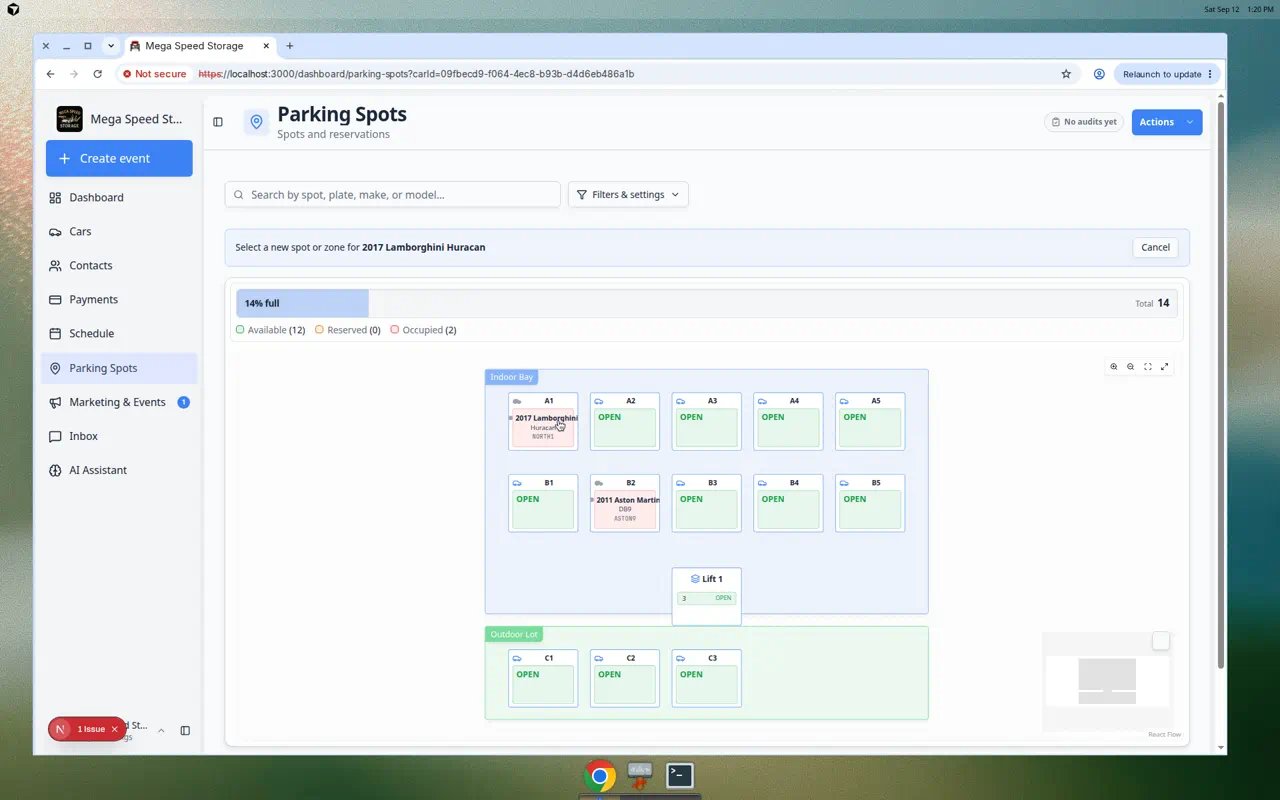 *Use Move Vehicle when the car is already on the map but needs a new spot. Pick the destination carefully before you save.*
**Expected result**
The car's current location updates across the Parking Spots page, the car record, and the [parking report](https://www.carstoragesoftware.com/dashboard/parking-spots/report).
*Use Move Vehicle when the car is already on the map but needs a new spot. Pick the destination carefully before you save.*
**Expected result**
The car's current location updates across the Parking Spots page, the car record, and the [parking report](https://www.carstoragesoftware.com/dashboard/parking-spots/report).
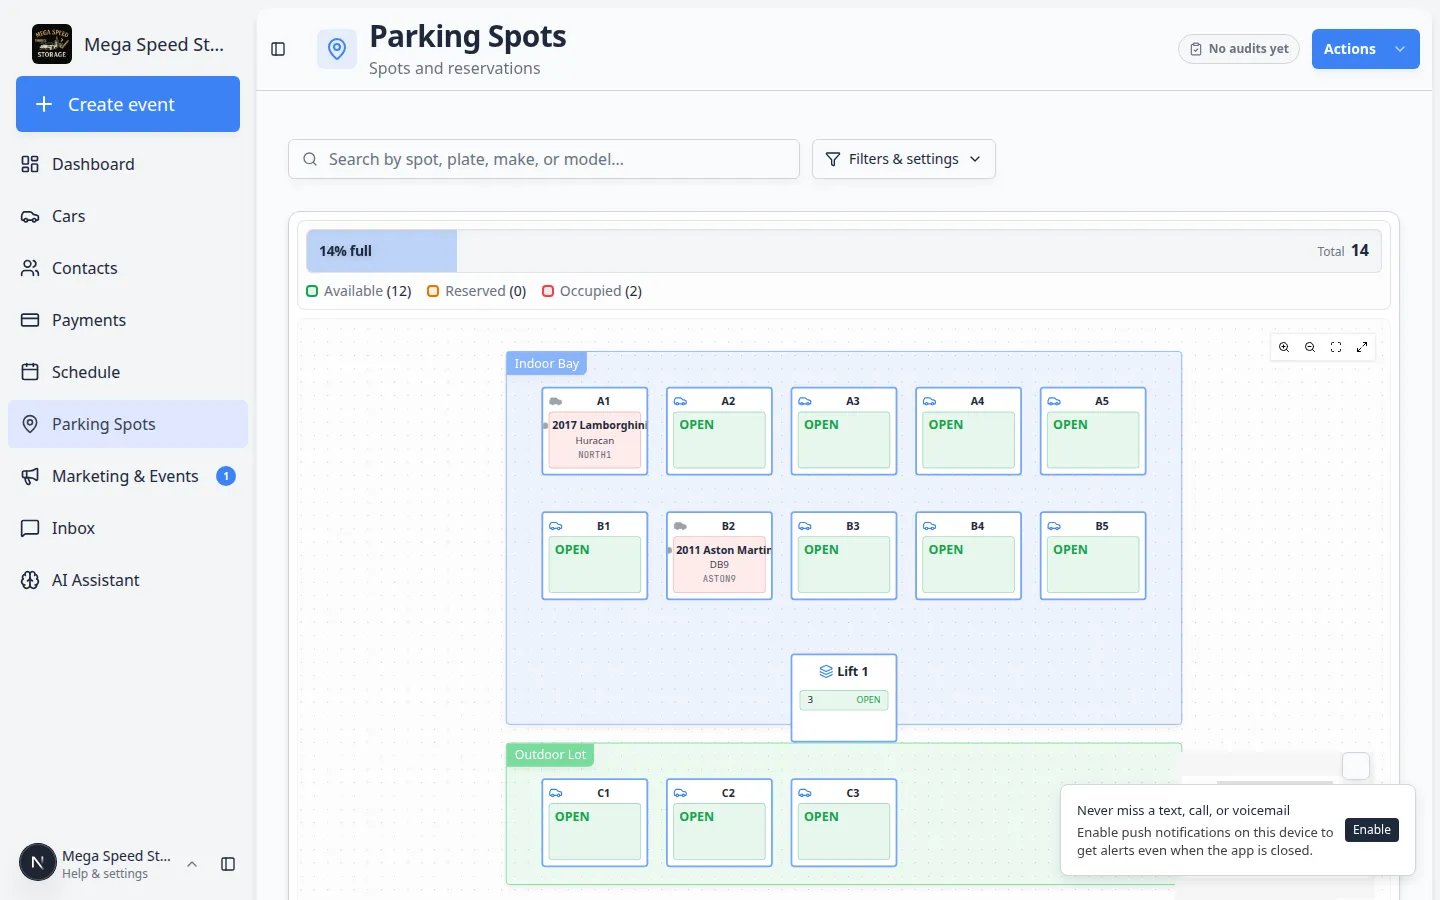 *After you save, the map should show the car in the new spot and the previous spot should look open.*
## Assign a car from the car record
Sometimes staff are already looking at the car record—for example during intake or when a customer calls about their vehicle. In that case, start on the car page instead of the map.
Go to [Cars](https://www.carstoragesoftware.com/dashboard/cars) and open the vehicle.
Near the top of the car page, find the parking button. If the car is already parked, it shows **Spot:** and the spot name (such as **A1**) or **Zone:** and the zone name (such as **Outdoor Lot**). If the car has no location yet, the button may say **Assign location**.
**Expected result:** You see the current spot or zone name—or a prompt to choose one—without leaving the car page.
Click the parking button and select the new spot or zone. You can pick a numbered spot or a flexible zone when an exact box is not required.
**Why zones matter:** A car in an outdoor overflow area may be assigned to **Outdoor Lot** instead of **C2** when staff do not need a precise space number.
Save the change, then confirm the car record shows the new location. Open [Parking Spots](https://www.carstoragesoftware.com/dashboard/parking-spots) if you want to double-check the map.
*After you save, the map should show the car in the new spot and the previous spot should look open.*
## Assign a car from the car record
Sometimes staff are already looking at the car record—for example during intake or when a customer calls about their vehicle. In that case, start on the car page instead of the map.
Go to [Cars](https://www.carstoragesoftware.com/dashboard/cars) and open the vehicle.
Near the top of the car page, find the parking button. If the car is already parked, it shows **Spot:** and the spot name (such as **A1**) or **Zone:** and the zone name (such as **Outdoor Lot**). If the car has no location yet, the button may say **Assign location**.
**Expected result:** You see the current spot or zone name—or a prompt to choose one—without leaving the car page.
Click the parking button and select the new spot or zone. You can pick a numbered spot or a flexible zone when an exact box is not required.
**Why zones matter:** A car in an outdoor overflow area may be assigned to **Outdoor Lot** instead of **C2** when staff do not need a precise space number.
Save the change, then confirm the car record shows the new location. Open [Parking Spots](https://www.carstoragesoftware.com/dashboard/parking-spots) if you want to double-check the map.
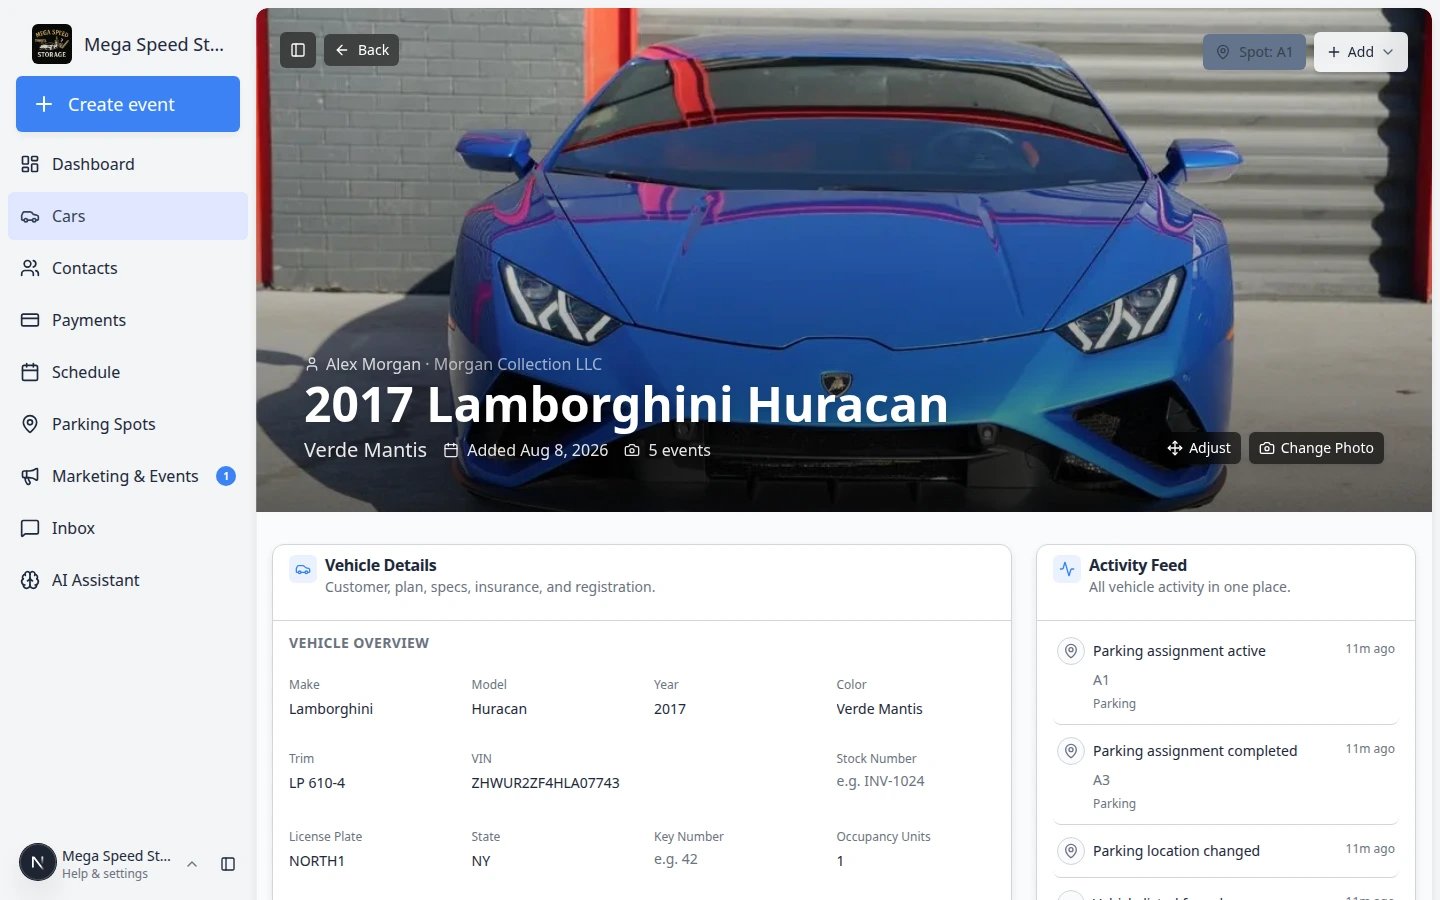 *The parking location on the car record should match where the vehicle sits in the building. Update it whenever the car moves.*
## Assign a car to a zone from the map
When cars park in a flexible area, you can start on the zone instead of a numbered spot.
On [Parking Spots](https://www.carstoragesoftware.com/dashboard/parking-spots), click the colored background area (for example **Outdoor Lot**), not a numbered spot box.
**Expected result:** A zone window opens showing capacity and cars already inside.
Search for the vehicle and add it to the zone, or move an existing car from the list.
**Why this matters:** The zone record updates even when no exact spot number is required.
Open the vehicle in [Cars](https://www.carstoragesoftware.com/dashboard/cars). The parking button should read **Zone: Outdoor Lot** (or your zone name).
**Expected result:** Map and car record agree—staff are not guessing which screen is right.
For full step-by-step help with zones, capacity, and moving cars between spots and zones, read [Work with zones on the map](/docs/parking-spots/work-with-zones-on-the-map).
## Send a car to an outside vendor from the map
Use this when the vehicle leaves your building for transport, detail, mechanical work, or another outside company.
On [Parking Spots](https://www.carstoragesoftware.com/dashboard/parking-spots), click the spot that holds the vehicle (or use **Move Vehicle** from **Table** view).
Click **Move Vehicle**. In the **Select spot, zone, or vendor…** field, type the vendor company name and pick it from the **Vendors** section.
**Why this matters:** A vendor move frees your numbered spot and shows **At vendor:** on the car record so staff do not search empty bays for a car that left the building.
Save the move. Open the car in [Cars](https://www.carstoragesoftware.com/dashboard/cars) and confirm the banner shows **At vendor:** and the correct company name.
*The parking location on the car record should match where the vehicle sits in the building. Update it whenever the car moves.*
## Assign a car to a zone from the map
When cars park in a flexible area, you can start on the zone instead of a numbered spot.
On [Parking Spots](https://www.carstoragesoftware.com/dashboard/parking-spots), click the colored background area (for example **Outdoor Lot**), not a numbered spot box.
**Expected result:** A zone window opens showing capacity and cars already inside.
Search for the vehicle and add it to the zone, or move an existing car from the list.
**Why this matters:** The zone record updates even when no exact spot number is required.
Open the vehicle in [Cars](https://www.carstoragesoftware.com/dashboard/cars). The parking button should read **Zone: Outdoor Lot** (or your zone name).
**Expected result:** Map and car record agree—staff are not guessing which screen is right.
For full step-by-step help with zones, capacity, and moving cars between spots and zones, read [Work with zones on the map](/docs/parking-spots/work-with-zones-on-the-map).
## Send a car to an outside vendor from the map
Use this when the vehicle leaves your building for transport, detail, mechanical work, or another outside company.
On [Parking Spots](https://www.carstoragesoftware.com/dashboard/parking-spots), click the spot that holds the vehicle (or use **Move Vehicle** from **Table** view).
Click **Move Vehicle**. In the **Select spot, zone, or vendor…** field, type the vendor company name and pick it from the **Vendors** section.
**Why this matters:** A vendor move frees your numbered spot and shows **At vendor:** on the car record so staff do not search empty bays for a car that left the building.
Save the move. Open the car in [Cars](https://www.carstoragesoftware.com/dashboard/cars) and confirm the banner shows **At vendor:** and the correct company name.
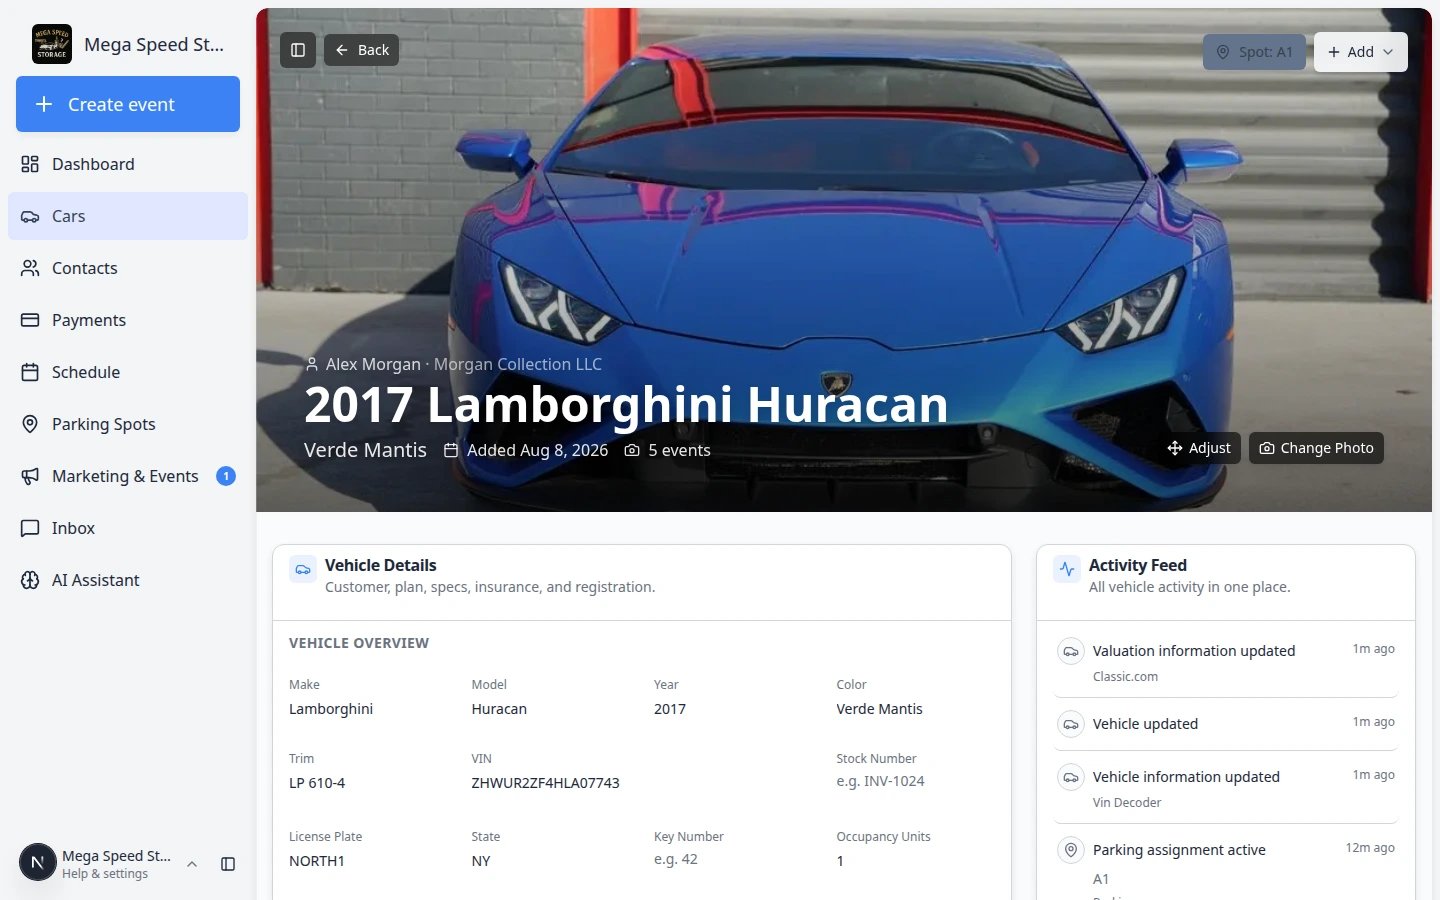 *Vendors appear in the same move picker as spots and zones. Pick the outside company when the car is no longer in your building.*
For the full vendor workflow—including adding a new vendor and reading vendor rows on the parking report—read [Send a car to an outside vendor](/docs/parking-spots/send-a-car-to-an-outside-vendor). You can also start from the car record in [Move a car](/docs/cars/move-a-car).
*Vendors appear in the same move picker as spots and zones. Pick the outside company when the car is no longer in your building.*
For the full vendor workflow—including adding a new vendor and reading vendor rows on the parking report—read [Send a car to an outside vendor](/docs/parking-spots/send-a-car-to-an-outside-vendor). You can also start from the car record in [Move a car](/docs/cars/move-a-car).
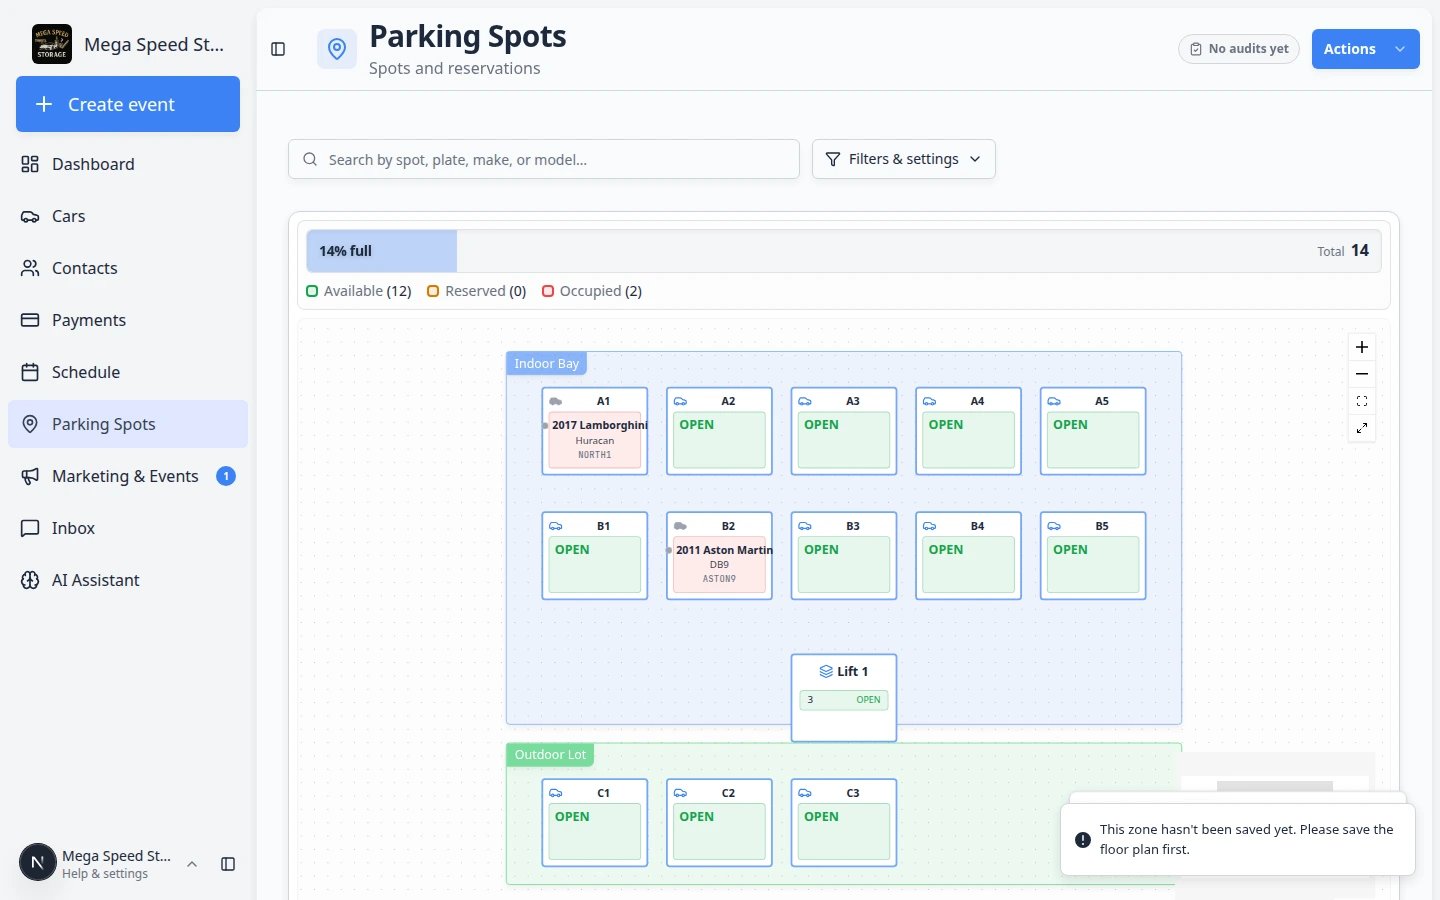 *Click a colored zone on the map when the car is in a flexible area rather than an exact numbered spot.*
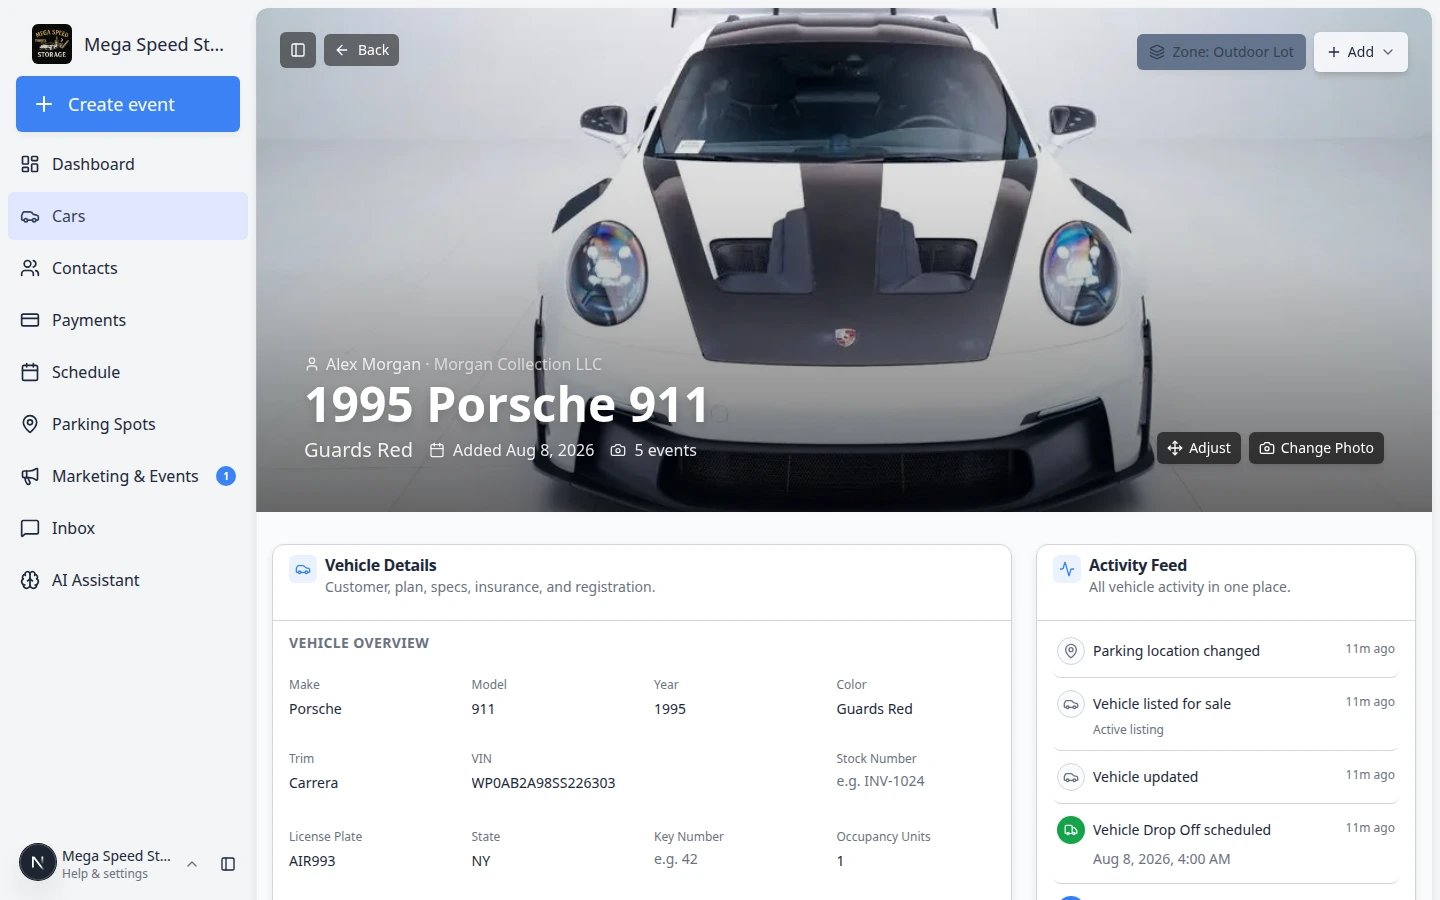 *Zone assignments show **Zone:** on the car record. Spot assignments show **Spot:** instead.*
## Assign a car to a zone (no exact spot number)
Some facilities park cars in a larger area—such as an outdoor lot or overflow lane—without assigning a numbered spot. Use a **zone** when the exact box does not matter.
Go to [Cars](https://www.carstoragesoftware.com/dashboard/cars) and open the vehicle.
Near the top, click **Assign location** (if the car has no spot yet) or the current **Spot:** / **Zone:** label.
In the picker, select a zone such as **Outdoor Lot** or **Indoor Bay** instead of a numbered spot like **A1**.
**Why this matters:** A zone tells your team the general area. A numbered spot tells them the exact space. Use zones only when your process allows flexible parking inside that area.
Save the change. Open [Parking Spots](https://www.carstoragesoftware.com/dashboard/parking-spots) and confirm the car appears inside the colored zone area on the map.
**Expected result:** The car record shows **Zone: Outdoor Lot** (or your zone name). The map highlights the zone, even if no single spot box is selected.
**Zone capacity**
Zones can allow more than one car when **Additional Capacity** is set in the floor plan. If every car in the zone must use a numbered spot, leave capacity at **0** and assign spots instead—see [Set up parking spots and zones](/docs/parking-spots/set-up-parking-spots-and-zones).
## Assign a car on a lift spot
Lift spots can hold more than one vehicle (for example ground level and upper level). Always check the level before you save.
On [Parking Spots](https://www.carstoragesoftware.com/dashboard/parking-spots), look for a spot labeled **Lift 1** (or your lift name).
Open the spot dialog. Read which level is **Present**, **Reserved**, or open.
**Why this matters:** Putting two cars on the same lift level in the app when only one fits there physically causes retrieval mistakes.
Choose the empty level before you assign the car. Do not stack two cars on the same level in the app if only one fits there physically.
Confirm the lift spot shows the car on the level you chose.
**Expected result:** Staff retrieving the car know whether to lower the lift or use the upper deck.
*Zone assignments show **Zone:** on the car record. Spot assignments show **Spot:** instead.*
## Assign a car to a zone (no exact spot number)
Some facilities park cars in a larger area—such as an outdoor lot or overflow lane—without assigning a numbered spot. Use a **zone** when the exact box does not matter.
Go to [Cars](https://www.carstoragesoftware.com/dashboard/cars) and open the vehicle.
Near the top, click **Assign location** (if the car has no spot yet) or the current **Spot:** / **Zone:** label.
In the picker, select a zone such as **Outdoor Lot** or **Indoor Bay** instead of a numbered spot like **A1**.
**Why this matters:** A zone tells your team the general area. A numbered spot tells them the exact space. Use zones only when your process allows flexible parking inside that area.
Save the change. Open [Parking Spots](https://www.carstoragesoftware.com/dashboard/parking-spots) and confirm the car appears inside the colored zone area on the map.
**Expected result:** The car record shows **Zone: Outdoor Lot** (or your zone name). The map highlights the zone, even if no single spot box is selected.
**Zone capacity**
Zones can allow more than one car when **Additional Capacity** is set in the floor plan. If every car in the zone must use a numbered spot, leave capacity at **0** and assign spots instead—see [Set up parking spots and zones](/docs/parking-spots/set-up-parking-spots-and-zones).
## Assign a car on a lift spot
Lift spots can hold more than one vehicle (for example ground level and upper level). Always check the level before you save.
On [Parking Spots](https://www.carstoragesoftware.com/dashboard/parking-spots), look for a spot labeled **Lift 1** (or your lift name).
Open the spot dialog. Read which level is **Present**, **Reserved**, or open.
**Why this matters:** Putting two cars on the same lift level in the app when only one fits there physically causes retrieval mistakes.
Choose the empty level before you assign the car. Do not stack two cars on the same level in the app if only one fits there physically.
Confirm the lift spot shows the car on the level you chose.
**Expected result:** Staff retrieving the car know whether to lower the lift or use the upper deck.
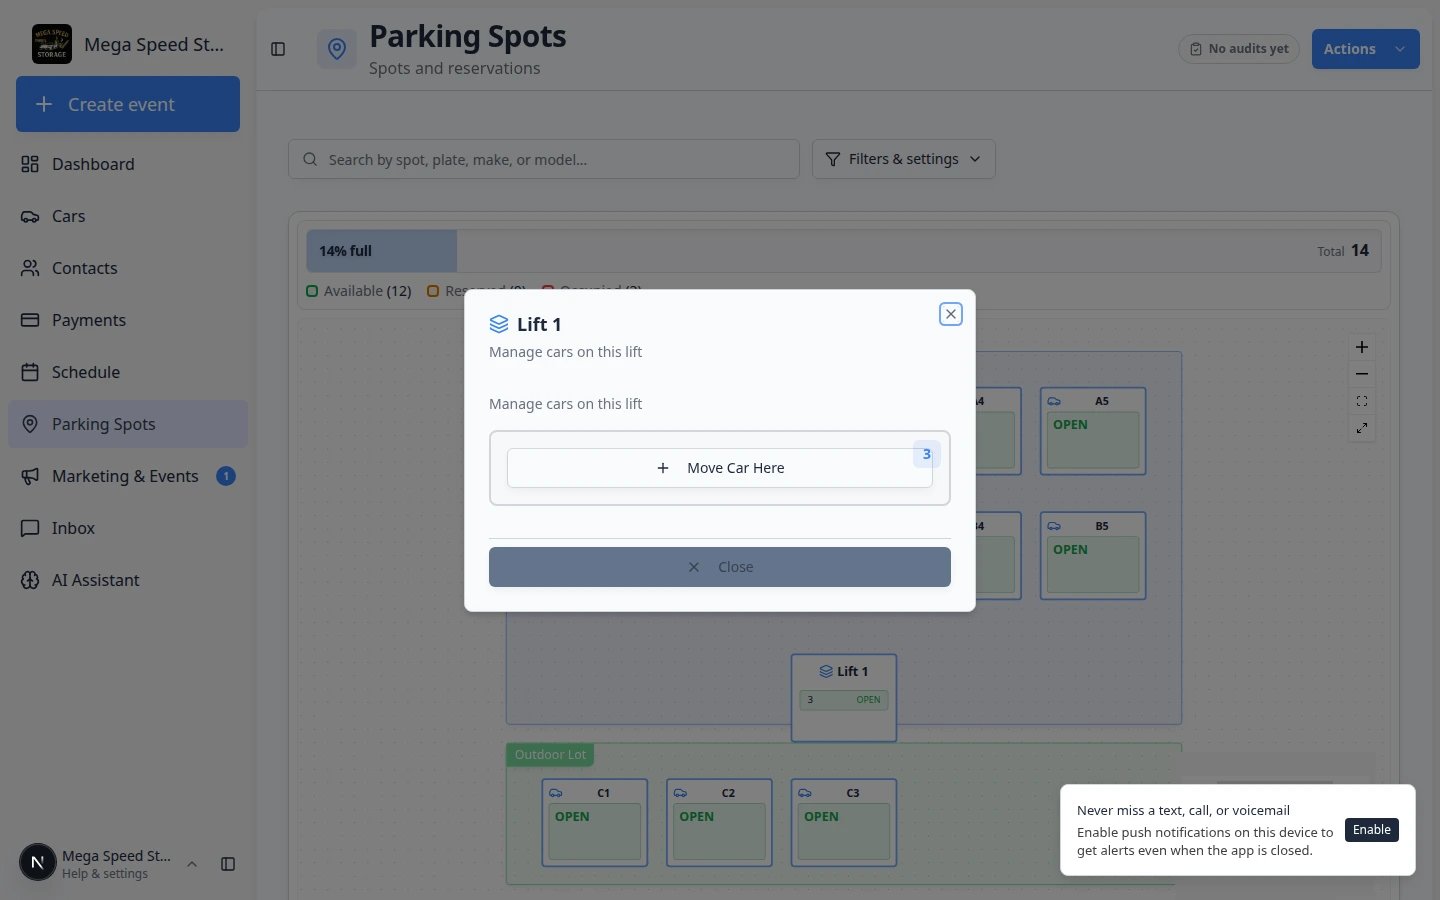 *Open **Lift 1** on the map before you assign a car. Read each level label so you pick the correct deck.*
## What the status colors mean
The exact colors may change with your theme, but the idea is simple:
* An **empty** or **available** spot has no car there now and no reservation showing on the map.
* An **occupied** or **present** spot has a car physically there now.
* A **reserved** spot is planned for a car or customer, but the car may not be there yet.
* A **lift** can show more than one level. Check each level label before you move a car on a stacked lift.
**Reserved vs physically present**
A spot can be **reserved** for a future arrival and still look **available** until someone assigns the car. After the car arrives, use **Assign** or **Move Vehicle** so the map shows **Present** or **Occupied**.
## Common mistakes to avoid
* Do not assign a car to a spot until you know where it is physically parked.
* Do not use a zone when your team needs an exact space number.
* Do not create a new spot just because you cannot find one. Search first, then ask an admin if the spot is missing.
* If a customer has more than one car, check the year, make, model, plate, and VIN before saving.
## Troubleshooting
**I do not see the spot I need**
The spot may not exist yet. Ask an admin to follow [Set up parking spots and zones](/docs/parking-spots/set-up-parking-spots-and-zones), then try again.
**The car is already assigned somewhere else**
This usually means the car has an old active assignment. If you are truly moving the car, confirm the move so the previous assignment ends.
**The map still looks wrong after I saved**
Refresh the page. If the map still looks wrong, open the car record and confirm the location there. If the car record is correct but the map is not, the floor plan may need to be saved again in [Settings > Floor Plan](https://www.carstoragesoftware.com/dashboard/settings/floor-plan).
## What to do next
* If the spot was reserved before the car arrived, confirm the reservation row on [Parking Spots](https://www.carstoragesoftware.com/dashboard/parking-spots) looks correct after you assign the car.
* If the spot was only planned ahead of time, you may also have a reservation to clear. See [Reserve a parking spot](/docs/parking-spots/reserve-a-parking-spot).
* If you finished a calendar drop-off or intake, see [Assign parking during a Schedule event](/docs/parking-spots/assign-parking-during-a-schedule-event).
* If the car left for transport or detail off-site, see [Send a car to an outside vendor](/docs/parking-spots/send-a-car-to-an-outside-vendor).
* To review parking history for billing or audits, open [Review the parking report](/docs/parking-spots/review-the-parking-report).
* If staff cannot find the spot quickly, review [Find parking spots and available spaces](/docs/parking-spots/find-parking-spots-and-available-spaces) with the team.
## Related topics
- [Parking Spots overview](/docs/parking-spots/overview.md)
- [Reserve a parking spot](/docs/parking-spots/reserve-a-parking-spot.md)
- [Assign parking during a Schedule event](/docs/parking-spots/assign-parking-during-a-schedule-event.md)
- [Set up parking spots and zones](/docs/parking-spots/set-up-parking-spots-and-zones.md)
- [Review the parking report](/docs/parking-spots/review-the-parking-report.md)
This documentation is built and hosted on [Mintlify](https://mintlify.com), a developer documentation platform.
*Open **Lift 1** on the map before you assign a car. Read each level label so you pick the correct deck.*
## What the status colors mean
The exact colors may change with your theme, but the idea is simple:
* An **empty** or **available** spot has no car there now and no reservation showing on the map.
* An **occupied** or **present** spot has a car physically there now.
* A **reserved** spot is planned for a car or customer, but the car may not be there yet.
* A **lift** can show more than one level. Check each level label before you move a car on a stacked lift.
**Reserved vs physically present**
A spot can be **reserved** for a future arrival and still look **available** until someone assigns the car. After the car arrives, use **Assign** or **Move Vehicle** so the map shows **Present** or **Occupied**.
## Common mistakes to avoid
* Do not assign a car to a spot until you know where it is physically parked.
* Do not use a zone when your team needs an exact space number.
* Do not create a new spot just because you cannot find one. Search first, then ask an admin if the spot is missing.
* If a customer has more than one car, check the year, make, model, plate, and VIN before saving.
## Troubleshooting
**I do not see the spot I need**
The spot may not exist yet. Ask an admin to follow [Set up parking spots and zones](/docs/parking-spots/set-up-parking-spots-and-zones), then try again.
**The car is already assigned somewhere else**
This usually means the car has an old active assignment. If you are truly moving the car, confirm the move so the previous assignment ends.
**The map still looks wrong after I saved**
Refresh the page. If the map still looks wrong, open the car record and confirm the location there. If the car record is correct but the map is not, the floor plan may need to be saved again in [Settings > Floor Plan](https://www.carstoragesoftware.com/dashboard/settings/floor-plan).
## What to do next
* If the spot was reserved before the car arrived, confirm the reservation row on [Parking Spots](https://www.carstoragesoftware.com/dashboard/parking-spots) looks correct after you assign the car.
* If the spot was only planned ahead of time, you may also have a reservation to clear. See [Reserve a parking spot](/docs/parking-spots/reserve-a-parking-spot).
* If you finished a calendar drop-off or intake, see [Assign parking during a Schedule event](/docs/parking-spots/assign-parking-during-a-schedule-event).
* If the car left for transport or detail off-site, see [Send a car to an outside vendor](/docs/parking-spots/send-a-car-to-an-outside-vendor).
* To review parking history for billing or audits, open [Review the parking report](/docs/parking-spots/review-the-parking-report).
* If staff cannot find the spot quickly, review [Find parking spots and available spaces](/docs/parking-spots/find-parking-spots-and-available-spaces) with the team.
## Related topics
- [Parking Spots overview](/docs/parking-spots/overview.md)
- [Reserve a parking spot](/docs/parking-spots/reserve-a-parking-spot.md)
- [Assign parking during a Schedule event](/docs/parking-spots/assign-parking-during-a-schedule-event.md)
- [Set up parking spots and zones](/docs/parking-spots/set-up-parking-spots-and-zones.md)
- [Review the parking report](/docs/parking-spots/review-the-parking-report.md)
This documentation is built and hosted on [Mintlify](https://mintlify.com), a developer documentation platform.