> ## Documentation Index
> Fetch the complete documentation index at: https://www.carstoragesoftware.com/docs/llms.txt
> Use this file to discover all available pages before exploring further.
# Set up parking spots and zones
> Create the spots, lifts, and zones your team will use to track where cars are stored.
## What you will accomplish
You will create the spot names, lifts, and zones your team uses every day, arrange them on the floor plan, and save a map that matches the real building.
## When to use this guide
Use this guide when you are setting up a new facility map or adding more spaces to an existing map.
When you finish, your team will be able to open [Parking Spots](https://www.carstoragesoftware.com/dashboard/parking-spots), see the facility layout, and assign cars to the right places.
**Why this matters**
Parking spots are the names your staff will use every day. If the names are clear and match the real building, your team can find cars faster and make fewer location mistakes.
**Match the signs on your floor**
Walk the building with a notepad before you type names into the app. If a bay is labeled **A-1** on the wall but **A1** in software, porters will hesitate every time they search. Pick one spelling and use it on signs, keys, and in Car Storage Software.
## Before you start
* You should have permission to open [Settings > Floor Plan](https://www.carstoragesoftware.com/dashboard/settings/floor-plan).
* Know the spot names your staff uses in the facility, such as A1, B12, Lift 2, or Outdoor 4.
* Decide whether you need exact spots, larger zones, or both.
* If your facility has stacked lifts, know how many cars each lift position can hold.
## Open the Floor Plan Editor
Go directly to [Settings > Floor Plan](https://www.carstoragesoftware.com/dashboard/settings/floor-plan). You can also open [Settings > Operations](https://www.carstoragesoftware.com/dashboard/settings/operations), scroll to **Parking map layout**, and click **Edit parking map**.
The page title should say **Floor Plan Editor**. The left side shows **Floor Plan Tools** with buttons such as **Single spot or lift**, **Multiple spots or lifts**, and **Zone or area**. The large area on the right is the map canvas.
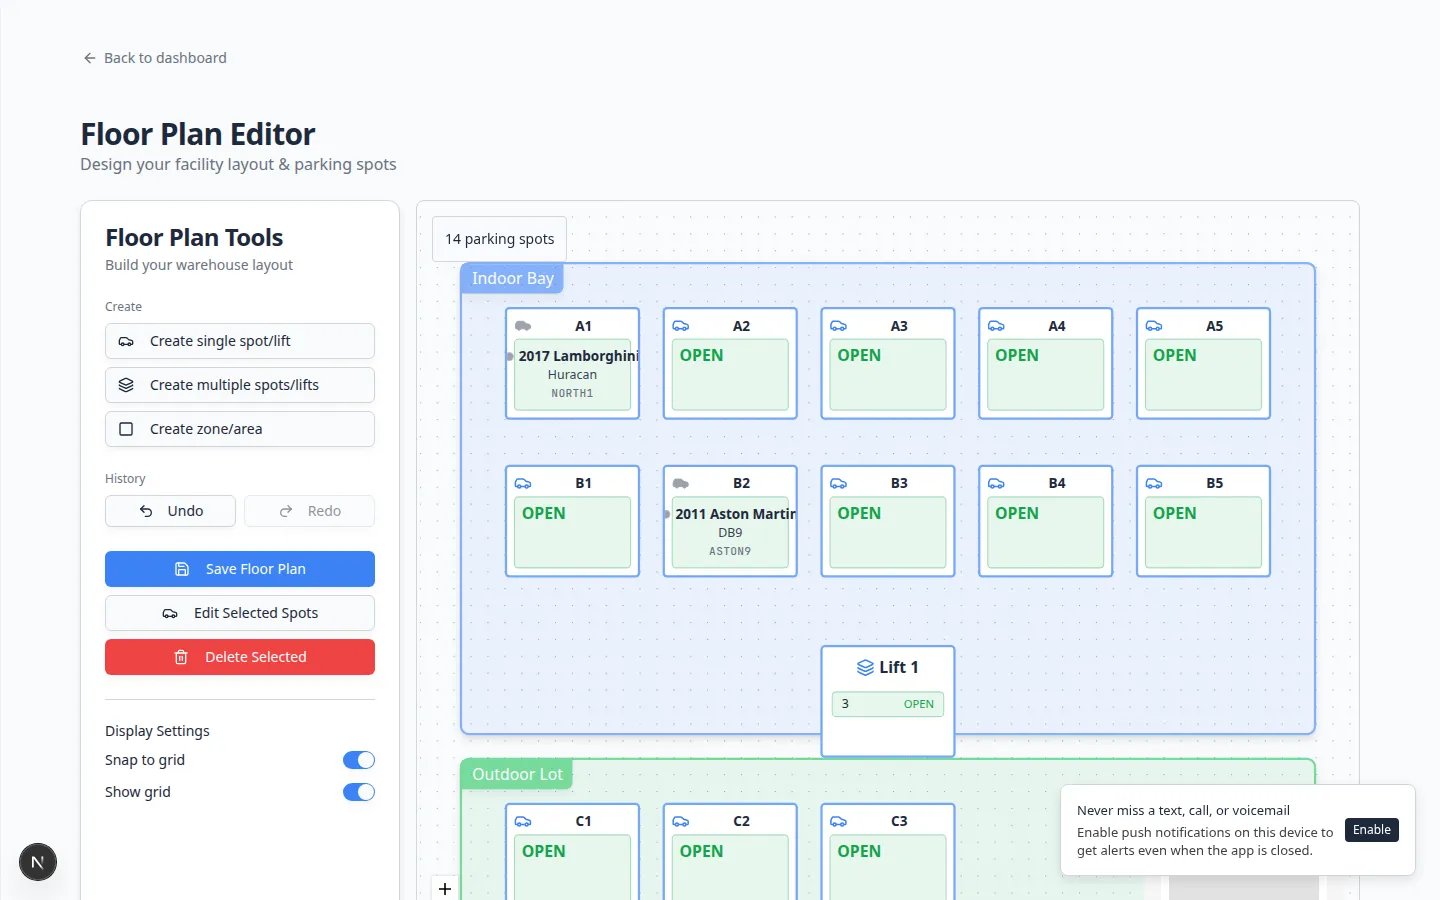 *Use the Floor Plan Editor to create spots, lifts, and zones, then arrange them on the map.*
## Create one spot or lift
Use this option when you only need to add one new space or one lift position.
In **Floor Plan Tools**, click **Single spot or lift**.
In **Name**, type the exact name your team will recognize, such as **A5**, **FRONT ROW 3**, or **LIFT-2**.
Keep names short and consistent. For example, use either **A1, A2, A3** or **A-1, A-2, A-3**. Do not mix both styles unless your real facility uses both.
Use **Description** for helpful details, such as "near front door", "wide spot", or "reserved for lift access".
Use **Tags** for simple labels like **Front Row**, **Climate Controlled**, or **Premium**. Tags help staff filter and understand spots later.
If the space is a lift, turn on **Lift Spot** and enter **Spots Per Lift Position**. For example, enter **2** if the lift holds one car on the ground and one car above it.
Choose **Level Labels** to match how your facility marks each level:
* **Per-lift numbers (L1, L2, …)** creates names like **LIFT-1-L1**, **LIFT-1-L2** (shown as levels 1, 2)
* **Letters (A, B, C, D)** creates names like **LIFT-1-LA**, **LIFT-1-LB** (shown as levels A, B)
* **Sequential pairs (1/2, 3/4, …)** names each platform with consecutive numbers across all lifts. With 2 spots per lift and start **1**, the first lift is **1** (ground) and **2** (top), the next is **3/4**, and so on.
Optionally set **Level Direction**:
* **Bottom → top** puts the first label (**1** / **A**) on the ground level
* **Top → bottom** puts the first label on the highest level
If this space is for a motorcycle or scooter, turn on **Motorcycle spot (half size)**. The box on the map becomes smaller so two bike spaces can sit where one car used to fit.
Leave this off for regular cars. Do not combine **Motorcycle spot** with a lift—lifts use the stacked-level options above instead.
Keep **Active** turned on when staff can use the spot. Turn it off only for a spot that should not be used, such as a blocked bay or a space under repair.
**Why this matters:** **Inactive** spots still appear on the map but show **Inactive** in **Table** view so staff do not assign cars there by mistake.
Click **Create Spot**. The new spot appears on the floor plan.
*Use the Floor Plan Editor to create spots, lifts, and zones, then arrange them on the map.*
## Create one spot or lift
Use this option when you only need to add one new space or one lift position.
In **Floor Plan Tools**, click **Single spot or lift**.
In **Name**, type the exact name your team will recognize, such as **A5**, **FRONT ROW 3**, or **LIFT-2**.
Keep names short and consistent. For example, use either **A1, A2, A3** or **A-1, A-2, A-3**. Do not mix both styles unless your real facility uses both.
Use **Description** for helpful details, such as "near front door", "wide spot", or "reserved for lift access".
Use **Tags** for simple labels like **Front Row**, **Climate Controlled**, or **Premium**. Tags help staff filter and understand spots later.
If the space is a lift, turn on **Lift Spot** and enter **Spots Per Lift Position**. For example, enter **2** if the lift holds one car on the ground and one car above it.
Choose **Level Labels** to match how your facility marks each level:
* **Per-lift numbers (L1, L2, …)** creates names like **LIFT-1-L1**, **LIFT-1-L2** (shown as levels 1, 2)
* **Letters (A, B, C, D)** creates names like **LIFT-1-LA**, **LIFT-1-LB** (shown as levels A, B)
* **Sequential pairs (1/2, 3/4, …)** names each platform with consecutive numbers across all lifts. With 2 spots per lift and start **1**, the first lift is **1** (ground) and **2** (top), the next is **3/4**, and so on.
Optionally set **Level Direction**:
* **Bottom → top** puts the first label (**1** / **A**) on the ground level
* **Top → bottom** puts the first label on the highest level
If this space is for a motorcycle or scooter, turn on **Motorcycle spot (half size)**. The box on the map becomes smaller so two bike spaces can sit where one car used to fit.
Leave this off for regular cars. Do not combine **Motorcycle spot** with a lift—lifts use the stacked-level options above instead.
Keep **Active** turned on when staff can use the spot. Turn it off only for a spot that should not be used, such as a blocked bay or a space under repair.
**Why this matters:** **Inactive** spots still appear on the map but show **Inactive** in **Table** view so staff do not assign cars there by mistake.
Click **Create Spot**. The new spot appears on the floor plan.
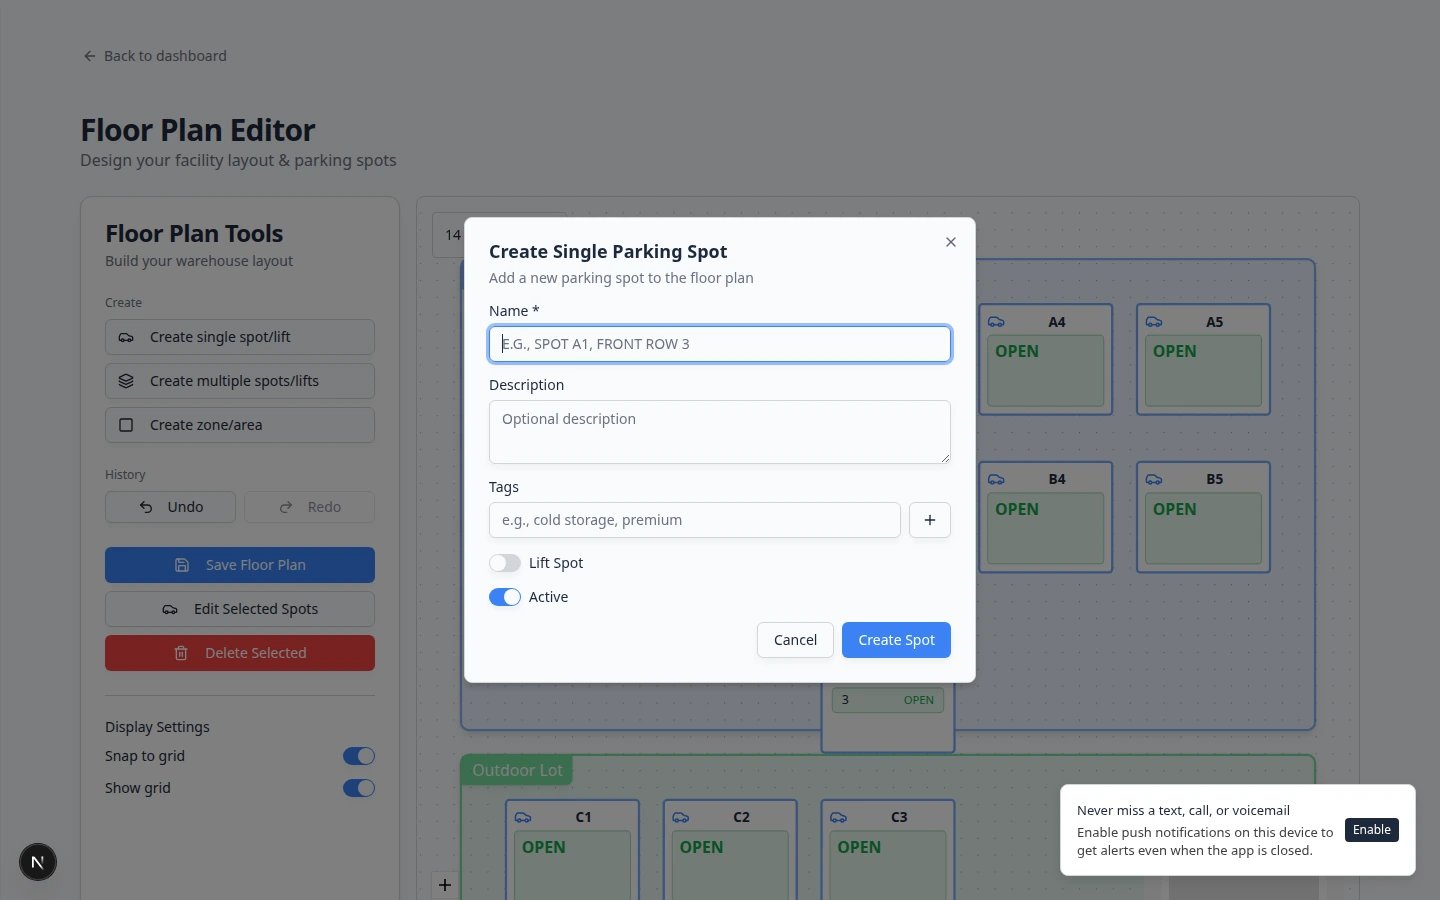 *The **Single spot or lift** dialog is best for adding one space or one lift position at a time.*
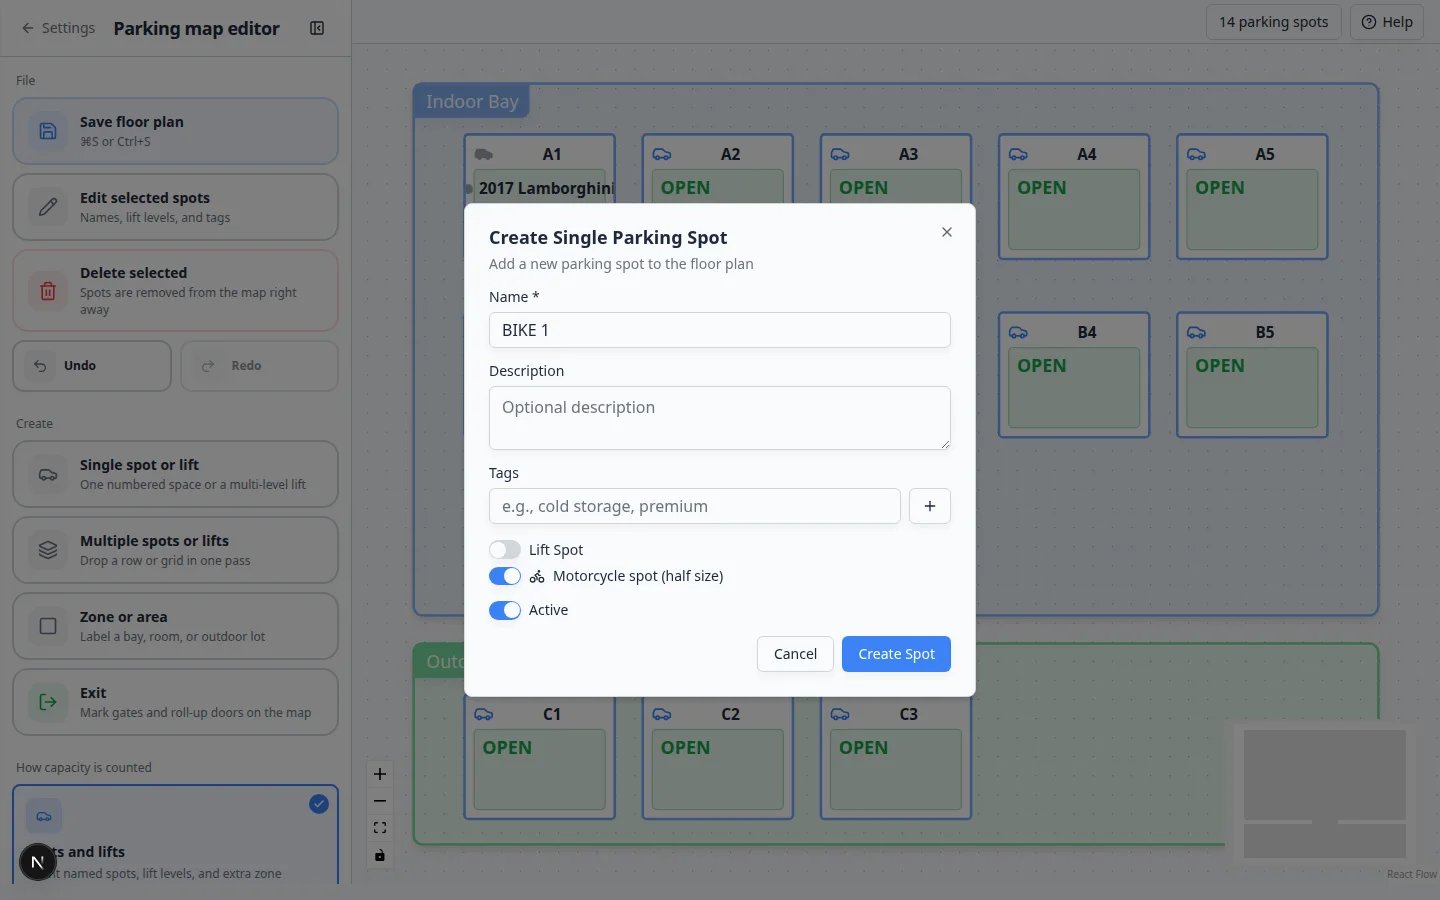 *Turn on **Motorcycle spot (half size)** for bikes and scooters so the box on the map is smaller than a car space.*
## Create many spots at once
Use this option when you are setting up a row, section, or whole facility.
In **Floor Plan Tools**, click **Multiple spots or lifts**.
**Rows** means how many lines of spots to create. **Columns** means how many spots are in each line.
Example: 2 rows and 5 columns creates 10 spots.
**Name Prefix** is the first part of the name, such as **A** or **OUTDOOR**. **Start Number** is the first number.
Example: Prefix **A** and Start Number **1** creates **A1, A2, A3**, and so on.
The **Preview** shows the names that will be created. Stop here if the names do not look right. It is easier to fix names before creating spots.
Turn on **Lift/Stacked Spots** only if these spaces are stacked lifts. Then enter **Spots Per Lift Position**.
Choose **Level Labels** if your facility uses letters or continuous numbering for stack levels:
* **Letters (A, B, C, D)** creates names like **A1-LA**, **A1-LB** (shown as A, B on the map)
* **Per-lift numbers** creates names like **A1-L1**, **A1-L2**
* **Sequential pairs (1/2, 3/4, …)** is for facilities that number every platform in order (ground **1**, top **2**, next lift **3/4**, through **100**). Set **Start Number** to the first number and **Spots Per Lift Position** to **2**.
Use **Level Direction** when the facility numbers or letters from the top down (for example **A** or the lower number on the highest platform instead of the ground).
Click the create button at the bottom of the dialog. The spots appear on the map in a grid.
*Turn on **Motorcycle spot (half size)** for bikes and scooters so the box on the map is smaller than a car space.*
## Create many spots at once
Use this option when you are setting up a row, section, or whole facility.
In **Floor Plan Tools**, click **Multiple spots or lifts**.
**Rows** means how many lines of spots to create. **Columns** means how many spots are in each line.
Example: 2 rows and 5 columns creates 10 spots.
**Name Prefix** is the first part of the name, such as **A** or **OUTDOOR**. **Start Number** is the first number.
Example: Prefix **A** and Start Number **1** creates **A1, A2, A3**, and so on.
The **Preview** shows the names that will be created. Stop here if the names do not look right. It is easier to fix names before creating spots.
Turn on **Lift/Stacked Spots** only if these spaces are stacked lifts. Then enter **Spots Per Lift Position**.
Choose **Level Labels** if your facility uses letters or continuous numbering for stack levels:
* **Letters (A, B, C, D)** creates names like **A1-LA**, **A1-LB** (shown as A, B on the map)
* **Per-lift numbers** creates names like **A1-L1**, **A1-L2**
* **Sequential pairs (1/2, 3/4, …)** is for facilities that number every platform in order (ground **1**, top **2**, next lift **3/4**, through **100**). Set **Start Number** to the first number and **Spots Per Lift Position** to **2**.
Use **Level Direction** when the facility numbers or letters from the top down (for example **A** or the lower number on the highest platform instead of the ground).
Click the create button at the bottom of the dialog. The spots appear on the map in a grid.
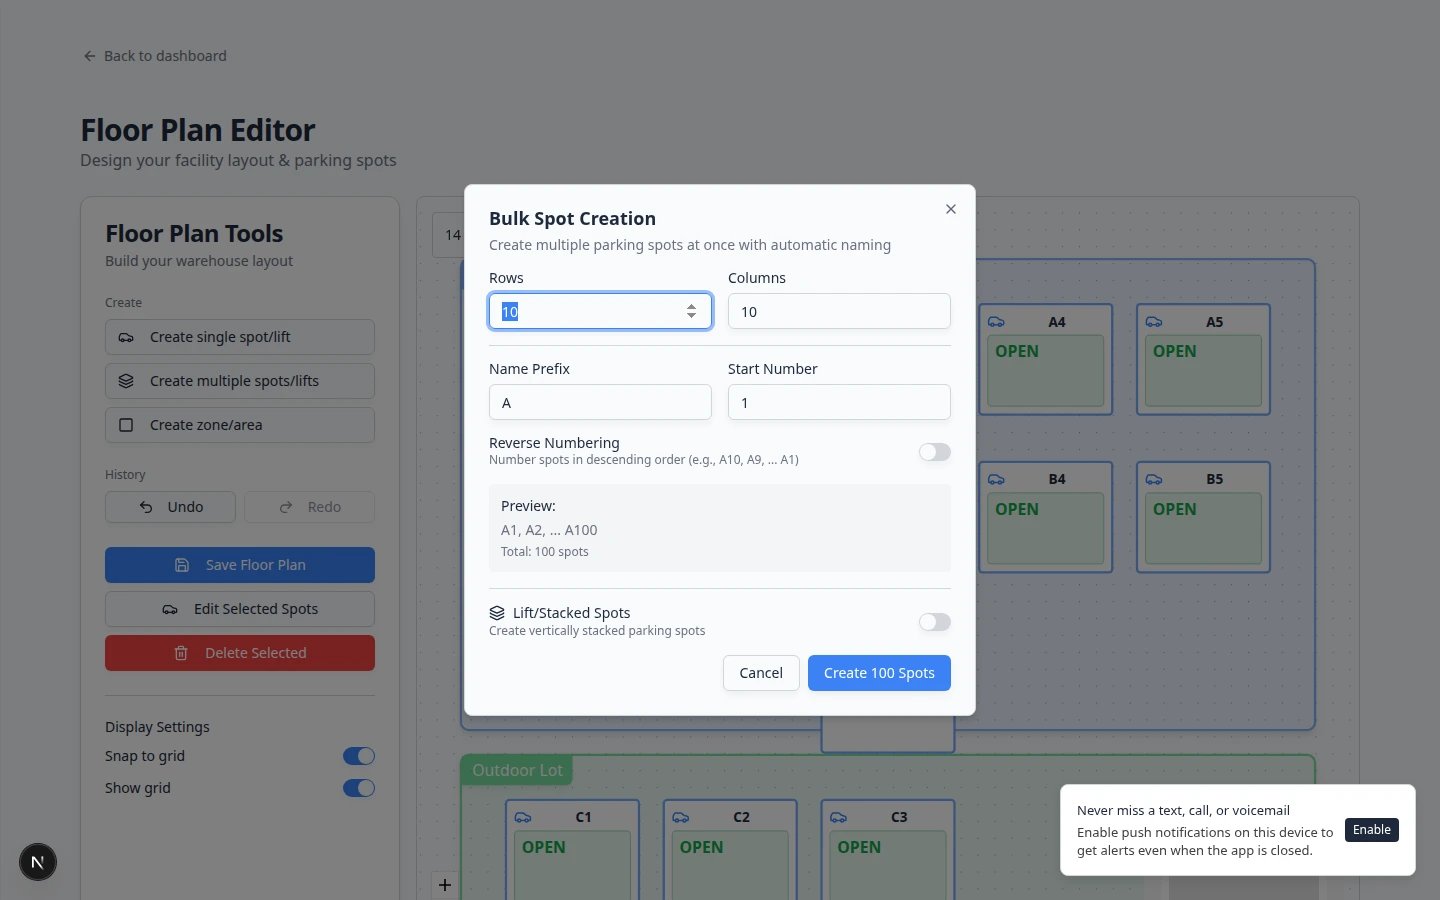 *Use Create multiple spots/lifts when you are building a whole row or section. Check the Preview before you click create; fixing names later takes more time.*
**Why the preview matters**
A typo in **Name Prefix** or **Start Number** creates dozens of wrong names at once. Pause on the preview line. Your staff will search for these exact names every day.
## Create a zone or area
Zones are helpful for flexible spaces where cars can be parked without an exact numbered spot.
Examples:
* Outdoor Lot
* Service Area
* Main Storage
* Waiting for Pickup
* Detail Bay Area
In **Floor Plan Tools**, click **Zone or area**.
Type a simple name your staff will understand, such as **Main Storage** or **Outdoor Lot**.
Use **Description** for details like "climate controlled area" or "cars waiting for transport".
**Additional Capacity** means how many cars can be assigned directly to this zone without choosing a specific spot inside it.
If every car in the zone must use an exact spot, leave this blank or use **0**.
Choose a color that makes the zone easy to recognize on the map.
The zone appears on the map. Drag it behind the spots or around the area it represents.
*Use Create multiple spots/lifts when you are building a whole row or section. Check the Preview before you click create; fixing names later takes more time.*
**Why the preview matters**
A typo in **Name Prefix** or **Start Number** creates dozens of wrong names at once. Pause on the preview line. Your staff will search for these exact names every day.
## Create a zone or area
Zones are helpful for flexible spaces where cars can be parked without an exact numbered spot.
Examples:
* Outdoor Lot
* Service Area
* Main Storage
* Waiting for Pickup
* Detail Bay Area
In **Floor Plan Tools**, click **Zone or area**.
Type a simple name your staff will understand, such as **Main Storage** or **Outdoor Lot**.
Use **Description** for details like "climate controlled area" or "cars waiting for transport".
**Additional Capacity** means how many cars can be assigned directly to this zone without choosing a specific spot inside it.
If every car in the zone must use an exact spot, leave this blank or use **0**.
Choose a color that makes the zone easy to recognize on the map.
The zone appears on the map. Drag it behind the spots or around the area it represents.
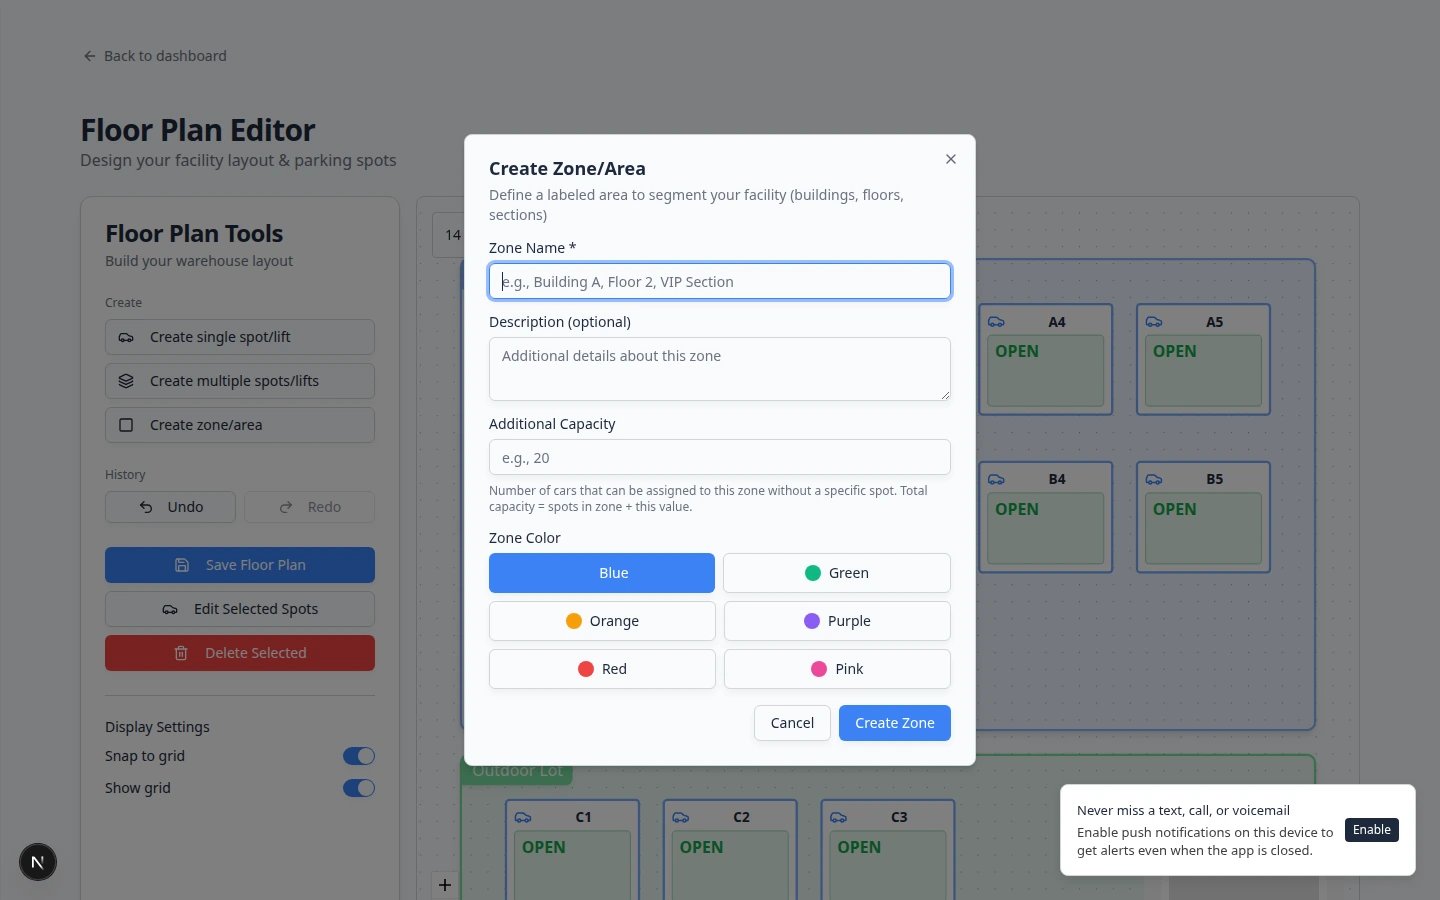 *Zones appear as colored areas on the map. Pick a color your team will recognize at a glance—blue for indoor, green for outdoor, and so on.*
**When to use Additional Capacity**
Leave **Additional Capacity** at **0** when every car in the zone must use a numbered spot inside it. Enter a number (for example **4**) when cars can park anywhere in the zone without picking an exact spot—common for outdoor overflow lots.
## Arrange the map
After spots or zones appear, arrange them so the map looks like the real facility.
Click and drag a spot to move it. Place spots in the same order your staff sees in the building.
Select multiple spots to use alignment tools such as align top, align middle, distribute horizontally, or distribute vertically.
If spots are diagonal in the real facility, select them and use **Rotate Selected**.
If two spots sit on top of each other, select one and use **Forward**, **Backward**, **To front**, or **To back** in **Floor Plan Tools**. That changes which box staff see on top—it does not move the car assignment.
**Why this matters:** Tight rows and motorcycle spots often overlap. Saving the visual order keeps the daily map readable.
Click **Save Floor Plan** before leaving the page. If the button says **No Changes to Save**, your latest changes are already saved.
**Why this matters:** Zones and new spots do not appear on [Parking Spots](https://www.carstoragesoftware.com/dashboard/parking-spots) until the floor plan is saved at least once after your edits.
*Always click **Save Floor Plan** after you create, move, or rename spots. Staff will not see your changes on the daily Parking Spots map until you save.*
**Expected result**
After saving, the [Parking Spots page](https://www.carstoragesoftware.com/dashboard/parking-spots) shows the new spots and zones. Staff can now assign cars to them.
If zones show a **not saved yet** message when clicked, return to this page and click **Save Floor Plan** again, then teach staff to use [Work with zones on the map](/docs/parking-spots/work-with-zones-on-the-map).
## Test the new layout before the team uses it
After you save the floor plan, open [Parking Spots](https://www.carstoragesoftware.com/dashboard/parking-spots) and check the layout like a staff member would.
Click **Save Floor Plan**, then go to [Parking Spots](https://www.carstoragesoftware.com/dashboard/parking-spots).
Open **filters & settings** and choose **Map** if needed. You should see your spot names on the drawing.
**Expected result:** Spots appear where you placed them. The occupancy bar above the map shows **Available**, **Reserved**, and **Occupied** counts.
Switch to **Table** and confirm the same spot names appear in the **Name** column.
Type a spot name (for example **A1**) in the search box. The map should jump to that spot.
Why this matters: staff will search by name on busy days. If search fails, fix spot names before go-live.
Show the map to someone who moves cars daily. Ask whether the layout matches the real building.
* Search for a few spot names to confirm they are easy to find.
* Switch between **Map** and **Table** views to make sure the spot names look clear in both places.
* Assign one test car or reservation only if your team is comfortable removing or correcting it afterward.
Use [Find parking spots and available spaces](/docs/parking-spots/find-parking-spots-and-available-spaces) after setup to learn how staff will use the finished layout.
## Edit an existing spot
Go to [Settings > Floor Plan](https://www.carstoragesoftware.com/dashboard/settings/floor-plan).
Select the spot you want to update.
Use this to change the name, description, tags, or active status.
Click the save button in the edit dialog, then click **Save Floor Plan** if you moved or rearranged the spot.
## Troubleshooting
**I created a spot but do not see it on Parking Spots**
Return to [Settings > Floor Plan](https://www.carstoragesoftware.com/dashboard/settings/floor-plan) and click **Save Floor Plan**. Then refresh [Parking Spots](https://www.carstoragesoftware.com/dashboard/parking-spots).
**The spot names are not in the order I expected**
Use consistent names and numbers. For example, A1 through A9 may sort differently than A01 through A09 in some lists. If your facility has many numbered spots, consider using leading zeros such as A01, A02, and A03.
**I am not sure whether to use a spot or a zone**
Use a **spot** when staff need an exact location. Use a **zone** when the car can be anywhere in a larger area.
## What to do next
* Assign cars as they arrive using [Assign a parking spot](/docs/parking-spots/assign-a-parking-spot).
* Teach staff to search the map with [Find parking spots and available spaces](/docs/parking-spots/find-parking-spots-and-available-spaces).
* Hold spaces for upcoming arrivals with [Reserve a parking spot](/docs/parking-spots/reserve-a-parking-spot).
* If cars park in flexible areas, share [Work with zones on the map](/docs/parking-spots/work-with-zones-on-the-map) with floor staff.
* After cars are parked, teach [Run a parking audit](/docs/parking-spots/run-a-parking-audit) so the map stays honest.
## Related topics
- [Parking Spots overview](/docs/parking-spots/overview.md)
- [Work with zones on the map](/docs/parking-spots/work-with-zones-on-the-map.md)
- [Assign a parking spot](/docs/parking-spots/assign-a-parking-spot.md)
- [Assign parking during a Schedule event](/docs/parking-spots/assign-parking-during-a-schedule-event.md)
- [Run a parking audit](/docs/parking-spots/run-a-parking-audit.md)
This documentation is built and hosted on [Mintlify](https://mintlify.com), a developer documentation platform.
*Zones appear as colored areas on the map. Pick a color your team will recognize at a glance—blue for indoor, green for outdoor, and so on.*
**When to use Additional Capacity**
Leave **Additional Capacity** at **0** when every car in the zone must use a numbered spot inside it. Enter a number (for example **4**) when cars can park anywhere in the zone without picking an exact spot—common for outdoor overflow lots.
## Arrange the map
After spots or zones appear, arrange them so the map looks like the real facility.
Click and drag a spot to move it. Place spots in the same order your staff sees in the building.
Select multiple spots to use alignment tools such as align top, align middle, distribute horizontally, or distribute vertically.
If spots are diagonal in the real facility, select them and use **Rotate Selected**.
If two spots sit on top of each other, select one and use **Forward**, **Backward**, **To front**, or **To back** in **Floor Plan Tools**. That changes which box staff see on top—it does not move the car assignment.
**Why this matters:** Tight rows and motorcycle spots often overlap. Saving the visual order keeps the daily map readable.
Click **Save Floor Plan** before leaving the page. If the button says **No Changes to Save**, your latest changes are already saved.
**Why this matters:** Zones and new spots do not appear on [Parking Spots](https://www.carstoragesoftware.com/dashboard/parking-spots) until the floor plan is saved at least once after your edits.
*Always click **Save Floor Plan** after you create, move, or rename spots. Staff will not see your changes on the daily Parking Spots map until you save.*
**Expected result**
After saving, the [Parking Spots page](https://www.carstoragesoftware.com/dashboard/parking-spots) shows the new spots and zones. Staff can now assign cars to them.
If zones show a **not saved yet** message when clicked, return to this page and click **Save Floor Plan** again, then teach staff to use [Work with zones on the map](/docs/parking-spots/work-with-zones-on-the-map).
## Test the new layout before the team uses it
After you save the floor plan, open [Parking Spots](https://www.carstoragesoftware.com/dashboard/parking-spots) and check the layout like a staff member would.
Click **Save Floor Plan**, then go to [Parking Spots](https://www.carstoragesoftware.com/dashboard/parking-spots).
Open **filters & settings** and choose **Map** if needed. You should see your spot names on the drawing.
**Expected result:** Spots appear where you placed them. The occupancy bar above the map shows **Available**, **Reserved**, and **Occupied** counts.
Switch to **Table** and confirm the same spot names appear in the **Name** column.
Type a spot name (for example **A1**) in the search box. The map should jump to that spot.
Why this matters: staff will search by name on busy days. If search fails, fix spot names before go-live.
Show the map to someone who moves cars daily. Ask whether the layout matches the real building.
* Search for a few spot names to confirm they are easy to find.
* Switch between **Map** and **Table** views to make sure the spot names look clear in both places.
* Assign one test car or reservation only if your team is comfortable removing or correcting it afterward.
Use [Find parking spots and available spaces](/docs/parking-spots/find-parking-spots-and-available-spaces) after setup to learn how staff will use the finished layout.
## Edit an existing spot
Go to [Settings > Floor Plan](https://www.carstoragesoftware.com/dashboard/settings/floor-plan).
Select the spot you want to update.
Use this to change the name, description, tags, or active status.
Click the save button in the edit dialog, then click **Save Floor Plan** if you moved or rearranged the spot.
## Troubleshooting
**I created a spot but do not see it on Parking Spots**
Return to [Settings > Floor Plan](https://www.carstoragesoftware.com/dashboard/settings/floor-plan) and click **Save Floor Plan**. Then refresh [Parking Spots](https://www.carstoragesoftware.com/dashboard/parking-spots).
**The spot names are not in the order I expected**
Use consistent names and numbers. For example, A1 through A9 may sort differently than A01 through A09 in some lists. If your facility has many numbered spots, consider using leading zeros such as A01, A02, and A03.
**I am not sure whether to use a spot or a zone**
Use a **spot** when staff need an exact location. Use a **zone** when the car can be anywhere in a larger area.
## What to do next
* Assign cars as they arrive using [Assign a parking spot](/docs/parking-spots/assign-a-parking-spot).
* Teach staff to search the map with [Find parking spots and available spaces](/docs/parking-spots/find-parking-spots-and-available-spaces).
* Hold spaces for upcoming arrivals with [Reserve a parking spot](/docs/parking-spots/reserve-a-parking-spot).
* If cars park in flexible areas, share [Work with zones on the map](/docs/parking-spots/work-with-zones-on-the-map) with floor staff.
* After cars are parked, teach [Run a parking audit](/docs/parking-spots/run-a-parking-audit) so the map stays honest.
## Related topics
- [Parking Spots overview](/docs/parking-spots/overview.md)
- [Work with zones on the map](/docs/parking-spots/work-with-zones-on-the-map.md)
- [Assign a parking spot](/docs/parking-spots/assign-a-parking-spot.md)
- [Assign parking during a Schedule event](/docs/parking-spots/assign-parking-during-a-schedule-event.md)
- [Run a parking audit](/docs/parking-spots/run-a-parking-audit.md)
This documentation is built and hosted on [Mintlify](https://mintlify.com), a developer documentation platform.