> ## Documentation Index
> Fetch the complete documentation index at: https://www.carstoragesoftware.com/docs/llms.txt
> Use this file to discover all available pages before exploring further.
# Create an appointment
> Add a customer appointment, vehicle task, or facility event to the Schedule calendar.
Use this guide when you need to place new work on the [Schedule page](https://www.carstoragesoftware.com/dashboard/schedule). This may be a customer visit, service task, pickup, delivery, staff task, or a **Calendar Block** when the shop should not accept bookings.
When you save the event, your whole team sees it on the calendar, in **Table** and **Whiteboard** views, and in **Progress** when they track status.
## What you will accomplish
* Open the **Create New Event** form from [Schedule](https://www.carstoragesoftware.com/dashboard/schedule).
* Choose the right **Event type**, customer or vehicle, date, and time.
* Assign a team member and add notes when the handoff matters.
* Save the event so it appears on the calendar for your whole team.
## When to create an event from Schedule
* A customer calls to book a drop-off, pickup, detail, or service visit.
* Your team needs to block time for a meeting, holiday, or bay maintenance (**Calendar Block**).
* Work is starting **right now** and you want the calendar to show the correct time without picking a future slot.
* The same visit should repeat weekly or monthly — turn on **Recurring Event** or follow [Create recurring appointments](/docs/schedule/create-recurring-appointments).
* The work can happen anytime that day (no customer arrival time) — turn on **All day** or follow [Create an all-day event](/docs/schedule/create-an-all-day-event).
## Before you start
* Know what kind of event you are adding, such as **Vehicle Drop Off**, **Dealer Service**, **Vehicle Pick Up**, or **Calendar Block**.
* If the event is for a customer or vehicle, make sure the customer or car already exists in the app.
* Know the date, preferred start time, and how long the event should take.
* If the work belongs to a specific staff member or outside vendor, know who should be assigned.
* If your team uses customer notifications, confirm the time before saving so the customer receives the correct information.
## Phone bookings: a simple front-desk script
When a customer calls to book, use this order so nothing is missed:
Ask for the customer name, vehicle (year, make, model), and what they need (drop-off, detail, pickup, service).
Go to [Schedule](https://www.carstoragesoftware.com/dashboard/schedule) and click **Schedule Event**. Search for the vehicle or customer before you pick a time.
**Why this matters:** Booking under the wrong car is one of the most common front-desk mistakes—and it is easy to prevent with a quick search.
Match the visit to the correct **Event type**, choose a highlighted time slot, and add notes the floor team will need (entrance, keys, special requests).
If a technician or vendor is already lined up, set **Assigned to** now. Otherwise leave it **Unassigned** and let the morning stand-up assign owners.
**Expected result:** The customer hears a confirmed time, and your team sees the visit on the calendar without a separate sticky note.
## Create the event
Go to [Schedule](https://www.carstoragesoftware.com/dashboard/schedule) from the dashboard sidebar.
**Expected result:** You see the schedule header with **Schedule Event**, **Full screen**, and **Filters & Settings**. Events appear as colored blocks, cards, or table rows depending on your last view.
Click **Schedule Event** near the top-right of the page.
**Expected result:** A window titled **Create New Event** opens. On the left you will see **EVENT TYPE OR WORKFLOW**, vehicle or customer, **ASSIGNED TO**, **DESCRIPTION (OPTIONAL)**, and **RECURRING EVENT**. On the right you will see **All day**, then the date and available times.
Select the event type that best matches the work. The dropdown shows all event types your team has set up.
Examples:
* Use **Vehicle Drop Off** when a customer is bringing in a car for storage.
* Use **Dealer Service** when the car is going to or returning from outside service.
* Use **Detail & Wash** for cleaning or detailing work.
* Use **Battery Maintenance** for routine battery checks.
* Use **Calendar Block** when your facility should not accept bookings during a time period.
Choosing the right event type matters because it controls which fields the app asks for, how the event appears on the calendar (each type has its own color), and whether customers receive notifications.
If the event type is about a vehicle, search for and select the correct car. Start typing the make, model, or owner name and the app will show matching vehicles.
If the event type is about a customer but not a specific car, search for and select the customer.
Facility-only events (like Calendar Block) do not need a customer or vehicle.
Some event types have options, such as a standard appointment length or service package. If an **Option** field appears, choose the option that matches the work.
If no option appears, your team may have only one default setup for that event type, and it is already selected.
If you are an admin and the **Assigned to** field appears, choose the team member and/or vendor responsible for the event.
You can leave it **Unassigned** if the team will decide later. Assigning someone helps them find their work using the "Assigned to me" filter.
**Tip:** The picker lists **Team members** and **Vendors** in one searchable menu. See [Assign team members and vendors to events](/docs/schedule/assign-team-members-and-vendors) for screenshots and vendor setup steps.
On the **right** side of the form, confirm the date. Available times appear as buttons (for example **9:00 AM**).
Click a highlighted time slot that works for the customer and your bays.
If the work can happen **anytime that day** and nobody is arriving at a clock time, turn on **All day** instead of picking a slot. The helper text says **No timed slot — the team can do this anytime that day.** Full steps: [Create an all-day event](/docs/schedule/create-an-all-day-event).
**Expected result:** The slot you picked is selected, or the time grid is hidden because **All day** is on. Times follow your facility time zone (shown on the form).
**Why this matters:** Available slots follow your event type rules (hours, buffers, and closed days). Picking a highlighted slot is the safest choice when a customer is coming at a real time.
In the **Description** field, add notes that will help the next person understand the event.
Good notes are short and specific. Example: "Customer will drop off the Porsche at the front entrance. Please confirm battery tender setup."
Review the event type, customer or vehicle, date, time, and notes. Then click **Create Event** at the bottom of the form.
**Expected result:** The window closes. The event appears on [Schedule](https://www.carstoragesoftware.com/dashboard/schedule) at the date and time you chose. Other views (**Table**, **Whiteboard**, **Progress**) show the same event after you switch to them.
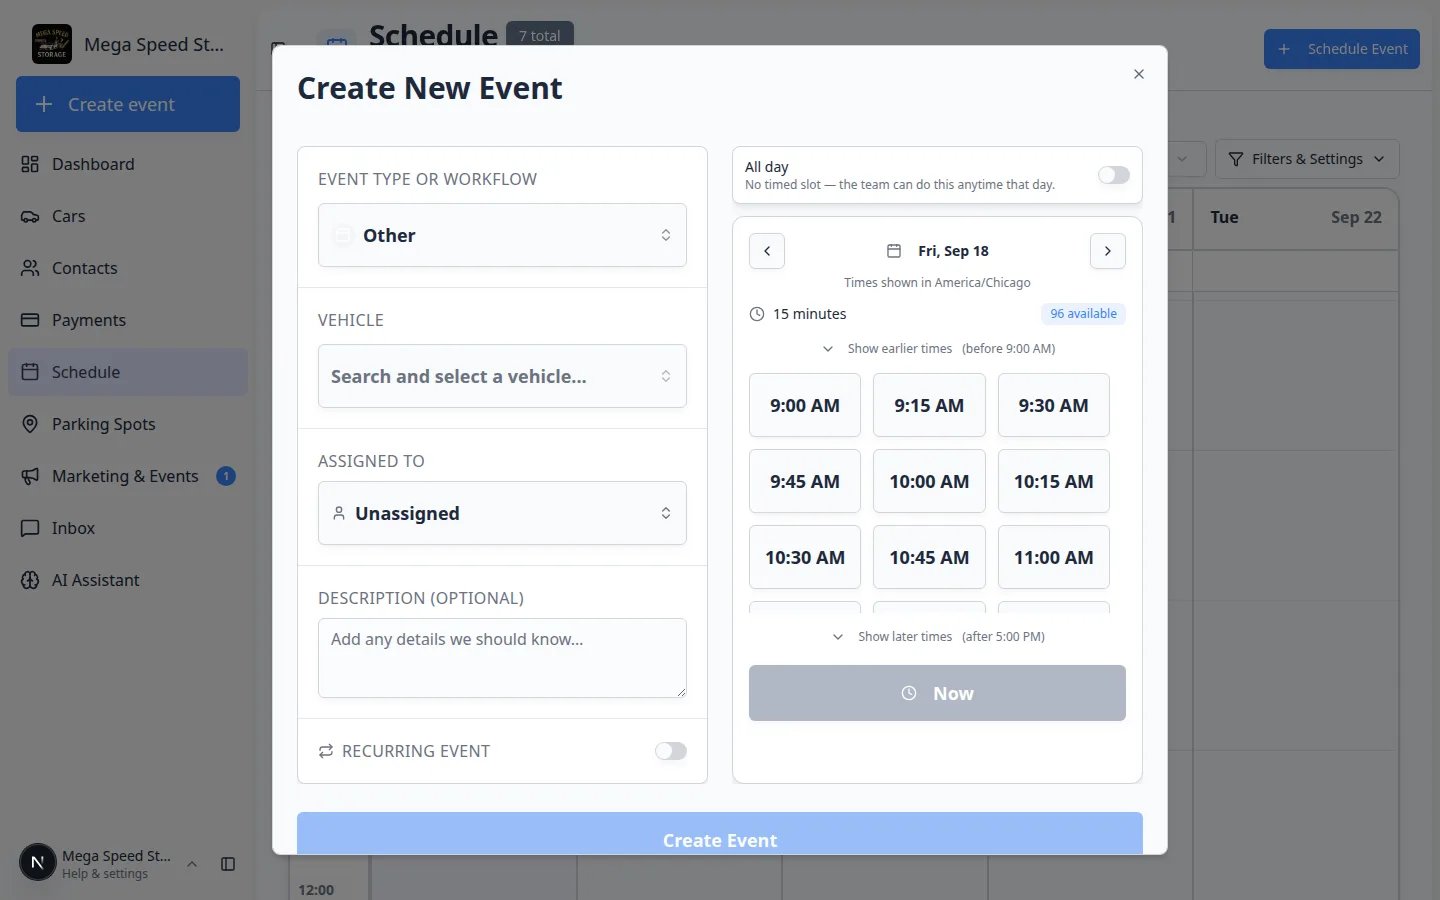 *The **Create New Event** window keeps details on the left and the date on the right. **All day** sits above the time slots. Leave it off when the customer is arriving at a real time.*
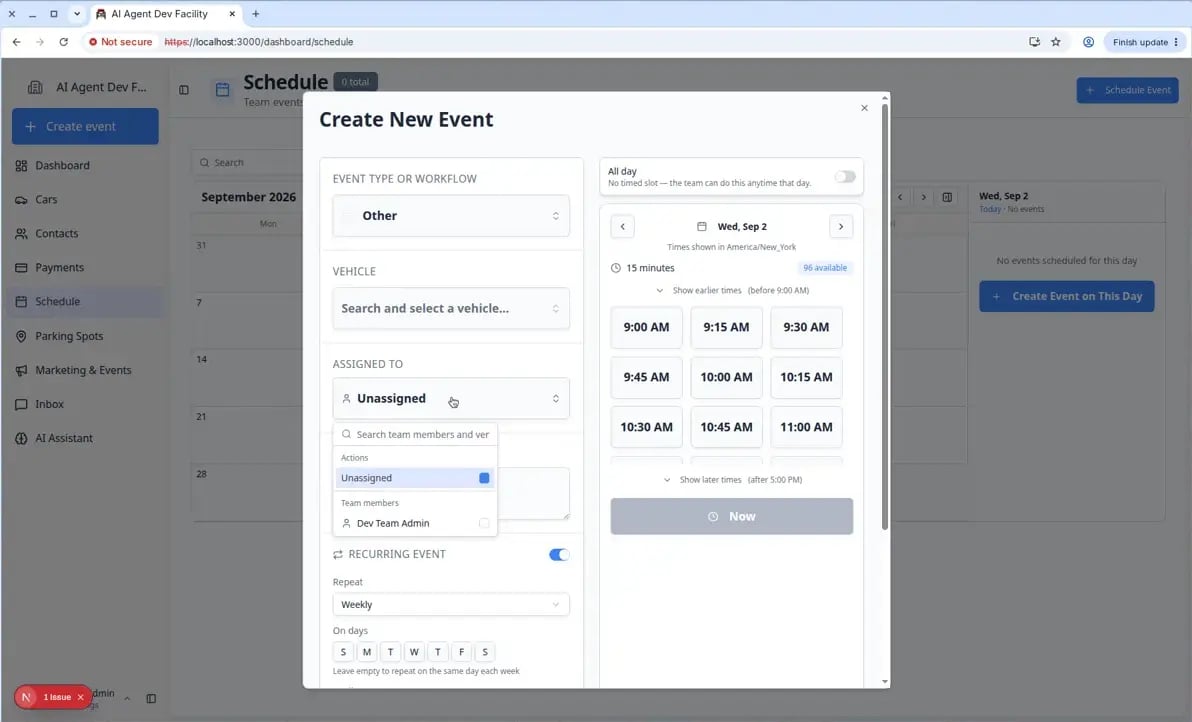 *Click **Assigned to** to pick team members and vendors. You can assign more than one person or partner when the job needs a handoff.*
## Use Now for work that is starting immediately
Open **Schedule Event**, select the **Event type**, and choose the vehicle or customer if the event needs one.
Below the available times, click **Now**.
**Expected result:** The form sets the appointment to the **current time** so you do not have to hunt for a slot when the car is already on the lot.
Add a short **Description** if the next person needs context, then click **Create Event**.
**Expected result:** The event appears on today’s calendar at the current time.
*Click **Assigned to** to pick team members and vendors. You can assign more than one person or partner when the job needs a handoff.*
## Use Now for work that is starting immediately
Open **Schedule Event**, select the **Event type**, and choose the vehicle or customer if the event needs one.
Below the available times, click **Now**.
**Expected result:** The form sets the appointment to the **current time** so you do not have to hunt for a slot when the car is already on the lot.
Add a short **Description** if the next person needs context, then click **Create Event**.
**Expected result:** The event appears on today’s calendar at the current time.
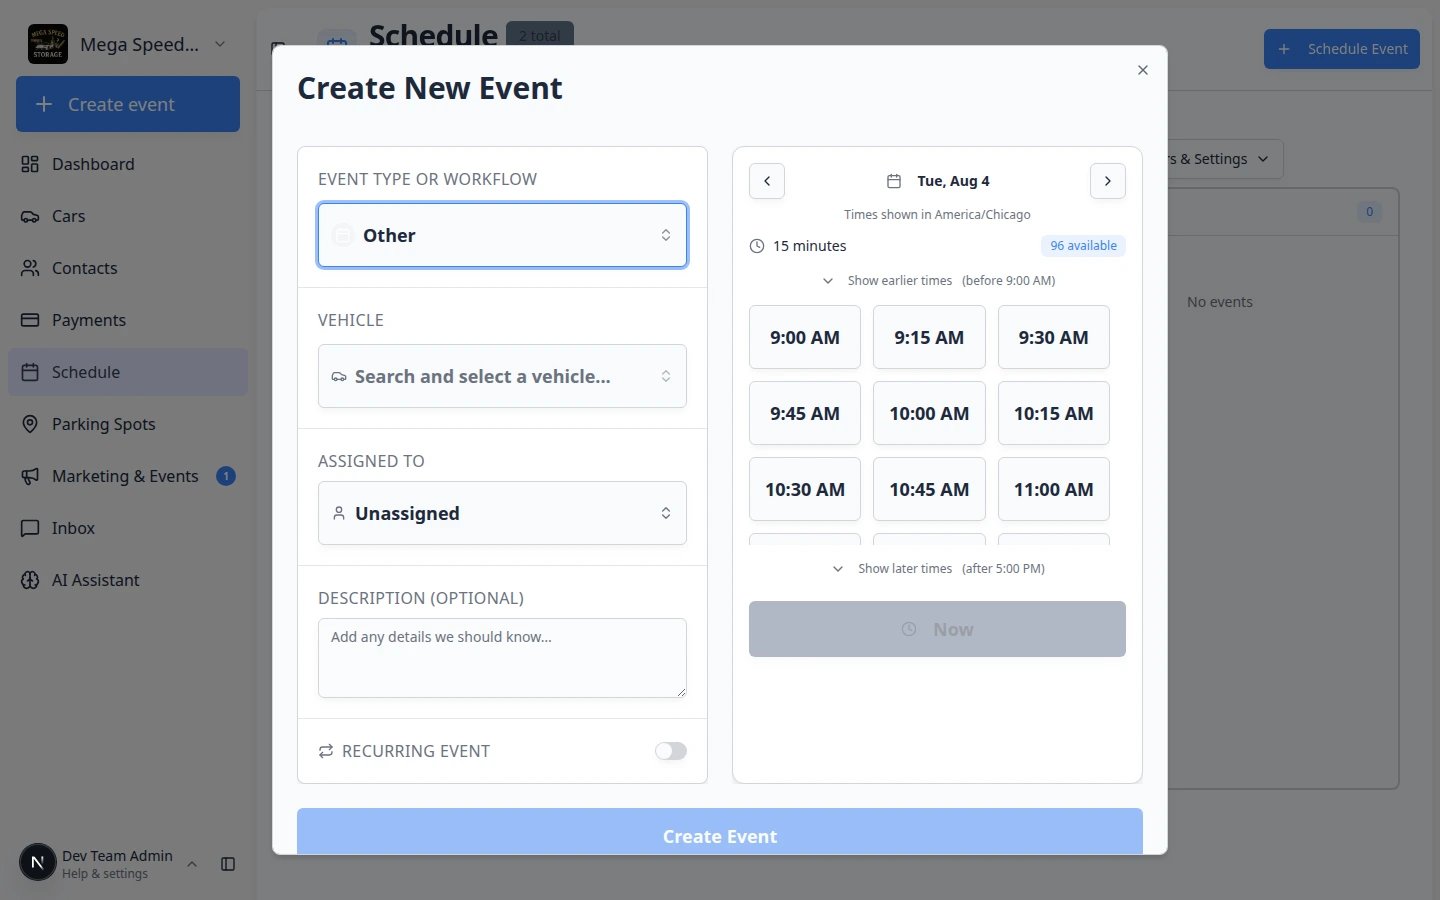 *Use Now when work is already in progress. You can still add notes before you save the event.*
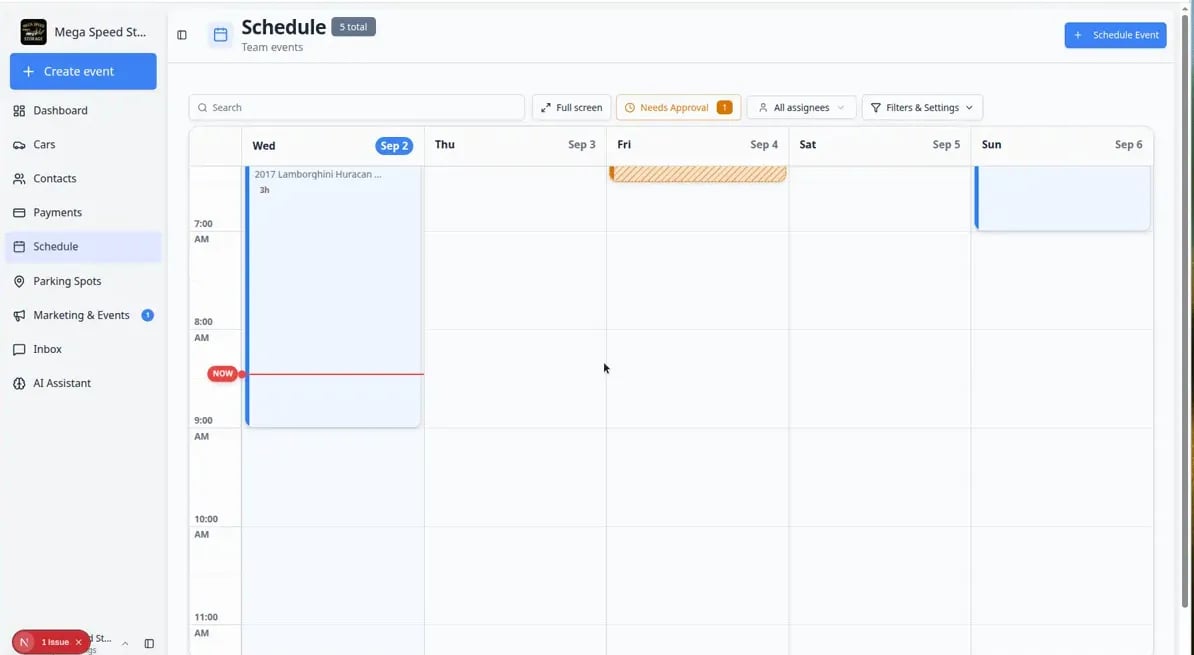 *After creating an event, it appears immediately on the calendar. Your whole team can see it in every view.*
## What success looks like
After you save the event:
* The event appears on the [Schedule page](https://www.carstoragesoftware.com/dashboard/schedule) as a colored block at the correct date and time.
* The event shows the correct event type name and color.
* The vehicle or customer name is visible on the event block when the event needs one.
* The assigned staff member or vendor can see the event when they use the **Assigned to me** filter (staff) or when your team shares the schedule with partners.
* Any notes are visible when someone clicks on the event to open its details.
## Common mistakes to avoid
**Do not use Calendar Block for customer work**
Use **Calendar Block** only when you want to reserve or block time for the facility. For customer visits, choose the correct customer or vehicle event type instead. Calendar blocks prevent other bookings during that time.
**Check the vehicle before saving**
Many customers have more than one car. Confirm the year, make, model, and plate before creating the event. Creating an event for the wrong vehicle causes confusion for your team and the customer.
**Use notes for handoffs**
If another team member may handle the appointment, add notes that explain what the customer expects. This prevents repeat questions and missed details. Think of notes as a message to your future self or a teammate.
## Troubleshooting
**I do not see the Schedule Event button**
Your role may not have permission to create scheduled work. Ask a team admin to review your access in [Settings > Team](https://www.carstoragesoftware.com/dashboard/settings/team).
**The event type I need is missing**
The event type may be turned off or not set up yet. Ask an admin to check [Settings > Events & schedule](https://www.carstoragesoftware.com/dashboard/settings/events). They can create new event types or reactivate existing ones.
**The customer or vehicle is missing from the search**
Create the record first in [Contacts](https://www.carstoragesoftware.com/dashboard/contacts) or [Cars](https://www.carstoragesoftware.com/dashboard/cars), then return to Schedule and create the event. The search only shows customers and vehicles that already exist in the system.
**No available time slots are showing**
The event type may have availability rules that limit when bookings can happen. Try a different date, or ask an admin to review the availability settings for that event type in [Settings > Events & schedule](https://www.carstoragesoftware.com/dashboard/settings/events).
## Create repeating work on the same form
If this visit should happen every week or month, turn on **RECURRING EVENT** at the bottom of the left column and set the repeat pattern.
For full step-by-step help, follow [Create recurring appointments](/docs/schedule/create-recurring-appointments).
You can also turn on **All day** and **RECURRING EVENT** together when the repeating work has no arrival time. See [Create an all-day event](/docs/schedule/create-an-all-day-event).
**Customers may see this visit**
If the event type is set so customers can see it, the visit can appear in their portal after you save. Timed visits show a clock time. All-day visits show the date only. Admins set **Who can see this** in [Settings → Events & schedule](https://www.carstoragesoftware.com/dashboard/settings/events). See [Configure event types](/docs/events/configure-event-types).
## Create an event from Month view
Click **Filters & Settings**, choose **Calendar** under **View Mode**, then click **Month**.
**Expected result:** You see a month grid with colored dots or blocks on busy days.
Click the date on the month grid.
**Expected result:** A list opens showing how many events are on that day. You can read what is already booked before adding more work.
If the day has **no events yet**, click **Create Event on This Day**.
**Expected result:** The **Create New Event** form opens with that date already selected on the right side.
*After creating an event, it appears immediately on the calendar. Your whole team can see it in every view.*
## What success looks like
After you save the event:
* The event appears on the [Schedule page](https://www.carstoragesoftware.com/dashboard/schedule) as a colored block at the correct date and time.
* The event shows the correct event type name and color.
* The vehicle or customer name is visible on the event block when the event needs one.
* The assigned staff member or vendor can see the event when they use the **Assigned to me** filter (staff) or when your team shares the schedule with partners.
* Any notes are visible when someone clicks on the event to open its details.
## Common mistakes to avoid
**Do not use Calendar Block for customer work**
Use **Calendar Block** only when you want to reserve or block time for the facility. For customer visits, choose the correct customer or vehicle event type instead. Calendar blocks prevent other bookings during that time.
**Check the vehicle before saving**
Many customers have more than one car. Confirm the year, make, model, and plate before creating the event. Creating an event for the wrong vehicle causes confusion for your team and the customer.
**Use notes for handoffs**
If another team member may handle the appointment, add notes that explain what the customer expects. This prevents repeat questions and missed details. Think of notes as a message to your future self or a teammate.
## Troubleshooting
**I do not see the Schedule Event button**
Your role may not have permission to create scheduled work. Ask a team admin to review your access in [Settings > Team](https://www.carstoragesoftware.com/dashboard/settings/team).
**The event type I need is missing**
The event type may be turned off or not set up yet. Ask an admin to check [Settings > Events & schedule](https://www.carstoragesoftware.com/dashboard/settings/events). They can create new event types or reactivate existing ones.
**The customer or vehicle is missing from the search**
Create the record first in [Contacts](https://www.carstoragesoftware.com/dashboard/contacts) or [Cars](https://www.carstoragesoftware.com/dashboard/cars), then return to Schedule and create the event. The search only shows customers and vehicles that already exist in the system.
**No available time slots are showing**
The event type may have availability rules that limit when bookings can happen. Try a different date, or ask an admin to review the availability settings for that event type in [Settings > Events & schedule](https://www.carstoragesoftware.com/dashboard/settings/events).
## Create repeating work on the same form
If this visit should happen every week or month, turn on **RECURRING EVENT** at the bottom of the left column and set the repeat pattern.
For full step-by-step help, follow [Create recurring appointments](/docs/schedule/create-recurring-appointments).
You can also turn on **All day** and **RECURRING EVENT** together when the repeating work has no arrival time. See [Create an all-day event](/docs/schedule/create-an-all-day-event).
**Customers may see this visit**
If the event type is set so customers can see it, the visit can appear in their portal after you save. Timed visits show a clock time. All-day visits show the date only. Admins set **Who can see this** in [Settings → Events & schedule](https://www.carstoragesoftware.com/dashboard/settings/events). See [Configure event types](/docs/events/configure-event-types).
## Create an event from Month view
Click **Filters & Settings**, choose **Calendar** under **View Mode**, then click **Month**.
**Expected result:** You see a month grid with colored dots or blocks on busy days.
Click the date on the month grid.
**Expected result:** A list opens showing how many events are on that day. You can read what is already booked before adding more work.
If the day has **no events yet**, click **Create Event on This Day**.
**Expected result:** The **Create New Event** form opens with that date already selected on the right side.
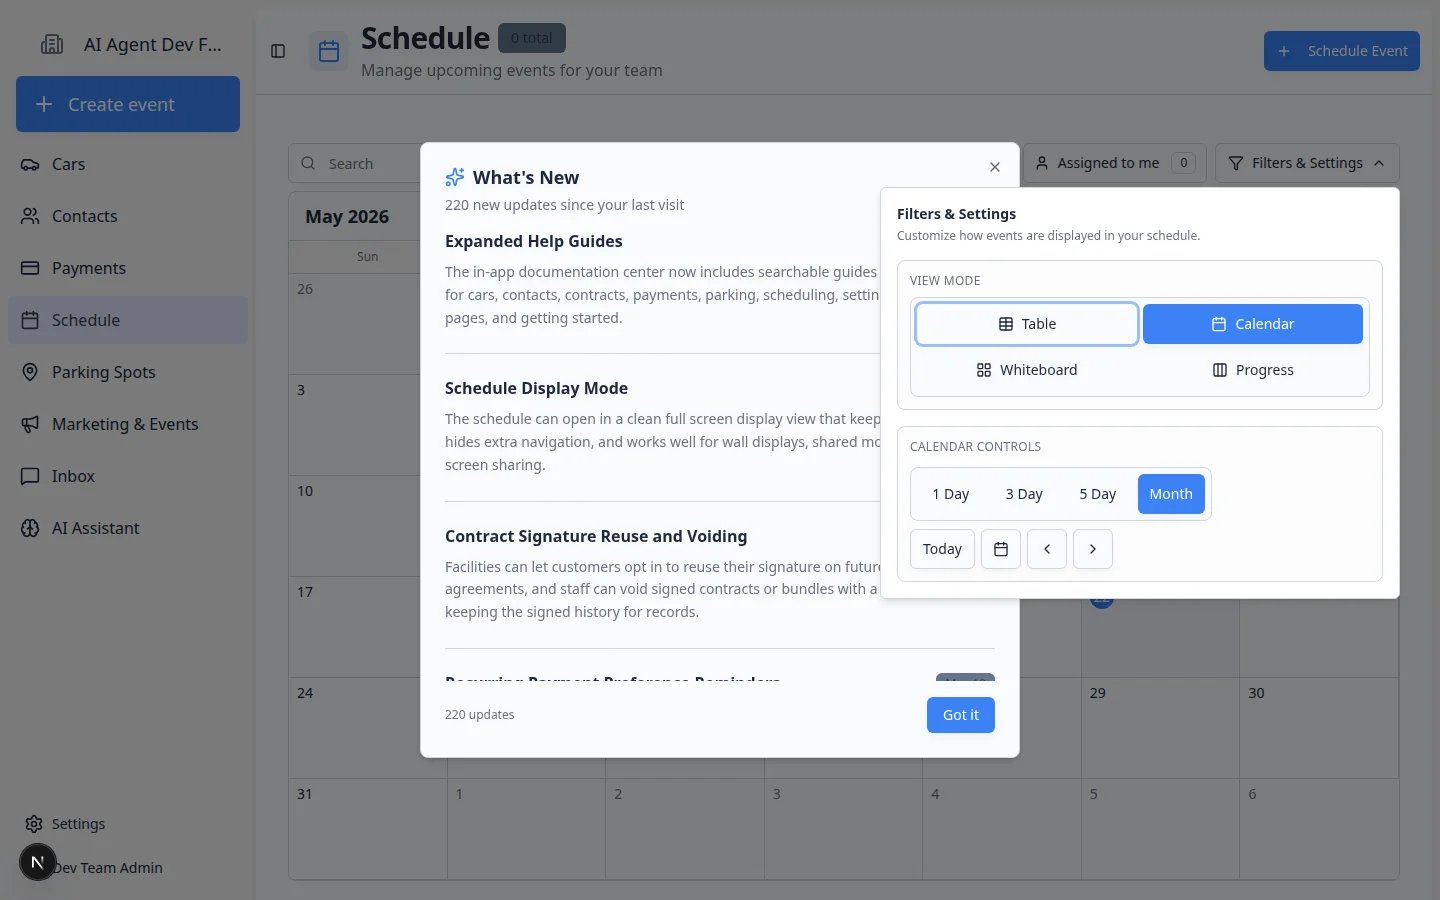 *Month view is helpful for spotting busy days. Open a day to see its list, then add work when the day is still open.*
## If the time you want is not available
Sometimes the time picker shows **Unavailable**, **Fully booked**, or **No Time Slots** because of booking rules, buffers, closed days, or another event already using the bay.
Pick a highlighted slot that the app offers. This is the safest choice for customer notifications and avoids double-booking.
If your role allows it, you may see a yellow alert titled **This time isn’t available** with the message that the time is outside available slots or conflicts with another booking.
Click **Continue anyway** only when a manager has agreed to book outside normal rules. Otherwise click **Cancel** and pick a different slot or day.
**Expected result:** The form lets you save at the time you chose. Your team should expect possible conflicts and customer messages tied to that time.
**Why availability matters**
Availability rules protect your bays and staff from double-booking. Bookable resources and event type settings (in [Settings → Events & schedule](https://www.carstoragesoftware.com/dashboard/settings/events)) control which slots appear. Overriding without a good reason can leave two customers expecting the same time.
## What to do next
If plans change after the event is created, use [Update, assign, or reschedule an event](/docs/schedule/update-assign-or-reschedule-an-event). If the event is no longer happening, use [Cancel or delete a scheduled event](/docs/schedule/cancel-or-delete-a-scheduled-event). To see work as cards instead of a time grid, open [Use the Whiteboard view on Schedule](/docs/schedule/use-the-whiteboard-view-on-schedule). For a wall display, see [Use full-screen schedule display](/docs/schedule/use-full-screen-schedule-display).
## Related topics
- [Create appointment](/docs/api-reference/appointments/create-appointment.md)
- [Create recurring appointments](/docs/schedule/create-recurring-appointments.md)
- [Create an all-day event](/docs/schedule/create-an-all-day-event.md)
- [Create operations workflows](/docs/settings/create-operations-workflows.md)
- [Prepare work with the AI Assistant](/docs/ai-assistant/prepare-work-with-the-ai-assistant.md)
This documentation is built and hosted on [Mintlify](https://mintlify.com), a developer documentation platform.
*Month view is helpful for spotting busy days. Open a day to see its list, then add work when the day is still open.*
## If the time you want is not available
Sometimes the time picker shows **Unavailable**, **Fully booked**, or **No Time Slots** because of booking rules, buffers, closed days, or another event already using the bay.
Pick a highlighted slot that the app offers. This is the safest choice for customer notifications and avoids double-booking.
If your role allows it, you may see a yellow alert titled **This time isn’t available** with the message that the time is outside available slots or conflicts with another booking.
Click **Continue anyway** only when a manager has agreed to book outside normal rules. Otherwise click **Cancel** and pick a different slot or day.
**Expected result:** The form lets you save at the time you chose. Your team should expect possible conflicts and customer messages tied to that time.
**Why availability matters**
Availability rules protect your bays and staff from double-booking. Bookable resources and event type settings (in [Settings → Events & schedule](https://www.carstoragesoftware.com/dashboard/settings/events)) control which slots appear. Overriding without a good reason can leave two customers expecting the same time.
## What to do next
If plans change after the event is created, use [Update, assign, or reschedule an event](/docs/schedule/update-assign-or-reschedule-an-event). If the event is no longer happening, use [Cancel or delete a scheduled event](/docs/schedule/cancel-or-delete-a-scheduled-event). To see work as cards instead of a time grid, open [Use the Whiteboard view on Schedule](/docs/schedule/use-the-whiteboard-view-on-schedule). For a wall display, see [Use full-screen schedule display](/docs/schedule/use-full-screen-schedule-display).
## Related topics
- [Create appointment](/docs/api-reference/appointments/create-appointment.md)
- [Create recurring appointments](/docs/schedule/create-recurring-appointments.md)
- [Create an all-day event](/docs/schedule/create-an-all-day-event.md)
- [Create operations workflows](/docs/settings/create-operations-workflows.md)
- [Prepare work with the AI Assistant](/docs/ai-assistant/prepare-work-with-the-ai-assistant.md)
This documentation is built and hosted on [Mintlify](https://mintlify.com), a developer documentation platform.