> ## Documentation Index
> Fetch the complete documentation index at: https://www.carstoragesoftware.com/docs/llms.txt
> Use this file to discover all available pages before exploring further.
# Configure customer onboarding
> Set up your public registration form and the steps new customers complete after they sign in to the customer app.
**Customer onboarding** is the path a new customer follows when they join your facility online.
This guide covers two related settings on [Settings > Customer onboarding](https://www.carstoragesoftware.com/dashboard/settings/customer-onboarding):
1. **Online registration form** — what strangers fill out on your public signup page **before** they have an account.
2. **Customer app onboarding** — what happens **after** they sign in for the first time (welcome screen, payment, contracts, document uploads, and more).
When onboarding is set up well, customers finish paperwork without repeated phone calls, and your team sees complete records from day one.
## What you will accomplish
* Turn your public registration form **Off** or **On**.
* Choose which **Form cards** to ask, and in what order.
* Turn customer app onboarding on or off and pick which steps run after sign-in.
* Test the full flow with a safe test email before sharing your public link.
## Before you start
* Complete [Set up your facility name, logo, and colors](/docs/settings/set-up-facility-branding) so signup pages show your logo and colors.
* Review [Connect payment processing](/docs/settings/connect-payment-processing) if customers must pay during signup or onboarding.
* Create contract templates in [Create a contract template](/docs/contracts/create-a-contract-template) if customers must sign during onboarding.
* Add document types in [Configure document requirements](/docs/contracts/configure-document-requirements) if customers must upload insurance, registration, or other files.
* Know your public registration link from [Settings > Website & customer app](https://www.carstoragesoftware.com/dashboard/settings/website) (the **Registration** card under **Shareable links**).
**Registration vs in-app onboarding**
**Online registration form** = one public web form for brand-new customers (name, vehicle, payment, and more).
**Customer app onboarding** = guided steps inside the signed-in customer app (welcome, contracts, push notifications, and more).
Many facilities use both. Some use only in-app onboarding for customers staff invite manually.
## Open Customer onboarding settings
From the [Dashboard](https://www.carstoragesoftware.com/dashboard), click **Settings** in the main sidebar.
Click **Customer onboarding** in the settings list — or search **registration** in **Search settings…**.
Direct link: [Settings > Customer onboarding](https://www.carstoragesoftware.com/dashboard/settings/customer-onboarding).
**Expected result:** The page title is **Customer onboarding**. You see **Online registration form** at the top with **Off** and **On** cards.
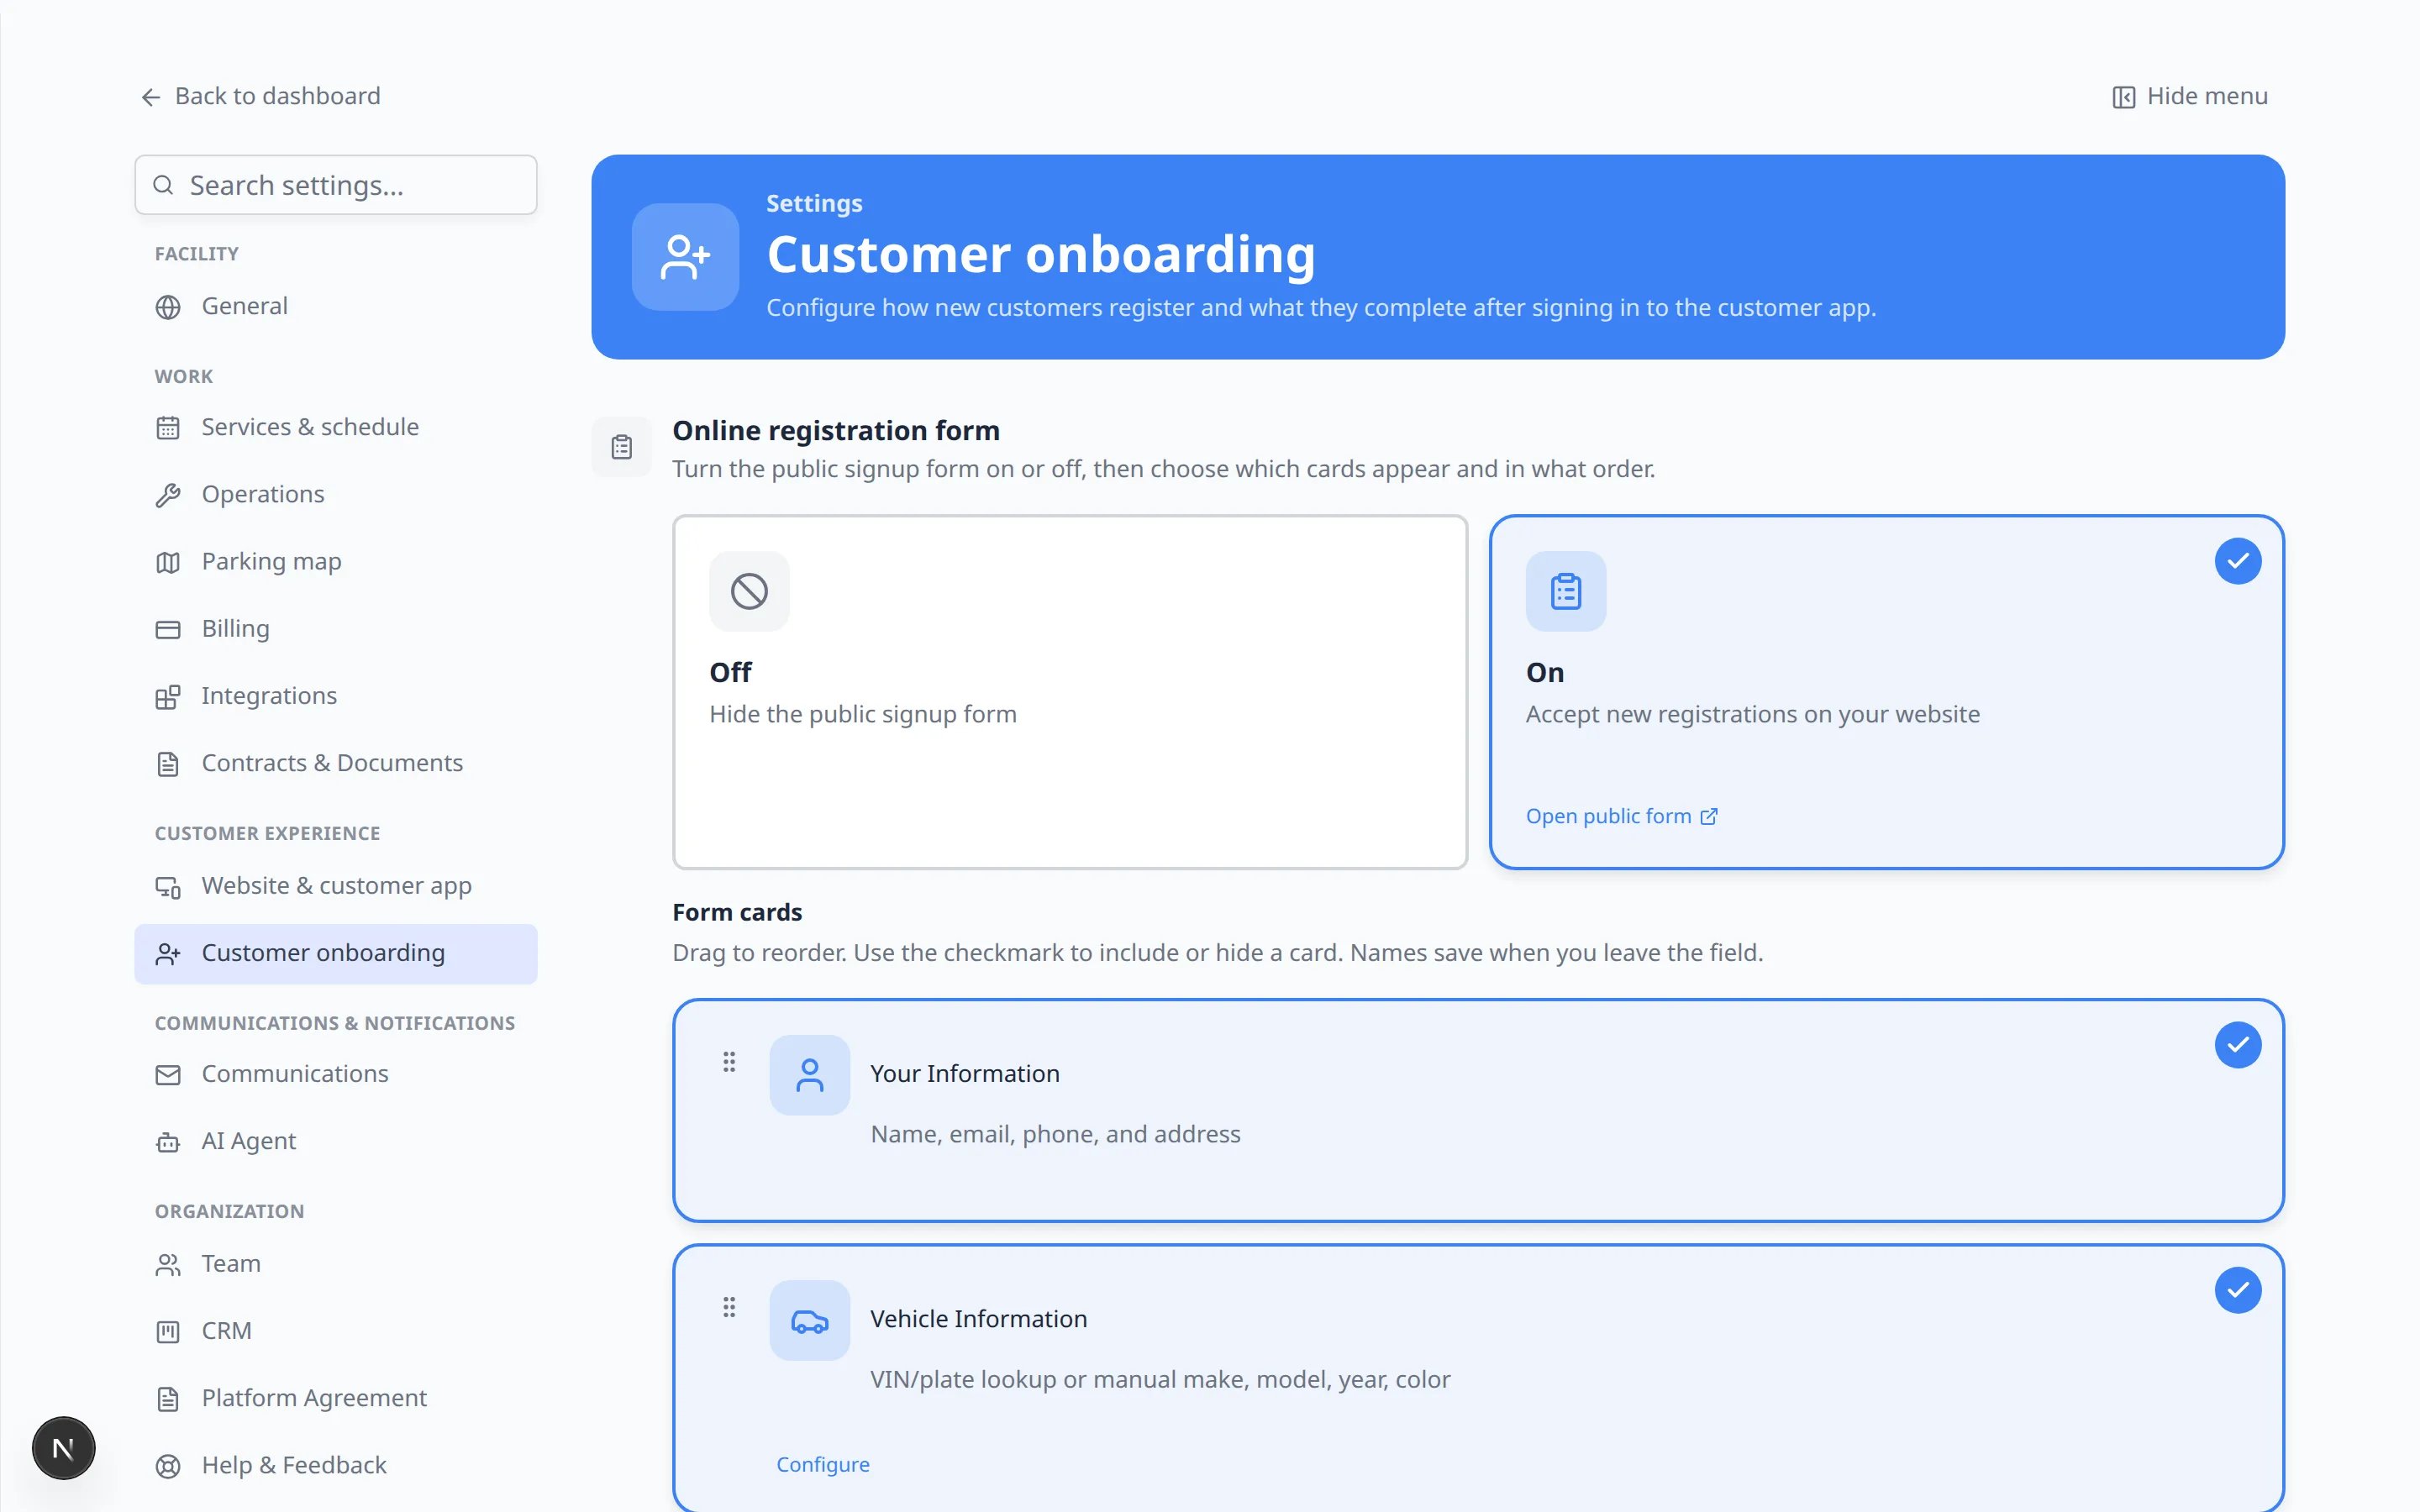 *Pick **On** only when you are ready for strangers to register online. **Open public form** appears on the On card so you can preview the live page. **Form cards** sit under the Off / On choice.*
## Part 1: Set up the online registration form
Use this when new customers should sign up from a link on your website or facility page.
At the top of **Online registration form**, tap **Off** or **On**.
* **Off** — Hide the public signup form.
* **On** — Accept new registrations on your website.
Leave it **Off** until your questions, payment rules, and approval process are ready.
When **On** is selected, you may also see **Open public form**. Use that to preview the live page.
Under **Form cards**, each row is one section of the public form. Common cards include:
* **Your Information** — name, email, phone, address. Use the **Address required** switch on
the card to decide whether customers must enter a full address (on by default).
* **Vehicle Information** — VIN, plate, or year / make / model
* **Drop-off Details** — preferred date and notes
* **Payment** — card on file or product checkout (requires billing setup)
* **Documents** — insurance, registration, and other uploads
* **Custom Questions** — your own text or choice questions
Use the check mark on each card to include or hide it. Names save when you leave the field.
Grab the handle on the left side of a row and drag it up or down.
Put **Your Information** first. Put **Vehicle Information** before **Payment** if price depends on the car.
**Why this matters:** Customers abandon long forms when questions feel random. A natural order feels like a conversation.
Click a card to set details such as:
* Which document types are required
* Which product or plan appears on **Payment**
* How customers enter vehicle details
* Custom questions
**Expected result:** Each card matches what your team actually needs before approving a new customer.
**Common registration order**
Many facilities use: **Your Information** → **Vehicle Information** → **Drop-off Details** → **Documents** → **Payment**. Put payment last when price depends on the vehicle or plan the customer chose.
**Test before you advertise the link**
Submit a test registration with an internal email address (not a real customer's email). Then review the request in [Review and approve registration requests](/docs/facility-web-pages/review-and-approve-registration-requests).
## Part 2: Set up customer app onboarding
Use this when customers who sign in to the portal should complete guided steps (contracts, uploads, payment, and more).
Find **Customer app onboarding** below the registration form.
Use the main switch to enable or disable the in-app onboarding flow.
When **off**, customers go straight to the customer app home screen after sign-in.
Each row is one screen customers may see. Examples include:
* **Welcome** — greeting with your branding
* **Profile** — confirm contact details
* **Cars** — add vehicles to the account
* **Contract Signing** — sign required agreements
* **Document Upload** — upload insurance or registration
* **Payment** — add a card or buy a plan
* **Push Notifications** — optional alerts on their phone
* **Mobile App Install** — help them save the portal to their home screen
Turn off any step your team handles manually or does not need yet.
Drag rows by the handle on the left.
Put **Cars** before **Contract Signing** when your agreement uses vehicle fields (year, make, model, VIN).
**Expected result:** The step list matches the order you would explain to a customer on the phone.
## Configure contract, payment, and document steps
In **Customer app onboarding**, find the **Contract Signing** row and turn it **on**.
Click **Configure** and turn on each agreement customers must sign (for example, **Car Storage Agreement**).
Only **active** templates from [Settings > Contracts & Documents](https://www.carstoragesoftware.com/dashboard/settings/contracts-and-documents) appear here.
Enable **Document Upload** and click **Configure**.
Choose which document types customers must upload (for example, **Insurance** and **Vehicle Registration**).
Document types must exist and have **Customer Access** turned on in [Configure document requirements](/docs/contracts/configure-document-requirements).
Enable **Payment** only after [Connect payment processing](/docs/settings/connect-payment-processing) is complete.
Click **Configure** to choose whether customers add a card on file or purchase a specific product or plan.
**Why this matters:** Turning payment on before payments are connected causes failed signups and support calls.
**Need more detail on contracts?**
For a contract-focused walkthrough, read [Attach contracts to customer workflows](/docs/contracts/attach-contracts-to-workflows).
## Test the full customer journey
Pick an email your team controls (not a real customer's inbox).
Open your **Registration** link from [Settings > Website & customer app](https://www.carstoragesoftware.com/dashboard/settings/website) and submit the form.
Approve or review the request following [Review and approve registration requests](/docs/facility-web-pages/review-and-approve-registration-requests).
Open the **Customer login** link and sign in with your test email.
Complete each screen the way a real customer would.
**Expected result:** After onboarding, the customer lands on the customer app home screen with cars, documents, or billing visible as configured.
Open [Contacts](https://www.carstoragesoftware.com/dashboard/contacts), find the test customer, and confirm signed contracts and uploads appear under **Documents & Contracts**.
## What success looks like
* Public registration (if **On**) asks only the questions your team needs.
* New portal customers complete contracts and uploads without staff re-sending links.
* Step order matches real-world work (vehicles before vehicle contracts, payment after billing is ready).
* Your team tested the flow with an internal email before sharing public links.
## Troubleshooting
**Contract Signing does not appear in the step list**
Create at least one **active** contract template in [Settings > Contracts & Documents](https://www.carstoragesoftware.com/dashboard/settings/contracts-and-documents). Inactive or incomplete templates may not be available to select.
**Payment step is grayed out or fails**
Finish [Connect payment processing](/docs/settings/connect-payment-processing) first. Payments must show as connected before customers can pay during onboarding.
**Customers signed but car fields are blank on the contract**
Move the **Cars** step **above** **Contract Signing** in **Customer app onboarding**. Customers need a vehicle on their account before vehicle fields can fill in.
**Document types do not appear in Configure**
Open [Configure document requirements](/docs/contracts/configure-document-requirements) and confirm each type is **Active** with **Customer Access** enabled.
## What to do next
* Copy and test public links in [Configure portal and website](/docs/settings/configure-portal-and-website).
* Invite real customers with [Invite a customer to the portal](/docs/contacts/invite-a-customer-to-the-portal).
* Return to [Settings overview](/docs/settings/overview) for the full first-week setup path.
## Related topics
- [Configure document requirements](/docs/contracts/configure-document-requirements.md)
- [Configure portal and website](/docs/settings/configure-portal-and-website.md)
- [Attach contracts to customer workflows](/docs/contracts/attach-contracts-to-workflows.md)
- [Settings overview](/docs/settings/overview.md)
- [Configure the customer shop](/docs/facility-web-pages/configure-the-customer-shop.md)
This documentation is built and hosted on [Mintlify](https://mintlify.com), a developer documentation platform.
*Pick **On** only when you are ready for strangers to register online. **Open public form** appears on the On card so you can preview the live page. **Form cards** sit under the Off / On choice.*
## Part 1: Set up the online registration form
Use this when new customers should sign up from a link on your website or facility page.
At the top of **Online registration form**, tap **Off** or **On**.
* **Off** — Hide the public signup form.
* **On** — Accept new registrations on your website.
Leave it **Off** until your questions, payment rules, and approval process are ready.
When **On** is selected, you may also see **Open public form**. Use that to preview the live page.
Under **Form cards**, each row is one section of the public form. Common cards include:
* **Your Information** — name, email, phone, address. Use the **Address required** switch on
the card to decide whether customers must enter a full address (on by default).
* **Vehicle Information** — VIN, plate, or year / make / model
* **Drop-off Details** — preferred date and notes
* **Payment** — card on file or product checkout (requires billing setup)
* **Documents** — insurance, registration, and other uploads
* **Custom Questions** — your own text or choice questions
Use the check mark on each card to include or hide it. Names save when you leave the field.
Grab the handle on the left side of a row and drag it up or down.
Put **Your Information** first. Put **Vehicle Information** before **Payment** if price depends on the car.
**Why this matters:** Customers abandon long forms when questions feel random. A natural order feels like a conversation.
Click a card to set details such as:
* Which document types are required
* Which product or plan appears on **Payment**
* How customers enter vehicle details
* Custom questions
**Expected result:** Each card matches what your team actually needs before approving a new customer.
**Common registration order**
Many facilities use: **Your Information** → **Vehicle Information** → **Drop-off Details** → **Documents** → **Payment**. Put payment last when price depends on the vehicle or plan the customer chose.
**Test before you advertise the link**
Submit a test registration with an internal email address (not a real customer's email). Then review the request in [Review and approve registration requests](/docs/facility-web-pages/review-and-approve-registration-requests).
## Part 2: Set up customer app onboarding
Use this when customers who sign in to the portal should complete guided steps (contracts, uploads, payment, and more).
Find **Customer app onboarding** below the registration form.
Use the main switch to enable or disable the in-app onboarding flow.
When **off**, customers go straight to the customer app home screen after sign-in.
Each row is one screen customers may see. Examples include:
* **Welcome** — greeting with your branding
* **Profile** — confirm contact details
* **Cars** — add vehicles to the account
* **Contract Signing** — sign required agreements
* **Document Upload** — upload insurance or registration
* **Payment** — add a card or buy a plan
* **Push Notifications** — optional alerts on their phone
* **Mobile App Install** — help them save the portal to their home screen
Turn off any step your team handles manually or does not need yet.
Drag rows by the handle on the left.
Put **Cars** before **Contract Signing** when your agreement uses vehicle fields (year, make, model, VIN).
**Expected result:** The step list matches the order you would explain to a customer on the phone.
## Configure contract, payment, and document steps
In **Customer app onboarding**, find the **Contract Signing** row and turn it **on**.
Click **Configure** and turn on each agreement customers must sign (for example, **Car Storage Agreement**).
Only **active** templates from [Settings > Contracts & Documents](https://www.carstoragesoftware.com/dashboard/settings/contracts-and-documents) appear here.
Enable **Document Upload** and click **Configure**.
Choose which document types customers must upload (for example, **Insurance** and **Vehicle Registration**).
Document types must exist and have **Customer Access** turned on in [Configure document requirements](/docs/contracts/configure-document-requirements).
Enable **Payment** only after [Connect payment processing](/docs/settings/connect-payment-processing) is complete.
Click **Configure** to choose whether customers add a card on file or purchase a specific product or plan.
**Why this matters:** Turning payment on before payments are connected causes failed signups and support calls.
**Need more detail on contracts?**
For a contract-focused walkthrough, read [Attach contracts to customer workflows](/docs/contracts/attach-contracts-to-workflows).
## Test the full customer journey
Pick an email your team controls (not a real customer's inbox).
Open your **Registration** link from [Settings > Website & customer app](https://www.carstoragesoftware.com/dashboard/settings/website) and submit the form.
Approve or review the request following [Review and approve registration requests](/docs/facility-web-pages/review-and-approve-registration-requests).
Open the **Customer login** link and sign in with your test email.
Complete each screen the way a real customer would.
**Expected result:** After onboarding, the customer lands on the customer app home screen with cars, documents, or billing visible as configured.
Open [Contacts](https://www.carstoragesoftware.com/dashboard/contacts), find the test customer, and confirm signed contracts and uploads appear under **Documents & Contracts**.
## What success looks like
* Public registration (if **On**) asks only the questions your team needs.
* New portal customers complete contracts and uploads without staff re-sending links.
* Step order matches real-world work (vehicles before vehicle contracts, payment after billing is ready).
* Your team tested the flow with an internal email before sharing public links.
## Troubleshooting
**Contract Signing does not appear in the step list**
Create at least one **active** contract template in [Settings > Contracts & Documents](https://www.carstoragesoftware.com/dashboard/settings/contracts-and-documents). Inactive or incomplete templates may not be available to select.
**Payment step is grayed out or fails**
Finish [Connect payment processing](/docs/settings/connect-payment-processing) first. Payments must show as connected before customers can pay during onboarding.
**Customers signed but car fields are blank on the contract**
Move the **Cars** step **above** **Contract Signing** in **Customer app onboarding**. Customers need a vehicle on their account before vehicle fields can fill in.
**Document types do not appear in Configure**
Open [Configure document requirements](/docs/contracts/configure-document-requirements) and confirm each type is **Active** with **Customer Access** enabled.
## What to do next
* Copy and test public links in [Configure portal and website](/docs/settings/configure-portal-and-website).
* Invite real customers with [Invite a customer to the portal](/docs/contacts/invite-a-customer-to-the-portal).
* Return to [Settings overview](/docs/settings/overview) for the full first-week setup path.
## Related topics
- [Configure document requirements](/docs/contracts/configure-document-requirements.md)
- [Configure portal and website](/docs/settings/configure-portal-and-website.md)
- [Attach contracts to customer workflows](/docs/contracts/attach-contracts-to-workflows.md)
- [Settings overview](/docs/settings/overview.md)
- [Configure the customer shop](/docs/facility-web-pages/configure-the-customer-shop.md)
This documentation is built and hosted on [Mintlify](https://mintlify.com), a developer documentation platform.