> ## Documentation Index
> Fetch the complete documentation index at: https://www.carstoragesoftware.com/docs/llms.txt
> Use this file to discover all available pages before exploring further.
# Configure portal and website
> Set up shareable links, the customer app, marketplace, and your public facility page before inviting customers.
The **Website & customer app** settings control what customers see outside your staff dashboard: how the signed-in app looks, which links you share publicly, and how your facility page appears online.
Use this guide before you invite customers to sign in, add a booking widget to your website, or publish your public facility page.
## What you will accomplish
* Copy and test **Shareable links** (customer login, registration, public page, marketplace).
* Arrange the signed-in **Customer app** using the live preview.
* Choose **Marketplace** visibility if you list cars or products.
* Preview your **Public website** before you post the link.
* Turn on **Community** and the **Website schedule widget** only when you are ready.
**Related settings live on other pages**
* **Logo and colors:** [Settings > General](https://www.carstoragesoftware.com/dashboard/settings/general) under **Facility profile**. The old [Settings > Branding](https://www.carstoragesoftware.com/dashboard/settings/branding) link opens the same place. See [Set up your facility name, logo, and colors](/docs/settings/set-up-facility-branding).
* **Registration form and first-login steps:** [Settings > Customer onboarding](https://www.carstoragesoftware.com/dashboard/settings/customer-onboarding) — see [Configure customer onboarding](/docs/settings/configure-customer-onboarding).
* **Custom domain:** [Settings > Custom domain](https://www.carstoragesoftware.com/dashboard/settings/custom-domain) — see [Connect a custom domain](/docs/facility-web-pages/connect-a-custom-domain).
## Before you start
* Complete [Set up your facility name, logo, and colors](/docs/settings/set-up-facility-branding) so previews show your logo and colors.
* Review [Connect payment processing](/docs/settings/connect-payment-processing) before turning on paid signup or shop items.
* Review [Configure communications](/docs/settings/configure-communications) before sending portal invites or registration emails.
* If you plan to place code on your website, know who manages your website (WordPress, Squarespace, Wix, and similar).
## Open Website & customer app settings
Go to [Settings > Website & customer app](https://www.carstoragesoftware.com/dashboard/settings/website).
The page title is **Website & customer app**.
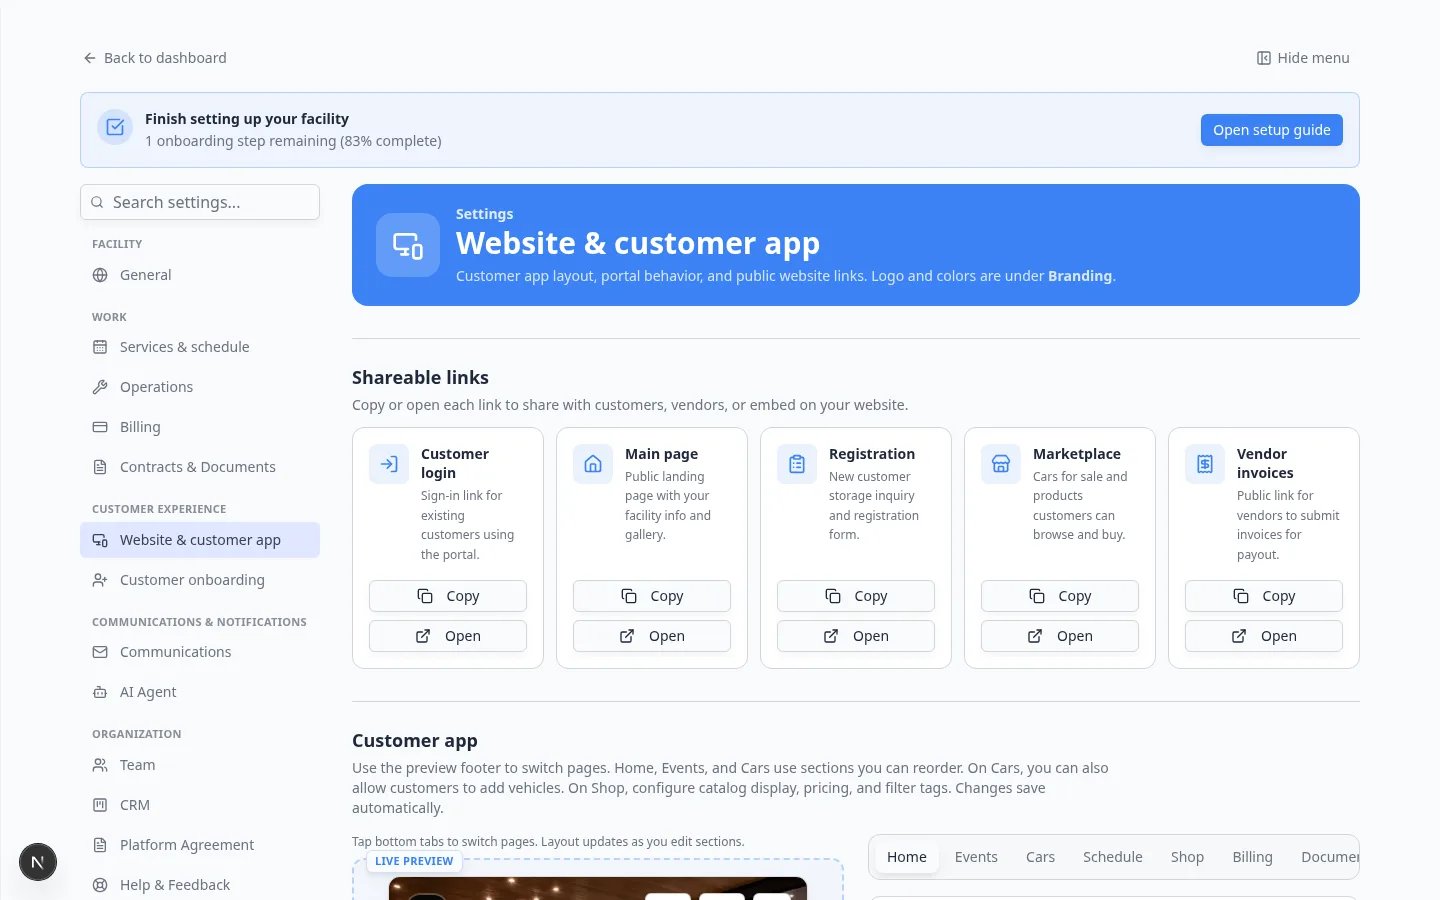 ***Shareable links** sit at the top. Each card has **Copy** and **Open** so you can test a link before you send it.*
**Expected result:** You see **Shareable links** first, then **Customer app**, **Marketplace**, and **Public website** as you scroll down.
## Copy shareable links first
Most teams start here because you need these URLs for emails, your website, and text messages.
At the top of [Settings > Website & customer app](https://www.carstoragesoftware.com/dashboard/settings/website), find **Shareable links**.
Common cards include:
* **Customer login** — sign-in for existing customers
* **Main page** — your public landing page
* **Registration** — new customer storage inquiry form
* **Marketplace** — cars for sale customers can browse
* **Vendor invoices** — a link for vendors to submit invoices
On the **Customer login** card, click **Copy**.
**Why this matters:** This is the link you send when you invite someone to the portal. It is not the same as your staff dashboard link.
Click **Open**, or paste the link into a private or incognito window.
**Expected result:** You see a customer sign-in page with your facility name and logo — not the staff [Dashboard](https://www.carstoragesoftware.com/dashboard).
**Do not share dashboard links**
Staff dashboard links start with `/dashboard`. Those are for your team only. Always copy from **Shareable links**.
For a full guide on which link to share when, read [Choose the right public link to share](/docs/facility-web-pages/choose-the-right-public-link).
For printable QR codes that stay stable when you change destinations, read [Set up printable QR codes](/docs/settings/set-up-printable-qr-codes).
## Set up the customer app
The customer app is the first page customers see after they sign in.
Find **Customer app** under **Shareable links**.
Use the **LIVE PREVIEW** and the page tabs (**Home**, **Events**, **Cars**, **Schedule**, **Shop**, and others) to switch pages.
Turn sections on or off, then drag them into the order customers should see.
On **Cars**, you can also allow customers to add vehicles.
On **Shop**, configure catalog display, pricing, and filter tags.
Changes save automatically.
Tap the bottom tabs in the preview to confirm each page.
**Expected result:** The preview matches the experience you want before you send invite emails.
**Preview vs real customer view**
The preview on this settings page shows layout and colors. After you save, sign in as a test customer using the **Customer login** link to confirm the live portal matches what you expect.
## Set Marketplace visibility
Scroll to **Marketplace**.
Turn the marketplace on or off, then choose who can see cars and products.
Choose **Public** only when you want guests (people who are not signed in) to browse.
**Expected result:** The **Marketplace** shareable link matches the visibility you chose.
## Configure the public website
***Shareable links** sit at the top. Each card has **Copy** and **Open** so you can test a link before you send it.*
**Expected result:** You see **Shareable links** first, then **Customer app**, **Marketplace**, and **Public website** as you scroll down.
## Copy shareable links first
Most teams start here because you need these URLs for emails, your website, and text messages.
At the top of [Settings > Website & customer app](https://www.carstoragesoftware.com/dashboard/settings/website), find **Shareable links**.
Common cards include:
* **Customer login** — sign-in for existing customers
* **Main page** — your public landing page
* **Registration** — new customer storage inquiry form
* **Marketplace** — cars for sale customers can browse
* **Vendor invoices** — a link for vendors to submit invoices
On the **Customer login** card, click **Copy**.
**Why this matters:** This is the link you send when you invite someone to the portal. It is not the same as your staff dashboard link.
Click **Open**, or paste the link into a private or incognito window.
**Expected result:** You see a customer sign-in page with your facility name and logo — not the staff [Dashboard](https://www.carstoragesoftware.com/dashboard).
**Do not share dashboard links**
Staff dashboard links start with `/dashboard`. Those are for your team only. Always copy from **Shareable links**.
For a full guide on which link to share when, read [Choose the right public link to share](/docs/facility-web-pages/choose-the-right-public-link).
For printable QR codes that stay stable when you change destinations, read [Set up printable QR codes](/docs/settings/set-up-printable-qr-codes).
## Set up the customer app
The customer app is the first page customers see after they sign in.
Find **Customer app** under **Shareable links**.
Use the **LIVE PREVIEW** and the page tabs (**Home**, **Events**, **Cars**, **Schedule**, **Shop**, and others) to switch pages.
Turn sections on or off, then drag them into the order customers should see.
On **Cars**, you can also allow customers to add vehicles.
On **Shop**, configure catalog display, pricing, and filter tags.
Changes save automatically.
Tap the bottom tabs in the preview to confirm each page.
**Expected result:** The preview matches the experience you want before you send invite emails.
**Preview vs real customer view**
The preview on this settings page shows layout and colors. After you save, sign in as a test customer using the **Customer login** link to confirm the live portal matches what you expect.
## Set Marketplace visibility
Scroll to **Marketplace**.
Turn the marketplace on or off, then choose who can see cars and products.
Choose **Public** only when you want guests (people who are not signed in) to browse.
**Expected result:** The **Marketplace** shareable link matches the visibility you chose.
## Configure the public website
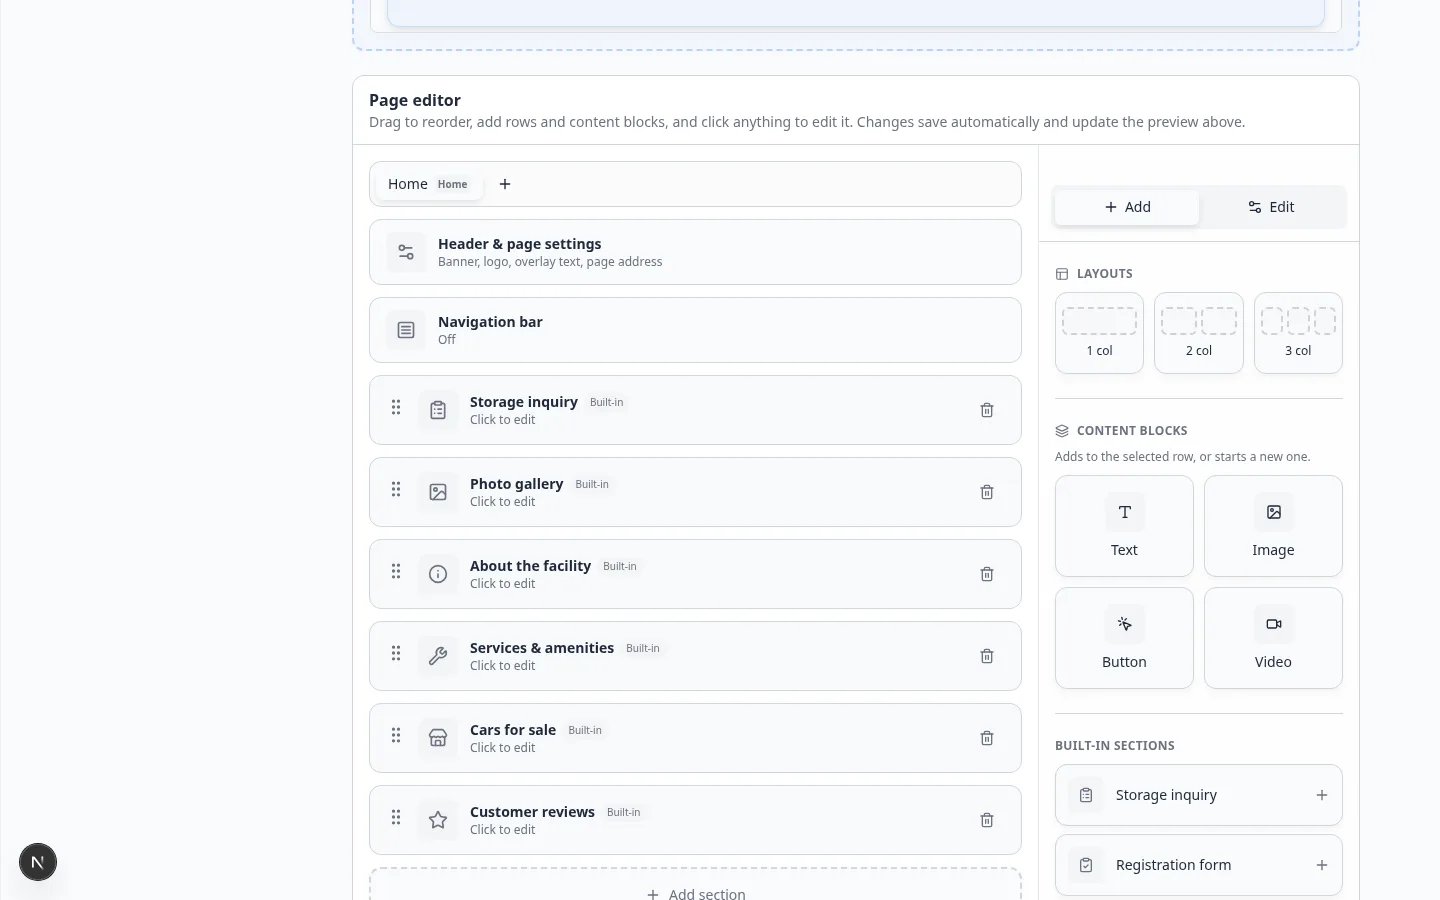 ***Public website** includes a live preview. Change the slug, banner, or content blocks and watch the preview update.*
Find **Public website** on [Settings > Website & customer app](https://www.carstoragesoftware.com/dashboard/settings/website).
Enable the public page and confirm the page address (often called a **slug**).
Keep it short and close to your facility name.
Add description, photos, services, and reviews your team wants customers to see. To reuse content from a previous website, add an **HTML** block (see [Add custom HTML](/docs/facility-web-pages/configure-the-facility-landing-page#add-custom-html)).
Open the public page in a new tab and confirm it looks correct.
**Expected result:** A stranger can learn about your facility and find the right next step (register, browse cars, or sign in).
For a detailed landing page walkthrough, read [Configure the facility landing page](/docs/facility-web-pages/configure-the-facility-landing-page).
## Control what customers see on each car page
Find **Car page**.
This controls which blocks appear inside the **Vehicle Details** card when a customer opens one of their cars.
Show or hide photos, service history, documents, and market data.
Turn off anything that should stay internal to your team.
**Why this matters:** Some facilities share condition photos with owners; others keep inspection notes staff-only.
## Add a website schedule widget
The **Website schedule widget** is a small embed you paste into a website builder such as WordPress, Squarespace, Wix, or Webflow.
On [Settings > Website & customer app](https://www.carstoragesoftware.com/dashboard/settings/website), scroll to **Website schedule widget**.
Click **Copy** to copy the HTML embed code.
Send the code to whoever manages your website, or paste it yourself into an HTML or embed block.
**Expected result:** The schedule widget loads on your public website and lets customers book without calling first.
For step-by-step website instructions, read [Add a website embed](/docs/facility-web-pages/add-a-website-embed).
## Turn on Community chat (optional)
**Community** lets customers join chat channels your team manages in Marketing & Events.
Scroll to **Community**.
Turn it on when you have at least one channel and staff who can monitor messages.
Then create channels in [Marketing & Events > Community](https://www.carstoragesoftware.com/dashboard/marketing/community). See [Manage community channels](/docs/marketing-events/manage-community-channels).
## Set registration and onboarding (quick pointer)
Public registration and first-login steps live on their own Settings page:
* **Public registration form:** [Configure customer onboarding](/docs/settings/configure-customer-onboarding).
* **Steps after sign-in:** same guide, **Customer app onboarding** section.
* **Approve new registrations:** [Review and approve registration requests](/docs/facility-web-pages/review-and-approve-registration-requests).
## What success looks like
* You copied and tested the **Customer login** link in a private browser window.
* The customer app preview shows the sections and tabs your team wants customers to use.
* Marketplace visibility matches who should browse cars and products.
* Your public facility page looks ready before you share it.
* Community and the schedule widget are on only when staff can support them.
## Troubleshooting
**The customer login link opens the staff dashboard**
You may have copied the wrong URL. Copy again from **Shareable links** on [Settings > Website & customer app](https://www.carstoragesoftware.com/dashboard/settings/website).
**The schedule widget does not appear on my website**
Confirm the full embed code was pasted into an HTML or embed block. Some website builders require a "Custom HTML" element.
**Customers see sections they should not see**
Review **Car page** and the **Customer app** preview. Turn off staff-only sections until you are ready to share them.
**Customers cannot pay during signup**
Check [Settings > Billing](https://www.carstoragesoftware.com/dashboard/settings/billing) and [Configure customer onboarding](/docs/settings/configure-customer-onboarding). Payment processing and onboarding payment steps must both be configured.
## What to do next
* Set up registration and first-login steps in [Configure customer onboarding](/docs/settings/configure-customer-onboarding).
* Invite a test customer first, then follow [Invite a customer to the portal](/docs/contacts/invite-a-customer-to-the-portal).
* Use [Go-live checklist for public pages](/docs/facility-web-pages/go-live-checklist-for-public-pages) before marketing your public links widely.
## Related topics
- [Configure customer onboarding](/docs/settings/configure-customer-onboarding.md)
- [Configure communications](/docs/settings/configure-communications.md)
- [Configure operations settings](/docs/settings/configure-operations-settings.md)
- [Settings overview](/docs/settings/overview.md)
- [Set up your facility name, logo, and colors](/docs/settings/set-up-facility-branding.md)
This documentation is built and hosted on [Mintlify](https://mintlify.com), a developer documentation platform.
***Public website** includes a live preview. Change the slug, banner, or content blocks and watch the preview update.*
Find **Public website** on [Settings > Website & customer app](https://www.carstoragesoftware.com/dashboard/settings/website).
Enable the public page and confirm the page address (often called a **slug**).
Keep it short and close to your facility name.
Add description, photos, services, and reviews your team wants customers to see. To reuse content from a previous website, add an **HTML** block (see [Add custom HTML](/docs/facility-web-pages/configure-the-facility-landing-page#add-custom-html)).
Open the public page in a new tab and confirm it looks correct.
**Expected result:** A stranger can learn about your facility and find the right next step (register, browse cars, or sign in).
For a detailed landing page walkthrough, read [Configure the facility landing page](/docs/facility-web-pages/configure-the-facility-landing-page).
## Control what customers see on each car page
Find **Car page**.
This controls which blocks appear inside the **Vehicle Details** card when a customer opens one of their cars.
Show or hide photos, service history, documents, and market data.
Turn off anything that should stay internal to your team.
**Why this matters:** Some facilities share condition photos with owners; others keep inspection notes staff-only.
## Add a website schedule widget
The **Website schedule widget** is a small embed you paste into a website builder such as WordPress, Squarespace, Wix, or Webflow.
On [Settings > Website & customer app](https://www.carstoragesoftware.com/dashboard/settings/website), scroll to **Website schedule widget**.
Click **Copy** to copy the HTML embed code.
Send the code to whoever manages your website, or paste it yourself into an HTML or embed block.
**Expected result:** The schedule widget loads on your public website and lets customers book without calling first.
For step-by-step website instructions, read [Add a website embed](/docs/facility-web-pages/add-a-website-embed).
## Turn on Community chat (optional)
**Community** lets customers join chat channels your team manages in Marketing & Events.
Scroll to **Community**.
Turn it on when you have at least one channel and staff who can monitor messages.
Then create channels in [Marketing & Events > Community](https://www.carstoragesoftware.com/dashboard/marketing/community). See [Manage community channels](/docs/marketing-events/manage-community-channels).
## Set registration and onboarding (quick pointer)
Public registration and first-login steps live on their own Settings page:
* **Public registration form:** [Configure customer onboarding](/docs/settings/configure-customer-onboarding).
* **Steps after sign-in:** same guide, **Customer app onboarding** section.
* **Approve new registrations:** [Review and approve registration requests](/docs/facility-web-pages/review-and-approve-registration-requests).
## What success looks like
* You copied and tested the **Customer login** link in a private browser window.
* The customer app preview shows the sections and tabs your team wants customers to use.
* Marketplace visibility matches who should browse cars and products.
* Your public facility page looks ready before you share it.
* Community and the schedule widget are on only when staff can support them.
## Troubleshooting
**The customer login link opens the staff dashboard**
You may have copied the wrong URL. Copy again from **Shareable links** on [Settings > Website & customer app](https://www.carstoragesoftware.com/dashboard/settings/website).
**The schedule widget does not appear on my website**
Confirm the full embed code was pasted into an HTML or embed block. Some website builders require a "Custom HTML" element.
**Customers see sections they should not see**
Review **Car page** and the **Customer app** preview. Turn off staff-only sections until you are ready to share them.
**Customers cannot pay during signup**
Check [Settings > Billing](https://www.carstoragesoftware.com/dashboard/settings/billing) and [Configure customer onboarding](/docs/settings/configure-customer-onboarding). Payment processing and onboarding payment steps must both be configured.
## What to do next
* Set up registration and first-login steps in [Configure customer onboarding](/docs/settings/configure-customer-onboarding).
* Invite a test customer first, then follow [Invite a customer to the portal](/docs/contacts/invite-a-customer-to-the-portal).
* Use [Go-live checklist for public pages](/docs/facility-web-pages/go-live-checklist-for-public-pages) before marketing your public links widely.
## Related topics
- [Configure customer onboarding](/docs/settings/configure-customer-onboarding.md)
- [Configure communications](/docs/settings/configure-communications.md)
- [Configure operations settings](/docs/settings/configure-operations-settings.md)
- [Settings overview](/docs/settings/overview.md)
- [Set up your facility name, logo, and colors](/docs/settings/set-up-facility-branding.md)
This documentation is built and hosted on [Mintlify](https://mintlify.com), a developer documentation platform.