> ## Documentation Index
> Fetch the complete documentation index at: https://www.carstoragesoftware.com/docs/llms.txt
> Use this file to discover all available pages before exploring further.
# Manage your profile and alerts
> Set your photo, phone number, event alerts, Face ID sign-in, light or dark mode, text size, and sign-out from Settings > Your profile.
**Your profile** is *your* login — not the facility-wide settings your manager uses for billing or branding.
Use this page to add a photo, keep your phone current for text alerts, choose which scheduled work pings you, sign in faster on this device, and make the words on screen easier to read.
Every staff member can open it. You do not need admin access.
## What you will accomplish
* Open [Settings > Your profile](https://www.carstoragesoftware.com/dashboard/settings/user).
* Add or update your name, photo, and phone number.
* Choose **All scheduled**, **Assigned to me**, or **Custom** for event alerts.
* Turn **Email**, **Text**, and **Push** on or off for yourself.
* Know where Face ID / Touch ID, light or dark mode, text size, and **Sign out** live.
**This page only changes your login**
Facility defaults for the whole team live on [Settings > Communications](https://www.carstoragesoftware.com/dashboard/settings/communications). Anything you change here **overrides those defaults for you only**. Other teammates keep their own choices.
## When you would use this
Open **Your profile** when:
* You just got a new work phone and texts should go there.
* Calendar alerts feel too noisy — or you are missing jobs you are assigned to.
* You want to sign in with Face ID, Touch ID, or Windows Hello instead of waiting for an email link.
* The words on screen feel too small on this computer or tablet.
* You need to sign out of a shared front-desk computer.
## Before you start
* You are signed in to the dashboard (any staff role is enough).
* If you want **Text** alerts, have the phone you actually carry nearby.
* Know whether you want alerts for every appointment, or only the ones with your name on them.
## Open Your profile
From the [Dashboard](https://www.carstoragesoftware.com/dashboard), click **Settings** near the bottom of the left sidebar.
In the settings list, scroll to the **Account** group at the bottom and click **Your profile**.
Direct link: [Settings > Your profile](https://www.carstoragesoftware.com/dashboard/settings/user).
**Expected result:** The blue header says **Your profile**. The first section is **Profile**, then **Notifications**.
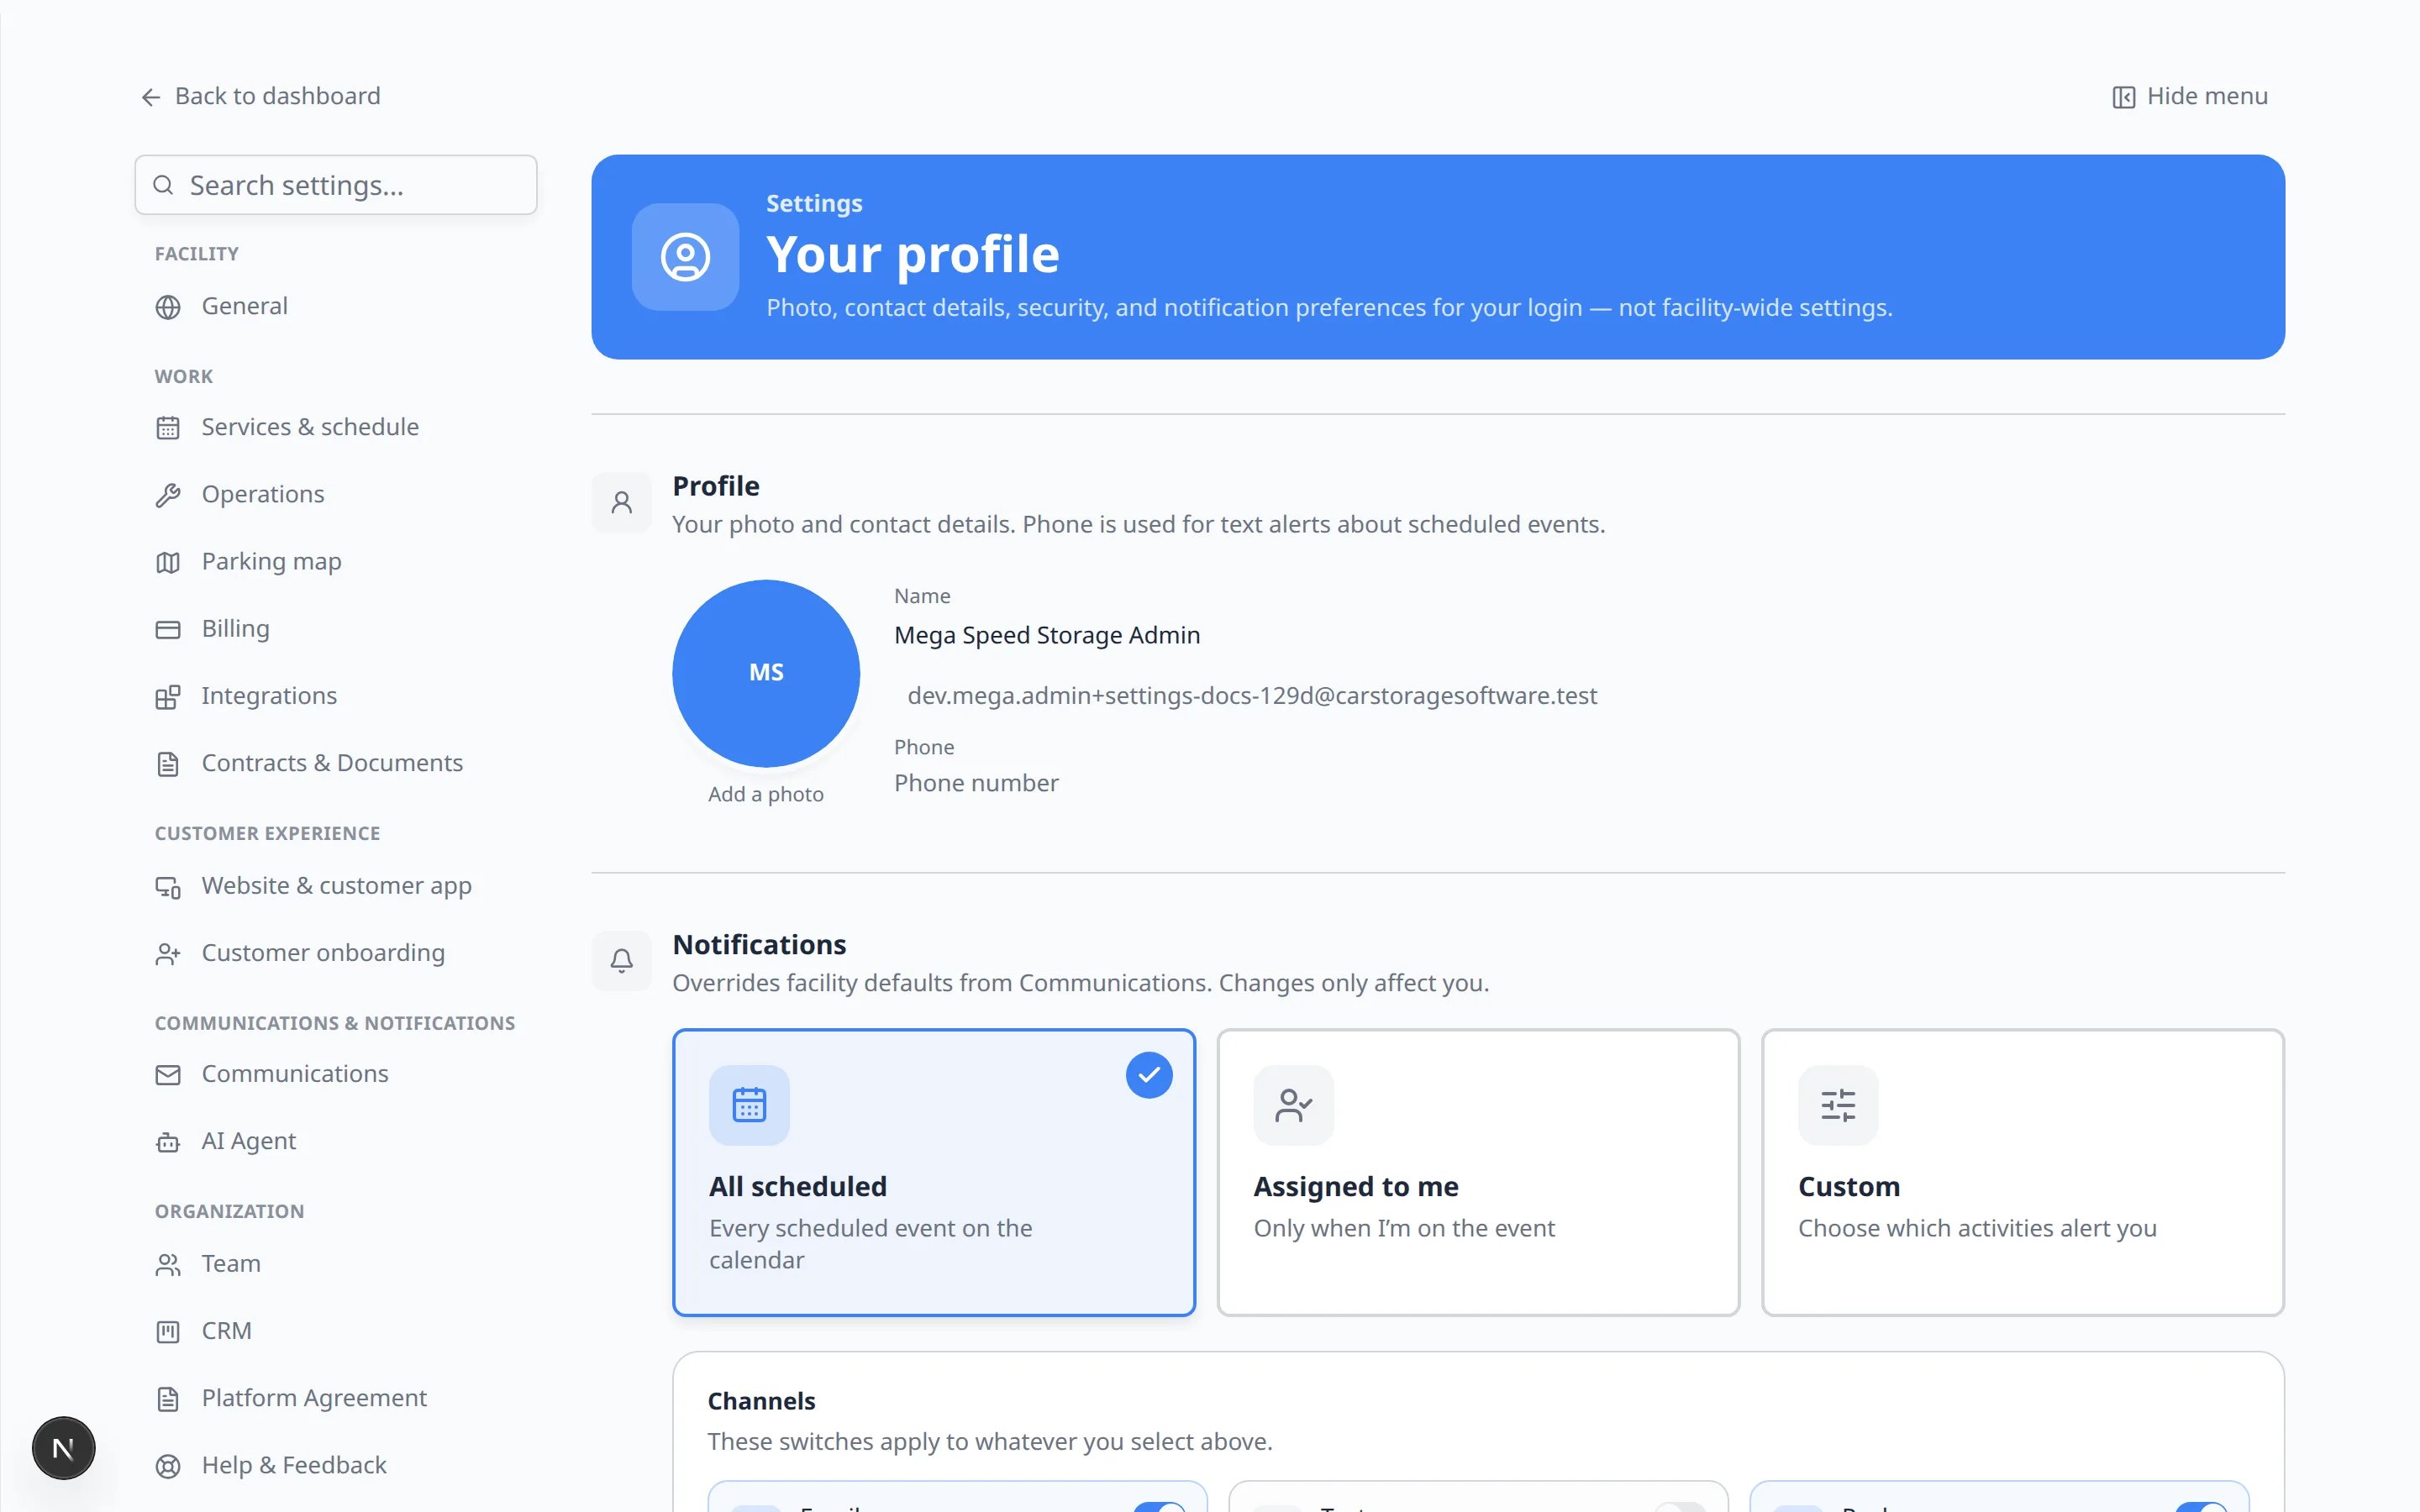 ***Your profile** is your personal page. **All scheduled** is selected here, so this person gets alerts for every event on the calendar.*
## Update your photo, name, and phone
At the top of [Settings > Your profile](https://www.carstoragesoftware.com/dashboard/settings/user), find **Profile**. The line under the heading says your photo and contact details are used for text alerts about scheduled events.
Click **Add a photo** on the circle (or click the circle if a photo is already there).
Choose a clear face photo. Customers and teammates see this on messages and the schedule.
**Expected result:** Your initials in the circle are replaced by the photo.
Click the **Name** field if you need to fix spelling. Press Enter or click away to save.
Use the name staff already say out loud — for example **Alex Rivera**, not a nickname no one will search for.
Click **Phone number** and type the mobile number that should receive texts.
**Why this matters:** The **Text** switch under **Channels** stays off (or shows **Add a phone number in Profile**) until a number is saved here. Email alone cannot send a text.
**The email under your name is your sign-in**
You cannot edit that email on this page. It is the address you use to receive the sign-in link. Ask a team admin if you need a different login email.
## Choose which events alert you
The three large cards under **Notifications** control *which* scheduled work can ping you. They save when you click them.
* **All scheduled** — Every scheduled event on the calendar. Choose this if you run the floor and need the full day.
* **Assigned to me** — Only when you are on the event. Choose this if you are a tech or porter and do not need every booking.
* **Custom** — Choose which activity types alert you (for example transport but not oil changes).
A check mark appears on the card you chose. You may see **Saving…** for a moment.
**Expected result:** The card stays highlighted. The next alert you get matches that choice.
**Start simple**
If you are not sure, pick **Assigned to me**. You can switch to **All scheduled** later if you keep missing work that is not assigned yet.
## Turn Email, Text, and Push on or off
Under the three cards you will see **Channels**. These switches apply to whatever you selected above.
On [Settings > Your profile](https://www.carstoragesoftware.com/dashboard/settings/user), look just below **All scheduled**, **Assigned to me**, and **Custom**.
* **Email** — Send alerts to your account email.
* **Text** — SMS to the phone on your profile. Add a number first if the switch is unavailable.
* **Push** — Alerts on this device. If you see **Attach this device**, click it so this computer or phone can show banners.
**Expected result:** The next reminder uses only the channels you left on. Turning **Text** off does not remove your phone number — it only stops texts.
**Too many messages?**
Turn **Text** off first if your phone is buzzing during the day. Keep **Email** on so you still have a record. Then switch from **All scheduled** to **Assigned to me**.
## Set up faster sign-in and a shared-computer PIN
Scroll to **Security**.
The card **Face ID & Touch ID** lets this device sign you in with the same unlock you already use (Face ID, Touch ID, Windows Hello, or a hardware key).
Click the card and follow the prompts on *this* device. Magic-link email still works as a backup.
**Expected result:** The next time you open the app on this device, you can unlock instead of waiting for an email.
The **Quick switch PIN** card is for a front-desk computer that several people share. Set a short PIN so the next person can switch users without a full sign-out.
Skip this if you are the only person who uses this computer.
**Passkeys stay on this device**
Face ID on your phone does not automatically unlock the office computer. Attach each device you actually use. For the facility-wide passkey page, see [Review security settings](/docs/settings/review-security-settings).
## Choose light or dark mode and text size
Scroll to **Display**. The line under the heading says you can choose light or dark for yourself, or follow the team default, plus text size on this device.
Under **Appearance**, click **Team default** (follow the facility appearance setting), **Device** (follow this device's light or dark setting), **Light**, or **Dark**.
**Expected result:** The dashboard switches to that look for you. Other people on the team are not affected.
Under **Text size**, click **Smaller**, **Regular**, or **Large**.
**Expected result:** Menus and page text change size on *this* browser. Other people on the team are not affected.
## Download your data, sign out, or delete your account
Scroll to **Account**.
Click **Download my data** if you need a copy of what the app stores about your login. This is your personal export — not the facility spreadsheet on [Settings > Team](https://www.carstoragesoftware.com/dashboard/settings/team). For cars, contacts, or events, use [Export your facility data](/docs/settings/export-your-facility-data).
Click **Sign out** when you leave a shared computer.
**Expected result:** The next person sees the sign-in page, not your inbox.
**Delete account** removes *your login*. It does not close the facility. Ask an owner before you use this. Most people only need **Sign out**.
## What success looks like
* Your name and photo look like you on the schedule.
* Your mobile number is saved if you want texts.
* **All scheduled** or **Assigned to me** matches how you actually work.
* **Email**, **Text**, and **Push** match how you like to be reached.
* You know how to **Sign out** of a shared computer.
## Common mistakes to avoid
* Do not look for your photo on [Settings > Branding](https://www.carstoragesoftware.com/dashboard/settings/branding). Branding is the *facility* logo. Your face lives here.
* Do not turn on **Text** and then wonder why nothing arrives — add **Phone number** first.
* Do not change [Settings > Communications](https://www.carstoragesoftware.com/dashboard/settings/communications) when you only meant to quiet *your* phone. Communications is the facility default.
* Do not skip **Sign out** on a front-desk computer at the end of a shift.
## Troubleshooting
**I cannot find Your profile**
It is the last item in the settings list, under **Account**. Or open [Settings > Your profile](https://www.carstoragesoftware.com/dashboard/settings/user) directly. If Settings itself is missing, you may be in the customer app — sign in as staff from the dashboard.
**Text is grayed out**
Add a **Phone number** in **Profile**. Until a number is saved, **Text** shows **Add a phone number in Profile**.
**I still get alerts I do not want**
Click **Assigned to me** or **Custom**, then turn off **Text** if the leftover noise is on your phone. Facility-wide customer messages are separate — those are set on [Settings > Communications](https://www.carstoragesoftware.com/dashboard/settings/communications).
**Face ID does not appear**
Some browsers and the mobile app do not support passkeys. Use the email sign-in link. Ask a teammate to try on Safari, Chrome, or Edge on the same device if you expected Face ID to show.
## What to do next
* Need to ask support a question? Use [Send help and feedback](/docs/settings/send-help-and-feedback).
* Inviting other staff? Use [Manage team permissions](/docs/settings/manage-team-permissions).
* Still setting up the facility? Return to [Settings overview](/docs/settings/overview).
## Related topics
- [Send help and feedback](/docs/settings/send-help-and-feedback.md)
- [Settings overview](/docs/settings/overview.md)
- [Configure communications](/docs/settings/configure-communications.md)
- [Configure communication settings for Inbox](/docs/inbox/configure-communication-settings.md)
- [Coordinate with your team in Inbox](/docs/inbox/coordinate-with-your-team-in-inbox.md)
This documentation is built and hosted on [Mintlify](https://mintlify.com), a developer documentation platform.
***Your profile** is your personal page. **All scheduled** is selected here, so this person gets alerts for every event on the calendar.*
## Update your photo, name, and phone
At the top of [Settings > Your profile](https://www.carstoragesoftware.com/dashboard/settings/user), find **Profile**. The line under the heading says your photo and contact details are used for text alerts about scheduled events.
Click **Add a photo** on the circle (or click the circle if a photo is already there).
Choose a clear face photo. Customers and teammates see this on messages and the schedule.
**Expected result:** Your initials in the circle are replaced by the photo.
Click the **Name** field if you need to fix spelling. Press Enter or click away to save.
Use the name staff already say out loud — for example **Alex Rivera**, not a nickname no one will search for.
Click **Phone number** and type the mobile number that should receive texts.
**Why this matters:** The **Text** switch under **Channels** stays off (or shows **Add a phone number in Profile**) until a number is saved here. Email alone cannot send a text.
**The email under your name is your sign-in**
You cannot edit that email on this page. It is the address you use to receive the sign-in link. Ask a team admin if you need a different login email.
## Choose which events alert you
The three large cards under **Notifications** control *which* scheduled work can ping you. They save when you click them.
* **All scheduled** — Every scheduled event on the calendar. Choose this if you run the floor and need the full day.
* **Assigned to me** — Only when you are on the event. Choose this if you are a tech or porter and do not need every booking.
* **Custom** — Choose which activity types alert you (for example transport but not oil changes).
A check mark appears on the card you chose. You may see **Saving…** for a moment.
**Expected result:** The card stays highlighted. The next alert you get matches that choice.
**Start simple**
If you are not sure, pick **Assigned to me**. You can switch to **All scheduled** later if you keep missing work that is not assigned yet.
## Turn Email, Text, and Push on or off
Under the three cards you will see **Channels**. These switches apply to whatever you selected above.
On [Settings > Your profile](https://www.carstoragesoftware.com/dashboard/settings/user), look just below **All scheduled**, **Assigned to me**, and **Custom**.
* **Email** — Send alerts to your account email.
* **Text** — SMS to the phone on your profile. Add a number first if the switch is unavailable.
* **Push** — Alerts on this device. If you see **Attach this device**, click it so this computer or phone can show banners.
**Expected result:** The next reminder uses only the channels you left on. Turning **Text** off does not remove your phone number — it only stops texts.
**Too many messages?**
Turn **Text** off first if your phone is buzzing during the day. Keep **Email** on so you still have a record. Then switch from **All scheduled** to **Assigned to me**.
## Set up faster sign-in and a shared-computer PIN
Scroll to **Security**.
The card **Face ID & Touch ID** lets this device sign you in with the same unlock you already use (Face ID, Touch ID, Windows Hello, or a hardware key).
Click the card and follow the prompts on *this* device. Magic-link email still works as a backup.
**Expected result:** The next time you open the app on this device, you can unlock instead of waiting for an email.
The **Quick switch PIN** card is for a front-desk computer that several people share. Set a short PIN so the next person can switch users without a full sign-out.
Skip this if you are the only person who uses this computer.
**Passkeys stay on this device**
Face ID on your phone does not automatically unlock the office computer. Attach each device you actually use. For the facility-wide passkey page, see [Review security settings](/docs/settings/review-security-settings).
## Choose light or dark mode and text size
Scroll to **Display**. The line under the heading says you can choose light or dark for yourself, or follow the team default, plus text size on this device.
Under **Appearance**, click **Team default** (follow the facility appearance setting), **Device** (follow this device's light or dark setting), **Light**, or **Dark**.
**Expected result:** The dashboard switches to that look for you. Other people on the team are not affected.
Under **Text size**, click **Smaller**, **Regular**, or **Large**.
**Expected result:** Menus and page text change size on *this* browser. Other people on the team are not affected.
## Download your data, sign out, or delete your account
Scroll to **Account**.
Click **Download my data** if you need a copy of what the app stores about your login. This is your personal export — not the facility spreadsheet on [Settings > Team](https://www.carstoragesoftware.com/dashboard/settings/team). For cars, contacts, or events, use [Export your facility data](/docs/settings/export-your-facility-data).
Click **Sign out** when you leave a shared computer.
**Expected result:** The next person sees the sign-in page, not your inbox.
**Delete account** removes *your login*. It does not close the facility. Ask an owner before you use this. Most people only need **Sign out**.
## What success looks like
* Your name and photo look like you on the schedule.
* Your mobile number is saved if you want texts.
* **All scheduled** or **Assigned to me** matches how you actually work.
* **Email**, **Text**, and **Push** match how you like to be reached.
* You know how to **Sign out** of a shared computer.
## Common mistakes to avoid
* Do not look for your photo on [Settings > Branding](https://www.carstoragesoftware.com/dashboard/settings/branding). Branding is the *facility* logo. Your face lives here.
* Do not turn on **Text** and then wonder why nothing arrives — add **Phone number** first.
* Do not change [Settings > Communications](https://www.carstoragesoftware.com/dashboard/settings/communications) when you only meant to quiet *your* phone. Communications is the facility default.
* Do not skip **Sign out** on a front-desk computer at the end of a shift.
## Troubleshooting
**I cannot find Your profile**
It is the last item in the settings list, under **Account**. Or open [Settings > Your profile](https://www.carstoragesoftware.com/dashboard/settings/user) directly. If Settings itself is missing, you may be in the customer app — sign in as staff from the dashboard.
**Text is grayed out**
Add a **Phone number** in **Profile**. Until a number is saved, **Text** shows **Add a phone number in Profile**.
**I still get alerts I do not want**
Click **Assigned to me** or **Custom**, then turn off **Text** if the leftover noise is on your phone. Facility-wide customer messages are separate — those are set on [Settings > Communications](https://www.carstoragesoftware.com/dashboard/settings/communications).
**Face ID does not appear**
Some browsers and the mobile app do not support passkeys. Use the email sign-in link. Ask a teammate to try on Safari, Chrome, or Edge on the same device if you expected Face ID to show.
## What to do next
* Need to ask support a question? Use [Send help and feedback](/docs/settings/send-help-and-feedback).
* Inviting other staff? Use [Manage team permissions](/docs/settings/manage-team-permissions).
* Still setting up the facility? Return to [Settings overview](/docs/settings/overview).
## Related topics
- [Send help and feedback](/docs/settings/send-help-and-feedback.md)
- [Settings overview](/docs/settings/overview.md)
- [Configure communications](/docs/settings/configure-communications.md)
- [Configure communication settings for Inbox](/docs/inbox/configure-communication-settings.md)
- [Coordinate with your team in Inbox](/docs/inbox/coordinate-with-your-team-in-inbox.md)
This documentation is built and hosted on [Mintlify](https://mintlify.com), a developer documentation platform.