> ## Documentation Index
> Fetch the complete documentation index at: https://www.carstoragesoftware.com/docs/llms.txt
> Use this file to discover all available pages before exploring further.
# Settings overview
> Follow the first-week setup path for facility details, billing, communications, portal, team access, CRM, and security.
## What you will accomplish
You will follow a clear first-week setup path so your facility's time zone, payments, messages, portal, team access, and daily operations tools work correctly before customers and staff rely on them.
Settings is where you tell Car Storage Software how your facility works.
Use this guide when you are setting up a new facility, preparing to invite staff, turning on customer-facing tools, or checking that important business settings are correct.
**New facility? Start with Basics too**
If your team is brand new to the app, read [Getting started overview](/docs/basics/overview) and the in-app [Setup Guide](https://www.carstoragesoftware.com/dashboard/onboarding) first. Then return here for detailed settings walkthroughs.
**Find any page fast**
You do not need to memorize where every option lives. On any [Settings](https://www.carstoragesoftware.com/dashboard/settings) page, click **Search settings…** and type a plain word such as **tax**, **logo**, **invite**, or **QR**. Matching sections highlight on the page, and the category list helps you jump to the right area.
When Settings is set up well, your team can:
* Schedule work in the right time zone.
* Send invoices and collect payments.
* Send emails and text messages from the right business identity.
* Standardize recurring care, checklists, status labels, and bookable facility spaces.
* Invite customers to a portal that looks like your facility.
* Collect signed agreements and customer documents.
* Give staff the right access without exposing private areas.
* Organize leads and customer follow-up.
## Quick start: your first 30 minutes
If you are brand new to the app, do these steps in order before you invite customers or staff. Each step links to a full guide when you need more detail.
Open [Settings > General](https://www.carstoragesoftware.com/dashboard/settings/general) and follow [Set up general facility settings](/docs/settings/set-up-general-facility-settings).
**Expected result:** Dates and times on [Schedule](https://www.carstoragesoftware.com/dashboard/schedule) match how your team talks about the day.
Open [Settings > Branding](https://www.carstoragesoftware.com/dashboard/settings/branding) and follow [Set up facility branding](/docs/settings/set-up-facility-branding).
**Expected result:** Customer emails and the portal show your facility name—not a generic label.
If many customers speak Spanish, open [Settings > General](https://www.carstoragesoftware.com/dashboard/settings/general) and set **Language** in [Set up general facility settings](/docs/settings/set-up-general-facility-settings).
**Expected result:** Portal menus and messages appear in the language you chose.
If you plan to send invoices or collect storage fees online, open [Settings > Billing](https://www.carstoragesoftware.com/dashboard/settings/billing) and start [Connect payment processing](/docs/settings/connect-payment-processing).
You can skip this step today if you only need scheduling and customer records.
When someone else needs dashboard access, use [Manage team permissions](/docs/settings/manage-team-permissions). Give them only the areas they need—not admin access by default.
Every staff member should open [Settings > Your profile](https://www.carstoragesoftware.com/dashboard/settings/user) and follow [Manage your profile and alerts](/docs/settings/manage-your-profile-and-alerts). Add your phone if you want texts.
**Expected result:** You get alerts for the work you care about — not someone else's shift.
**Do not rush customer invites**
Wait until branding, billing (if used), and [Configure portal and website](/docs/settings/configure-portal-and-website) look right. A customer's first impression is hard to redo.
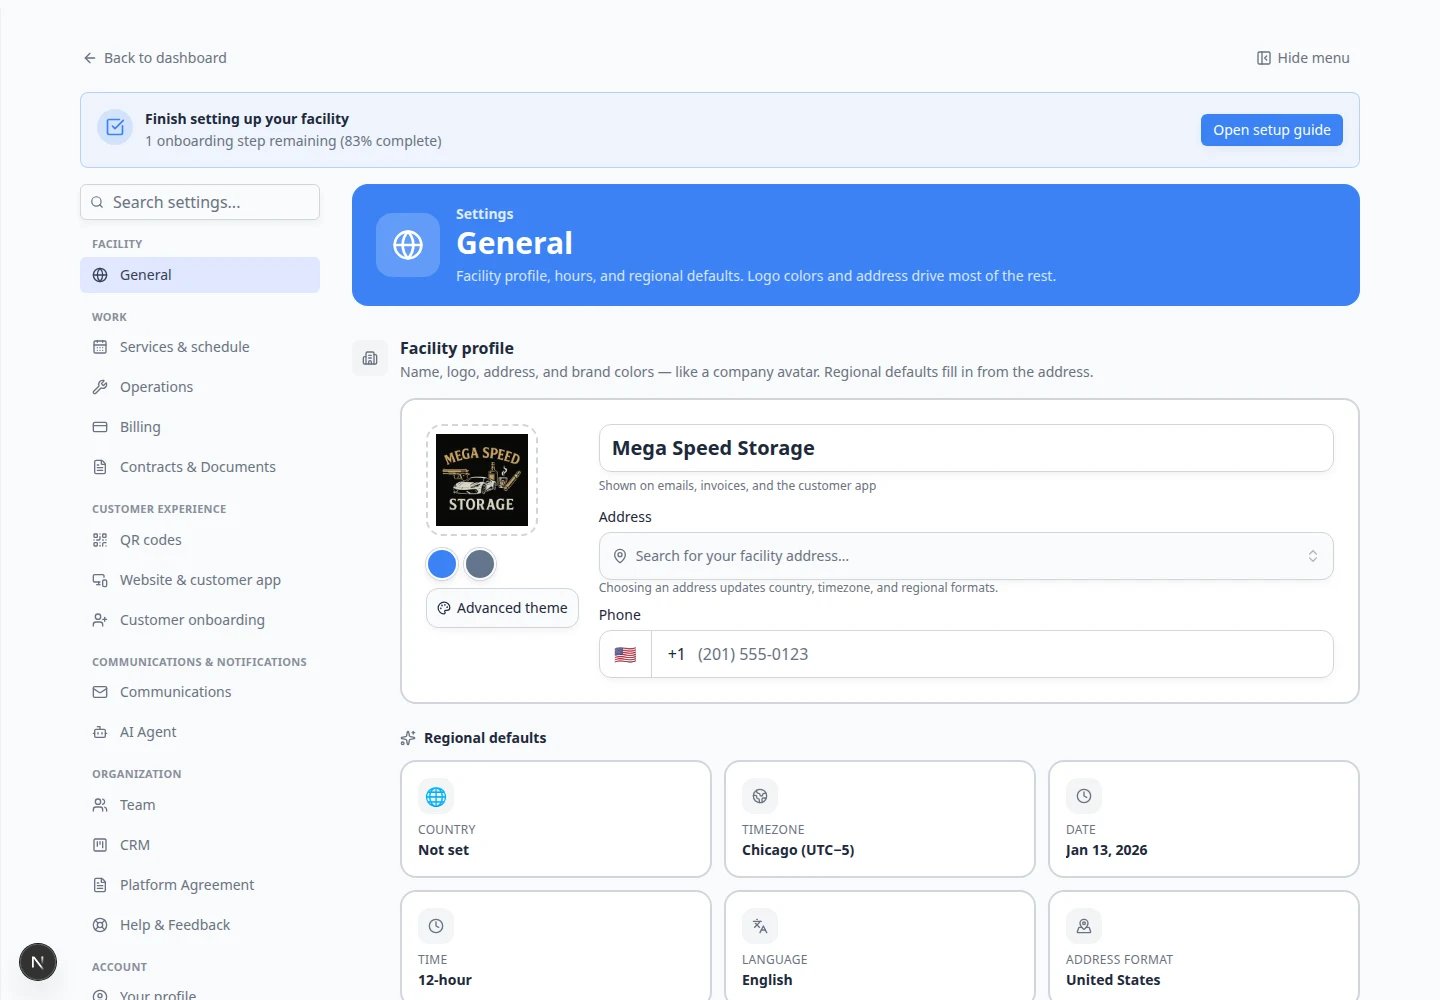 *Open **Settings** from the dashboard sidebar. Use the **Search settings…** box or the category list in the middle column to jump to Billing, Team, Branding, and other setup pages.*
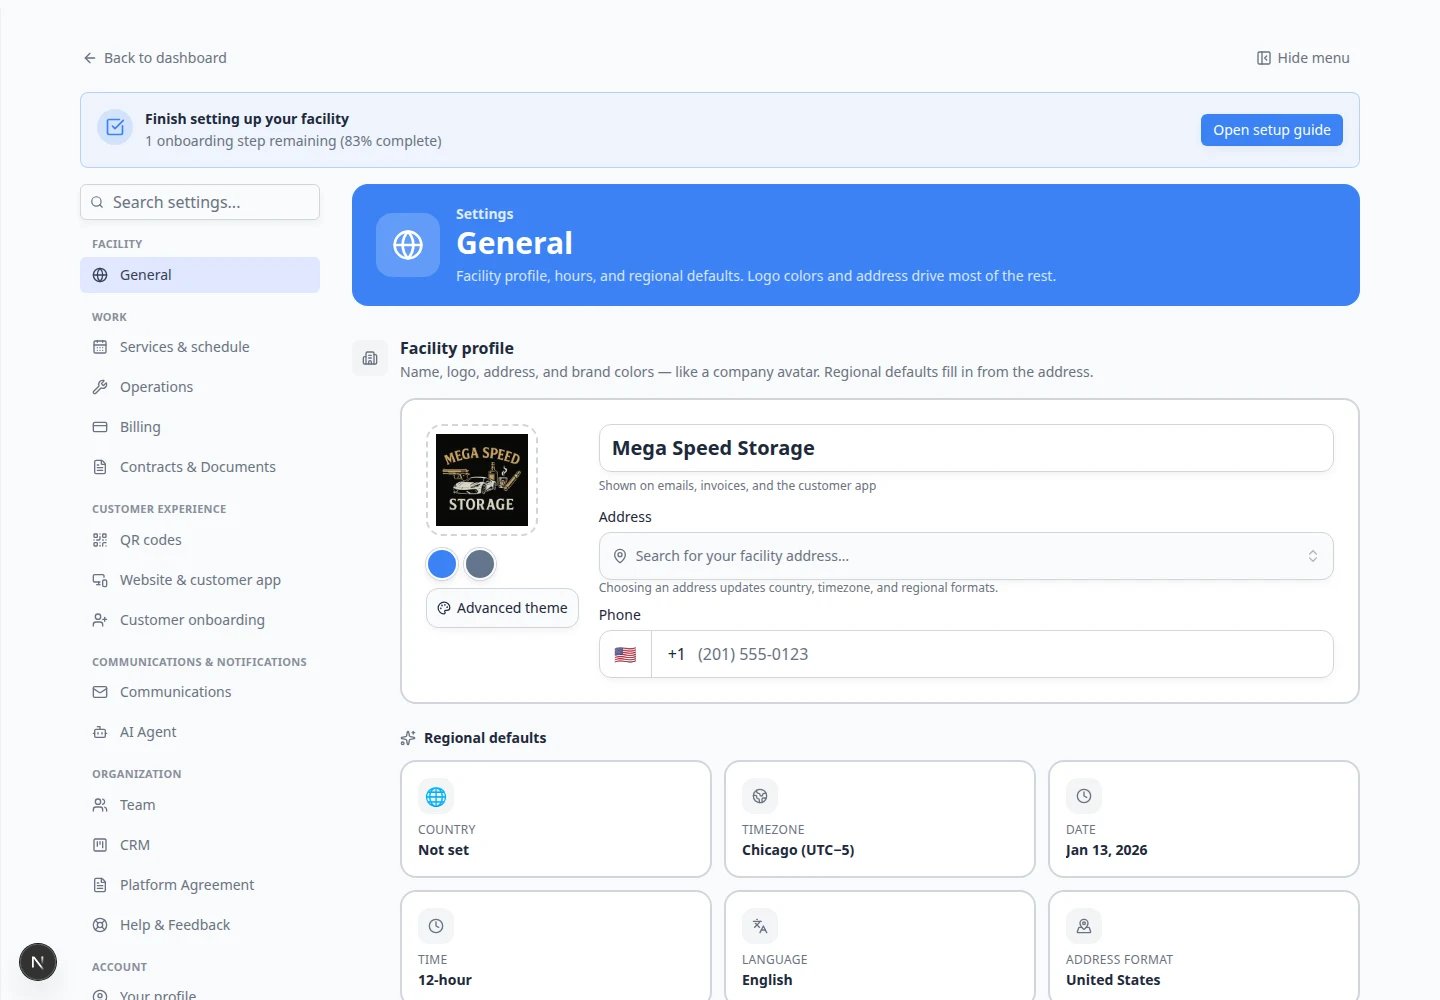 *Every settings category appears in the middle column. You do not need to memorize where each option lives—click the category name or search for a keyword.*
## How to find any settings page
In the main dashboard sidebar (far left), click **Settings** near the bottom.
**Expected result:** The settings area opens with a search box and a list of categories such as **General**, **Billing**, and **Team**.
Click **Search settings…** and type a plain word, such as **tax**, **logo**, **invite**, or **passkey**.
Matching sections on the current page highlight, and you can pick a category from the list.
**Why this matters:** You do not need to memorize where every option lives. Search is often faster than scrolling.
Click a category in the middle column—for example **Communications** or **Customer onboarding**.
**Expected result:** The page title at the top of the right panel matches the category you chose (for example **Communications**).
*Every settings category appears in the middle column. You do not need to memorize where each option lives—click the category name or search for a keyword.*
## How to find any settings page
In the main dashboard sidebar (far left), click **Settings** near the bottom.
**Expected result:** The settings area opens with a search box and a list of categories such as **General**, **Billing**, and **Team**.
Click **Search settings…** and type a plain word, such as **tax**, **logo**, **invite**, or **passkey**.
Matching sections on the current page highlight, and you can pick a category from the list.
**Why this matters:** You do not need to memorize where every option lives. Search is often faster than scrolling.
Click a category in the middle column—for example **Communications** or **Customer onboarding**.
**Expected result:** The page title at the top of the right panel matches the category you chose (for example **Communications**).
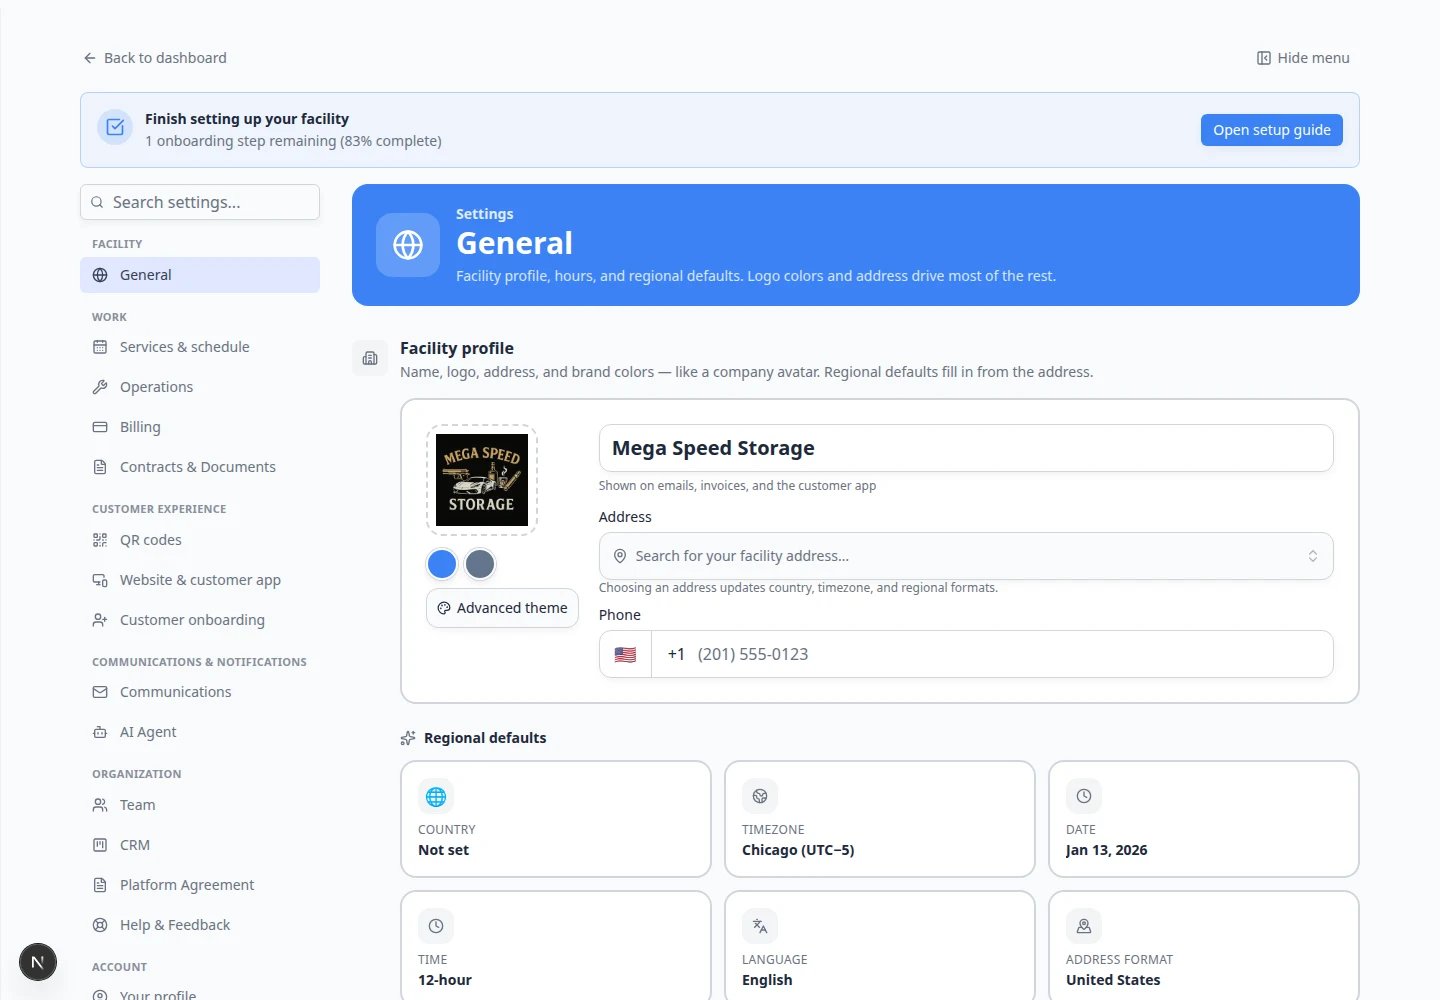 ***General** is the best first stop: time zone and regional formats affect every calendar, invoice, and customer message.*
## What success looks like after your first week
When your first-week setup is done well, you should be able to check these outcomes without guessing:
* [Schedule](https://www.carstoragesoftware.com/dashboard/schedule) shows appointments in the correct local time zone.
* Customer emails and the portal show your **logo and facility name**, not a generic label.
* At least one teammate besides the owner can sign in with the right areas—not full admin unless they need it.
* If you bill online, [Payments](https://www.carstoragesoftware.com/dashboard/payments) is connected and a test invoice looks correct.
* Your public registration or login link opens in a private browser window and looks ready for customers.
***General** is the best first stop: time zone and regional formats affect every calendar, invoice, and customer message.*
## What success looks like after your first week
When your first-week setup is done well, you should be able to check these outcomes without guessing:
* [Schedule](https://www.carstoragesoftware.com/dashboard/schedule) shows appointments in the correct local time zone.
* Customer emails and the portal show your **logo and facility name**, not a generic label.
* At least one teammate besides the owner can sign in with the right areas—not full admin unless they need it.
* If you bill online, [Payments](https://www.carstoragesoftware.com/dashboard/payments) is connected and a test invoice looks correct.
* Your public registration or login link opens in a private browser window and looks ready for customers.
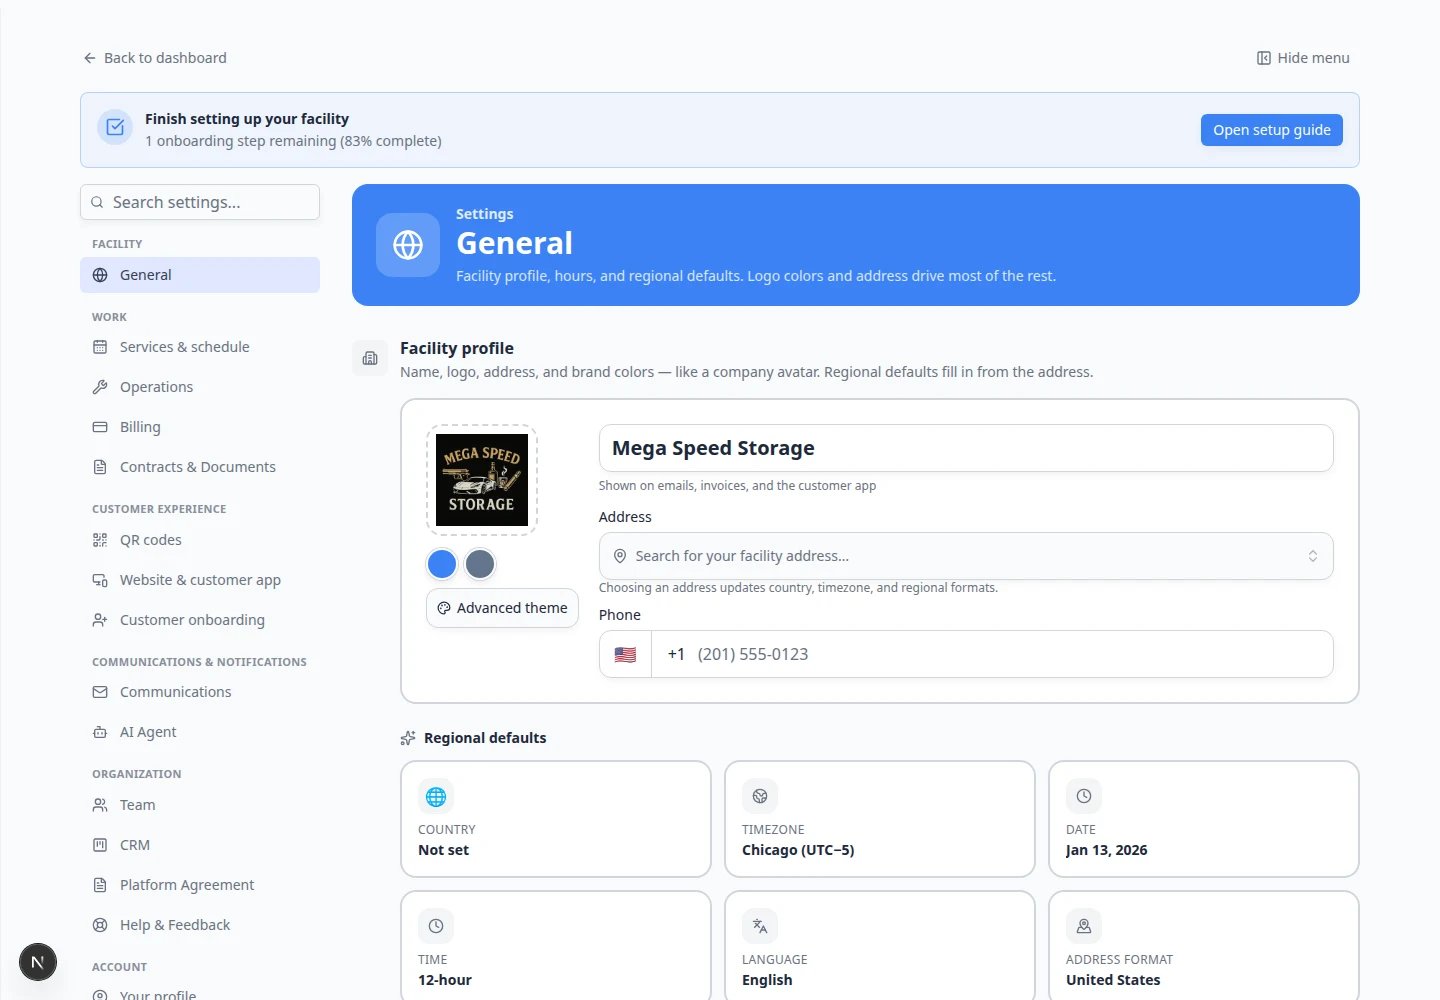 *Use the category list on the left side of Settings to move between setup areas during your first week. Finish **General** and **Branding** before you send customer-facing links.*
## First-week guides (start here)
These eight guides cover the setup most new facilities complete in the first week. Each one focuses on a single outcome so you do not have to read every page at once.
[Set up general facility settings](/docs/settings/set-up-general-facility-settings) then [Set up facility branding](/docs/settings/set-up-facility-branding).
[Connect payment processing](/docs/settings/connect-payment-processing) (if you bill online) and [Configure communications](/docs/settings/configure-communications).
[Configure operations settings](/docs/settings/configure-operations-settings) and [Set up vehicle service plans](/docs/settings/set-up-vehicle-service-plans) when stored cars include repeating care.
[Configure customer onboarding](/docs/settings/configure-customer-onboarding), [Configure portal and website](/docs/settings/configure-portal-and-website), then [Manage team permissions](/docs/settings/manage-team-permissions).
## Best setup order for a new facility
Follow this order if your team is setting up the app for the first time. Each step builds on the one before it.
* Start with [General settings](/docs/settings/set-up-general-facility-settings) so dates, times, addresses, country, and locations are correct.
* Set up [Branding](/docs/settings/set-up-facility-branding) so your logo, colors, and facility name look correct on customer pages and emails.
* Set up [Billing](/docs/settings/connect-payment-processing) before your team sends invoices, quotes, recurring charges, or checkout links.
* Set up [Communications](/docs/settings/configure-communications) so emails, texts, review links, and notification defaults work the way your team expects.
* Set up [Operations](/docs/settings/configure-operations-settings) before staff rely on recurring care plans, workflows, custom statuses, bookable amenities, or floor plan tools.
* Set up [Contracts](/docs/contracts/overview) before requiring customers to sign agreements or upload important documents.
* Set up [Customer onboarding](/docs/settings/configure-customer-onboarding) before turning on public registration or required portal setup steps.
* Set up [Website & customer app](/docs/settings/configure-portal-and-website) before inviting customers or adding public links to your website.
* Review [Team permissions](/docs/settings/manage-team-permissions) before inviting staff into the dashboard.
* Set up [CRM settings](/docs/settings/configure-crm-settings) so leads, customers, follow-up dates, and customer types are easy to understand.
* Finish with [Security settings](/docs/settings/review-security-settings) so sign-in and admin access are safe.
**Why this order helps**
If billing, communications, and portal settings are ready before you invite customers, the customer experience feels complete from the first email. It also prevents staff from guessing which tools are ready to use.
## What each Settings page is for
Open [Settings > General](https://www.carstoragesoftware.com/dashboard/settings/general) for time zone, date format, time format, address format, country, and facility locations.
Open [Settings > Events & schedule](https://www.carstoragesoftware.com/dashboard/settings/events) for services, appointment types, reminders, booking rules, photo rules, and resources. Start with [Configure events and schedule settings](/docs/settings/configure-events-and-schedule-settings), then [Configure event types](/docs/events/configure-event-types) when you add each service.
Open [Settings > Operations](https://www.carstoragesoftware.com/dashboard/settings/operations) for service plans, statuses, workflows, amenities, and floor plan setup. Start with [Configure operations settings](/docs/settings/configure-operations-settings).
Open [Settings > Contracts & Documents](https://www.carstoragesoftware.com/dashboard/settings/contracts-and-documents) for contract templates, e-signature setup, document types, and customer upload categories. For a full guide, see [Contracts overview](/docs/contracts/overview).
Open [Settings > Branding](https://www.carstoragesoftware.com/dashboard/settings/branding) for your logo, brand colors, facility name, app home screen name, and theme. For a full guide, see [Set up facility branding](/docs/settings/set-up-facility-branding).
Open [Settings > Website & customer app](https://www.carstoragesoftware.com/dashboard/settings/website) for customer app home layout, shareable links, booking widget, vehicle page visibility, and public facility pages. For a full guide, see [Configure portal and website](/docs/settings/configure-portal-and-website).
Enable **QR codes** from [Settings > Integrations](https://www.carstoragesoftware.com/dashboard/settings/integrations), then open [Settings > QR codes](https://www.carstoragesoftware.com/dashboard/settings/qr-codes) for printable short-link codes you can tape to a windshield or front desk. The printed image stays the same when you change where it points. See [Set up printable QR codes](/docs/settings/set-up-printable-qr-codes).
Open [Settings > Customer onboarding](https://www.carstoragesoftware.com/dashboard/settings/customer-onboarding) for the public registration form and the steps customers complete after sign-in. For a full guide, see [Configure customer onboarding](/docs/settings/configure-customer-onboarding).
Open [Settings > Communications](https://www.carstoragesoftware.com/dashboard/settings/communications) for phone and text messaging, email domain setup, social links, Google Reviews, and notification defaults.
Open [Settings > Billing](https://www.carstoragesoftware.com/dashboard/settings/billing) for Stripe payment processing, processing fee rules, statement billing, invoice settings, tax rates, and quote settings.
Open [Settings > Integrations](https://www.carstoragesoftware.com/dashboard/settings/integrations) to enable QR codes, cameras, the API, AI agents (MCP), a custom domain, Shopmonkey, or HubSpot, and to choose one accounting system (QuickBooks Online, QuickBooks Desktop, or Xero). For the API, see [Connect the API](/docs/settings/connect-api). For Claude, Cursor, and Claude Code, see [Connect AI agents (MCP)](/docs/settings/connect-ai-agents-mcp). For Shopmonkey, see [Connect Shopmonkey](/docs/settings/connect-shopmonkey). For HubSpot, see [Connect HubSpot](/docs/settings/connect-hubspot). For accounting, see [Connect accounting integrations](/docs/settings/connect-accounting-integrations).
Open [Settings > Team](https://www.carstoragesoftware.com/dashboard/settings/team) to invite staff, update permissions, review notification preferences, assign locations, and remove access for people who no longer need it.
Open [Settings > CRM](https://www.carstoragesoftware.com/dashboard/settings/crm) for pipeline stages, customer types, lead sources, and automatic follow-up timing.
Open [Settings > Security](https://www.carstoragesoftware.com/dashboard/settings/security) to manage passkeys for safer sign-in. Most people set Face ID / Touch ID on [Your profile](https://www.carstoragesoftware.com/dashboard/settings/user) instead. See [Review security settings](/docs/settings/review-security-settings).
Open [Settings > Help & Feedback](https://www.carstoragesoftware.com/dashboard/settings/help) to ask the docs assistant a how-to question, report a bug, or suggest a feature. See [Send help and feedback](/docs/settings/send-help-and-feedback).
Open [Settings > Your profile](https://www.carstoragesoftware.com/dashboard/settings/user) for *your* photo, phone, event alerts, Face ID, text size, and sign-out. This is not facility branding. See [Manage your profile and alerts](/docs/settings/manage-your-profile-and-alerts).
*Use the category list on the left side of Settings to move between setup areas during your first week. Finish **General** and **Branding** before you send customer-facing links.*
## First-week guides (start here)
These eight guides cover the setup most new facilities complete in the first week. Each one focuses on a single outcome so you do not have to read every page at once.
[Set up general facility settings](/docs/settings/set-up-general-facility-settings) then [Set up facility branding](/docs/settings/set-up-facility-branding).
[Connect payment processing](/docs/settings/connect-payment-processing) (if you bill online) and [Configure communications](/docs/settings/configure-communications).
[Configure operations settings](/docs/settings/configure-operations-settings) and [Set up vehicle service plans](/docs/settings/set-up-vehicle-service-plans) when stored cars include repeating care.
[Configure customer onboarding](/docs/settings/configure-customer-onboarding), [Configure portal and website](/docs/settings/configure-portal-and-website), then [Manage team permissions](/docs/settings/manage-team-permissions).
## Best setup order for a new facility
Follow this order if your team is setting up the app for the first time. Each step builds on the one before it.
* Start with [General settings](/docs/settings/set-up-general-facility-settings) so dates, times, addresses, country, and locations are correct.
* Set up [Branding](/docs/settings/set-up-facility-branding) so your logo, colors, and facility name look correct on customer pages and emails.
* Set up [Billing](/docs/settings/connect-payment-processing) before your team sends invoices, quotes, recurring charges, or checkout links.
* Set up [Communications](/docs/settings/configure-communications) so emails, texts, review links, and notification defaults work the way your team expects.
* Set up [Operations](/docs/settings/configure-operations-settings) before staff rely on recurring care plans, workflows, custom statuses, bookable amenities, or floor plan tools.
* Set up [Contracts](/docs/contracts/overview) before requiring customers to sign agreements or upload important documents.
* Set up [Customer onboarding](/docs/settings/configure-customer-onboarding) before turning on public registration or required portal setup steps.
* Set up [Website & customer app](/docs/settings/configure-portal-and-website) before inviting customers or adding public links to your website.
* Review [Team permissions](/docs/settings/manage-team-permissions) before inviting staff into the dashboard.
* Set up [CRM settings](/docs/settings/configure-crm-settings) so leads, customers, follow-up dates, and customer types are easy to understand.
* Finish with [Security settings](/docs/settings/review-security-settings) so sign-in and admin access are safe.
**Why this order helps**
If billing, communications, and portal settings are ready before you invite customers, the customer experience feels complete from the first email. It also prevents staff from guessing which tools are ready to use.
## What each Settings page is for
Open [Settings > General](https://www.carstoragesoftware.com/dashboard/settings/general) for time zone, date format, time format, address format, country, and facility locations.
Open [Settings > Events & schedule](https://www.carstoragesoftware.com/dashboard/settings/events) for services, appointment types, reminders, booking rules, photo rules, and resources. Start with [Configure events and schedule settings](/docs/settings/configure-events-and-schedule-settings), then [Configure event types](/docs/events/configure-event-types) when you add each service.
Open [Settings > Operations](https://www.carstoragesoftware.com/dashboard/settings/operations) for service plans, statuses, workflows, amenities, and floor plan setup. Start with [Configure operations settings](/docs/settings/configure-operations-settings).
Open [Settings > Contracts & Documents](https://www.carstoragesoftware.com/dashboard/settings/contracts-and-documents) for contract templates, e-signature setup, document types, and customer upload categories. For a full guide, see [Contracts overview](/docs/contracts/overview).
Open [Settings > Branding](https://www.carstoragesoftware.com/dashboard/settings/branding) for your logo, brand colors, facility name, app home screen name, and theme. For a full guide, see [Set up facility branding](/docs/settings/set-up-facility-branding).
Open [Settings > Website & customer app](https://www.carstoragesoftware.com/dashboard/settings/website) for customer app home layout, shareable links, booking widget, vehicle page visibility, and public facility pages. For a full guide, see [Configure portal and website](/docs/settings/configure-portal-and-website).
Enable **QR codes** from [Settings > Integrations](https://www.carstoragesoftware.com/dashboard/settings/integrations), then open [Settings > QR codes](https://www.carstoragesoftware.com/dashboard/settings/qr-codes) for printable short-link codes you can tape to a windshield or front desk. The printed image stays the same when you change where it points. See [Set up printable QR codes](/docs/settings/set-up-printable-qr-codes).
Open [Settings > Customer onboarding](https://www.carstoragesoftware.com/dashboard/settings/customer-onboarding) for the public registration form and the steps customers complete after sign-in. For a full guide, see [Configure customer onboarding](/docs/settings/configure-customer-onboarding).
Open [Settings > Communications](https://www.carstoragesoftware.com/dashboard/settings/communications) for phone and text messaging, email domain setup, social links, Google Reviews, and notification defaults.
Open [Settings > Billing](https://www.carstoragesoftware.com/dashboard/settings/billing) for Stripe payment processing, processing fee rules, statement billing, invoice settings, tax rates, and quote settings.
Open [Settings > Integrations](https://www.carstoragesoftware.com/dashboard/settings/integrations) to enable QR codes, cameras, the API, AI agents (MCP), a custom domain, Shopmonkey, or HubSpot, and to choose one accounting system (QuickBooks Online, QuickBooks Desktop, or Xero). For the API, see [Connect the API](/docs/settings/connect-api). For Claude, Cursor, and Claude Code, see [Connect AI agents (MCP)](/docs/settings/connect-ai-agents-mcp). For Shopmonkey, see [Connect Shopmonkey](/docs/settings/connect-shopmonkey). For HubSpot, see [Connect HubSpot](/docs/settings/connect-hubspot). For accounting, see [Connect accounting integrations](/docs/settings/connect-accounting-integrations).
Open [Settings > Team](https://www.carstoragesoftware.com/dashboard/settings/team) to invite staff, update permissions, review notification preferences, assign locations, and remove access for people who no longer need it.
Open [Settings > CRM](https://www.carstoragesoftware.com/dashboard/settings/crm) for pipeline stages, customer types, lead sources, and automatic follow-up timing.
Open [Settings > Security](https://www.carstoragesoftware.com/dashboard/settings/security) to manage passkeys for safer sign-in. Most people set Face ID / Touch ID on [Your profile](https://www.carstoragesoftware.com/dashboard/settings/user) instead. See [Review security settings](/docs/settings/review-security-settings).
Open [Settings > Help & Feedback](https://www.carstoragesoftware.com/dashboard/settings/help) to ask the docs assistant a how-to question, report a bug, or suggest a feature. See [Send help and feedback](/docs/settings/send-help-and-feedback).
Open [Settings > Your profile](https://www.carstoragesoftware.com/dashboard/settings/user) for *your* photo, phone, event alerts, Face ID, text size, and sign-out. This is not facility branding. See [Manage your profile and alerts](/docs/settings/manage-your-profile-and-alerts).
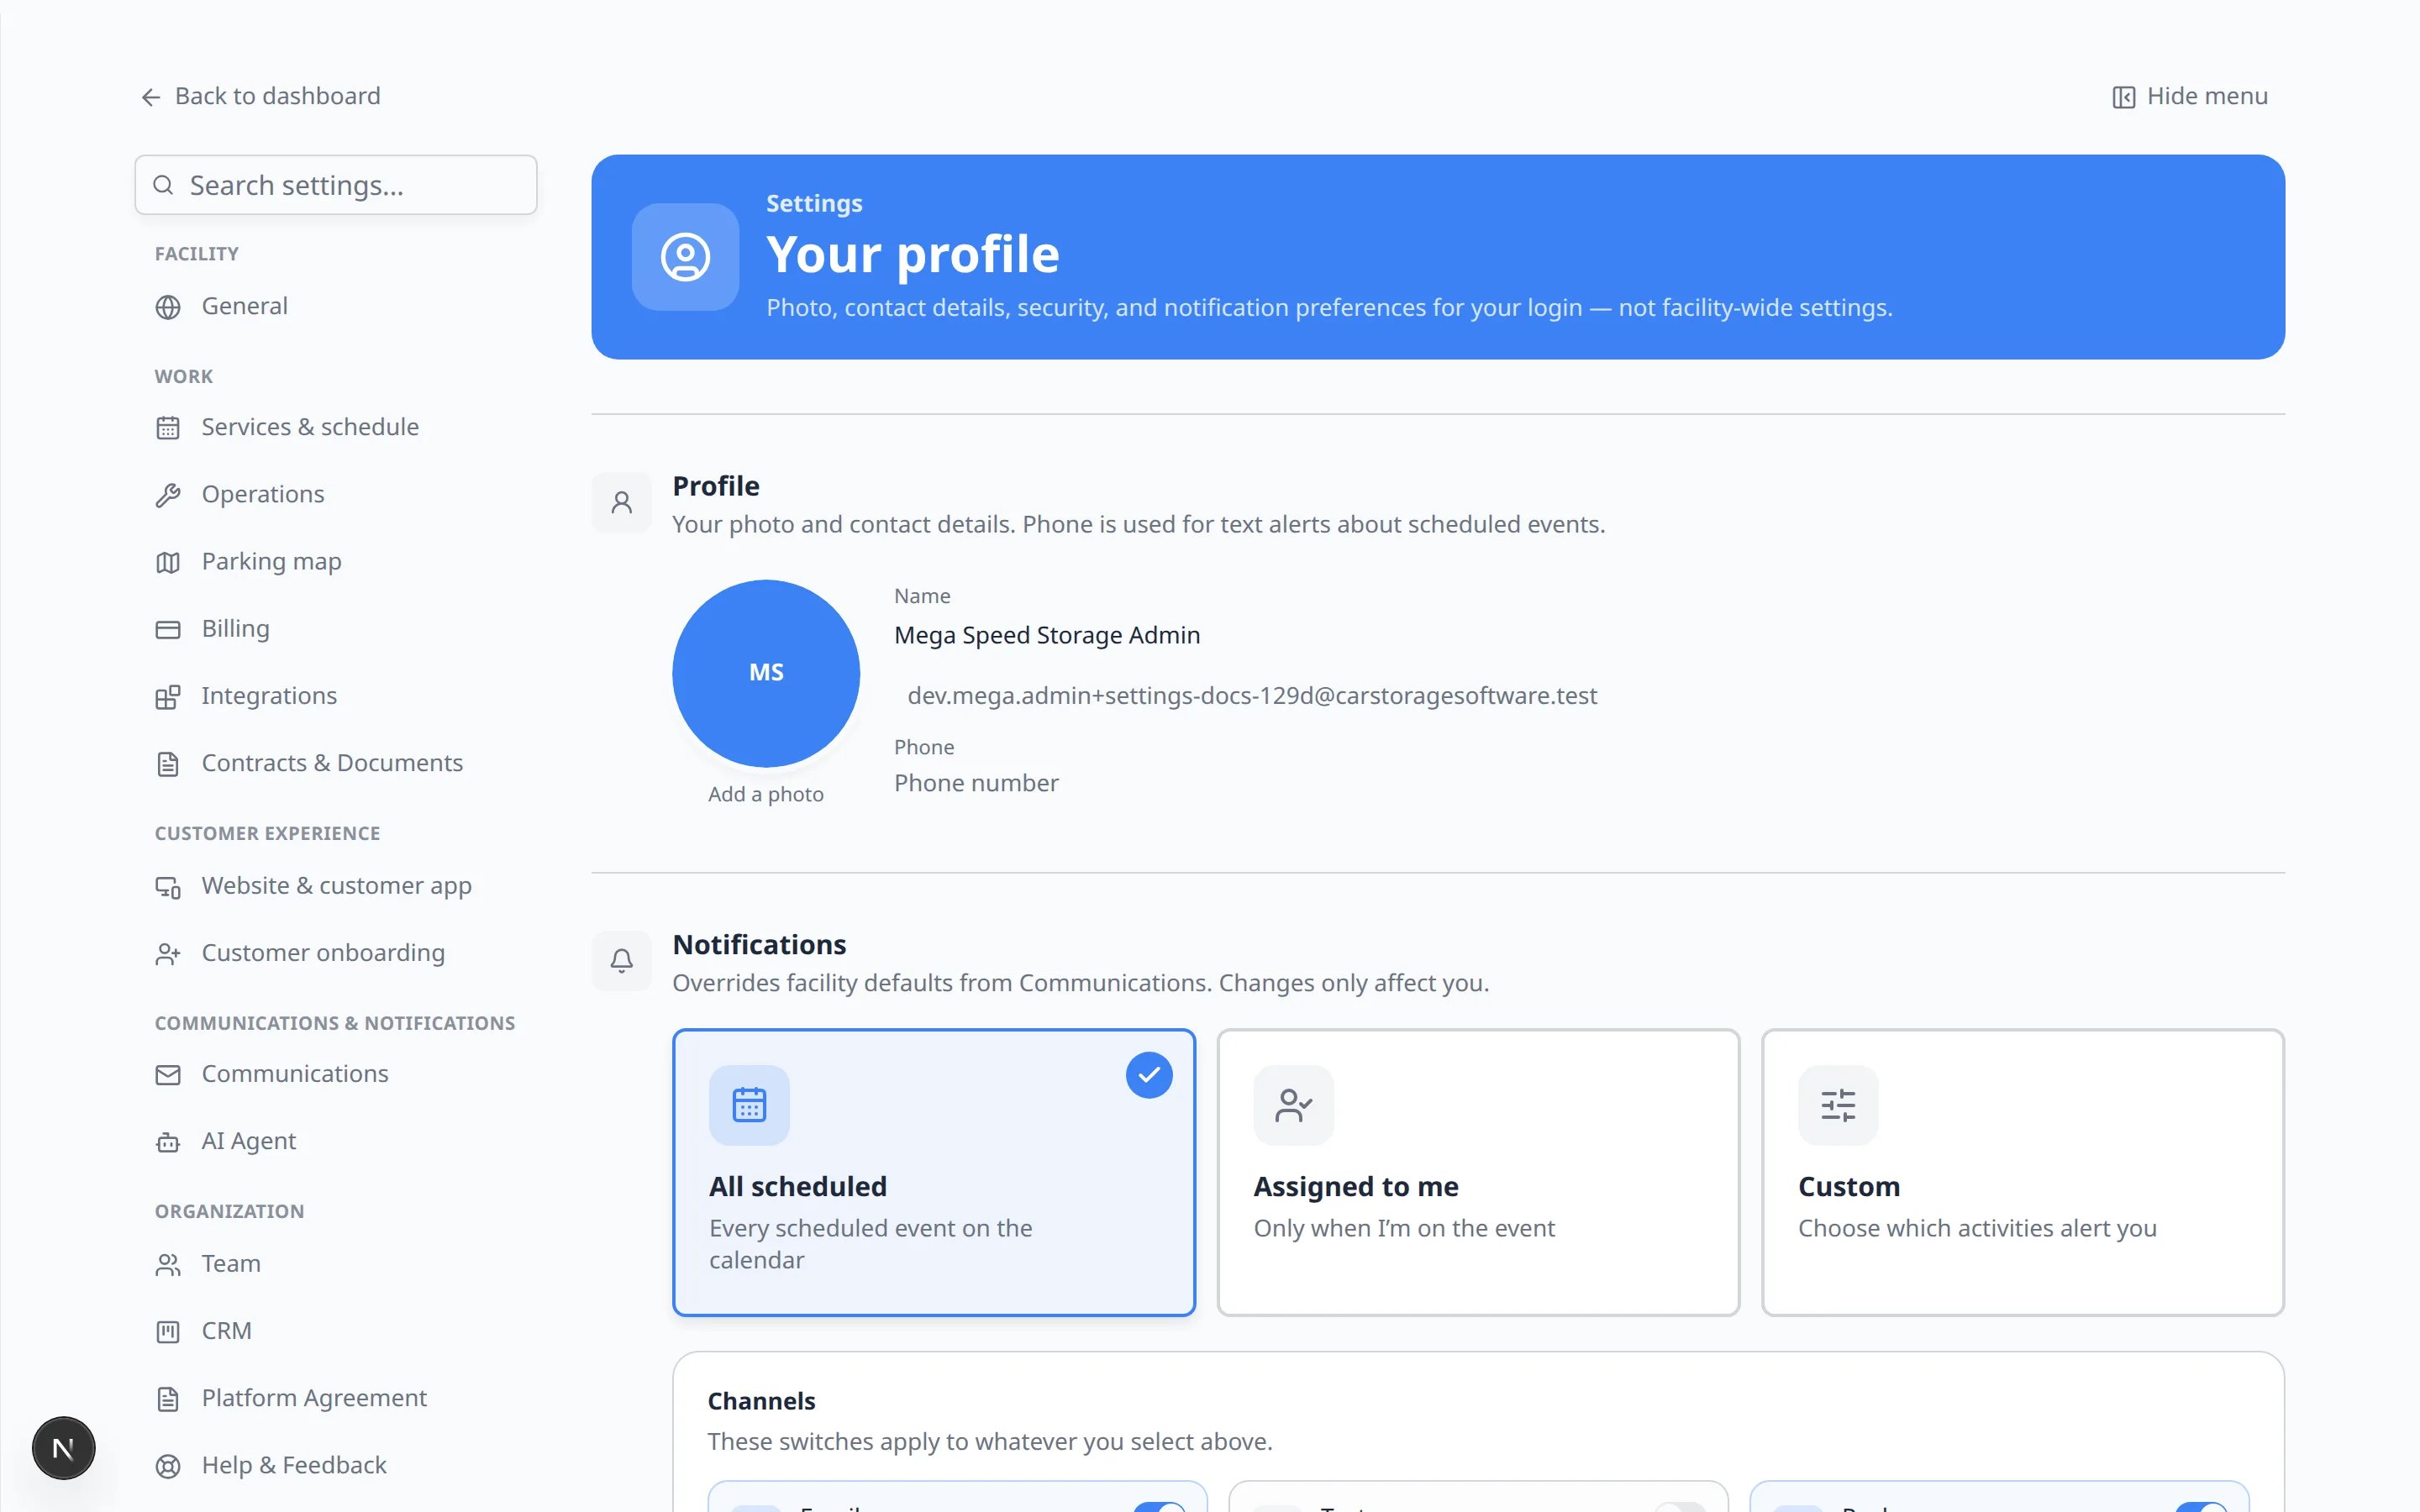 ***Your profile** is the last item in Settings. Every staff member uses it for their own alerts — not for the facility logo or billing.*
## Important words in plain English
**Customer portal** means the private area where customers sign in to see their cars, invoices, documents, messages, and events.
**Website & customer app** means the signed-in customer experience plus public links and pages you can place on your own website.
**Customer onboarding** means the public registration form and the guided steps new customers complete in the portal (contracts, uploads, payment, and more).
**Operations** means the repeatable work your team does every day, such as recurring vehicle care, intake checklists, status labels, and reserving bays or rooms.
**CRM** means the way your team tracks leads and customer follow-up. You do not need to know the term to use it. Think of it as your sales and relationship board.
**Passkey** means signing in with your device, such as Face ID, Touch ID, Windows Hello, or a security key.
**Admin** means a teammate who can access sensitive settings. Admin access should be limited to trusted owners or managers.
## Common setup mistakes to avoid
* Do not invite customers before the portal sections, logo, and billing settings are ready.
* Do not build workflows before the event types they use are correct.
* Do not give every staff member admin access. Most people only need access to the areas they work in.
* Do not send invoices until payment processing, tax settings, and invoice numbering are reviewed.
* Do not copy website links until you confirm the public page or portal page opens correctly.
## How-to guides in this section
* [Set up general facility settings](/docs/settings/set-up-general-facility-settings) — time zone, dates, country, and locations.
* [Configure events and schedule settings](/docs/settings/configure-events-and-schedule-settings) — services, plans, closed days, and reminders.
* [Set up facility branding](/docs/settings/set-up-facility-branding) — logo, colors, facility name, and theme.
* [Connect payment processing](/docs/settings/connect-payment-processing) — Stripe, fees, taxes, and invoices.
* [Configure communications](/docs/settings/configure-communications) — phone, text, email domain, reviews, and alerts.
* [Configure operations settings](/docs/settings/configure-operations-settings) — overview of service plans, workflows, statuses, and amenities.
* [Set up vehicle service plans](/docs/settings/set-up-vehicle-service-plans) — recurring care packages for stored vehicles.
* [Create operations workflows](/docs/settings/create-operations-workflows) — step-by-step checklists for intake, pickup, and similar jobs.
* [Manage custom statuses and amenities](/docs/settings/manage-custom-statuses-and-amenities) — job labels and bookable bays or rooms.
* [Configure customer onboarding](/docs/settings/configure-customer-onboarding) — public registration form and portal setup steps.
* [Configure portal and website](/docs/settings/configure-portal-and-website) — customer app layout, login links, booking box, and public pages.
* [Set up printable QR codes](/docs/settings/set-up-printable-qr-codes) — enable the catalog card, then print stable short-link codes for front desk and vehicle cards.
* [Connect HubSpot](/docs/settings/connect-hubspot) — sign in with HubSpot and keep facility customers in sync. Payments are not required.
* [Connect the API](/docs/settings/connect-api) — enable the catalog card, create a scoped key, and call `/api/v1`.
* [Connect AI agents (MCP)](/docs/settings/connect-ai-agents-mcp) — OAuth connector for Claude, Cursor, and other MCP clients.
* [Manage team permissions](/docs/settings/manage-team-permissions) — invite staff and choose safe access.
* [Configure CRM settings](/docs/settings/configure-crm-settings) — pipeline stages, customer types, and sources.
* [Review security settings](/docs/settings/review-security-settings) — passkeys and access habits.
* [Manage your profile and alerts](/docs/settings/manage-your-profile-and-alerts) — your photo, phone, event alerts, Face ID, and sign-out.
* [Send help and feedback](/docs/settings/send-help-and-feedback) — ask a how-to question, report a bug, or suggest a feature.
* [Export your facility data](/docs/settings/export-your-facility-data) — download cars, contacts, or events as a spreadsheet.
## Quick links by job
* **Owner / manager setting up the facility:** Start with [Set up general facility settings](/docs/settings/set-up-general-facility-settings), then [Set up facility branding](/docs/settings/set-up-facility-branding), then [Connect payment processing](/docs/settings/connect-payment-processing) if you bill online.
* **Front desk inviting customers:** Finish [Configure customer onboarding](/docs/settings/configure-customer-onboarding) and [Configure portal and website](/docs/settings/configure-portal-and-website) before sending public links. See [Facility Web Pages](/docs/facility-web-pages/overview). For printed login tents, see [Set up printable QR codes](/docs/settings/set-up-printable-qr-codes).
* **Hiring or updating staff:** Use [Manage team permissions](/docs/settings/manage-team-permissions) and [Review security settings](/docs/settings/review-security-settings). Each person should also set [their own profile and alerts](/docs/settings/manage-your-profile-and-alerts).
* **Any staff member who is stuck:** Use [Send help and feedback](/docs/settings/send-help-and-feedback) instead of guessing.
* **Shop floor / operations lead:** Use [Configure operations settings](/docs/settings/configure-operations-settings) and [Create operations workflows](/docs/settings/create-operations-workflows).
* **Sales or CRM lead:** Use [Configure CRM settings](/docs/settings/configure-crm-settings).
## Troubleshooting
**I cannot see Settings in the sidebar**
Your account may not have permission to open settings. Ask a team admin to review your access in [Settings > Team](https://www.carstoragesoftware.com/dashboard/settings/team). Only admins (or teammates with settings access) can change facility-wide options.
**A settings page says I need admin access**
Billing, branding, communications, and team invites usually require **admin** access. Ask an owner or manager to make the change, or to update your permissions.
**Customers see the wrong time zone or language**
Start with [Set up general facility settings](/docs/settings/set-up-general-facility-settings). Time zone and portal **Language** live there—not on the customer record.
**I changed branding but the portal still looks generic**
Complete [Set up facility branding](/docs/settings/set-up-facility-branding), then preview again from [Configure portal and website](/docs/settings/configure-portal-and-website). Open the customer login link in a **private** browser window so you are not signed in as staff.
**Not sure which guide to open**
Use the **Quick links by job** list above, or search the in-app docs from the **Help** area. Each guide focuses on one outcome so you do not have to read every page.
## What to do next
If this is your first time setting up the app, open the in-app [Setup Guide](https://www.carstoragesoftware.com/dashboard/onboarding) and continue with [Set up general facility settings](/docs/settings/set-up-general-facility-settings).
If your team is already using the app and you need to fix one area, choose the guide that matches your task from the list above.
## Related topics
- [Configure services and schedule settings](/docs/settings/configure-events-and-schedule-settings.md)
- [Events overview](/docs/events/overview.md)
- [Inbox overview](/docs/inbox/overview.md)
- [Contacts overview](/docs/contacts/overview.md)
- [Schedule overview](/docs/schedule/overview.md)
This documentation is built and hosted on [Mintlify](https://mintlify.com), a developer documentation platform.
***Your profile** is the last item in Settings. Every staff member uses it for their own alerts — not for the facility logo or billing.*
## Important words in plain English
**Customer portal** means the private area where customers sign in to see their cars, invoices, documents, messages, and events.
**Website & customer app** means the signed-in customer experience plus public links and pages you can place on your own website.
**Customer onboarding** means the public registration form and the guided steps new customers complete in the portal (contracts, uploads, payment, and more).
**Operations** means the repeatable work your team does every day, such as recurring vehicle care, intake checklists, status labels, and reserving bays or rooms.
**CRM** means the way your team tracks leads and customer follow-up. You do not need to know the term to use it. Think of it as your sales and relationship board.
**Passkey** means signing in with your device, such as Face ID, Touch ID, Windows Hello, or a security key.
**Admin** means a teammate who can access sensitive settings. Admin access should be limited to trusted owners or managers.
## Common setup mistakes to avoid
* Do not invite customers before the portal sections, logo, and billing settings are ready.
* Do not build workflows before the event types they use are correct.
* Do not give every staff member admin access. Most people only need access to the areas they work in.
* Do not send invoices until payment processing, tax settings, and invoice numbering are reviewed.
* Do not copy website links until you confirm the public page or portal page opens correctly.
## How-to guides in this section
* [Set up general facility settings](/docs/settings/set-up-general-facility-settings) — time zone, dates, country, and locations.
* [Configure events and schedule settings](/docs/settings/configure-events-and-schedule-settings) — services, plans, closed days, and reminders.
* [Set up facility branding](/docs/settings/set-up-facility-branding) — logo, colors, facility name, and theme.
* [Connect payment processing](/docs/settings/connect-payment-processing) — Stripe, fees, taxes, and invoices.
* [Configure communications](/docs/settings/configure-communications) — phone, text, email domain, reviews, and alerts.
* [Configure operations settings](/docs/settings/configure-operations-settings) — overview of service plans, workflows, statuses, and amenities.
* [Set up vehicle service plans](/docs/settings/set-up-vehicle-service-plans) — recurring care packages for stored vehicles.
* [Create operations workflows](/docs/settings/create-operations-workflows) — step-by-step checklists for intake, pickup, and similar jobs.
* [Manage custom statuses and amenities](/docs/settings/manage-custom-statuses-and-amenities) — job labels and bookable bays or rooms.
* [Configure customer onboarding](/docs/settings/configure-customer-onboarding) — public registration form and portal setup steps.
* [Configure portal and website](/docs/settings/configure-portal-and-website) — customer app layout, login links, booking box, and public pages.
* [Set up printable QR codes](/docs/settings/set-up-printable-qr-codes) — enable the catalog card, then print stable short-link codes for front desk and vehicle cards.
* [Connect HubSpot](/docs/settings/connect-hubspot) — sign in with HubSpot and keep facility customers in sync. Payments are not required.
* [Connect the API](/docs/settings/connect-api) — enable the catalog card, create a scoped key, and call `/api/v1`.
* [Connect AI agents (MCP)](/docs/settings/connect-ai-agents-mcp) — OAuth connector for Claude, Cursor, and other MCP clients.
* [Manage team permissions](/docs/settings/manage-team-permissions) — invite staff and choose safe access.
* [Configure CRM settings](/docs/settings/configure-crm-settings) — pipeline stages, customer types, and sources.
* [Review security settings](/docs/settings/review-security-settings) — passkeys and access habits.
* [Manage your profile and alerts](/docs/settings/manage-your-profile-and-alerts) — your photo, phone, event alerts, Face ID, and sign-out.
* [Send help and feedback](/docs/settings/send-help-and-feedback) — ask a how-to question, report a bug, or suggest a feature.
* [Export your facility data](/docs/settings/export-your-facility-data) — download cars, contacts, or events as a spreadsheet.
## Quick links by job
* **Owner / manager setting up the facility:** Start with [Set up general facility settings](/docs/settings/set-up-general-facility-settings), then [Set up facility branding](/docs/settings/set-up-facility-branding), then [Connect payment processing](/docs/settings/connect-payment-processing) if you bill online.
* **Front desk inviting customers:** Finish [Configure customer onboarding](/docs/settings/configure-customer-onboarding) and [Configure portal and website](/docs/settings/configure-portal-and-website) before sending public links. See [Facility Web Pages](/docs/facility-web-pages/overview). For printed login tents, see [Set up printable QR codes](/docs/settings/set-up-printable-qr-codes).
* **Hiring or updating staff:** Use [Manage team permissions](/docs/settings/manage-team-permissions) and [Review security settings](/docs/settings/review-security-settings). Each person should also set [their own profile and alerts](/docs/settings/manage-your-profile-and-alerts).
* **Any staff member who is stuck:** Use [Send help and feedback](/docs/settings/send-help-and-feedback) instead of guessing.
* **Shop floor / operations lead:** Use [Configure operations settings](/docs/settings/configure-operations-settings) and [Create operations workflows](/docs/settings/create-operations-workflows).
* **Sales or CRM lead:** Use [Configure CRM settings](/docs/settings/configure-crm-settings).
## Troubleshooting
**I cannot see Settings in the sidebar**
Your account may not have permission to open settings. Ask a team admin to review your access in [Settings > Team](https://www.carstoragesoftware.com/dashboard/settings/team). Only admins (or teammates with settings access) can change facility-wide options.
**A settings page says I need admin access**
Billing, branding, communications, and team invites usually require **admin** access. Ask an owner or manager to make the change, or to update your permissions.
**Customers see the wrong time zone or language**
Start with [Set up general facility settings](/docs/settings/set-up-general-facility-settings). Time zone and portal **Language** live there—not on the customer record.
**I changed branding but the portal still looks generic**
Complete [Set up facility branding](/docs/settings/set-up-facility-branding), then preview again from [Configure portal and website](/docs/settings/configure-portal-and-website). Open the customer login link in a **private** browser window so you are not signed in as staff.
**Not sure which guide to open**
Use the **Quick links by job** list above, or search the in-app docs from the **Help** area. Each guide focuses on one outcome so you do not have to read every page.
## What to do next
If this is your first time setting up the app, open the in-app [Setup Guide](https://www.carstoragesoftware.com/dashboard/onboarding) and continue with [Set up general facility settings](/docs/settings/set-up-general-facility-settings).
If your team is already using the app and you need to fix one area, choose the guide that matches your task from the list above.
## Related topics
- [Configure services and schedule settings](/docs/settings/configure-events-and-schedule-settings.md)
- [Events overview](/docs/events/overview.md)
- [Inbox overview](/docs/inbox/overview.md)
- [Contacts overview](/docs/contacts/overview.md)
- [Schedule overview](/docs/schedule/overview.md)
This documentation is built and hosted on [Mintlify](https://mintlify.com), a developer documentation platform.