> ## Documentation Index
> Fetch the complete documentation index at: https://www.carstoragesoftware.com/docs/llms.txt
> Use this file to discover all available pages before exploring further.
# Set up your facility name, logo, and colors
> Put your facility name, logo, and brand colors on invoices, emails, and your public website — all from Settings > General.
This guide helps you put your facility’s look on the paperwork and pages customers see. You will add your facility name, logo, and colors so invoices, emails, quotes, and your public website match your real brand.
Do this when you first open the software, when you change your business name, or when you want customer emails to look like they came from you — not from a generic form.
**This used to be its own page**
Branding is no longer a separate Settings page. It lives in [Settings > General](https://www.carstoragesoftware.com/dashboard/settings/general) under **Facility profile**. If you still have an old bookmark to [Settings > Branding](https://www.carstoragesoftware.com/dashboard/settings/branding), the software sends you to the same place.
## What you will accomplish
* Open [Settings > General](https://www.carstoragesoftware.com/dashboard/settings/general) and find **Facility profile**.
* Set the facility name customers already know.
* Upload a logo and choose primary and secondary colors.
* Add the people who can appear on your public website.
## Before you start
* You should be signed in as a team owner, manager, or admin.
* Have a logo file ready. A square PNG or JPG works well.
* Know your brand colors, or be ready to pick two colors that look good together.
* Know the street address and main phone number customers should use.
## Open Facility profile
From the [Dashboard](https://www.carstoragesoftware.com/dashboard), look at the **bottom of the left sidebar**. Click **Settings**.
You can also click your name at the bottom of the sidebar, then choose **Settings**.
In the Settings list, click **General**.
Direct link: [Settings > General](https://www.carstoragesoftware.com/dashboard/settings/general).
**Expected result:** The page title is **General**. The first block is **Facility profile**.
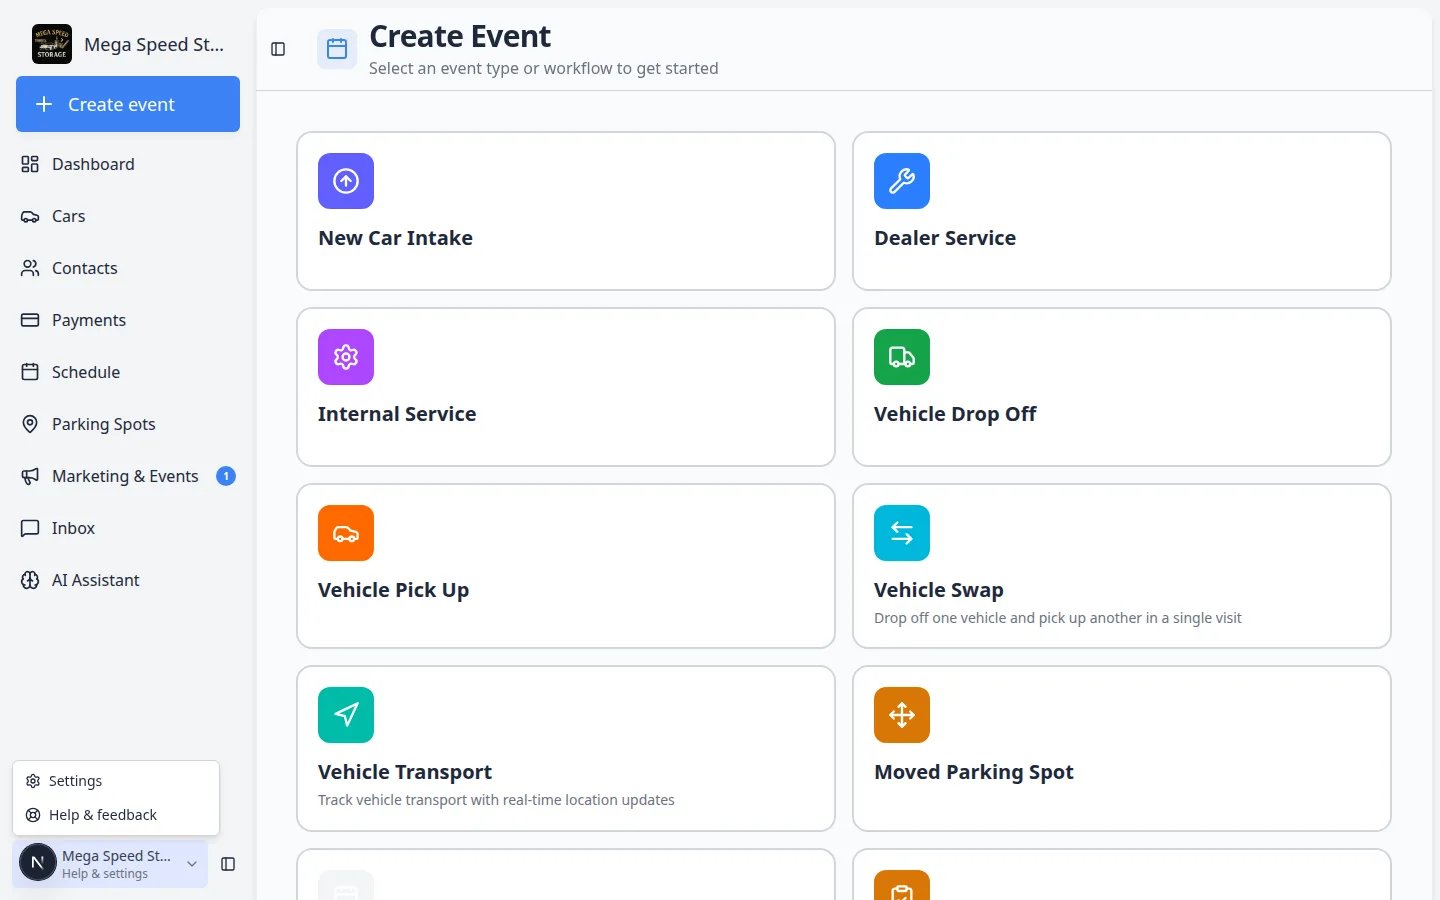 ***Settings** lives near the bottom of the left sidebar. Click it, then choose **General**.*
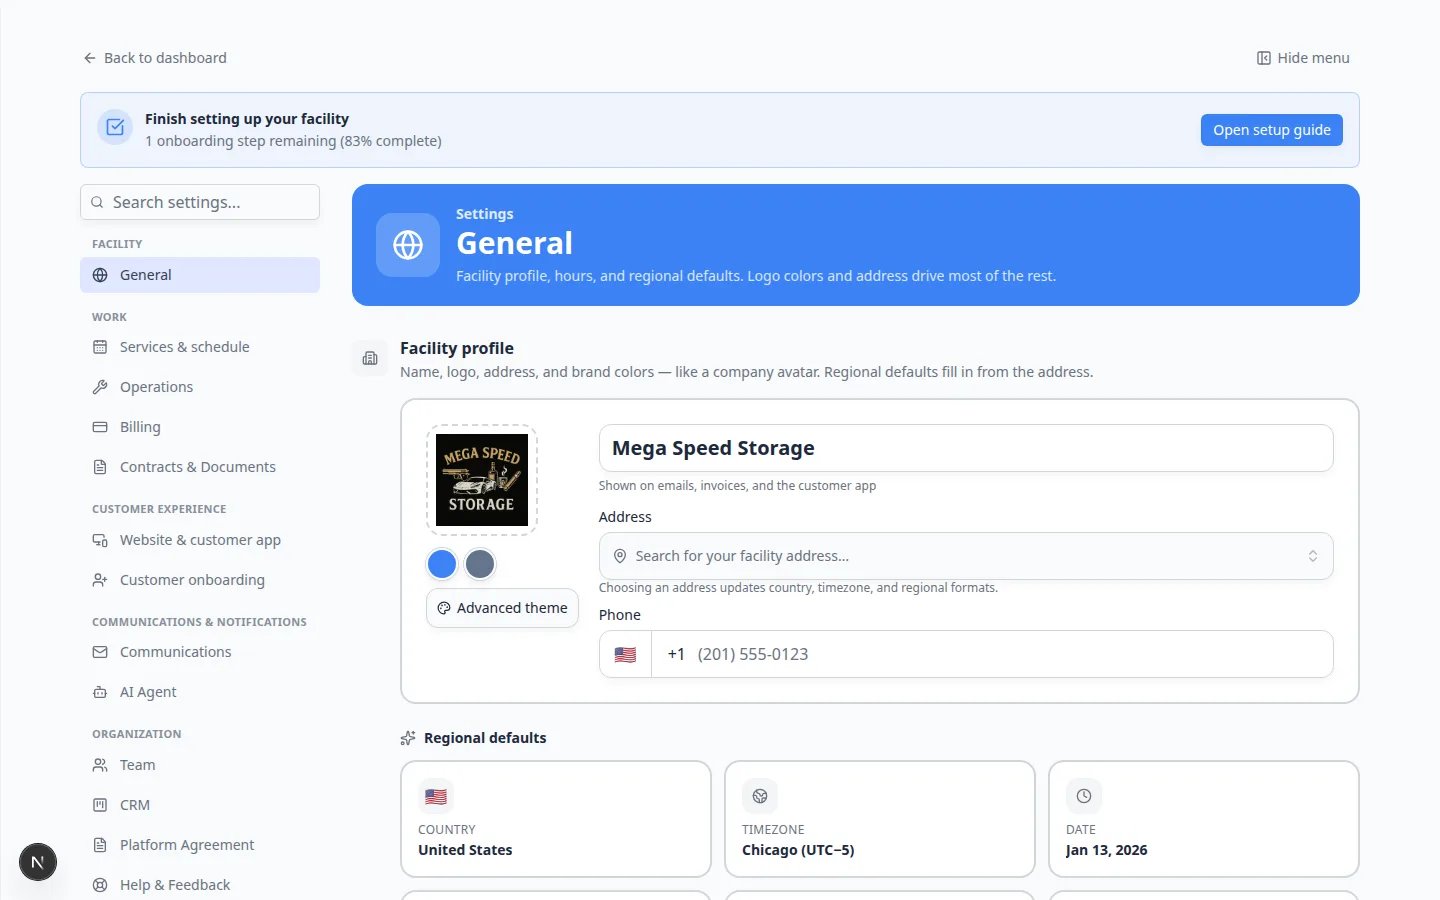 ***Facility profile** holds your name, address, phone, website, logo, and colors. This is the new home for branding.*
## Set your facility name and contact details
In the large name field (for example **Mega Speed Storage**), type the name customers already know.
Click outside the field to save.
**Why this matters:** This name appears on invoices, emails, quotes, and your public website. Use the name on your building sign, not a legal name customers never say out loud.
Click **Search for an address**. Start typing your street. Choose the matching row.
**Expected result:** Your city, state, and postal code fill in so invoices and maps stay accurate.
Fill in **Phone number** and **Website**. Use the number customers should call, and the website you want printed on invoices.
**Expected result:** These details travel with your logo on customer paperwork.
**The address search finds nothing**
Type the street number and street name first. If search still fails, you can type the address the way a customer would write it on an envelope.
## Upload your logo
In **Facility profile**, click the **Logo** square (or the image already there).
Select a PNG or JPG. A clear logo on a simple background looks best on invoices and emails.
**Expected result:** A preview of your logo appears in the **Logo** square. The color dots next to **Advanced theme** often update to colors from the logo.
**The logo looks tiny or stretched**
Try a larger file. Square logos often look cleaner in emails than very wide banners.
## Choose your colors
Click the **Primary color** swatch. Pick the main color from your logo or website.
**Expected result:** Buttons and highlights on your public pages use this color.
Click the **Secondary color** swatch. Pick a second color that still looks like you.
**Expected result:** The software uses this color next to the primary color so pages do not look flat.
**You do not need perfect brand guidelines**
Two colors that look good together are enough to start. You can change them later without rebuilding invoices that are already sent.
## Add the people who appear on your website
On the same **General** page, find **Website contacts**.
Click **Add a contact**, or click an existing card. Enter their name, title, email, and phone.
Use a role customers can call, such as **Member Services Manager**.
**Expected result:** A contact card appears. That person can show on your public website so customers know who to call.
***Facility profile** holds your name, address, phone, website, logo, and colors. This is the new home for branding.*
## Set your facility name and contact details
In the large name field (for example **Mega Speed Storage**), type the name customers already know.
Click outside the field to save.
**Why this matters:** This name appears on invoices, emails, quotes, and your public website. Use the name on your building sign, not a legal name customers never say out loud.
Click **Search for an address**. Start typing your street. Choose the matching row.
**Expected result:** Your city, state, and postal code fill in so invoices and maps stay accurate.
Fill in **Phone number** and **Website**. Use the number customers should call, and the website you want printed on invoices.
**Expected result:** These details travel with your logo on customer paperwork.
**The address search finds nothing**
Type the street number and street name first. If search still fails, you can type the address the way a customer would write it on an envelope.
## Upload your logo
In **Facility profile**, click the **Logo** square (or the image already there).
Select a PNG or JPG. A clear logo on a simple background looks best on invoices and emails.
**Expected result:** A preview of your logo appears in the **Logo** square. The color dots next to **Advanced theme** often update to colors from the logo.
**The logo looks tiny or stretched**
Try a larger file. Square logos often look cleaner in emails than very wide banners.
## Choose your colors
Click the **Primary color** swatch. Pick the main color from your logo or website.
**Expected result:** Buttons and highlights on your public pages use this color.
Click the **Secondary color** swatch. Pick a second color that still looks like you.
**Expected result:** The software uses this color next to the primary color so pages do not look flat.
**You do not need perfect brand guidelines**
Two colors that look good together are enough to start. You can change them later without rebuilding invoices that are already sent.
## Add the people who appear on your website
On the same **General** page, find **Website contacts**.
Click **Add a contact**, or click an existing card. Enter their name, title, email, and phone.
Use a role customers can call, such as **Member Services Manager**.
**Expected result:** A contact card appears. That person can show on your public website so customers know who to call.
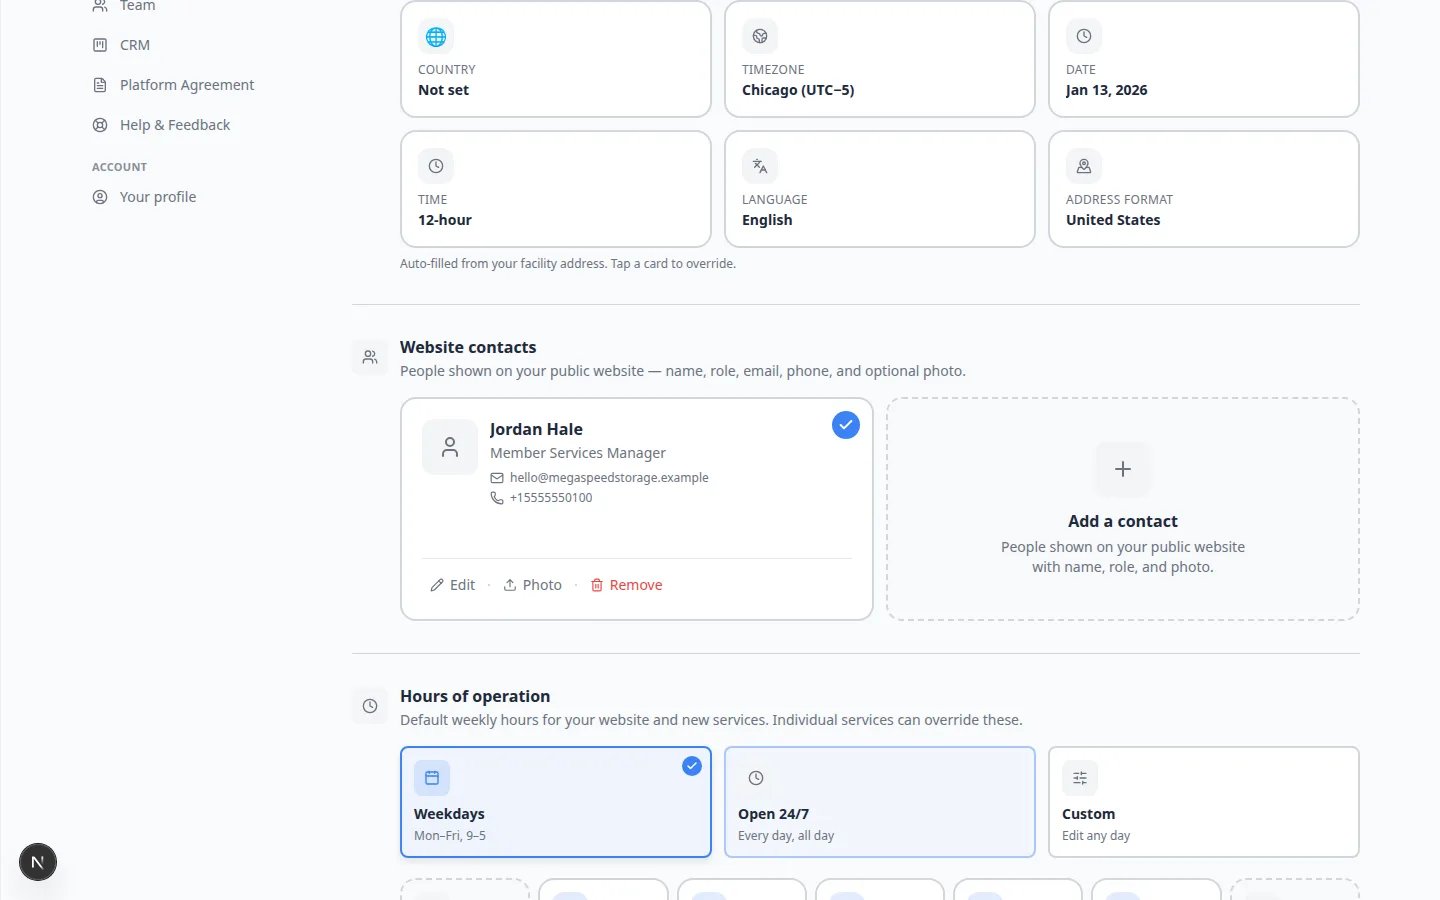 *Add the people customers should reach. These cards can appear on your public facility page.*
**Use a work email, not a personal one**
Customers may copy this address. A shared inbox such as **[hello@yourfacility.com](mailto:hello@yourfacility.com)** is easier to cover when someone is out.
## What success looks like
* Your facility name is the name customers already use.
* Your logo preview looks sharp, not blurry.
* Primary and secondary colors match your real brand.
* Phone and website are the ones you want printed on invoices.
* Website contacts list the right people.
## Troubleshooting
**I still see the old company name on an invoice**
Open a new invoice or send a test quote after you save. Older invoices keep the name that was on them when you created them.
**My old Branding bookmark goes somewhere else**
That is expected. [Settings > Branding](https://www.carstoragesoftware.com/dashboard/settings/branding) now opens [Settings > General](https://www.carstoragesoftware.com/dashboard/settings/general) and jumps to the branding fields.
**I cannot change Settings**
Ask a team admin to give you access. See [Manage team members and permissions](/docs/settings/manage-team-permissions).
## What to do next
* Finish hours and closed days in [Set up general facility settings](/docs/settings/set-up-general-facility-settings).
* Connect payments in [Connect payment processing](/docs/settings/connect-payment-processing) before you send a live invoice.
* Preview customer-facing pages in [Configure portal and website](/docs/settings/configure-portal-and-website).
## Related topics
- [Configure portal and website](/docs/settings/configure-portal-and-website.md)
- [Configure communications](/docs/settings/configure-communications.md)
- [Configure customer onboarding](/docs/settings/configure-customer-onboarding.md)
- [Set up your facility profile](/docs/basics/set-up-your-facility-profile.md)
- [Set up general facility settings](/docs/settings/set-up-general-facility-settings.md)
This documentation is built and hosted on [Mintlify](https://mintlify.com), a developer documentation platform.
*Add the people customers should reach. These cards can appear on your public facility page.*
**Use a work email, not a personal one**
Customers may copy this address. A shared inbox such as **[hello@yourfacility.com](mailto:hello@yourfacility.com)** is easier to cover when someone is out.
## What success looks like
* Your facility name is the name customers already use.
* Your logo preview looks sharp, not blurry.
* Primary and secondary colors match your real brand.
* Phone and website are the ones you want printed on invoices.
* Website contacts list the right people.
## Troubleshooting
**I still see the old company name on an invoice**
Open a new invoice or send a test quote after you save. Older invoices keep the name that was on them when you created them.
**My old Branding bookmark goes somewhere else**
That is expected. [Settings > Branding](https://www.carstoragesoftware.com/dashboard/settings/branding) now opens [Settings > General](https://www.carstoragesoftware.com/dashboard/settings/general) and jumps to the branding fields.
**I cannot change Settings**
Ask a team admin to give you access. See [Manage team members and permissions](/docs/settings/manage-team-permissions).
## What to do next
* Finish hours and closed days in [Set up general facility settings](/docs/settings/set-up-general-facility-settings).
* Connect payments in [Connect payment processing](/docs/settings/connect-payment-processing) before you send a live invoice.
* Preview customer-facing pages in [Configure portal and website](/docs/settings/configure-portal-and-website).
## Related topics
- [Configure portal and website](/docs/settings/configure-portal-and-website.md)
- [Configure communications](/docs/settings/configure-communications.md)
- [Configure customer onboarding](/docs/settings/configure-customer-onboarding.md)
- [Set up your facility profile](/docs/basics/set-up-your-facility-profile.md)
- [Set up general facility settings](/docs/settings/set-up-general-facility-settings.md)
This documentation is built and hosted on [Mintlify](https://mintlify.com), a developer documentation platform.