What you will accomplish

After reading this overview, you will know which Parking Spots guide to open first, how map view and table view differ, and how reservations differ from cars that are physically parked.

When to use Parking Spots

Your team can answer one important question quickly: Where is each car right now? Use the Parking Spots page from the left sidebar whenever a car moves in your building. Parking Spots connects your real floor layout to your customer and vehicle records. When the map stays current, staff find cars faster, avoid putting two vehicles in the same space, and see which areas still have room. This section is written for anyone who parks, moves, or retrieves vehicles—front desk staff, valets, porters, and facility managers. You do not need technical skills. If you can read a floor map and click a spot, you can use Parking Spots.
Who should use this pageAny team member who parks, moves, or retrieves vehicles should use Parking Spots. Facility managers usually set up the map first in Set up parking spots and zones.
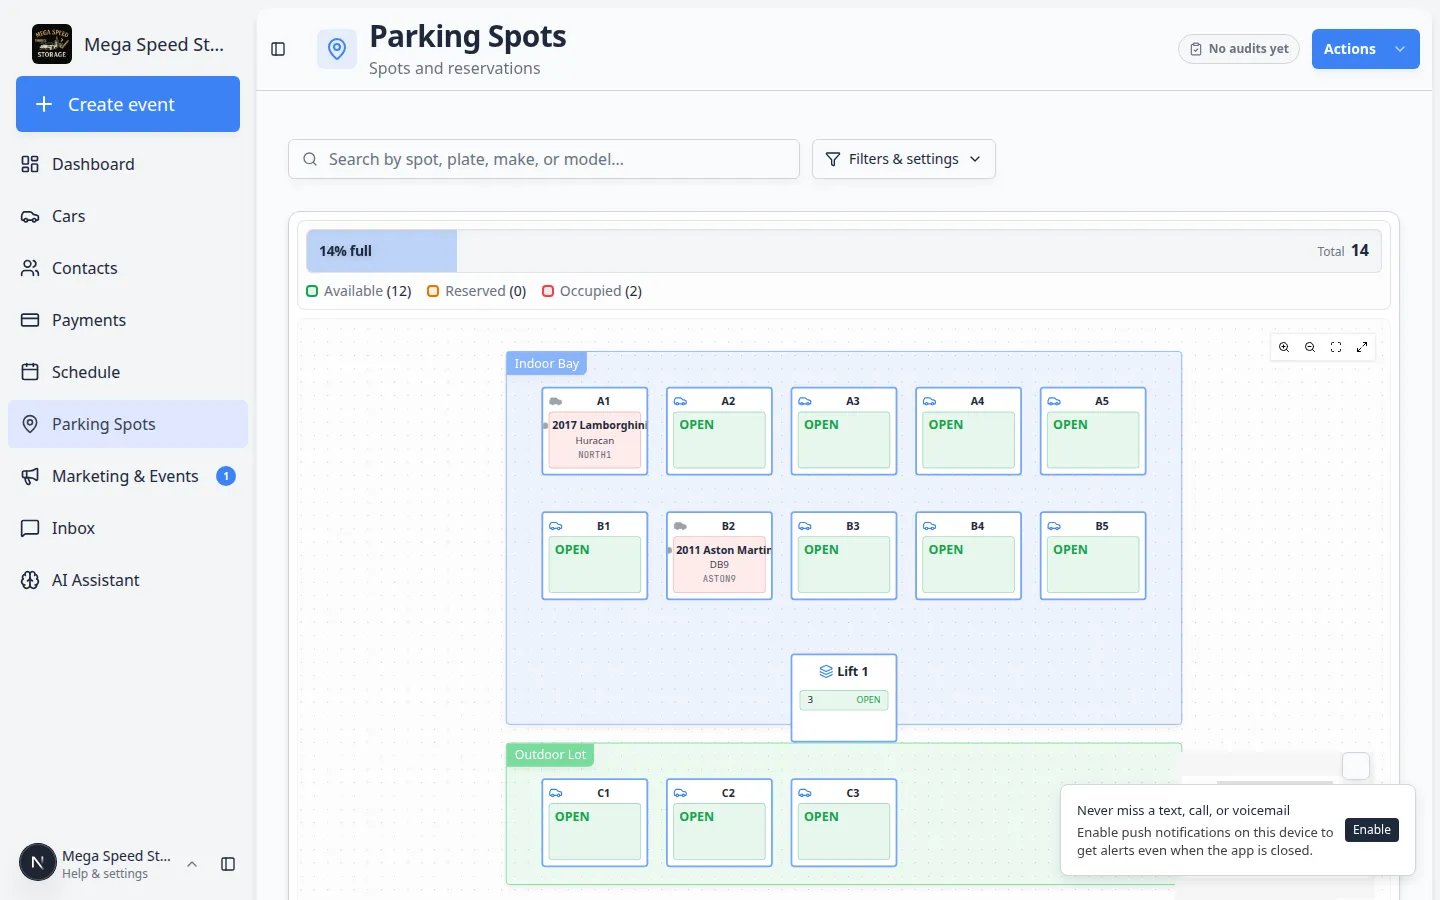
Parking Spots page showing a facility map with named parking spots, occupied and reserved spaces, zones, and availability counts
The Parking Spots page shows your facility map, current vehicle locations, reserved spaces, and spot availability in one place.

Three questions Parking Spots helps you answer

Where is this car right now? Search by plate, customer, or spot name on Parking Spots. The map and table should match what staff see on the floor.Do we still have room? Read the occupancy bar (Available, Reserved, Occupied) before you promise a spot to a customer.How long was it parked here? Open Parking Spots Report when you need history for billing, a customer question, or an internal audit.

Read the occupancy bar at the top

Just above the map (or table), look for a short summary line. It usually shows:
  • A percent full number (for example 14% full)
  • Available — spots with no car parked there and no active hold showing on the map
  • Reserved — spots held for a future arrival (when your team uses reservations)
  • Occupied — cars physically parked right now (the map may also say Present on a spot)
Why this helpsGlance at the counts before you promise a spot to a customer. If Available is low during a busy week, your team knows to search another row or zone before walking the building.
Reserved on the bar vs Reserved in the tableThe occupancy bar counts spots that are held for someone right now. In Table view, the Reserved Car and Reserved Customer columns show who a spot is held for. Use both: the bar for a quick total, the table when you need a name. See Reserve a parking spot.
Expected result: The numbers change when someone assigns a car, saves a reservation, or moves a vehicle. They should match what you see on the map.

Search from the top of the page

The search box at the top works in both Map and Table view. The placeholder says: Search by spot, plate, make, or model… Type a spot name (for example A1), a license plate, a make or model, or a customer-related match. Press Enter or pick a suggestion to jump to that spot on the map or narrow the table. For step-by-step search help, see Find parking spots and available spaces.

What you can do from Parking Spots

  • Create named spots such as A1, A2, Front Row 3, or Lift 1.
  • Group flexible areas into zones, such as Main Storage, Outdoor Lot, or Service Area.
  • Assign a vehicle to a spot or move it when the physical car moves.
  • Reserve a spot for a customer or car before the vehicle arrives.
  • Record when a car leaves for an outside vendor (transport, detail, mechanical work).
  • Search the map or switch to table view when you need to find a spot quickly.
  • Open the parking report to review which cars occupied which spaces during a date range.
  • Run a parking audit to walk spots and zones and fix mismatches before they become pickup problems.

Open Parking Spots

1

Sign in to the dashboard

Use your staff login. Customer portal logins do not include Parking Spots.
2

Click Parking Spots in the sidebar

In the left sidebar, click Parking Spots. You can also go directly to Parking Spots.Expected result: The page title says Parking Spots and you see either the facility map or a table of spots.
3

Use Actions when you need a tool

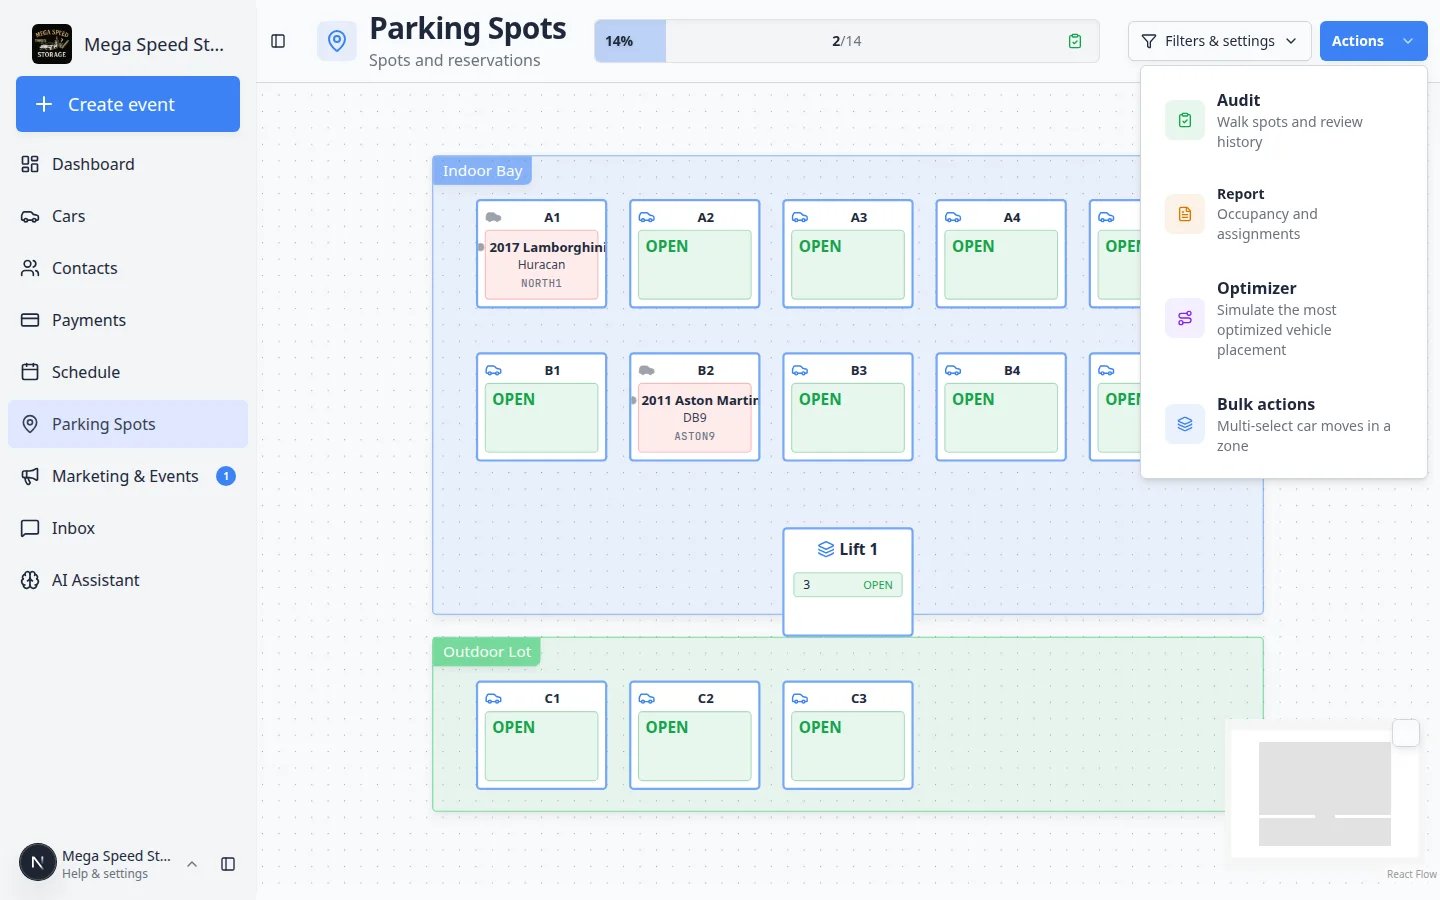
Click the blue Actions button. Audit starts a lot walk. Report opens parking history. Admins edit the map in Settings > Floor Plan (or Edit parking map on Settings > Operations).Expected result: You see Parking Spots as the page title, a search bar, Filters & settings, and Actions.
Parking Spots header with Actions menu open showing Audit, Report, Optimizer, and Bulk actions
Use Actions for Audit (walk the lot) and Report (history). Daily parking work still happens on the map or table below.

When a car arrives from Schedule

Many cars enter storage after a drop-off or intake appointment on Schedule. Parking Spots and Schedule work together: the calendar tells you when the car is coming; Parking Spots tells everyone where it ended up.
1

Finish or start the scheduled event

Open Schedule and find today’s drop-off or intake. When the vehicle is physically in the building, mark the event In progress or Completed if your team uses those statuses.Why this matters: Staff who only watch the calendar know the car arrived. Staff who only watch the map know where it is parked. Both updates help the whole team.
2

Assign the parking location right away

If your event type asks for parking at the end of the visit, click Open Event on Schedule and follow Assign parking during a Schedule event. Otherwise go to Parking Spots and follow Assign a parking spot.Expected result: The map shows the car as Present or Occupied. The car record shows Spot: or Zone: at the top.
3

Clear a reservation if one was waiting

If the spot was Reserved before arrival, confirm Currently Parked shows Present after you assign the car. Use Reserve a parking spot to clear or edit the hold if the plan changed.
Make this a team habitTrain porters and front desk staff: car moves in the building → update Parking Spots before the end of the shift. That one habit keeps the map, Schedule, and parking report trustworthy.

Start with the right guide

1

Set up the facility layout first

If this is a new workspace, start with Set up parking spots and zones. This creates the spot names and map layout your team will use later.
2

Assign cars as they enter storage

Use Assign a parking spot when a car arrives, moves to another spot, or needs its record corrected. If your team finishes drop-offs from Schedule, use Assign parking during a Schedule event so parking is recorded when the visit ends.
3

Find the right spot before you change anything

Use Find parking spots and available spaces when the facility is busy and you need to search by spot name, car, customer, plate, or occupancy.
4

Use zones for flexible parking areas

Use Work with zones on the map when cars park in outdoor lots or overflow lanes without exact spot numbers.
5

Reserve space before the car arrives

Use Reserve a parking spot when a customer has an approved spot but the vehicle is not physically parked there yet.
6

Assign parking when a Schedule visit ends

Use Assign parking during a Schedule event when your event types ask for a spot at the end of intake or drop-off workflows.
7

Track cars at outside vendors

Use Send a car to an outside vendor when a vehicle leaves for transport, detail, or repair off-site.
8

Walk the lot on a schedule

Use Run a parking audit when you need to confirm every space—not just the car that just arrived.
9

Review history and occupancy

Use Review the parking report when you need a date-based list of parking activity for operations, billing review, or an internal audit.

Map view and table view

The Parking Spots page has two useful views:
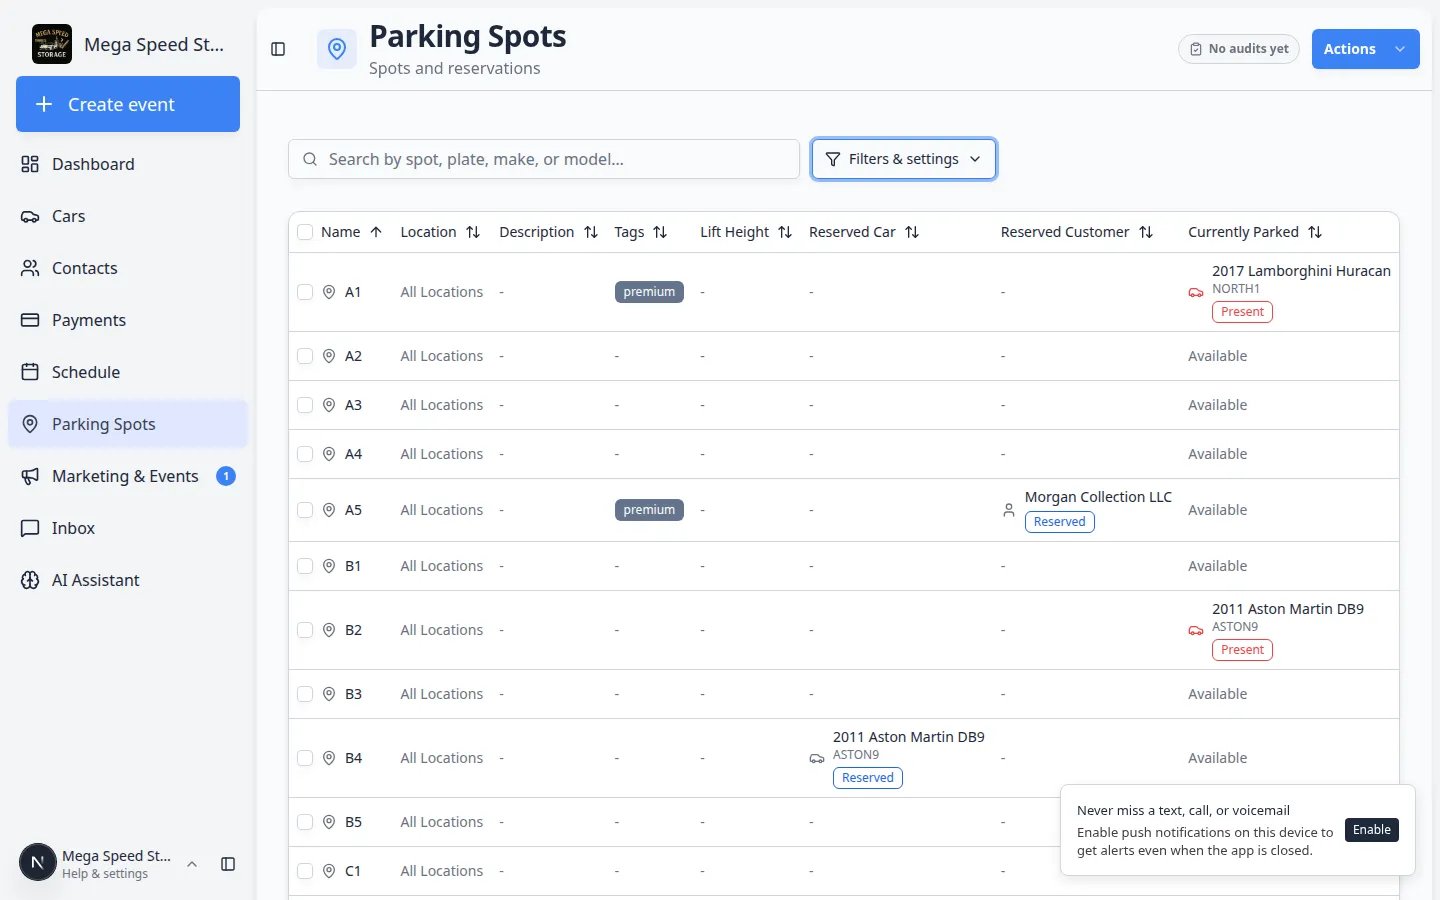
Map view shows the floor plan. Use it when you want to understand the facility visually or click a spot on the map.Table view shows rows and columns. Use it when you want to sort, scan many spots, reserve a spot from the row menu, or select multiple spots to delete.
1

Open Parking Spots

Click Parking Spots in the left sidebar, or go to Parking Spots.
2

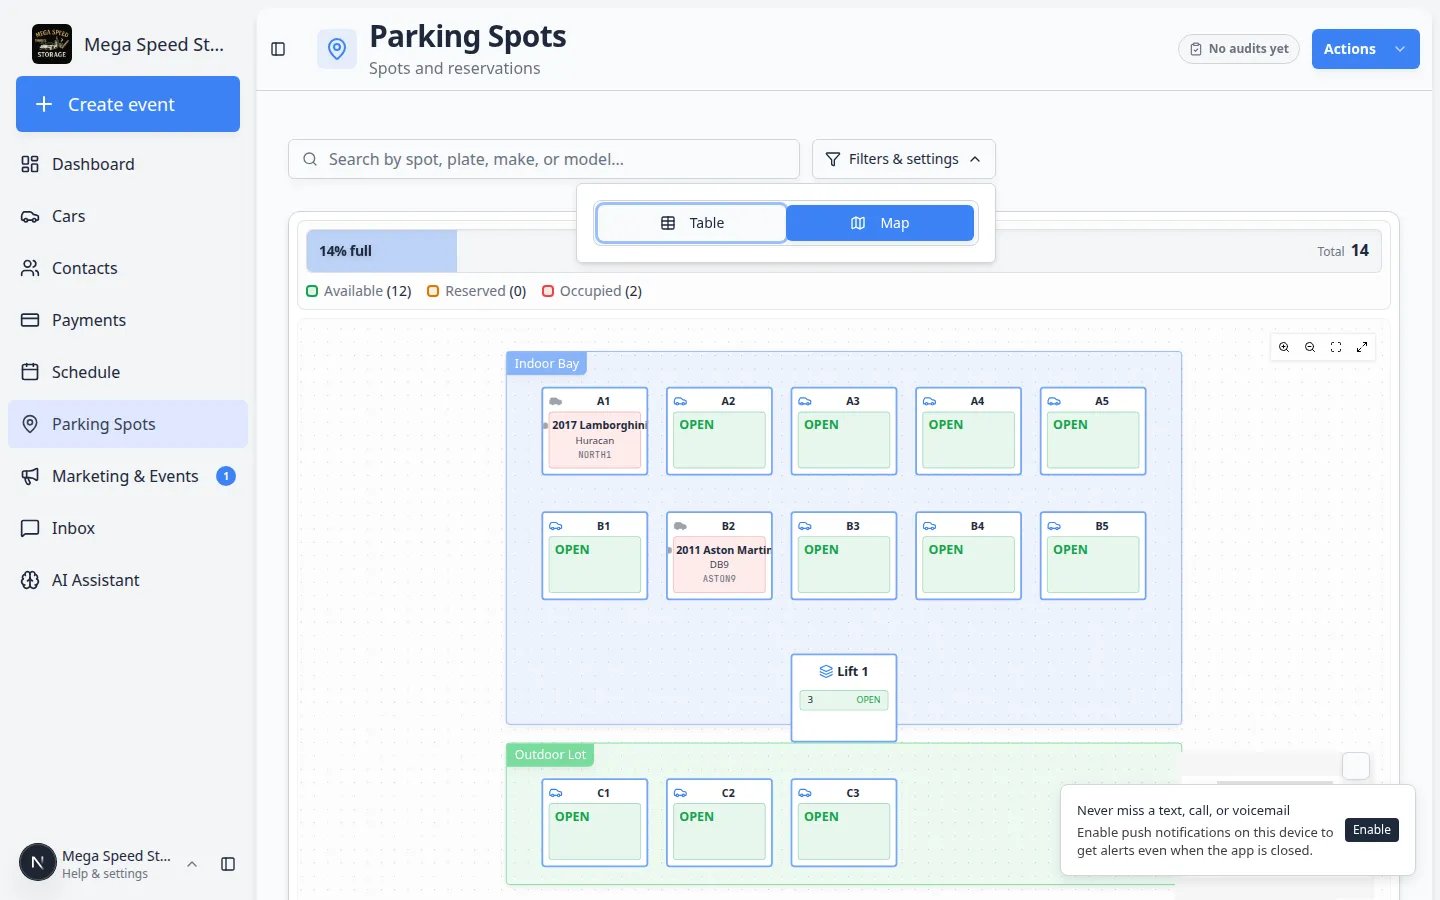
Open Filters & Settings

Near the top of the page, click Filters & Settings.
3

Choose Map or Table

Under the view options, click Map to see the floor plan, or Table to see a sortable list of every spot.Tip: The Table / Map buttons live inside the filters & settings panel—not on the main toolbar. Open that panel first if you do not see them.
4

Close Filters & Settings

Click outside the panel or press Escape to return to the main page.
Filters and Settings panel on Parking Spots showing Map and Table view buttons and display options
Filters & Settings is where you switch between Map and Table view and control how much of the floor plan you see.
Parking Spots table view listing spot names, reserved customers, currently parked vehicles, and status
Table view helps you scan many spots at once, sort columns, and use row actions such as Reserve Spot.

Expected result

You can switch between a visual map and a detailed list without losing your place. Both views show the same parking information.

Helpful terms

Parking spot means one exact place where a vehicle can be assigned, such as A1 or B4.Zone means a larger flexible area (for example Outdoor Lot or Indoor Bay) where a car can be assigned without a numbered spot. The map shows the zone as a colored background behind the spots.Lift spot means a stacked parking space. One lift position can hold more than one vehicle, such as ground level and upper level. Levels can be labeled with numbers (1, 2, 3) or letters (A, B, C), depending on how your facility marks them.Reservation means a spot is held for a customer or car, but the car may not physically be there yet.Present (or Occupied) means the car is physically parked in that spot now.Available means no car is parked there and no reservation is showing for that spot.Vendor (on the car record) means the vehicle is at an outside company—not in a facility spot or zone.

Lift spots, zones, and numbered spots

  • Numbered spot: Use when staff need an exact location such as A1 or B4 for retrieval and customer communication. The map shows each spot as its own labeled box.
  • Lift spot: Use when one physical lift holds two or more cars. Each level can show Occupied or Reserved separately. Set up lifts in Set up parking spots and zones.
  • Zone: Use when cars park anywhere inside a larger area (outdoor lot, service lane, overflow). Assign the car to the zone from the car record or map when an exact spot number is not required. A car in Outdoor Lot may not have a numbered spot but still appears on the map inside the green zone area.
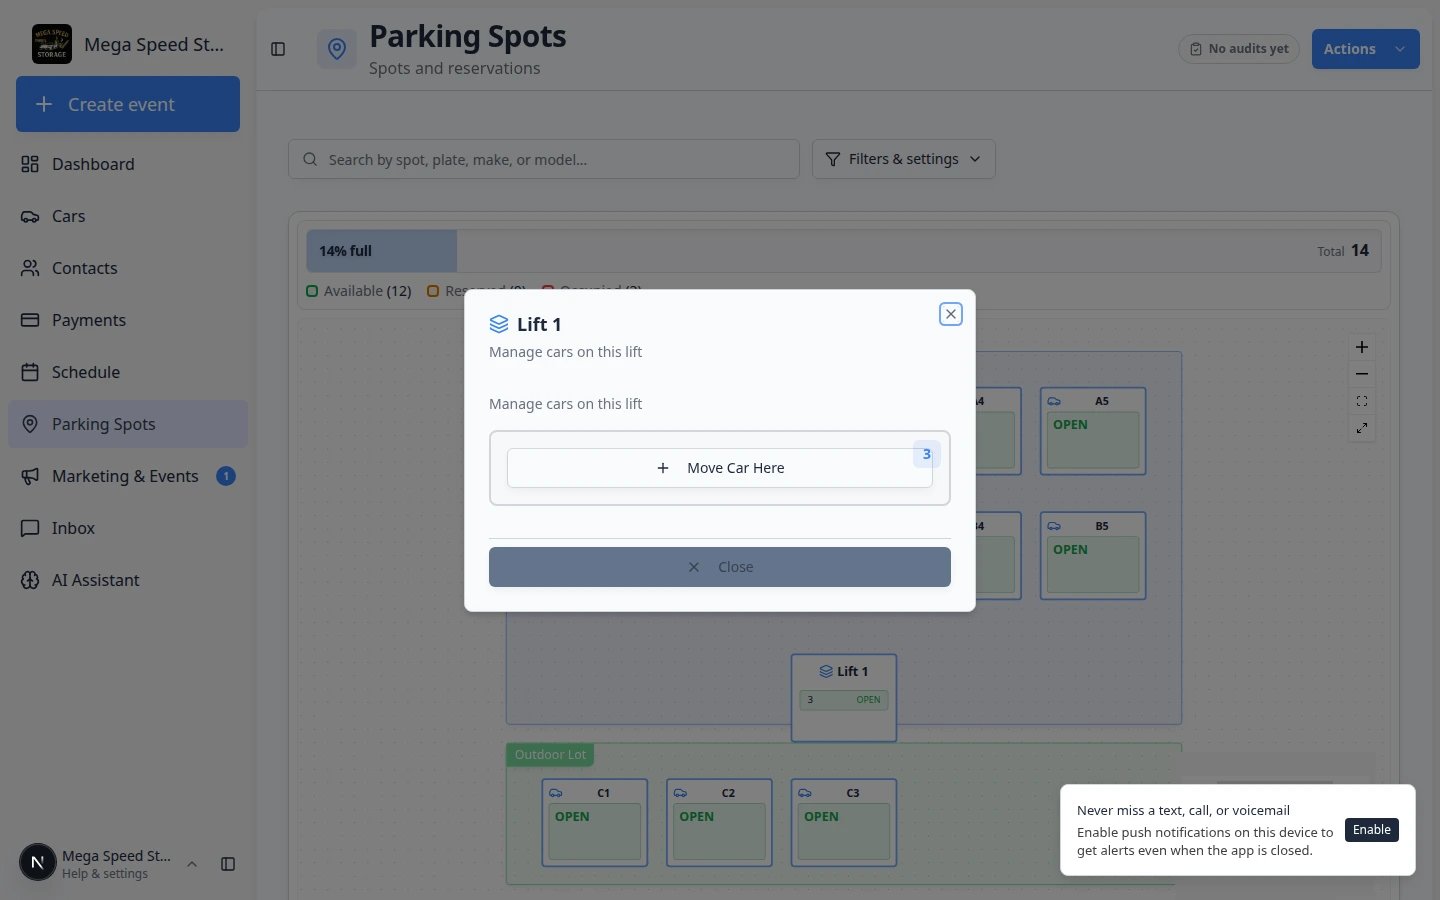
Lift 1 parking spot dialog on the map showing options to manage cars on the lift
Lift spots can hold more than one vehicle. Open Lift 1 (or your lift name) and check each level before you assign or move a car.
Reserved vs Present on the same mapOn a busy day your map may show Present cars (physically parked), Reserved spots (held for someone arriving later), and Available open spaces at the same time. Table view is the fastest way to scan all three—see Find parking spots and available spaces and Reserve a parking spot.

Keep the map trustworthy

The map is most useful when your staff updates it at the same time they move the car in the real facility.
  • Update the record right after a car is parked or moved.
  • Use clear spot names that match signs, floor labels, or your team’s normal language.
  • Use zones for flexible areas where cars move around often.
  • Review the parking report regularly to catch stale or missing assignments.
1

Day 1 — Build the map

Follow Set up parking spots and zones so spot names match your building.
2

Day 2 — Park the first cars

Use Assign a parking spot each time a vehicle moves in the facility.
3

Day 3 — Teach search habits

Share Find parking spots and available spaces so staff can search by plate, customer, or spot name.
4

Before busy arrivals

Use Reserve a parking spot when a space is promised but the car is not there yet.
5

Weekly check-in

Run Run a parking audit so the map matches the floor, then open Review the parking report if you need history for billing.

How parking connects to events and intake

Some workflows ask staff to park a car while finishing an appointment—for example after storage intake or a dealer drop-off.
1

Set the event to ask where the car is going (admin setup)

In Settings > Events & schedule, open the event type (for example Storage Intake). Under When this event completes, choose Ask where the car is going and leave Parking spot or zone checked.Read Configure event types for the full setup path.
2

Finish the event on Schedule

When staff complete the appointment on Schedule, the app can open Assign Parking Location and ask where the car should go.
3

Confirm on the map

After staff save, the car should appear on Parking Spots in the spot or zone they chose.Expected result: You do not need a second manual update if staff completed the parking step during the event.
Pickup events can clear a spot with no promptFor events where the car simply leaves — Vehicle Pickup, say — set When this event completes to Mark it as gone instead. Staff fill in nothing: finishing the event frees the spot and the map shows it open again. This works however the event is completed, including dragging it to Completed on the calendar. Set it on the same event type screen in Settings > Events & schedule.

Mark a spot out of service (inactive)

When a bay is blocked for repair, construction, or safety, do not just tell staff to avoid it—mark the spot Inactive in Settings > Floor Plan so it is clear in Table view.
  • Open the spot in the floor plan editor and turn Active off (or use Edit Selected Spots).
  • In Table view, the Status column shows Inactive for that row.
  • Do not assign or reserve inactive spots until the bay is ready again.
Parking Spots works closely with other parts of the app:
  • Cars — every vehicle should link to a customer and show a parking location on its record.
  • Contacts — customer names appear on reservations and the parking report.
  • Payments — the parking report helps confirm how long a car was stored before billing.
  • Schedule — drop-offs and pickups on the calendar should match where cars are parked on the map.

How-to guides in this section

What success looks like

When Parking Spots is working well for your facility:
  • Staff can answer “where is this car?” in seconds using search or the map.
  • Reserved spots are clearly marked before customers arrive, so two cars are never promised the same space.
  • The map legend counts (Available, Reserved, Occupied) match what staff see on the floor.
  • Off-site cars show Vendor: on the record—not a misleading spot on the map.
  • The parking report shows believable history because moves are recorded when they happen.
  • A recent parking audit shows a high accuracy score, and overdue walks are easy to see from Actions.

Troubleshooting

I do not see Parking Spots in the sidebarYour account may not have permission to open parking features. Ask your facility owner or manager to confirm your role includes parking access in Settings > Team, then sign out and back in.
The map is empty but we have spots in settingsAn admin should open Settings > Floor Plan, confirm spots appear on the canvas, and click Save Floor Plan. Then refresh Parking Spots. New facilities start with Set up parking spots and zones.
The map does not match the real buildingStaff must update the app when cars move. Train the team on Assign a parking spot and review the parking report weekly to catch stale locations.
Not sure which guide to openUse the Quick links by job table at the top of this page, or search the in-app docs from Help in the dashboard.

What to do next