

What you will accomplish
You will enter and update insurance and registration details on a car record so anyone on your team can answer customer and insurer questions from one screen. Storage and service facilities often need this information for:- Proof of coverage before accepting a vehicle
- Annual inspections or registration renewals
- Lien holder notifications when a financed car is stored or sold
When to use this guide
- A vehicle arrives for storage and the customer hands you an insurance card.
- Your insurer or lawyer asks for policy numbers or expiration dates.
- Registration or plate stickers are due soon and you want the date on the record.
- The car has a loan and you need the lien holder name on file.
Before you start
- Open the correct car from Cars.
- Have the customer’s insurance card, registration paperwork, or lien paperwork nearby (paper or photo on your phone).
- Know your facility’s rule: some teams require insurance on file before the first day of storage.
Enter insurance details
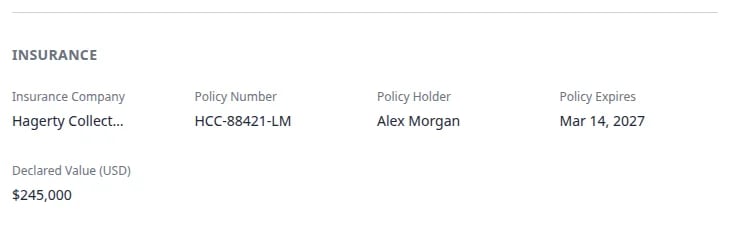
Insurance fields live in the Insurance block inside Vehicle Details.1
Open the car record
From Cars, click View on the vehicle.Expected result: You see the year, make, and model banner at the top.
2
Scroll to Insurance
In Vehicle Details on the left, scroll until you see the heading Insurance.Expected result: You see empty fields or existing values for company, policy number, holder name, and expiration.
3
Fill in Insurance Company
Click Insurance Company and type the name from the insurance card (for example Hagerty Collector Car Insurance or State Farm).Click away or press Tab to save. A brief “saved” indicator may appear on the field.Why this matters: The company name is what staff search for when a customer says “It’s through Hagerty.”
4
Add Policy Number and Policy Holder
Enter Policy Number exactly as printed on the card.Enter Policy Holder as the name on the policy (often the customer, sometimes a spouse or business).Expected result: Both values stay on the record after you click away from each field.
5
Set Policy Expires
Click Policy Expires and choose the expiration date from the calendar picker.Use the date on the insurance card—not today’s date.Expected result: The formatted date appears in the field (your facility’s date format may show as MM/DD/YYYY or DD/MM/YYYY).
6
Review Declared Value when needed
In the same Insurance section you may see Declared Value. This is the dollar amount your facility uses for insurance conversations.Enter the value the customer declared, or the amount your team agreed to store. This is separate from marketplace asking price.Expected result: Declared value saves on the record and may appear next to market data if your facility uses Classic.com charts. See View and edit vehicle details.
Enter registration and lien holder details
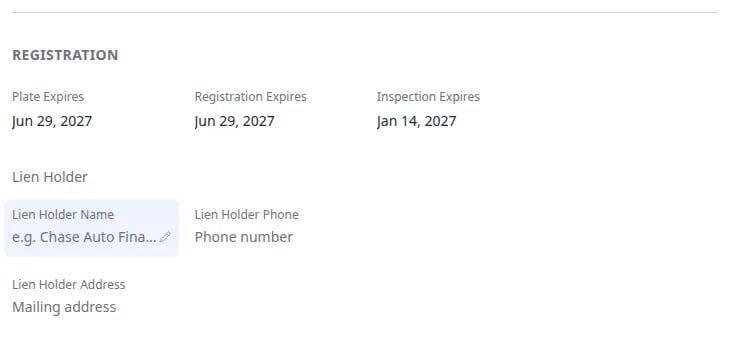
Below Insurance, find the Registration block. Field labels may vary slightly by country (for example Registration vs Rego), but the idea is the same: track plate and registration expirations.1
Scroll to Registration
Continue down Vehicle Details to the Registration heading.Expected result: You see date fields for plate and registration expirations, plus Lien Holder fields when the car is financed.
2
Set Plate Expires and Registration Expires
Enter the dates from the customer’s registration paperwork or plate stickers.
- Plate Expires — when the license plate tab or sticker expires.
- Registration Expires — when the vehicle registration itself expires (wording may match your region).
3
Add lien holder information when the car is financed
If a bank or finance company holds the title, scroll to Lien Holder inside the same block.Fill in:
- Lien Holder Name (for example Chase Auto Finance)
- Lien Holder Phone
- Lien Holder Address
Use insurance status on the Cars list
When expiration dates are filled in, the Cars list can surface vehicles that need attention.1
Open Filters & settings
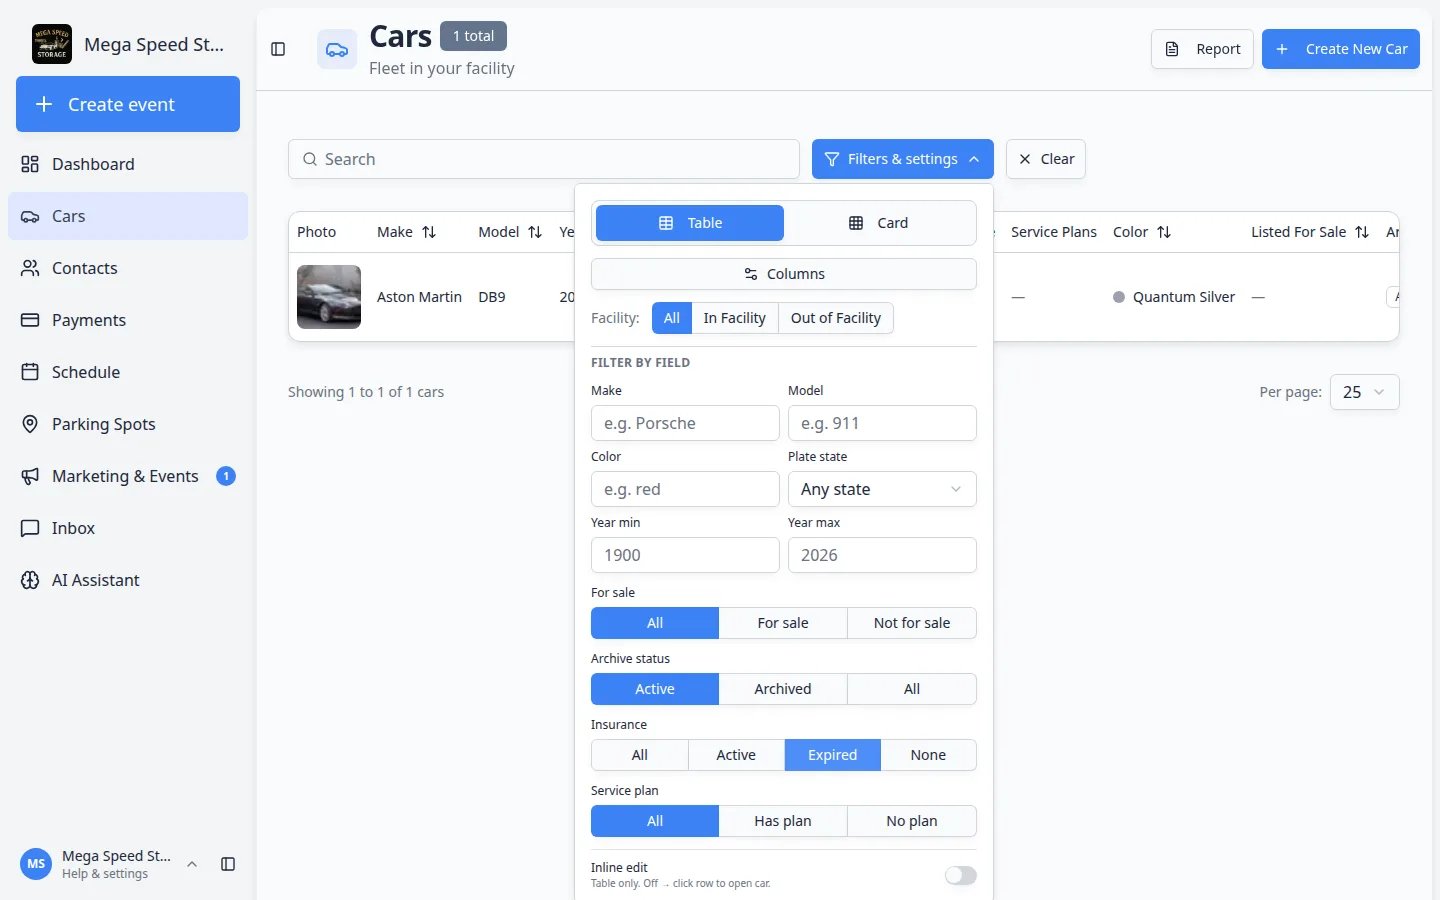
Go to Cars and click Filters & settings near the search bar.
2
Choose an Insurance filter
In the panel, find the row labeled Insurance. The buttons are:
- All — every car, no insurance filter
- Active — a policy expiration date is on file and it has not passed
- Expired — the policy expiration date is in the past
- None — no insurance expiration date is saved
3
Clear the filter when you are done
Click All on the Insurance row, or click Clear next to Filters & settings.Expected result: The full vehicle list returns.For more list tips, see Find and filter cars.
Upload proof documents when you have files
Insurance cards and registration slips are often uploads, not signed contracts.- On the car record, open Add → Upload document (requires a linked customer).
- Choose the document type your facility uses for insurance or registration scans.
- Ask the customer to upload through the portal when you use Help customers upload documents in the portal.
Common mistakes to avoid
Troubleshooting
What to do next
- Keep battery and mileage current with Record battery care and vehicle readings.
- Keep vehicle specs current with View and edit vehicle details.
- Store scanned cards with Upload a document for a customer.
- Return to the Cars overview.