What you will accomplish
- Find the correct event on Schedule.
- Change the time, assignee, vendor, duration, notes, or status when plans shift.
- Use Open Event for floor work (photos, checklists)—see Run event workflow from Schedule.
- Save changes so everyone sees the same updated plan.
- A customer asks for a later pickup time.
- A staff member is out, so the event needs a new assignee.
- The appointment will take longer than expected.
- Notes need to be clearer for the team.
- A vendor should be attached to the event.
Before you start
- Open Schedule.
- Find the event you want to change. If you are unsure how to find it, see Find and filter scheduled work.
- Confirm you are editing the correct customer, vehicle, and event type — not a similar-looking event nearby.
- Know the new time, assignee, vendor, duration, or notes before saving.
- If the customer has already been notified, be extra careful with time changes — the customer may receive an updated notification.
Change status from the event panel (without opening Edit Event)
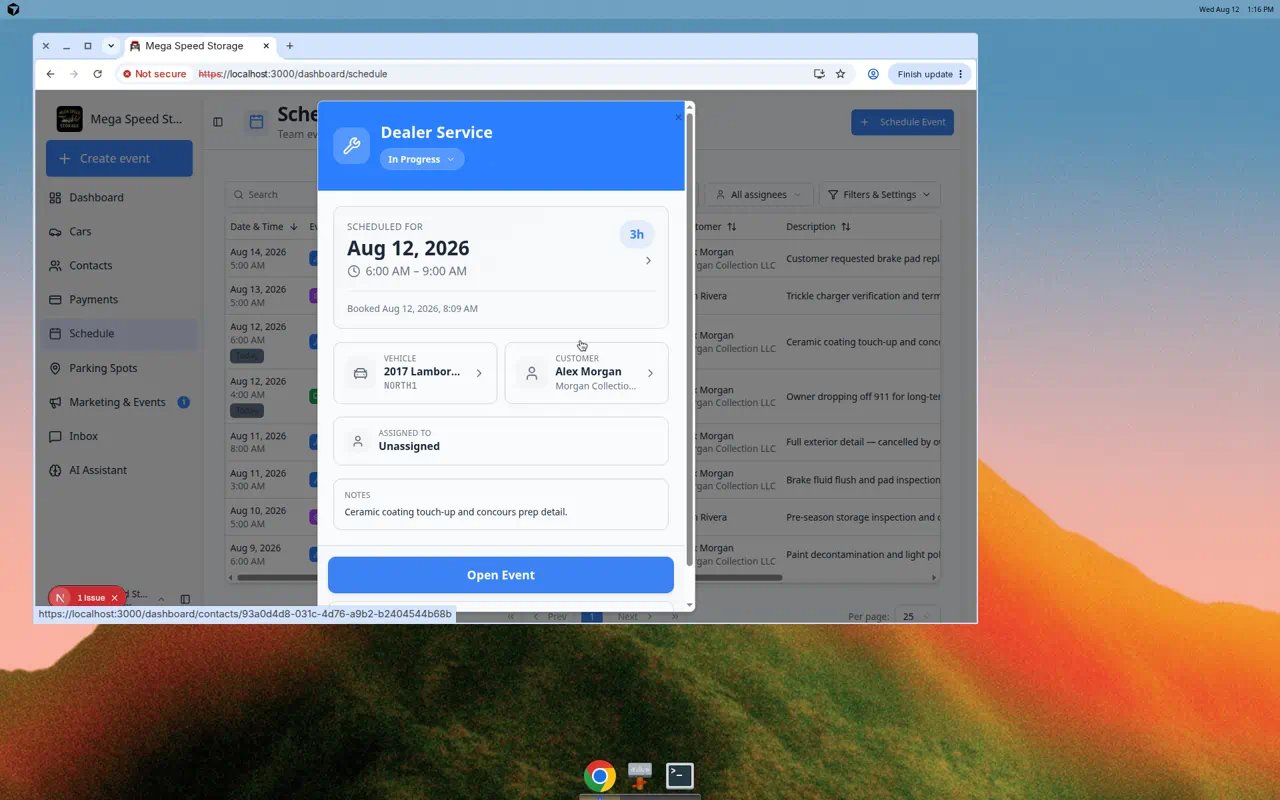
For quick updates, use the status control at the top of the event detail panel (next to the event title).1
Click the event
Open the event on Schedule.
2
Open the status menu
Click the current status label (for example Scheduled or In Progress).Expected result: A list of allowed statuses appears, such as To Do, In Progress, Complete, or custom names your team configured.
3
Pick the new status
Choose the status that matches reality right now.Expected result: The event updates on the calendar and on the Progress board. Actions that can notify the customer ask Notify the customer? first. Choose Yes to send the update on their preferred channels, or No to save without notifying them. Team notifications still send. Closing that window leaves the event unchanged.
Open the linked workflow with Open Event
Some events show Open Event on the detail panel. That button opens the full workflow (photos, checklists, vehicle status)—not just the calendar plan. For step-by-step help with photos, checklists, and marking work complete, follow Run event workflow from Schedule.Open the event details
1
Find the event
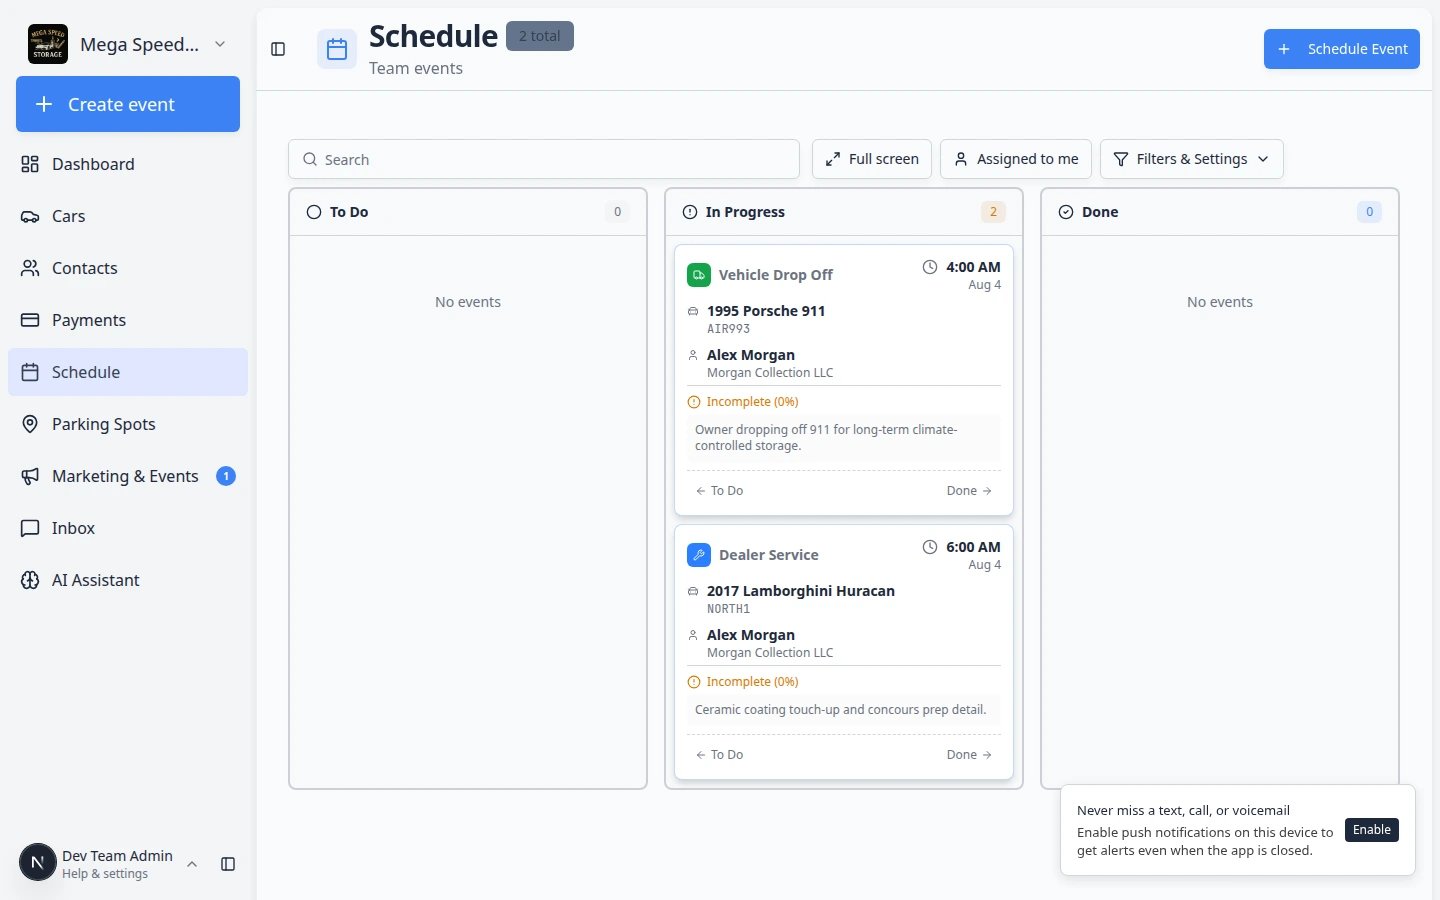
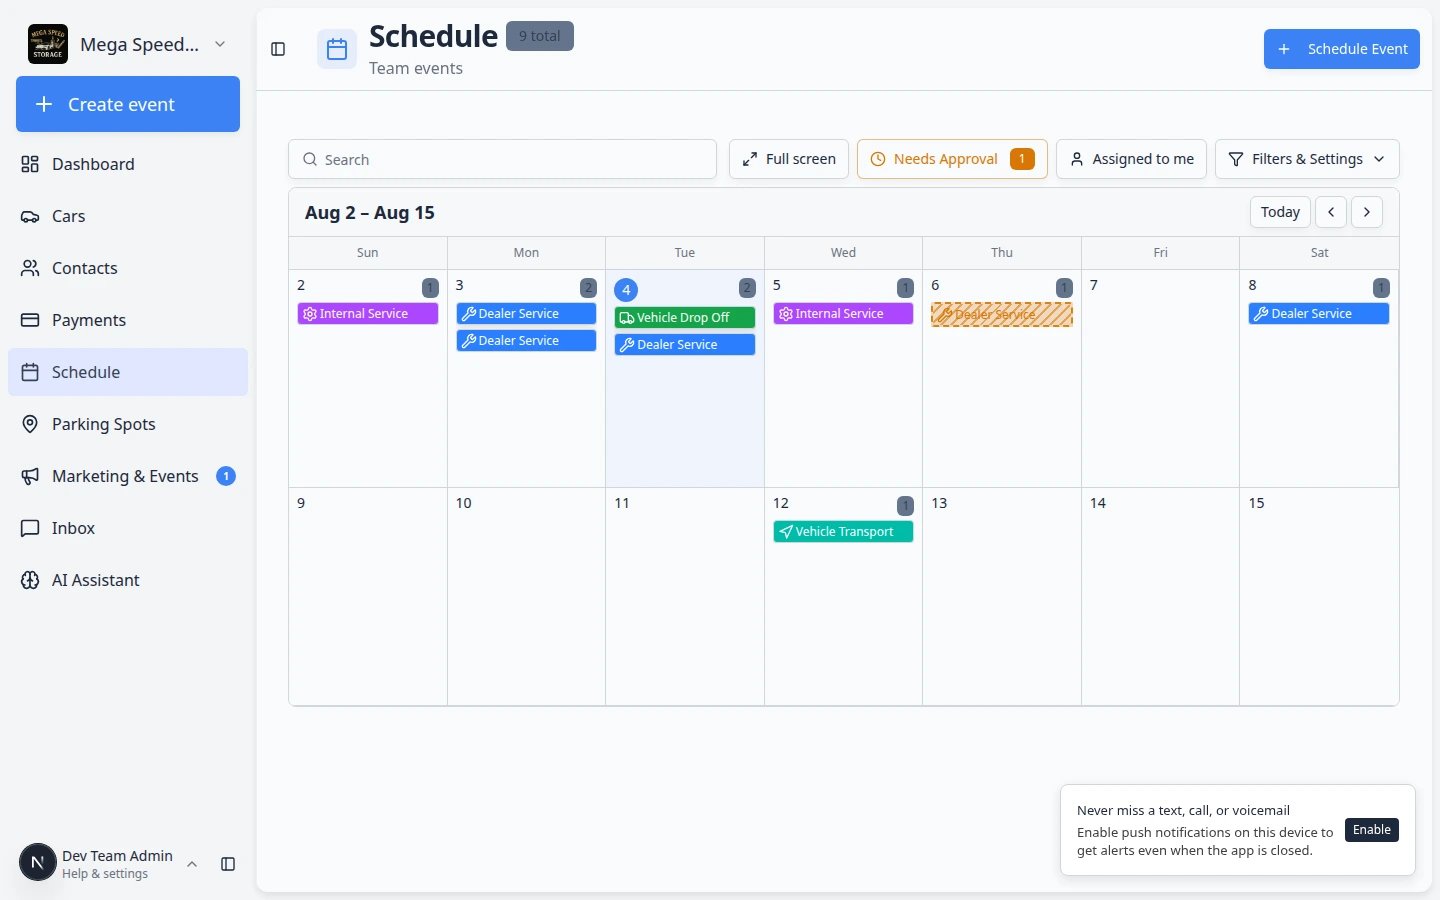
Use the calendar, search field, filters, table, or progress view to find the event. Each event appears as a colored block on the calendar with the event type name and vehicle or customer visible.
2
Click the event
Click the event card or row.A details panel opens showing the Scheduled for date and time, event type, customer, vehicle, assignee, duration, and notes.
3
Confirm this is the right event
Before editing, check the event type, customer or vehicle name, and date. This prevents accidentally changing the wrong appointment. If you have multiple events for the same customer, look at the time and notes to confirm.
Edit the event
1
Click Edit Event
In the event details panel, click Edit Event. The form fields become editable.
2
Change the date or time if needed
In the When section, choose the new date and time.This is the main rescheduling step. A time change updates the event block on the calendar so the whole team sees the new plan immediately.
3
Adjust the duration if needed
Use the Duration choices, such as 15m, 30m, 1h, 1.5h, or 2h.If the standard choices do not match the work, use Custom and enter the number of minutes. The event block on the calendar will stretch or shrink to match the new duration.
4
Change the Event Type only when the work is different
If the appointment was created under the wrong event type, choose a better one.Only change the event type when the work itself is different. For example, change Other to Vehicle Pick Up if that is what is actually happening. Changing the type may change the event’s color on the calendar.
5
Choose Assigned to
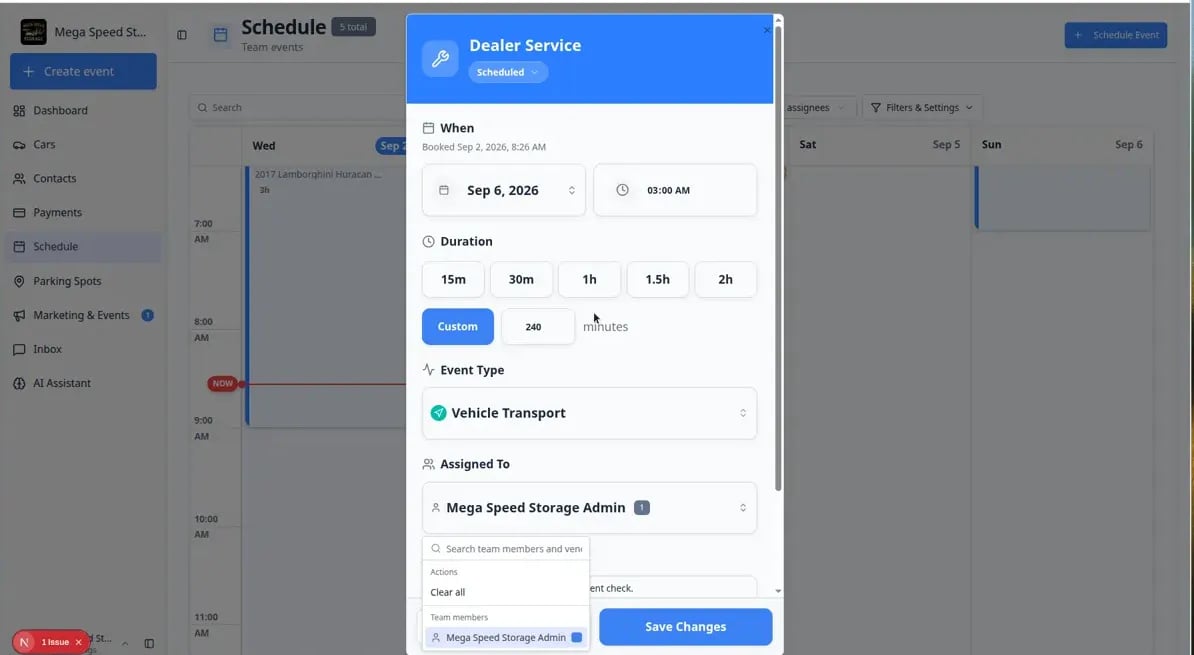
Use Assigned to to choose responsible team members, vendors, or both.The searchable picker groups Team members and Vendors. You can assign more than one name when two partners share the work.Leave it Unassigned if the team will decide later. Assigning someone ensures the event appears when they use Assigned to me.Step-by-step help with screenshots: Assign team members and vendors to events.
6
Update Notes
Add or edit notes so the team understands the change.Example: “Customer requested 3:00 PM instead of 1:00 PM. Please call on arrival.”Good notes explain the current plan, not the old plan. The next person reading the notes should know exactly what to do.
7
Click Save Changes
Click Save Changes.The event details panel closes and the schedule updates with the new information. The event block moves to its new position on the calendar if the time changed.
Assign a team member or vendor
Use this when the wrong person is on the job, or when outside help (transport, mobile detail, dealer pickup) should show on the calendar.1
Open Edit Event
Click the event on Schedule, then click Edit Event.
2
Click inside Assigned to
Find the Assigned to field in the form. Click the box so the search list opens.Expected result: You see staff names and vendor company names you can pick.
3
Search and select the right name
Type a few letters of the person or vendor. Click the correct row to add them.You can assign more than one person when your shop splits the work (for example a staff coordinator plus a transport vendor).Expected result: The name appears as a chip or tag inside Assigned to.
4
Click Save Changes
Save the form so the calendar and event detail panel show the updated owner.Why this matters: The floor team and front desk should not have to ask “Who is handling this?” when the answer is already on the schedule.
Reschedule by dragging on the calendar
When you are in Calendar view (1 Day, 3 Day, 5 Day, 2 Week, or Month), you can move an event to a new time by dragging it—helpful when a customer calls and says “Can we do 3 PM instead of 1 PM?”1
Switch to Calendar view
Open Filters & Settings, choose Calendar, and pick a day range where you can see the event clearly (many teams use 3 Day or 5 Day).Expected result: Events appear as colored blocks on a time grid.
2
Drag the event block
Click and hold the event you want to move, then drag it to the new time slot on the same day (or another day in the visible range).Why this matters: Dragging is faster than opening Edit Event when only the time is changing.
3
Confirm the move
A window titled Confirm event move appears. Read the new date and time, then click Confirm move.Expected result: The event block stays in the new slot and the detail panel shows the updated Scheduled for time.
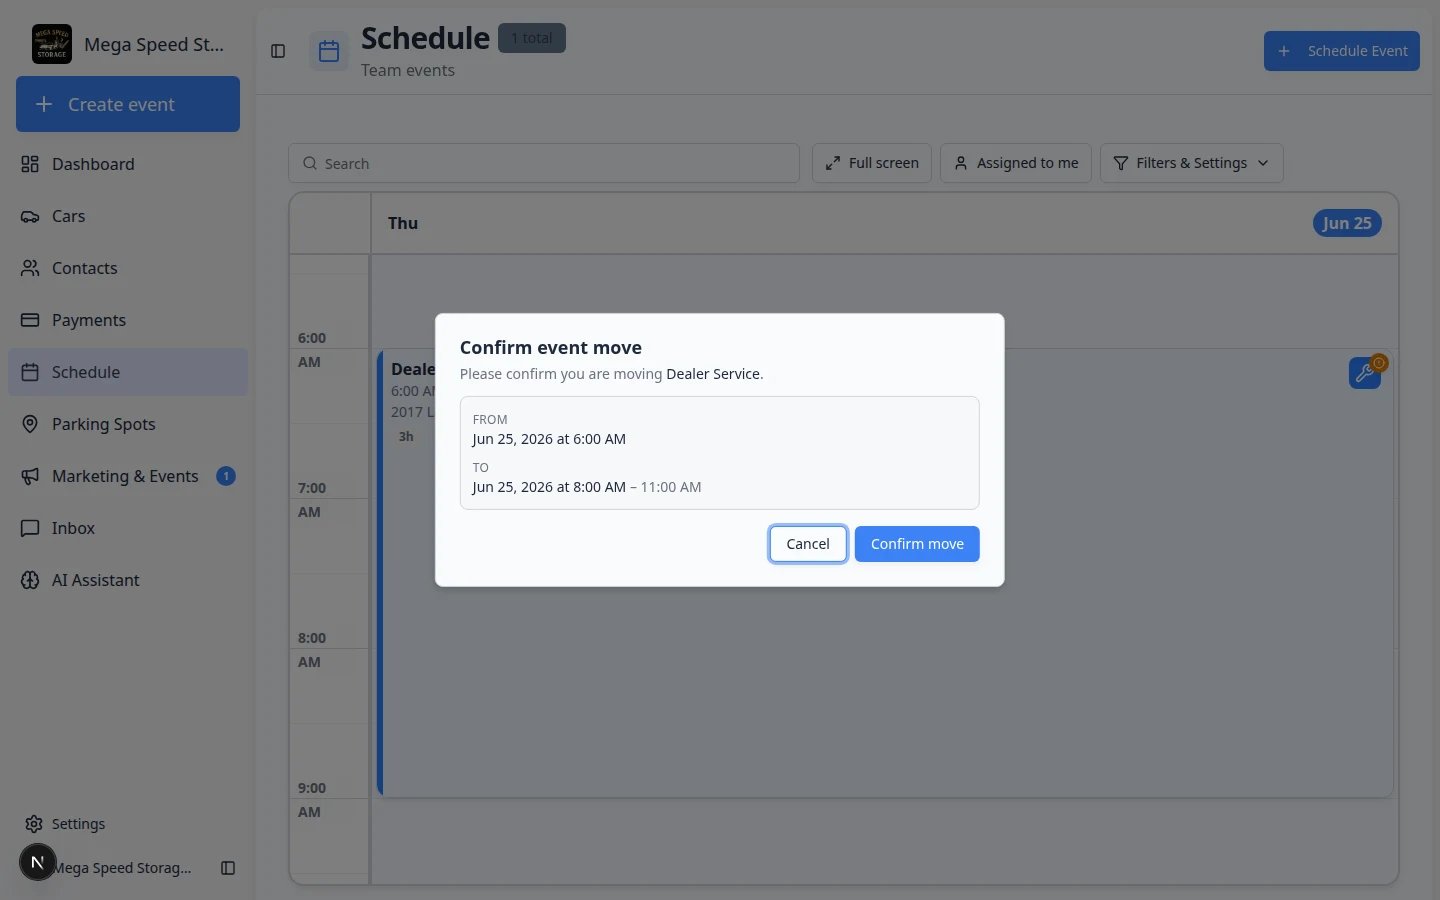
What you should see after draggingA window titled Confirm event move appears. It shows the From and To date and time. Click Confirm move to save, or Cancel to put the event back.If you do not see the confirmation window, the drag may not have landed on a valid time slot—try a different hour, switch to Full Day in Filters & Settings so the event is visible, or use Edit Event instead.
Turn All day on or off after the event exists
Use this when a timed visit becomes “anytime that day,” or an all-day visit now has a real arrival time.1
Open Edit Event
Click the event on Schedule, then click Edit Event.
2
Find All day
Look for the All day switch (the same control you see when creating an event).
- Turn on when staff can finish the work anytime that day.
- Turn off when you now have a real start time, then pick a slot.
3
Click Save Changes
Expected result: An all-day visit moves to the ALL DAY row. A timed visit returns to an hour block.Full create steps: Create an all-day event.
Invoice or quote on the event (when your team uses billing)
Some visits show a Billing section in the event detail panel (below Notes) when an invoice or quote is linked to that appointment.- You may see the invoice or quote status (for example open, paid, or draft) and a link to open it in Payments.
- On the calendar, a small colored dot on an event block can mean billing needs attention—paid is often green; open or draft is often yellow.
- If nothing appears, your team may not bill from that event type yet. See Create an invoice or ask your billing manager.
What changes can affect customers
Time changes may notify the customer depending on your team’s notification settings. If the customer received a confirmation email with the original time, they may now receive an updated email with the new time.Notes or assignment changes usually help internal staff and are typically not customer-facing.Status changes (like moving to In Progress or Complete) may trigger follow-up actions depending on your team’s workflow setup.If you are unsure whether a customer will be notified, ask a team admin to review notification settings in Settings > Events & schedule.
What success looks like
After saving:- The event appears at the new date and time on the calendar if it was rescheduled.
- The event details show the updated assignee, vendor, duration, event type, or notes when you click on it.
- The team can rely on the schedule without needing a separate message or spreadsheet to know about the change.
- If notifications are enabled, the customer receives the correct update about the new time.
Common mistakes to avoid
Troubleshooting
Edit one date in a recurring series
If the event repeats, saving a time change may open a question about the whole series.1
Read the prompt carefully
After you click Save Changes, a window titled Edit recurring event may appear. It asks whether to change Only this event or All events in the series.Expected result: You understand how many future appointments will move before you confirm.
2
Choose Only this event for one-off changes
Use this when one customer visit moved but the rest of the repeat pattern stays the same.Example: This Tuesday’s detail moved to Wednesday, but every other Tuesday stays put.
3
Choose All events in the series only when the pattern changed
Use this when the repeat rule itself is wrong (wrong day of week, wrong end date, wrong time for every future visit).