

What you will accomplish
You will turn on AI agents (MCP) in Settings, copy the Connector URL, add it in Claude (or a similar helper), and sign in as staff so that helper can look up your facility records. When you finish, you will know:- How this is different from the AI Assistant in the dashboard sidebar.
- How to find the AI agents (MCP) card and turn the switch to Enabled.
- How to copy the Connector URL and paste it into Claude.
- What to do when Claude asks you to sign in and pick what it can see.
When to use this guide
Use this guide if you already use Claude (on the web, on the desktop, or on your phone) and you want it to answer questions about your cars and customers—not just general advice. Skip this guide if you only need the helper that lives inside Car Storage Software. That tool is AI Assistant in the left sidebar. Start with Use the AI Assistant.Three doors, one set of recordsYour facility can use helpers in three places. They all read the same cars, customers, and schedule.
Why the name says MCP
The card is labeled AI agents (MCP). MCP is a technical nickname for the connection. You do not need to remember it. Think of the Connector URL as the address of your facility’s front door for helpers. You paste that address into Claude. Claude then asks you to sign in, just like a staff member signing in to the dashboard.Before you start
- Sign in as a team admin. Only an admin can turn this card on or off.
- Have a Claude account ready (claude.ai, Claude Desktop, or Claude on your phone). Cursor and Claude Code work too if your team already uses them.
- Know which staff person will sign in when Claude asks—use a real staff account, not a shared login.
- Plan to start with read-only access (look up records, do not create or change them) until you trust the setup.
Find the AI agents card
1
Open Settings
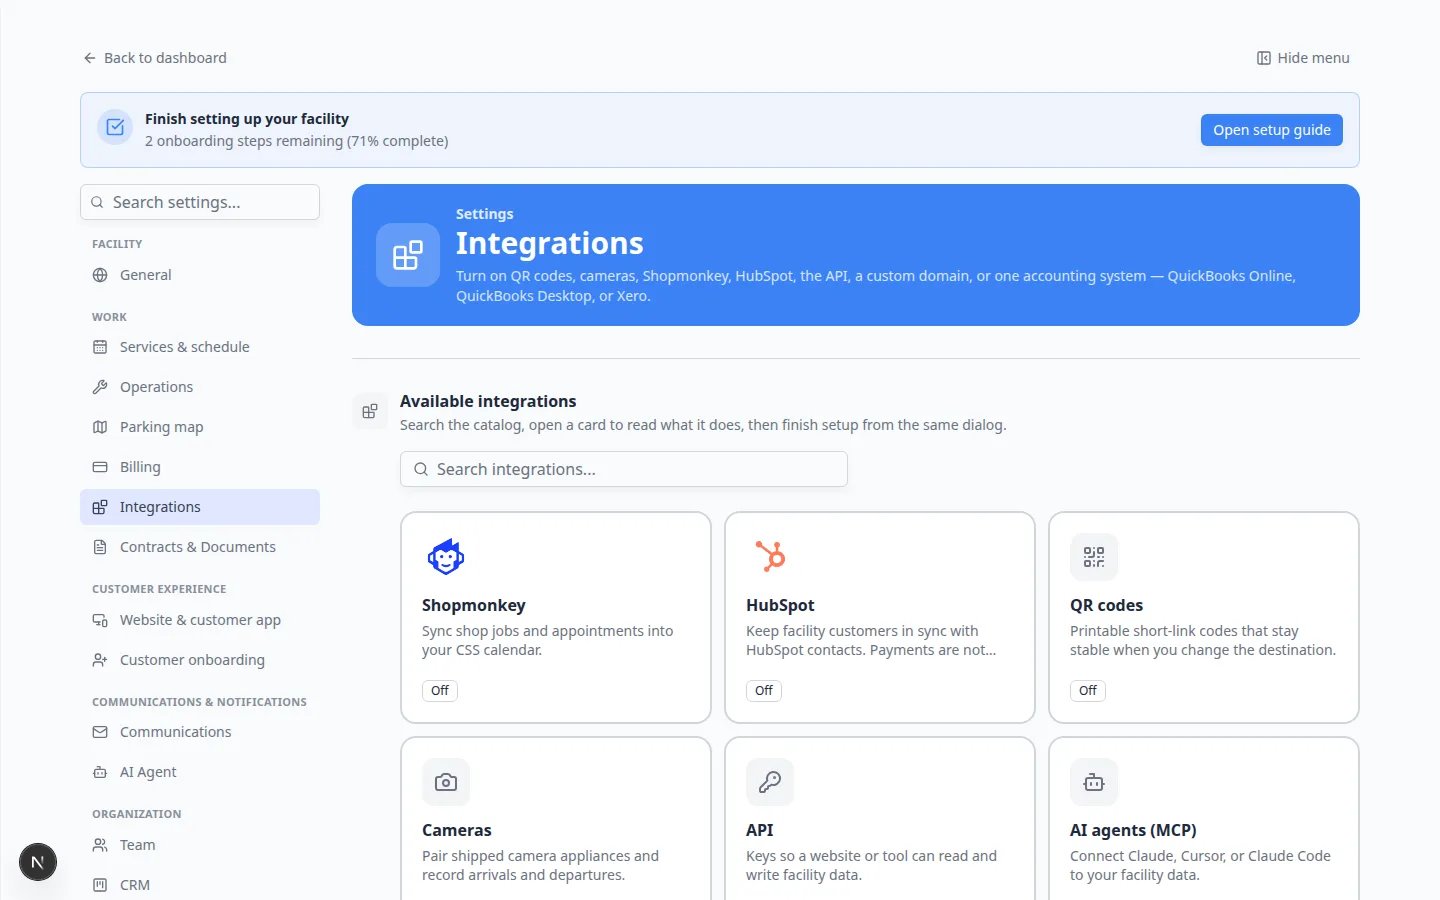
From the Dashboard, click Settings in the left menu.
2
Open Integrations
Click Integrations.Direct link: Settings > Integrations.Expected result: The page title is Integrations. Under Available integrations you see a search box and a grid of cards.
3
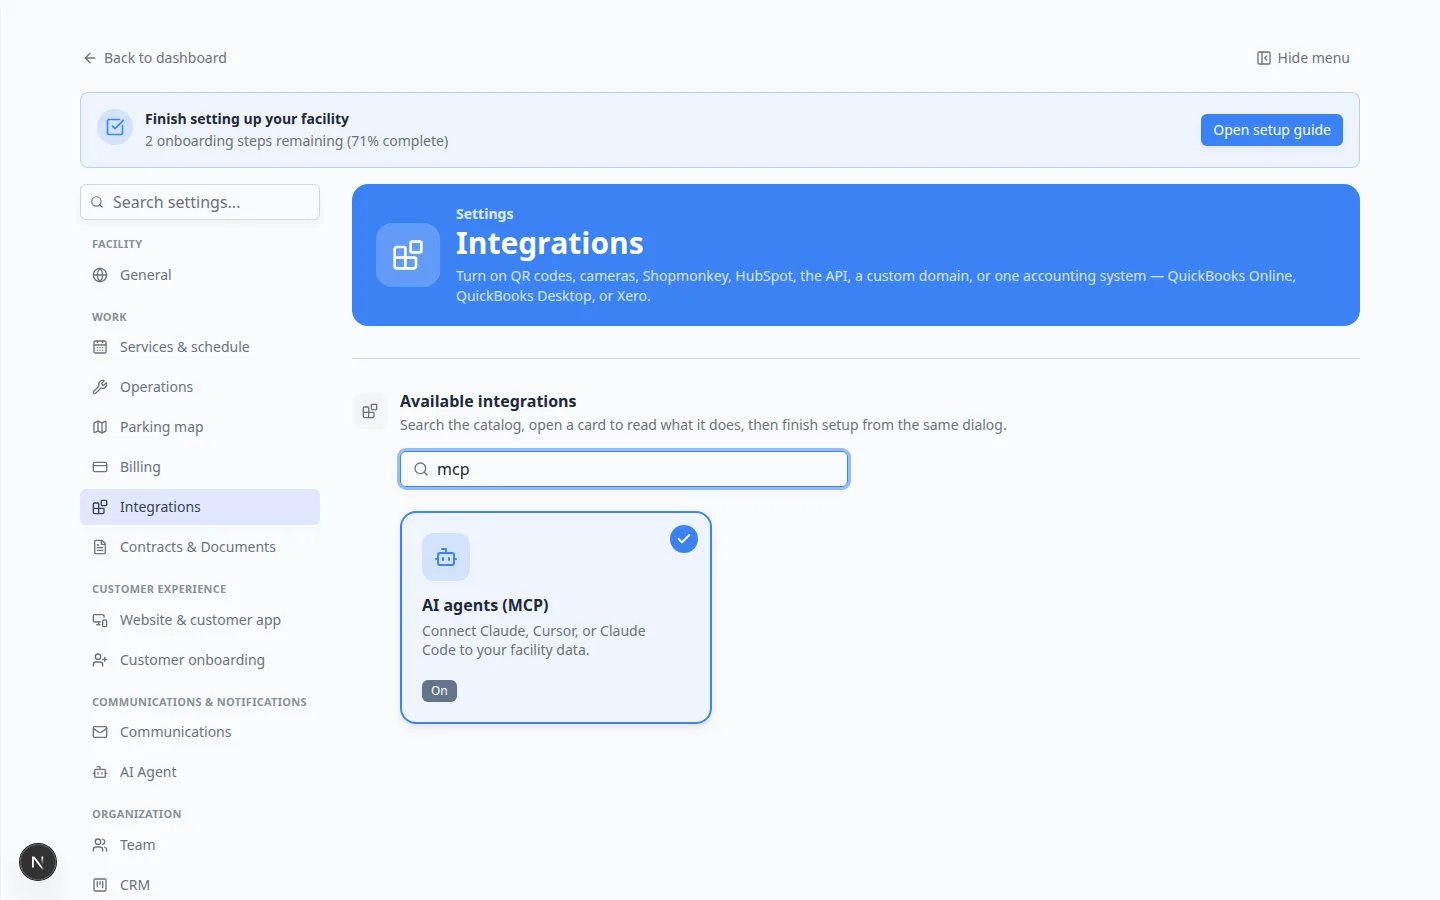
Search if you do not see the card
Click Search integrations… and type claude or mcp.Expected result: Only the AI agents (MCP) card stays on the page.
Turn it on and copy the address
1
Click the AI agents (MCP) card
A window opens. The title is AI agents (MCP). The first line says Connect Claude, Cursor, or Claude Code to your facility data.
2
Read the Turn it on box if you see it
If the switch at the bottom still says Enable this integration, you will also see a note titled Turn it on to connect. That is normal. The helper cannot finish sign-in until you flip the switch.
3
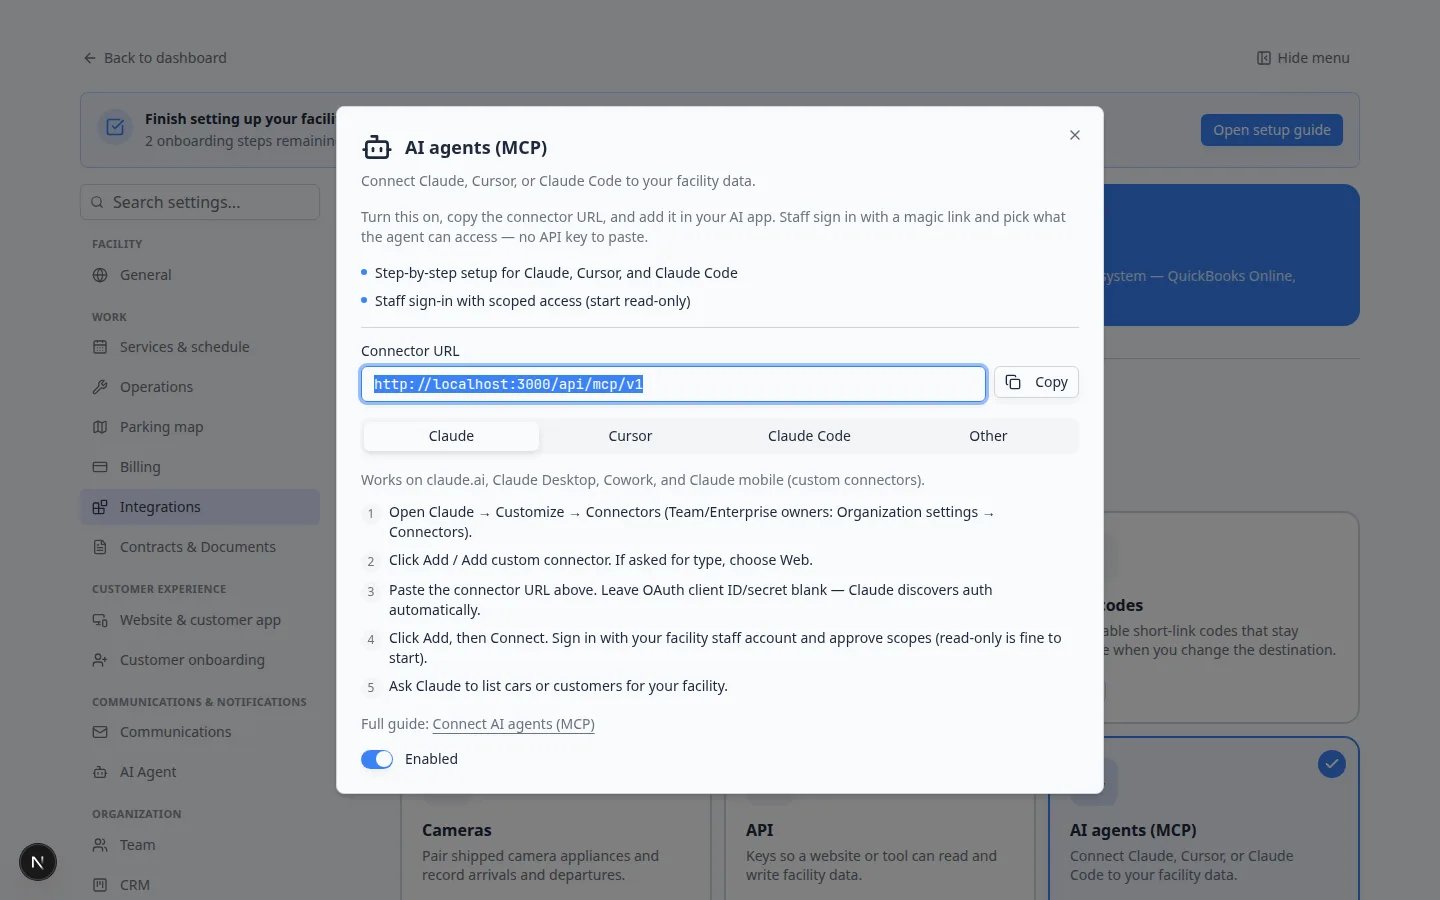
Turn the switch on
At the bottom of the window, turn the switch so the label changes from Enable this integration to Enabled.Expected result: The switch stays on. The card on the page now shows On.
4
Copy the Connector URL
Find the box labeled Connector URL. Click Copy next to it.Expected result: Your live facility address looks like
https://www.carstoragesoftware.com/api/mcp/v1. A practice or test site may show a different address—that is fine for testing, but Claude should get the address from your live Settings page.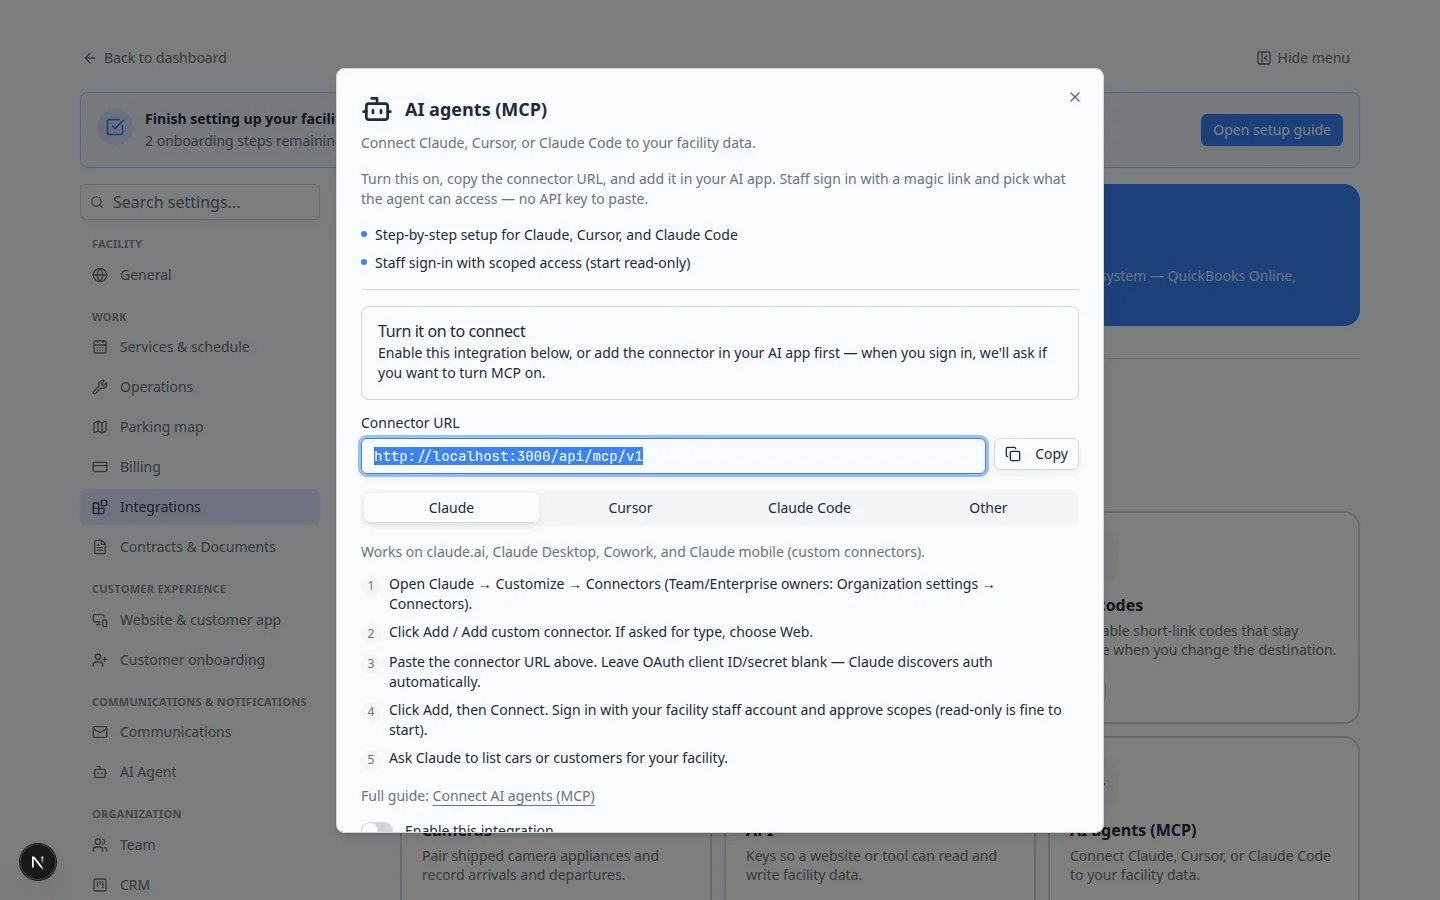
Add the connection in Claude
Stay on the Claude tab in the window. Those steps match what you do in Claude.1
Open Claude's connector settings
In Claude, open Customize → Connectors. Team or company owners may see Organization settings → Connectors instead.
2
Add a custom connector
Click Add or Add custom connector. If Claude asks for a type, choose Web.
3
Paste the Connector URL
Paste the address you copied. Leave any OAuth client ID or secret boxes blank. Claude fills those in for you.
4
Save, then click Connect
Click Add, then Connect.
5
Sign in as staff
A browser window opens. Sign in with your facility staff account. Approve access. Start with look-up (read) access if Claude lets you choose.Expected result: Claude finishes connecting. You can ask it to list cars or customers for your facility.
6
Try one safe question
Ask Claude: List the cars stored for Alex Morgan (use a real name from Contacts).Why this matters: You confirm the helper is looking at your records before anyone uses it with a customer on the phone.
What you allow Claude to seeThe sign-in screen asks what the helper may access. That list matches the same kinds of access as a team API key (cars, customers, schedule, and so on). Read means look up. Write means create or change records. Start with read. You can connect again later if you need write access.
If your team uses Cursor instead
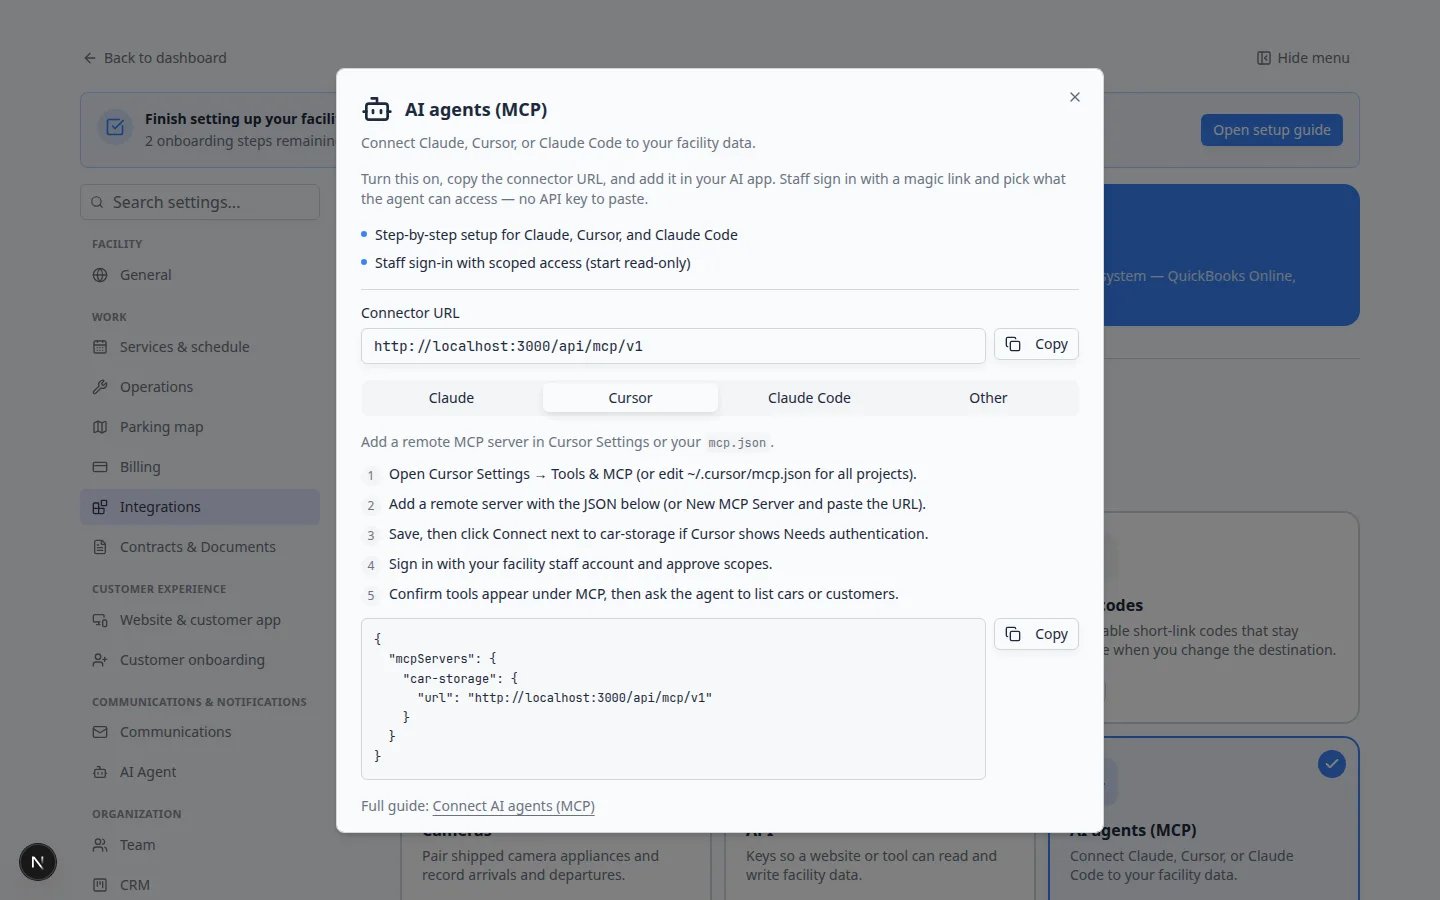
Some shops use Cursor for computer work. The same Connector URL works there.1
Keep the card Enabled
Confirm the switch still says Enabled on Settings > Integrations → AI agents (MCP).
2
Open the Cursor tab
In the same window, click the Cursor tab. Follow the numbered steps. You can copy the example block with Copy.
3
Connect and sign in
If Cursor shows Needs authentication, click Connect. Sign in as staff and approve access, the same way you would in Claude.
How this stays safe
You stay in control. Turning the card Off later stops new connections.Each staff member signs in as themselves. Do not share one login so several people can connect Claude.Look-up first. Let Claude read records before you allow it to create customers, cars, or events.Money and contracts still need the dashboard. Do not ask Claude to void an invoice, change a card on file, or delete a signed agreement. Use Payments and your contracts pages for that work.This does not text customers. Customer messages still go out from Inbox.
Common mistakes
- Pasting the Connector URL before the switch says Enabled—Claude cannot finish sign-in.
- Signing in with a customer email instead of a staff account.
- Sending the Connector URL to a customer or posting it in a public place.
- Assuming Claude already sent a text or created a car—check Inbox or Cars if you are not sure.
- Using a test address from a practice site in your live Claude app. Always copy the URL from your live Integrations page.
Troubleshooting
Claude connects but cannot list carsYou may have approved no access, or only areas that do not include cars. Connect again and allow read access for cars and customers. Also confirm your staff role can open Cars in the dashboard—see Who can use the AI Assistant.
What to do next
- Practice a lookup in the dashboard helper: Use the AI Assistant.
- If you prefer step-by-step notes that stay next to the Integrations window, open Connect Claude or another AI helper.
- For staff who should not use Claude at all, keep using AI Assistant and leave this card Off.