

What you will accomplish
When a detailer, transport company, or other outside provider sends your facility a bill, you will find it in Payments, review the uploaded file, update the review status for your team, and record that the vendor was paid (after your facility pays them using your normal bank or check process).Vendor vs customer invoiceA customer invoice is money your facility collects. A vendor invoice is money your facility may need to pay out. This guide is for bills from outside providers—not bills you send to customers.
How vendor invoices arrive
Most vendor bills follow this path:- Your team adds the vendor in Contacts > Vendors.
- You send a portal invitation so the vendor can sign in and upload their invoice.
- The vendor submits the file through the vendor invoice portal.
- Your team reviews the submission in Car Storage Software and records payment after paying the vendor outside the app.
Before you start
- The vendor should already exist in Contacts > Vendors, or the submission should include enough details to identify who sent it.
- Open the uploaded invoice file and confirm the work was completed before approving payment.
- Know who on your team is allowed to approve vendor bills.
- Know how your facility pays vendors (ACH, check, Zelle, or another method).
Open vendor invoices on the Invoices page
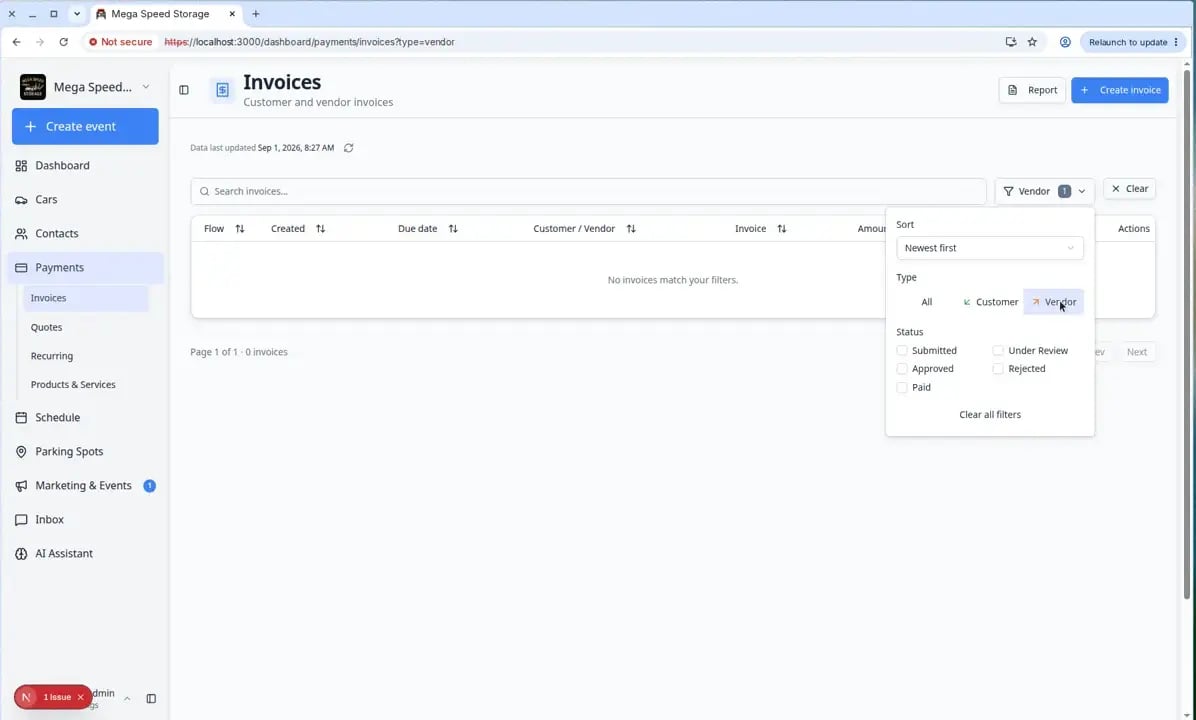
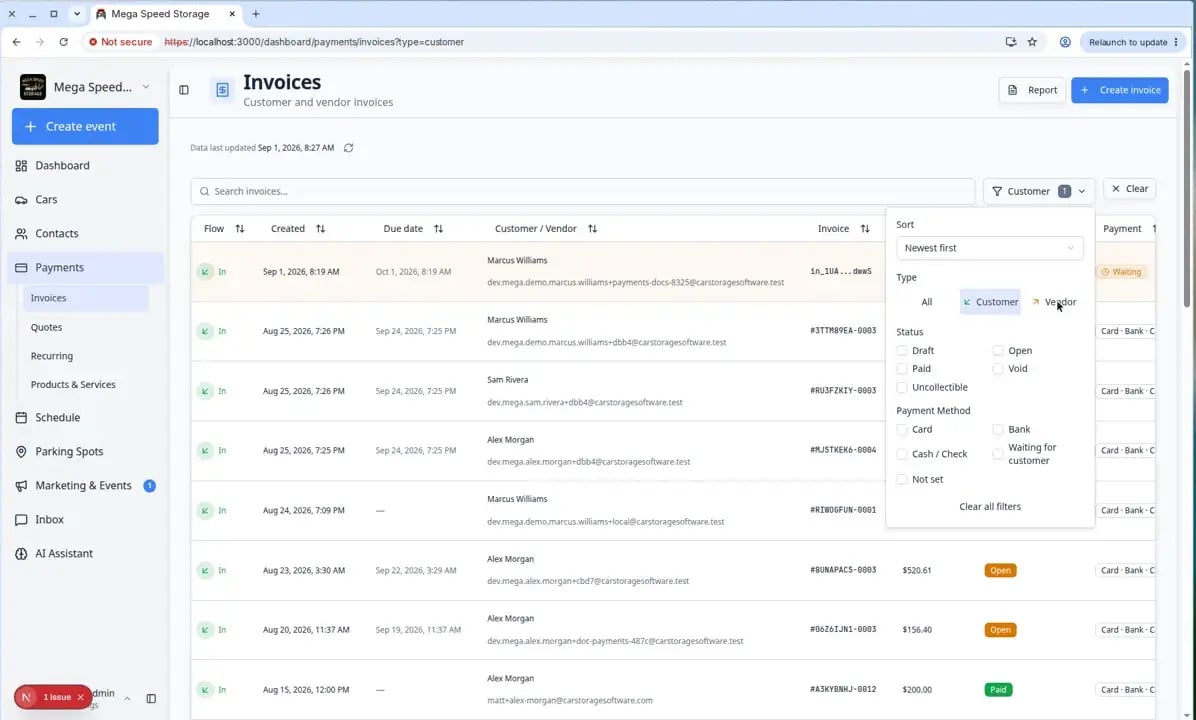
Customer bills and vendor bills both appear on Payments > Invoices. Use the Type filter to focus on vendor submissions.1
Go to Invoices
In the sidebar, open Payments, then Invoices. Or go to Payments > Invoices directly.Expected result: The page title is Invoices with the subtitle Customer and vendor invoices.
2
Open Filters
Click Filters on the toolbar (you may see a badge if filters are already active).
3
Choose Vendor under Type
In the Type section, click Vendor.You can also open Payments > Invoices to start with the vendor filter applied.Expected result: The list shows only vendor submissions. Customer invoices are hidden.
Find the invoice to review
1
Search if needed
Use the search box to search by vendor name, vendor email, invoice number, or invoice ID.
2
Check the status
Look at the Status column. Start with Submitted or Under review.
3
Open the invoice
Click the invoice row.Expected result: The vendor invoice detail page opens (URL like
/dashboard/payments/vendor-invoices/...) with the uploaded file, review controls, and payment section.Review the vendor invoice details
The vendor invoice detail page shows the uploaded invoice, who submitted it, the linked vendor record, review notes, and payment fields.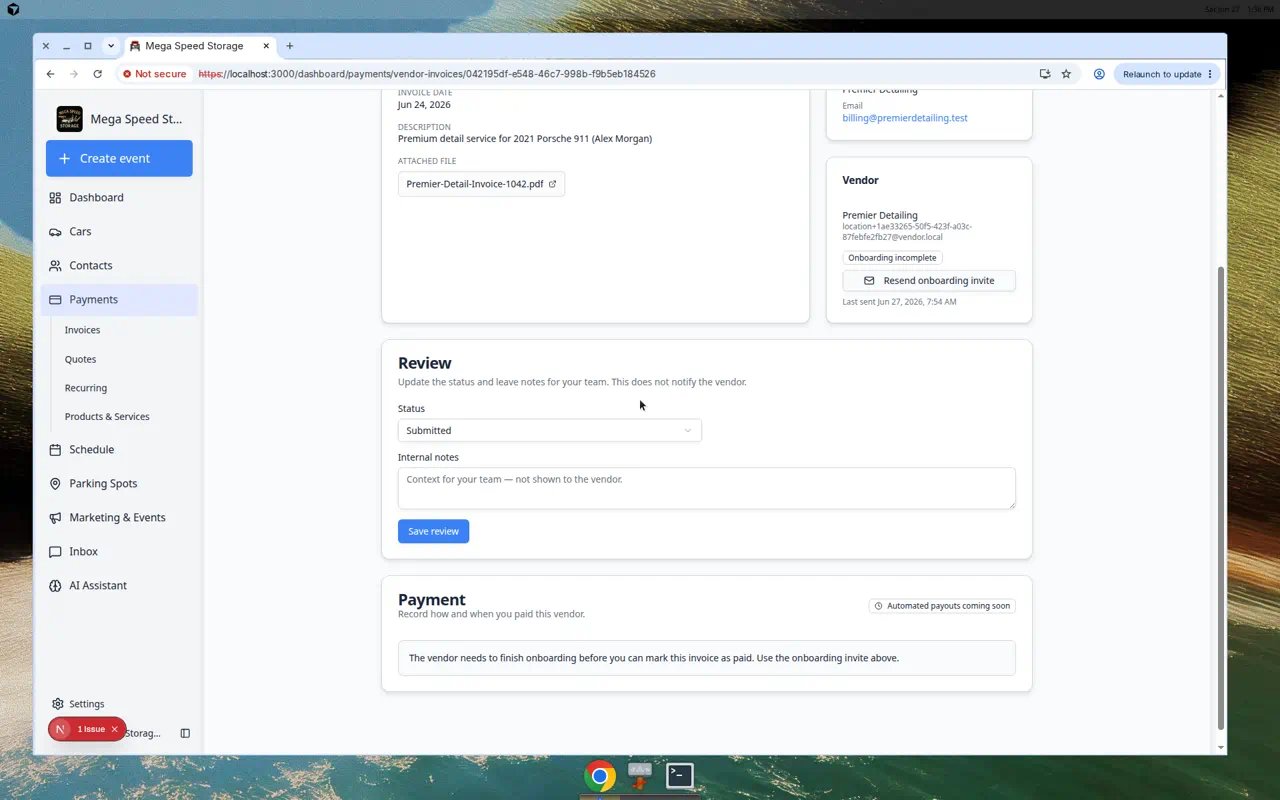
1
Confirm the invoice information
Review Invoice #, Amount, Invoice date, and Description.Make sure these details match the work your team expected.
2
Open the attached file
Click the attached file name to open the invoice the vendor uploaded.Check the vendor name, service date, amount, and service details.Why this matters: Approving without reading the file is a common source of overpayment mistakes.
3
Confirm the submitter and vendor
Review the Submitter and Vendor cards. If the vendor is linked, you can open the vendor record from this page.
Update the review status
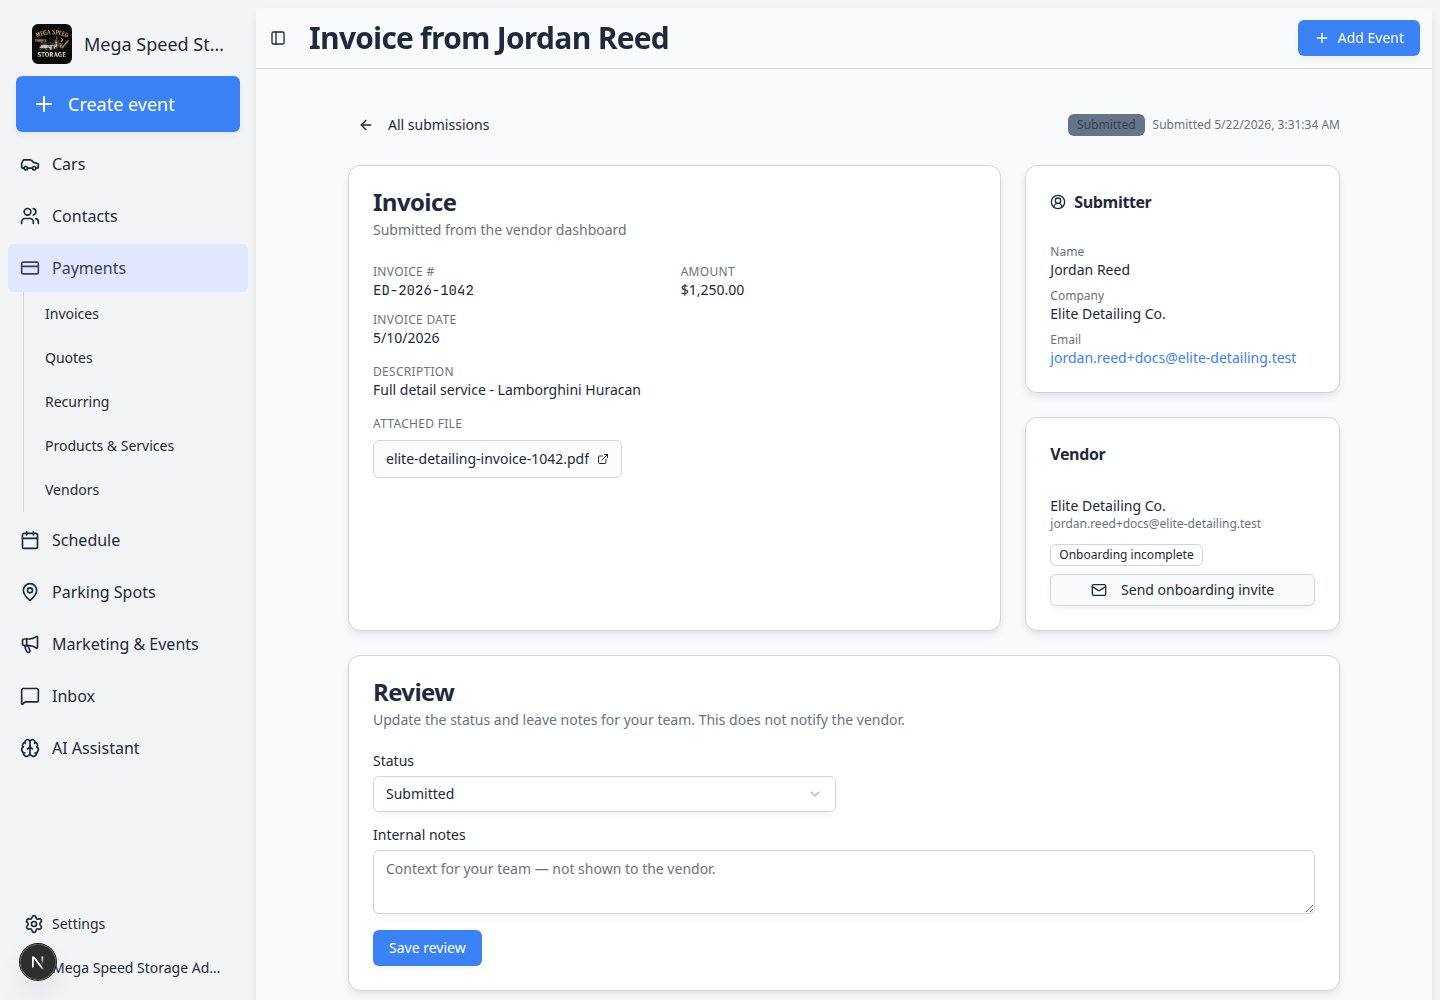
Use the Review section to tell your team where the invoice stands.1
Choose the status
Open the Status dropdown and choose the best option.
2
Add internal notes
Use Internal notes for details your team should know, such as “Confirmed detail service was completed” or “Waiting for manager approval.”These notes are for your team. They are not shown to the vendor.
3
Click Save review
Click Save review.Expected result: The status badge on the invoice updates. Your team can see which vendor bills still need attention.
What vendor invoice statuses mean
Submitted — the vendor sent the invoice, but your team has not finished reviewing it.Under review — someone on your team is checking the invoice.Approved — the invoice looks correct and is ready for payment.Rejected — your team is not approving the invoice as submitted.Paid — your team paid the vendor and recorded the payment in the app.
Reject a vendor invoice (when work or amount is wrong)
Use Rejected when the bill does not match what your team expected—for example, wrong amount, wrong vehicle, or service not completed.1
Open the vendor invoice
From Payments > Invoices (Filters → Type → Vendor), click the invoice row.
2
Review the uploaded file
Open the attachment and compare the vendor’s amount and description to your team’s records (schedule event, work order, or email approval).Why this matters: Rejecting without reading the file can damage vendor relationships.
3
Set status to Rejected
In the Review section, choose Rejected from the Status dropdown.
4
Explain in internal notes
Write a short note your team will understand, such as “Detail was for wrong vehicle—asked vendor to resubmit” or “Amount does not match approved quote.”Expected result: Other staff see why the bill was rejected and what to do next.
5
Save review
Click Save review, then contact the vendor outside the app (phone or email) so they know to send a corrected invoice.Expected result: Status shows Rejected. Do not click Mark as paid on a rejected bill.
Send the vendor onboarding invite if needed
Some vendors need to finish setup before your team can record payment details clearly.1
Look at the Vendor card
On the vendor invoice detail page, find the Vendor card.
2
Check the vendor setup message
If the vendor shows Onboarding incomplete, click Send onboarding invite or Resend onboarding invite.
3
Ask the vendor to complete setup
Tell the vendor to open the email and finish the steps.
Pay by ACH (when Vendor ACH Payments is enabled)
If your team has Vendor ACH Payments enabled, and both your facility bank and the vendor bank are connected, you can send payment from the invoice page.1
Open the Payment section
On the vendor invoice detail page, scroll to Payment. You should see Pay from your connected bank account.
2
Confirm the amount and fee
Check the invoice amount, processing fee, and Total debit. Your bank is charged the total; the vendor receives the full invoice amount.
3
Confirm ACH payment
Click Confirm ACH payment, review the debit total in the confirmation dialog, then click Confirm and send.Expected result: The payment is submitted. When Straddle reports it paid, the invoice status becomes Paid. If ACH is unavailable, connect your bank under Settings → Billing → Vendor Payments, or ask the vendor to finish bank setup.
Record an off-platform payment (Mark as paid)
If you paid the vendor outside the app, record the payment so your team has a clear history.1
Confirm the vendor has been paid
Make sure the payment was actually sent by ACH, check, Zelle, wire, or your facility’s normal method.
2
Open the Payment section
On the vendor invoice detail page, scroll to Payment.
3
Enter the amount
In Amount, enter the amount your facility paid.
4
Choose the payment date
In Payment date, choose the date the payment was sent.
5
Add a check or transaction number if you have one
Use Check / transaction number for a check number, ACH trace number, Zelle confirmation, or other payment reference.
6
Add internal notes if helpful
Use Internal notes for accounting context, such as “Paid from operating account.”
7
Click Mark as paid
Click Mark as paid.Expected result: Status changes to Paid. The amount, date, and reference you entered are saved for your records.
Vendor payment is recorded, not sentMark as paid tells your team the bill was handled. It does not send money to the vendor. Pay the vendor through your bank, check, or other normal process first, then record it here — or use Confirm ACH payment above when ACH is enabled.
What success looks like
- Vendor invoice status changes to Paid.
- Payment amount, date, reference, and notes are saved.
- Your team can see that this invoice has already been handled.
Common mistakes to avoid
- Do not mark a vendor invoice as paid before your facility actually sends payment.
- Do not approve an invoice without opening the uploaded file.
- Do not pay if the amount or service details do not match what your team expected.
- Do not put private customer information in vendor invoice notes unless your facility policy allows it.
- Do not look for a Vendor tab at the top of Invoices—use Filters → Type → Vendor instead.