

What you will accomplish
Use this guide after you have created a social event with Create a social event. When you finish, you will know:- How many customers plan to attend
- Who said Going, Maybe, or Can’t Go
- How to find one person quickly in a long guest list
- When to share the event link or send a reminder campaign
Why review RSVPs before event dayRSVP totals help your team plan parking, food, staff coverage, and name tags. Checking the list early gives you time to follow up with customers who have not responded.
Before you start
- The social event is already created and visible on Marketing & Events.
- You know the event date, time, and location.
- If the event is paid, payment processing is ready in Settings > Billing.
- You know whether the event is open to all customers, invited customers only, or anyone with a public link.
Open the event detail page
1
Open Marketing & Events
Go to Marketing & Events.
2
Find the event on the calendar
Use the calendar view and look for the event on the correct day. You can also use filters or search if your calendar is busy.
3
Click the event name
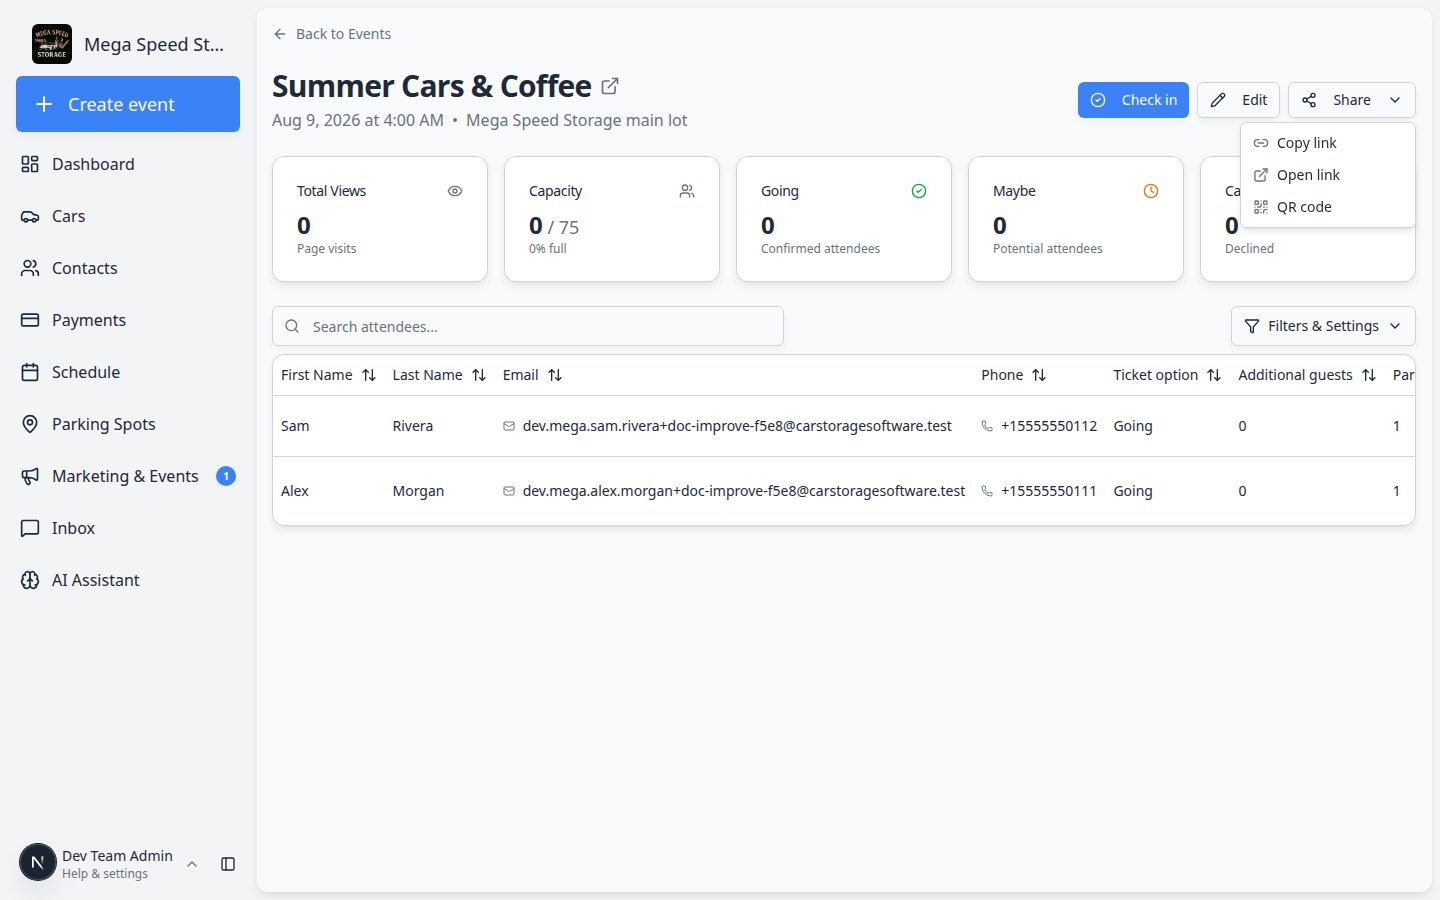
Click the event to open its detail page.Expected result: You see the event title, summary cards for attendance, and a list of attendees.
Your planning timeline (recommended)
You do not need to stare at the RSVP list every hour. These check-ins match what most facilities do before a busy open house or member event.1
Two weeks before — create and share
Publish the event with Create a social event. Send the first invite with Create a campaign or post in a community channel.Expected result: Total Views starts to rise as customers open the page.
2
One week before — read the summary cards
Open this event detail page. Note Going, Maybe, and Can’t Go. Do not count Maybe guests as confirmed when you order food or parking.Why this matters: Maybe means “interested, not sure yet.” Only Going is a firm head count.
3
Two to three days before — follow up
Send a short reminder campaign to customers marked Going or Maybe. Use Search attendees… when someone calls the front desk to ask if they are on the list.Expected result: More Maybe responses change to Going or Can’t Go so your numbers stay honest.
4
Event day — switch guides
Use Check in social event attendees at the door. The Checked In column on this page updates as guests arrive.
Understand the summary cards
At the top of the event page, five summary areas help you plan quickly:- Total Views — how many times customers opened the event page. A low number before you send invites is normal; it rises after you share the link.
- Capacity — how many people the event can hold, if you set a limit.
- Going — customers who plan to attend.
- Maybe — customers who are interested but not sure yet.
- Can’t Go — customers who declined. This still helps you know they saw the invite.
Paid events: If customers must buy a ticket, make sure ticket sales match the Going count you expect. If numbers look low, send a reminder campaign using Add campaign message, audience, and publish.
How to use the numbers in plain English
Capacity (for example 3 / 75) — how many people marked Going compared to the maximum you set. The first number is confirmed attendees; the second is your cap.Going — treat this as your planning number for parking spots, chairs, and coffee cups.Maybe — follow up with a reminder, but do not reserve resources for every Maybe guest.Can’t Go — still useful. It tells you they saw the invite and are not coming.Total Views — how many times anyone opened the event page. Low views before you send invites is normal. If views stay at zero after a big email blast, double-check the link in your campaign.
Review the attendee list
The attendee table shows one row per person who responded. Columns include:- First Name and Last Name — who the guest is.
- Email and Phone — how to reach them if plans change.
- Car(s) — vehicles linked to their portal account (helpful at car-focused events).
- RSVP Status — Going, Maybe, or Can’t Go.
- Checked In — whether they arrived on event day (empty until check-in).
1
Scroll to the attendee table
Below the summary cards, find the table of people who responded.Expected result: Each row shows a guest name, contact details, RSVP Status (going, maybe, or can’t go), and Checked In (empty until event day).
2
Sort or filter by RSVP status
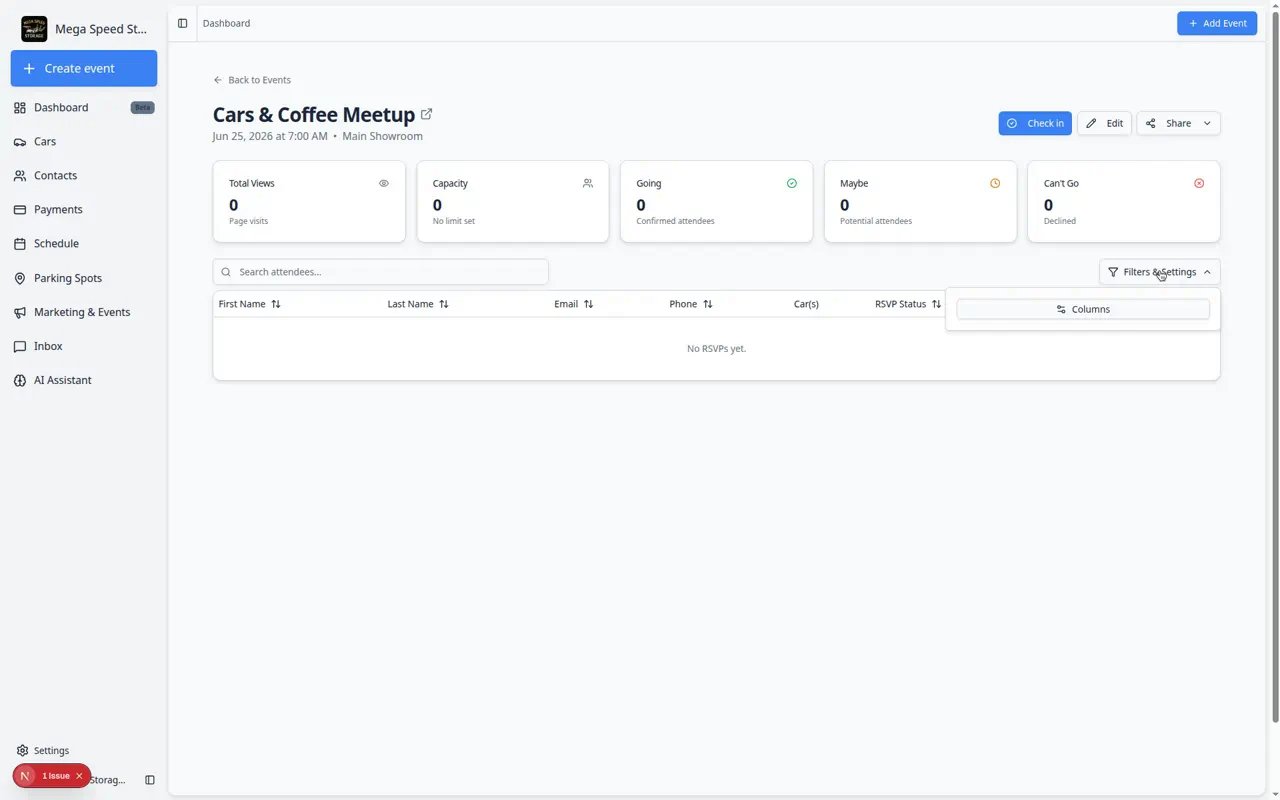
Click the RSVP Status column header to sort the list by response type. This groups going guests together so you can plan head count.To show or hide columns (for example Car(s) or Phone), click Filters & Settings on the right side of the search bar, then open Columns.Why this matters: Staff can fix mistakes without asking the customer to log in again.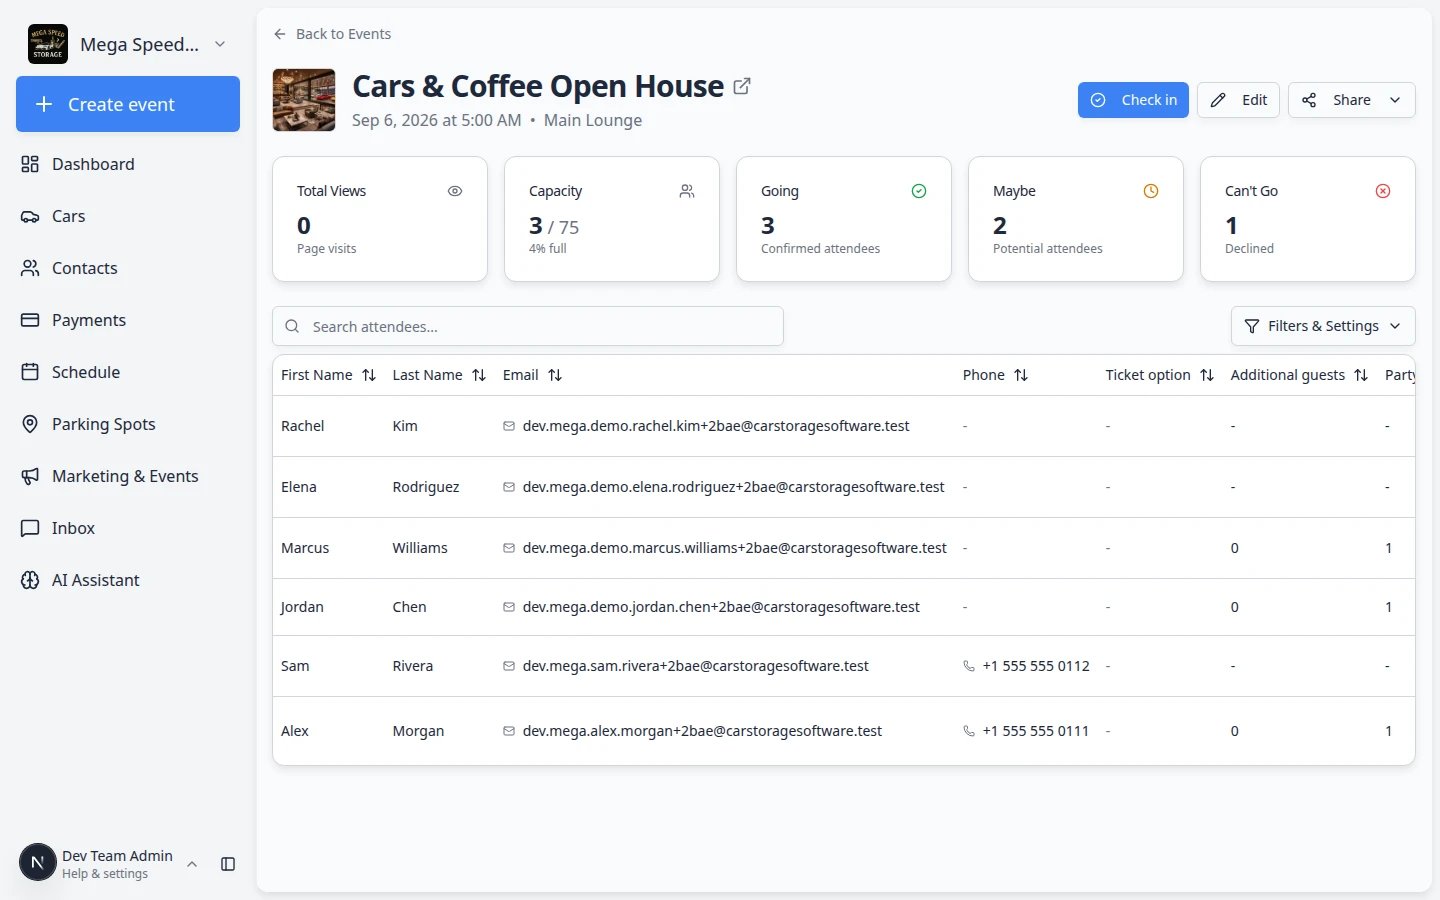
3
Read ticket and check-in badges
In the Checked In column you may see:
- Not checked in — guest has not arrived yet.
- No ticket — guest RSVP’d but does not have a ticket record (common for free events).
- Revoked — a ticket was cancelled and should not be used at the door.
1
Search for one person
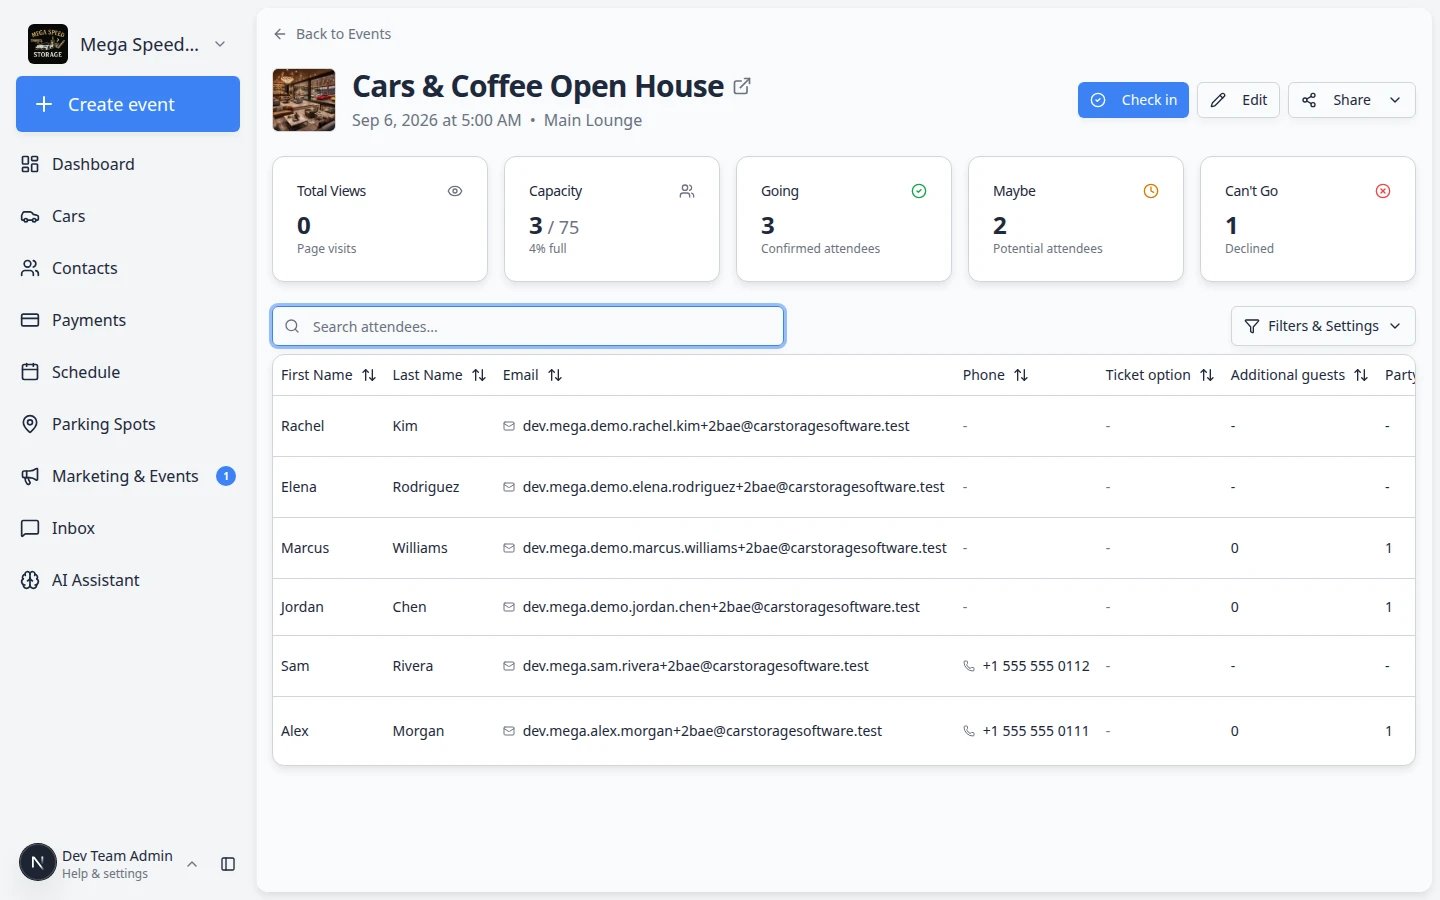
Type in Search attendees… when you need to find a name or email quickly.This is helpful when a customer calls and asks, “Am I on the list?”Expected result: The table shows only rows that match what you typed.
1
Check RSVP status for each row
Each row shows how that person responded. Use this list to:
- Confirm VIP guests are marked Going
- Follow up with Maybe responses if space is limited
- Avoid planning meals or gifts for people who chose Can’t Go
2
Use Edit if details changed
Click Edit if the event time, location, description, or capacity needs to change. Save updates before you widely share the event link.
Share the event when you are ready
1
Click Share
On the event detail page, click Share. A small menu opens.
2
Choose how to share
Pick the option that fits your workflow:
- Copy link — paste the RSVP page into a text, email, or campaign.
- Open link — preview what customers will see before you send it.
- QR code — show a code on a poster, TV screen, or printed flyer so guests can scan it at the door.
3
Tell customers what to do
In plain language, ask them to open the link and choose Going, Maybe, or Can’t Go so your counts stay accurate.
Prepare your team before event day
Use this short checklist three to five days before the event so surprises are rare on the day customers arrive.1
Compare Going to Capacity
If you set Max Attendees, compare the Going count to Capacity on the event detail page.Expected result: You know whether you need a waitlist, extra parking, or more staff before the week gets busy.
2
Call or email Maybe guests (optional)
Filter the attendee table to maybe and reach out to guests who have not decided.Why this matters: Maybe is not a head count for food or parking. A friendly confirmation call often turns a Maybe into Going or Can’t Go.
3
Send a reminder campaign
Use Add campaign message, audience, and publish to email guests marked Going with parking instructions and the event time.Expected result: Fewer “what time is it again?” calls on event morning.
4
Assign check-in staff
Share Check in social event attendees with whoever works the door. Have them open the event page and tap Check in once before guests arrive.Expected result: The door team is not learning the screen for the first time when a line forms.
- Compare Going count to Capacity if you set a maximum. Plan a waitlist process if you are close to full.
- Assign staff for check-in using Check in social event attendees.
- Send a reminder one or two days before the event to customers marked Going or Maybe.
- Confirm parking, food, and door access match the expected headcount.
Send a reminder campaign to RSVPs
A quick email or text reminder helps customers remember the date and gives you a chance to nudge Maybe responses to confirm.1
Note who needs a reminder
On the event detail page, check Going and Maybe counts. Write down whether you want to remind everyone or only people who have not confirmed yet.
2
Create a short campaign
Open Marketing & Events and click Create New → Email Campaign (or SMS Message if texting is set up). Name it something your team will recognize, such as Cars & Coffee Reminder — July 12.
3
Write a friendly reminder
Keep the message short: event name, date, time, location, and what to bring. Example: “Reminder: Cars & Coffee is this Saturday at 9 AM in the Main Showroom. We look forward to seeing you!”
4
Choose the audience
In the campaign Audience section, add customers who RSVP’d Going or Maybe. You can search by name if the list is long.Why this matters: A reminder sent only to people who already said they are coming reduces confusion—and you are not blasting customers who declined.
5
Schedule and publish
Follow Add campaign message, audience, and publish to schedule the send for one or two days before the event.Expected result: Customers receive a timely reminder, and your team sees the send on the marketing calendar.
Common mistakes to avoid
- Do not assume Maybe means Going when you order food or materials.
- Do not share a customers-only event link on a public website if the event is meant for invited customers only.
- Do not wait until event day to look at RSVPs for the first time.
- Do not edit capacity lower than the current Going count without a plan for who you will contact.
Troubleshooting
What to do next
- Send a reminder or final details with Add campaign message, audience, and publish.
- On the day of the event, use Check in social event attendees.
- After a great visit, ask for feedback with Request and manage reviews.