

What you will accomplish
You will set when a service can be booked and how long each visit takes on the Schedule calendar. Good hours and booking choices help your team avoid double bookings, last-minute rushes, and visits that do not leave enough time. On the event type edit page you will set:- Scheduling — the days and hours when this service can be booked, plus an optional Booking Sharing switch.
- Booking Options — the named choices people pick (for example Standard drop-off), including duration, buffer time, notice time, and how many can happen at once.
When to use this
Use this guide after the service already exists. Typical reasons:- Customers can book times your shop is not ready to support.
- Two drop-offs land at the same minute and the lot gets crowded.
- You offer more than one version of the same service (weekday intake vs after-hours intake).
- A new service should follow your normal shop hours instead of its own schedule.
Require Approval is not set hereIf online bookings must wait for staff before they are confirmed, turn on Require Approval in Configure event types—not in Scheduling or Booking Options.
Before you start
- The event type already exists. If not, start with Configure event types.
- You know your shop’s normal hours. Those live on Settings > General under Hours of operation.
- You know how long the work usually takes, and whether staff need extra time after each visit.
- Decide whether customers need choices, such as Standard drop-off or After-hours intake.
- If the work uses a limited bay, lift, room, or person, set that up first in Set up bookable resources.
Open the event type
1
Open Services & schedule
In the sidebar, open Settings, then click Services & schedule. You can also go directly to Settings > Services & schedule.Expected result: You see service cards with Set up and Advanced on each card.
2
Open Advanced on the service
Find the service you want to update (for example Vehicle Drop Off) and click Advanced.Why this matters: The guided Set up wizard is great for first-time setup. Advanced shows Scheduling and Booking Options on one long page so you can see hours and choices together.Expected result: The Edit Event Type page opens. Look for Saved near the top after you make a change—the page saves as you work.
3
Scroll to Scheduling
Scroll past photos and damage rules until you see the Scheduling heading.Expected result: You see Booking Sharing, then either Using facility hours or custom hour cards (Weekdays, Open 24/7, Custom).
Choose facility hours or custom hours
Most customer services should follow the same hours as the front desk. That is the Using facility hours path.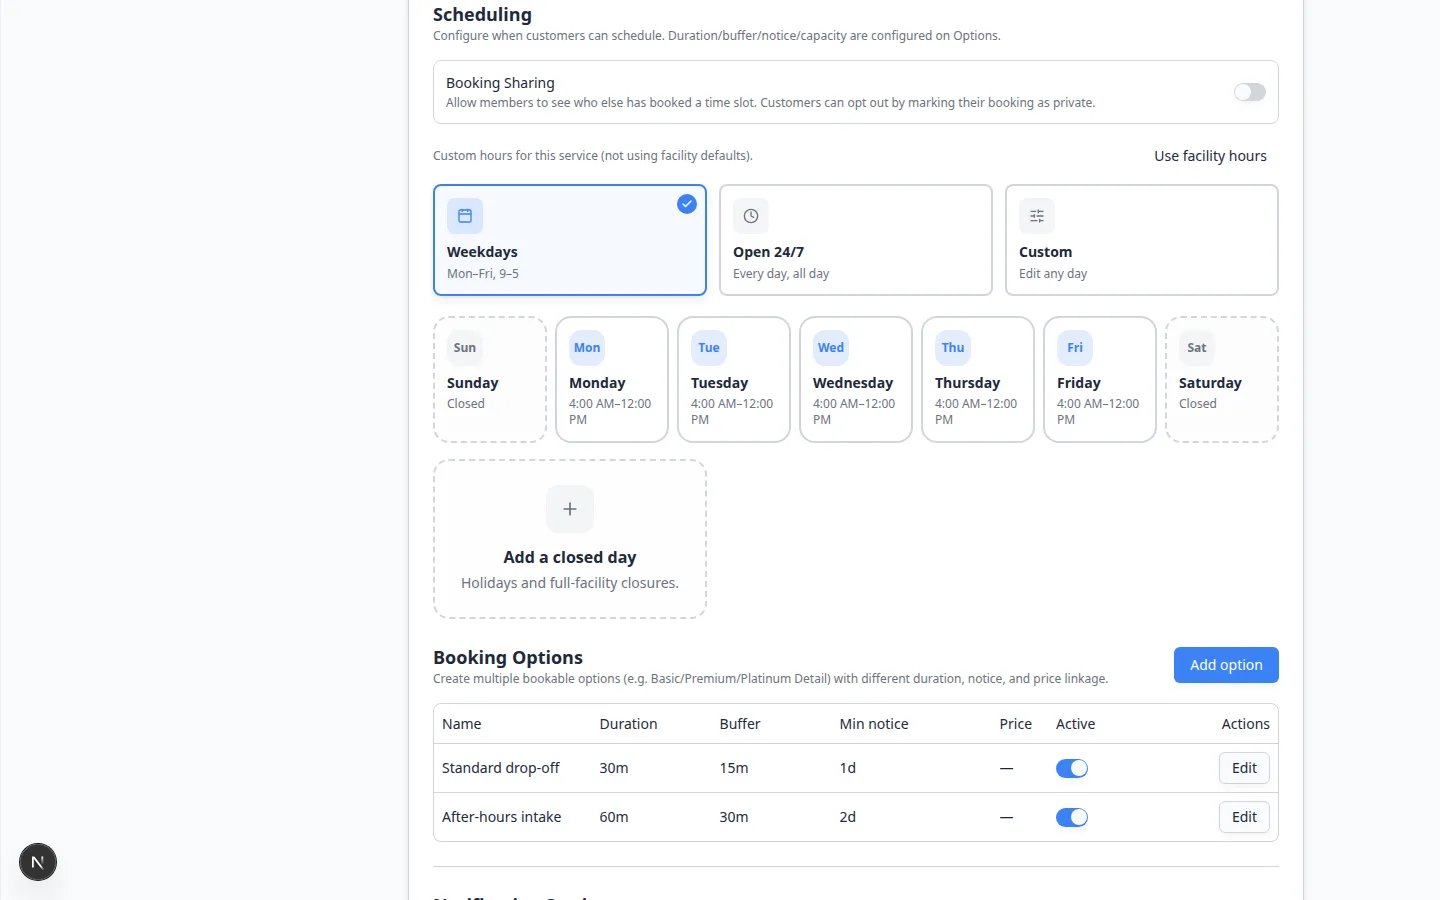
1
Keep Using facility hours when the service matches shop hours
If you see Using facility hours, this service already follows Hours of operation.Expected result: The weekday list matches your shop (for example Monday–Friday, 9:00 AM–5:00 PM). Sunday and Saturday may show Closed.
2
Click Customize hours for this service only when needed
Use this when the service is shorter than the shop day (details only until 3:00 PM) or runs on different days.Expected result: The page shows Custom hours for this service (not using facility defaults) plus three cards: Weekdays, Open 24/7, and Custom. A Use facility hours button returns you to the shop schedule.
Why hours matterThe calendar uses these hours to decide which time slots appear. Hours that are too wide let customers book times your team cannot support. Hours that are too narrow hide good openings.
Set custom hours with Weekdays, Open 24/7, or Custom
These three cards appear only after you click Customize hours for this service.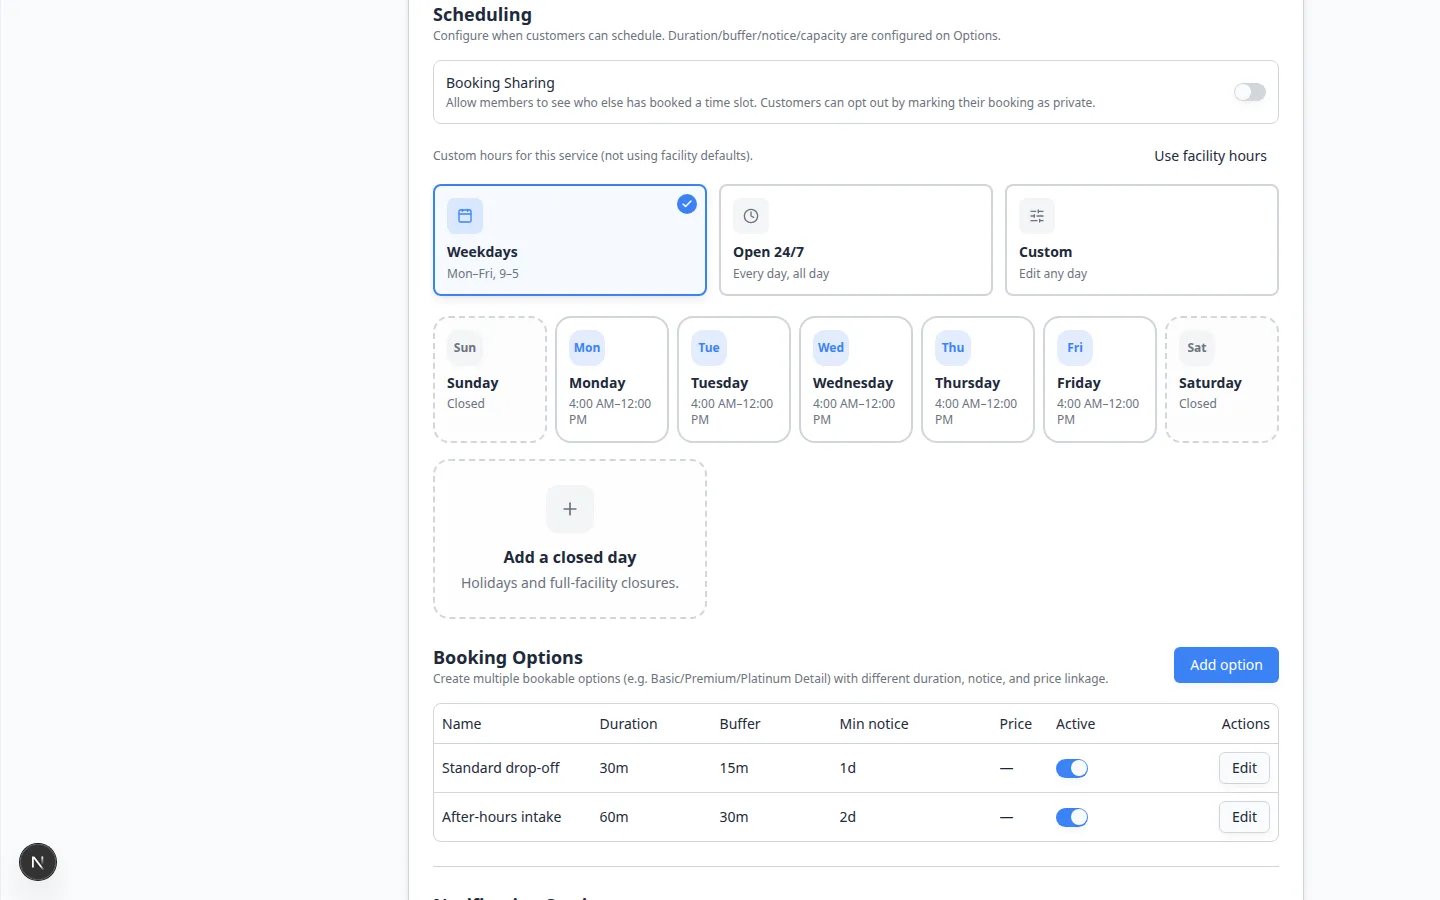
1
Start with Weekdays for most appointments
Click Weekdays. The card description says Mon–Fri, 9–5.Expected result: A brief Saved or success message appears. Weekday cards show open hours. Saturday and Sunday stay Closed.
2
Use Open 24/7 only when bookings can happen any time
Click Open 24/7 only for work your team truly allows at any hour.For most facilities this is better for internal blocks, not normal customer appointments.
3
Use Custom to change one day
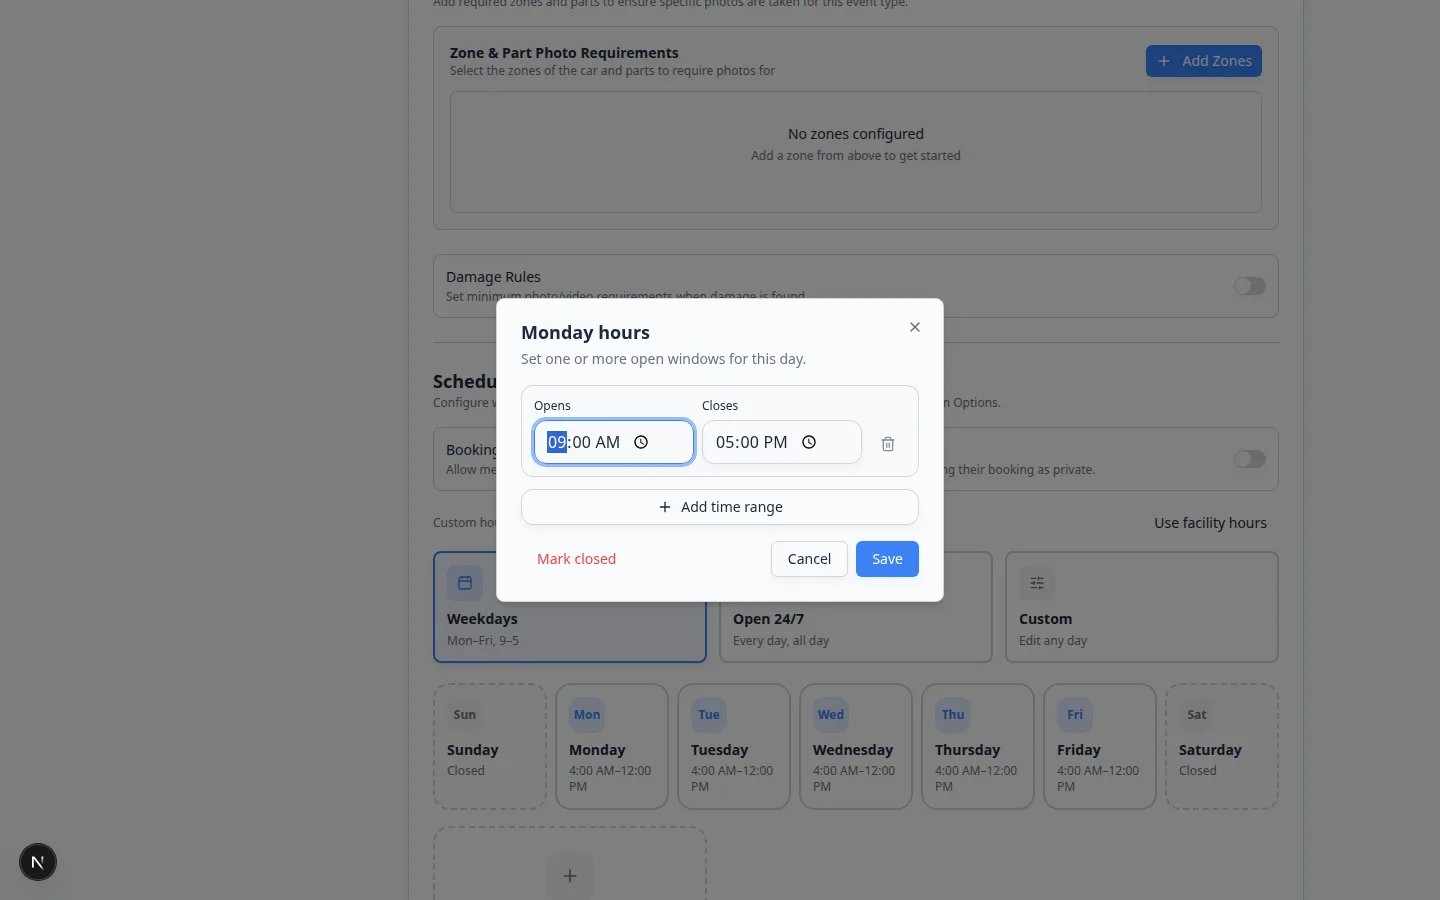
Click Custom, then click a day card such as Monday.Expected result: A window titled Monday hours (or that day’s name) opens.
4
Set Opens and Closes
In the day window, set Opens and Closes. Click Add time range if you need a lunch break or a second window (for example 9:00 AM–12:00 PM and 1:00 PM–5:00 PM).Click Mark closed if customers should not book this service on that day.Expected result: After Save, the day card shows the new windows—or Closed.
Turn on Booking Sharing (optional)
Booking Sharing sits at the top of Scheduling. Turn it on only when members should see who else booked the same time. Customers can still mark their own booking as private. Leave it off if your customers expect drop-off times to stay private.Block one date on this service only
Below the day cards you may see Add a closed day. Use that for a date this one service should not accept (for example a detailer day off). For a holiday that closes the whole shop, use Set closed days for events instead.Add booking options
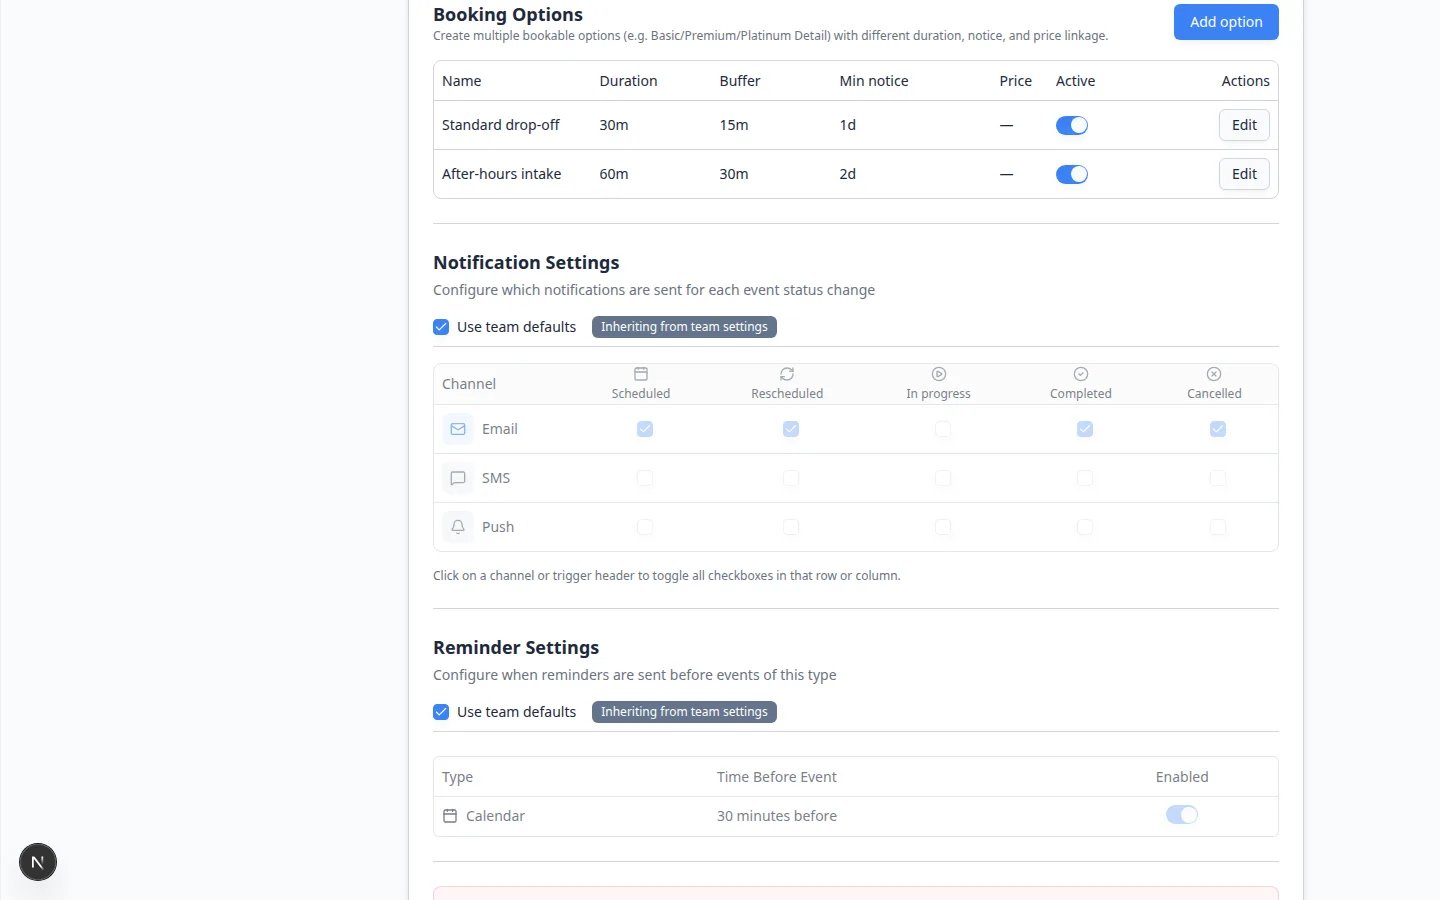
Booking options are the choices people select when they schedule this service. Examples:- Standard drop-off — 30 minutes, 15-minute buffer, 1 day notice
- After-hours intake — 60 minutes, 30-minute buffer, 2 day notice
- Basic Detail — 1 hour
- Premium Detail — 2 hours
1
Scroll to Booking Options
On the same Advanced page, find Booking Options below Scheduling.
2
Click Add option
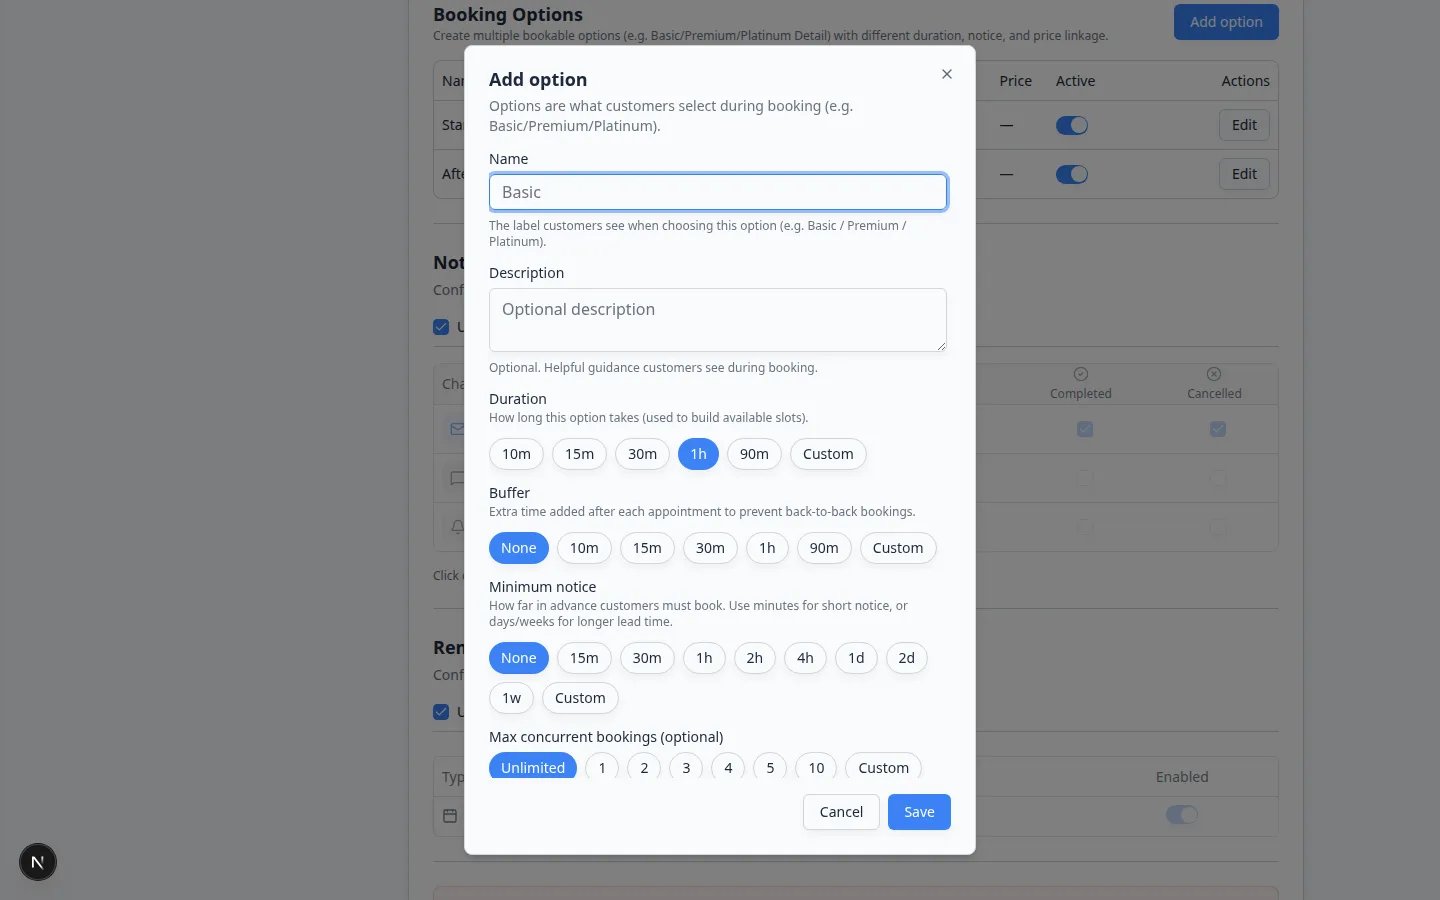
Click Add option.Expected result: An Add option window opens with Name, Description, Duration, Buffer, Minimum notice, and Max concurrent bookings.
3
Name the option clearly
Use a name customers and staff will understand.Good examples: Standard drop-off, After-hours intake, Basic Detail, or Storage Intake.
4
Add a helpful description
Explain what is included.Example: “Staff meet the owner, walk the car, and park it in storage.”
5
Choose Duration
Duration is how long the visit takes on the calendar.Use the real working time your team needs. Do not pick a shorter time just to show more openings.
6
Choose Buffer
Buffer is extra time after the visit.Use it when staff need time to park the car, clean a bay, or finish notes before the next booking.
7
Choose Minimum notice
Minimum notice is how far ahead someone must book.Example: If you need one day to prepare staff and space, choose 1d.
8
Set Max concurrent bookings
This is how many of this option can happen at the same time.
- Unlimited — this option itself does not cap slots. A linked bay or amenity can still limit bookings.
- 1 — only one of this option at a time.
- A higher number — your team can safely run several at once.
9
Save the option
Click Save on the window.Expected result: The new row appears in the Booking Options table with an Edit button and an Active switch.
Optional fields inside Add option or Edit
Scroll further in the same window when you need them:- Facility amenity (optional) — reserve a bay, lift, or room. See Set up bookable resources.
- Linked price (optional) — attach a product price so customers see the cost when they book. Finish Connect payment processing first. Skip this if they pay later on an invoice.
- Default assignee (optional) — pre-assign a teammate who usually does this work.
Save and test
The Edit Event Type page saves as you work. Look for Saving… or Saved near the top after you change hours or options.1
Confirm your changes saved
Wait until you see Saved. Open Advanced again if you want to double-check.Expected result: The hours and options you set are still there.
2
Create a test appointment
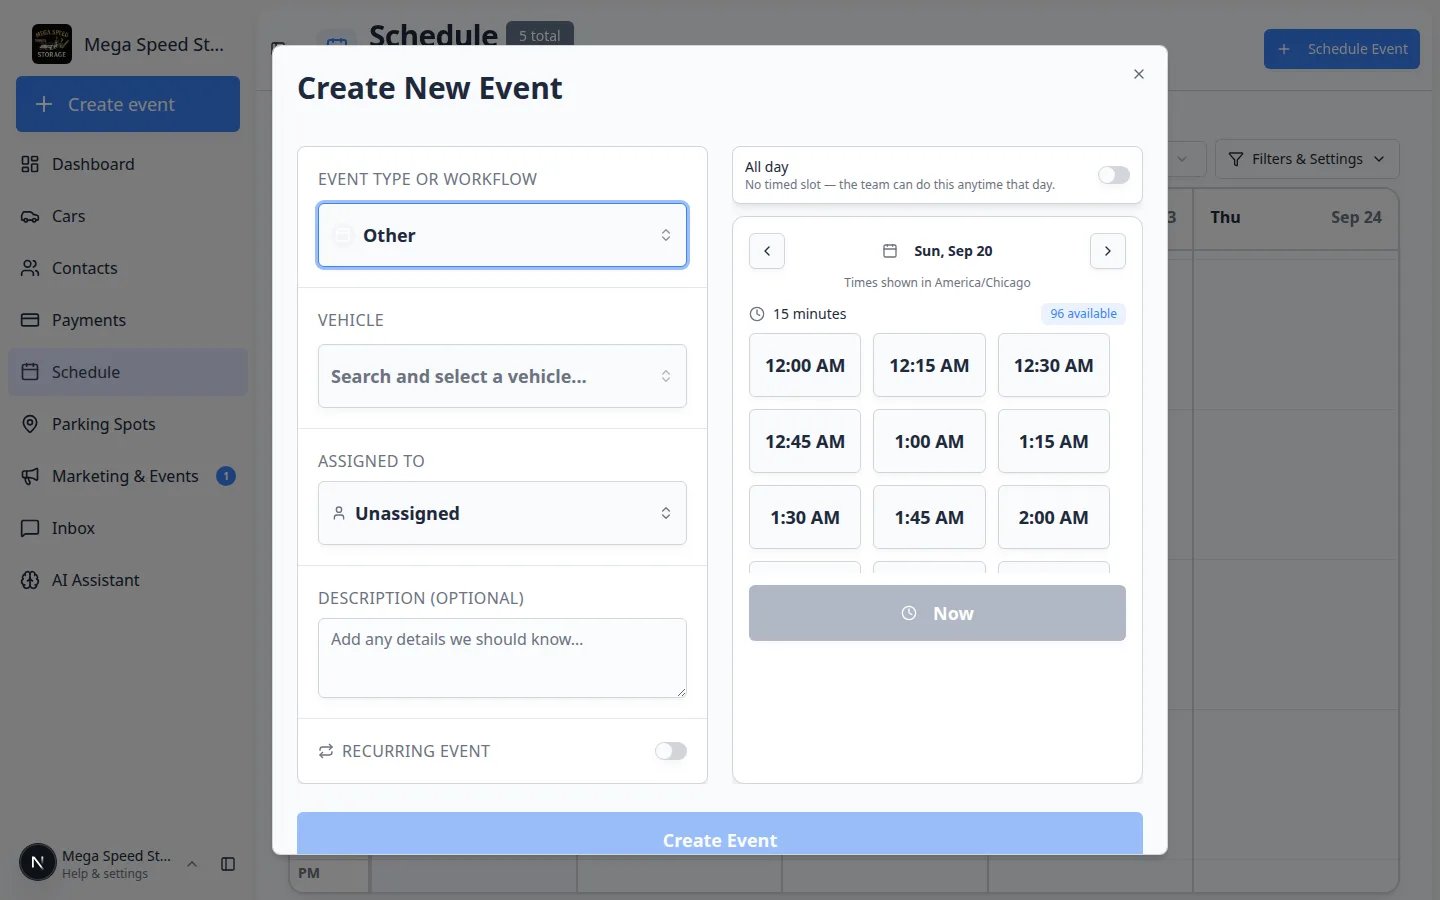
Open Schedule and click Schedule Event.Choose the event type you just edited. Pick a test vehicle. Type TEST in the description so your team can spot it later.Expected result: The Create New Event window shows time slots that match your Scheduling hours and the option you pick.
3
Compare slots to your rules
Pick an open day. Check that slots respect Minimum notice, Buffer, Max concurrent bookings, closed days, and any linked bay.Expected result: A closed day or holiday shows fewer slots—or none.
What success looks like
After setup:- Customers and staff see times your team can actually support.
- Each choice’s length matches the work being done.
- Buffer time keeps visits from stacking on top of each other.
- Minimum notice gives your team time to prepare.
- Limited bays, lifts, rooms, or staff are less likely to be double booked.
Troubleshooting
I cannot find Set Weekdays or Add dayThose older button names were replaced. Use Using facility hours, or click Customize hours for this service and choose Weekdays, Open 24/7, or Custom. Click a day card to edit Opens and Closes.